
Popular categories
Looking for a yarn?


|
|||||||||||||
Enjoy |
|||||||||||||
|
|
|||||||||||||
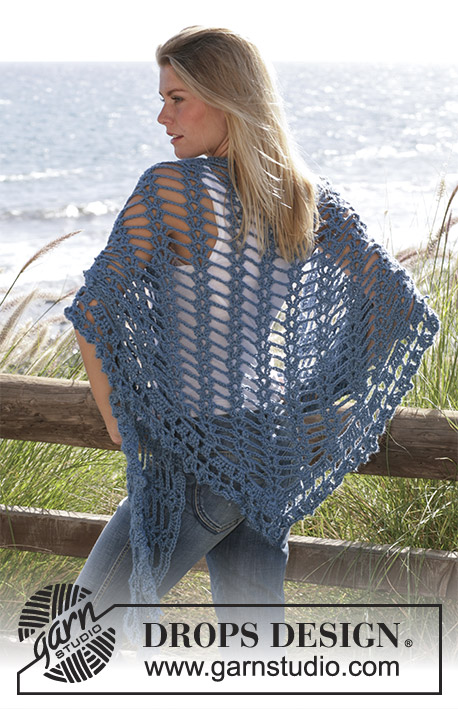
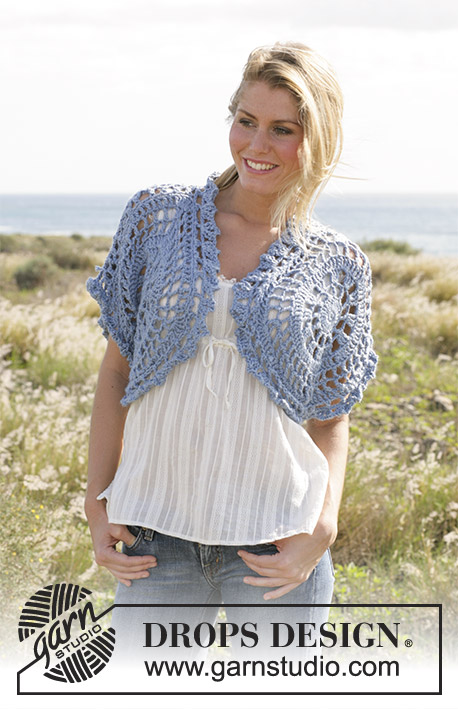
DROPS long sleeves less cardigan with wide shoulders crochet in “Muskat”. Sizes XS - XXL
DROPS 99-2 |
|||||||||||||
|
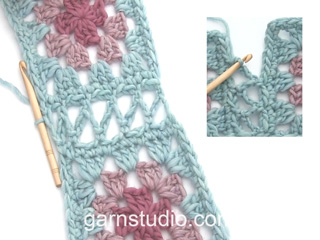
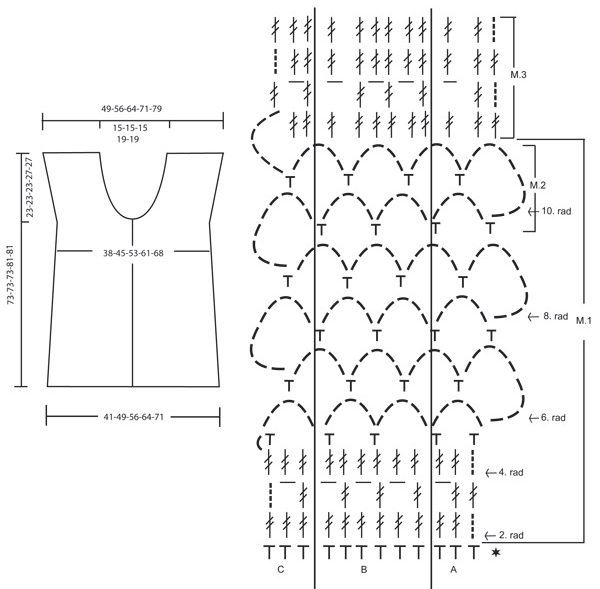
Crochet info: At the beg. of row substitute the dc with 3 ch. Pattern info: See diagram M.1, M.2 and M.3. M.2 is crochet only in size XL and XXL - one time after M.1 Size XS/S–M-L: 1 repeat = M.1 Size XL-XXL: 1 repeat = M.1 + M.2 The diagrams are seen from the RS. English Translations for the wording in the diagrams are given at the bottom of this pattern, and they are given in the vertical order in which they appear in the diagram. Increasing tip: For inc. crochet 1 extra ch-loop at the end of a row with ch-loops. Crochet until finish, then crochet 8 ch, 1 sc in the last sc. Turn and crochet the first sc in the new ch-loop. Bind off tip: For rows with tr: bind off as follows at beg. of row: Substitute 3 tr with 3 sl sts. bind off as follows at the end of row: Turn when there are 3 tr left on row . For rows with ch-loops: bind off as follows from beg. of row: Crochet sl sts over the the last ch-loop from previous row. bind off as follows at the end of row: Turn when 1 ch-loop is left. Crochet squares: 1 crochet square measures approx. 13 x 13 cm [5⅛" x 5⅛"]. Crochet squares: Crochet 5 ch and make a ring with a sl st in first ch. Read crochet info! 1st round: crochet 16 dc in the ring. 2nd round: 1 sc in the first dc, *3 ch, skip 1 dc, 1 sc in the next dc*, repeat from *-* and finish with 3 ch and a sl st in the first sc = 8 ch-loops. 3rd round: *1 dc in each sc, 3 dc in each ch-loop*, repeat from *-* and finish with a sl st in the first dc = 32 dc 4th round: 1 sc in the first dc, *3 ch, skip 1 dc, 1 sc in the next dc*, repeat from *-* and finish with 3 ch and a sl st in the first sc = 16 ch-loops 5th round: *1 dc in each sc and 2 dc in each ch-loop*, repeat from *-* until finish round and finish with a sl st in the first dc = 48 dc 6th round: *1 sc in the first dc, 5 ch, skip 2 dc, 1 sc in the next dc*, repeat from *-* and finish with 5 ch and a sl st in the first sc = 16 ch-loops 7th round: Crochet sl sts until the middle of the first ch-loop *(7 ch, 1 sc in the next ch-loop), repeat from (-)a total of 3 times, 10 ch (=corner), 1 sc in the next ch-loop*, repeat from *-* until finish round. Cut and sew the thread. Crochet a total of 6-7-8-9-10 squares. Put the squares on top of each other 2 by 2 and crochet as follows: 1 sc in the outer most ch-loop of both squares, *5 ch, 1 sc in the next ch-loop of both squares*, repeat from *-* until the squares are crochet tog. as a long string. Continue to crochet the sleeves less cardigan from the squares and down in one piece, and then the top part. Bottom piece: Crochet back and forth from the mid front. All measures should be done from the bottom line of the squares. Front and back piece are done in one piece, i.e. without any side seams. Crochet the first row from the WS. Crochet 120-144-168-192-216 sc in the bottom edge of the string of crochet squares (crochet approx. 20-20-21-21-22 sc in each square) Turn and crochet according to M.1A over the first 3 sc, repeat M.1B over the next 114-138-162-186-210 sc and finish with M.1C. Work M.1 (M.1 + M.2 for size XL and XXL) – read pattern info, 2 times in total. AT THE SAME TIME when M.1 is worked for the 2nd time, on 1st row inc 6 tr evenly distributed = 126-150-174-198-222 tr. Then work according to M.3, AT THE SAME TIME on 1st row inc 6 tr evenly distributed = 132-156-180-204-228 tr. Cut and sew the thread tight. The piece measures approx. 30-30-30-34-34 cm [11 ¾"-11 ¾"-11 ¾"-13⅜"-13⅜"]. Top piece: Crochet the first row from the WS. Crochet 120-144-168-192-216 sc in the top edge of the string of squares. Split the work and finish front and back pieces separately. All measures are done from the top edge of the string of squares. Right front: 1st row = RS. Crochet M.1 (M.1 + M.2 for size XL and XXL) – read pattern info over 30-36-42-48-54 sc at the right side of the piece. (crochet M.1A over the first 3 dc then repeat M.1B over the next 24-30-36-42-48 sc and finish with M.1C). At the same time at the end of the 6th, 8th and 10th row of M.1 inc. for wide shoulder – read increasing tip above. At the same time bind off 3 tr/ 1 ch-loop for the neck shaping on every 2.5 cm [7/8"] a total of 4-4-4-5-5 times – read binding off tip. After a total of 2 vertical repeats of M.1 (M.1 + M.2 for size XL and XXL) are completed crochet M.3. After all dec. and inc. are completed there are 27-33-39-42-48 tr left for each shoulder. Cut and sew the thread tight when the piece measures approx. 30-30-30-34-34 cm [11 ¾"-11 ¾"-11 ¾"-13⅜"-13⅜"]. The total length of the cardigan is approx. 73-73-73-81-81 cm [28 ¾"-28 ¾"-28 ¾"-32"-32"] Left from piece: Crochet as right front but reverse. Note: To get the bind off edges look the same each side, beg. the left front piece at the mid front. 1st row is the WS. Back piece: 1st row =RS. Crochet M.1 (M.1 + M.2 for size XL and XXL) – read pattern info, over the mid 60-72-84-96-108 sc. (Crochet M.1A over the first 3 sc, repeat M.1B over the next 54-66-78-90-102 sc and finish with M.1C). At the same time at the end of the 6th to 11th row inc. for wide shoulder as done for the front pieces. Crochet a total of 2 repeats of M.1 (M.1 + M.2 for size XL and XXL) then crochet M.3 (after all inc. for the wide shoulder there are 78-90-102-114-126 tr) At the same time on the 3rd row of M.3 crochet 1 row but only over the outer most 27-33-39-42-48 tr/ch each side (do not crochet over the mid 24-24-24-30-30 tr/ch= neck line). Crochet the last row of M.3, cut and sew the thread, the piece measures approx. 30-30-30-34-34 cm [11 ¾"-11 ¾"-11 ¾"-13⅜"-13⅜"]. Assembly: Sew the shoulder seams with small neat stitches. Sew approx. 4 cm [1½"] tog. underneath the armhole, i.e. up to where the inc. for the shoulder beg. Crochet edge: Crochet and edge around the armholes and up along the opening of the sleeve less cardigan as follows: Crochet up along one side of the front piece around the neck opening and down along the other front piece: 1st row: Crochet 1 sc, *3 ch, skip over approx. 1-1.5 cm [3/8"-½"], 1 sc*, repeat from *-* until finish. 2nd row: 1 sc in each sc and 2 sc in each ch-loop (in the transitions between the neck and front pieces crochet 4 sc in each ch-loop). 3rd row: 1 dc in each sc. Twisted string: Cut 4 threads Muskat of approx 3 meters [3.2 yds]. Twist them tog until they resist, double thread and let it twist tog. Tie a knot approx 5 cm [2"] from each end of the string. Pull thread up and down through the 2nd round of tr above the crochet squares. Make a tassel for each end: cut 25 threads Muskat of approx. 25 cm [10"] each. Split the string above the knot and pull the threads through the split. Knot the threads tog. and twist 1 of them around the top of the tassel to keep it tog. Cut and sew the thread. |
|||||||||||||
Diagram explanations |
|||||||||||||
|
|||||||||||||
|
|||||||||||||
|
Have you made this or any other of our designs? Tag your pictures in social media with #dropsdesign so we can see them! Do you need help with this pattern?You'll find tutorial videos, a Comments/Questions area and more by visiting the pattern on garnstudio.com. © 1982-2024 DROPS Design A/S. We reserve all rights. This document, including all its sub-sections, has copyrights. Read more about what you can do with our patterns at the bottom of each pattern on our site. |
|||||||||||||


With over 40 years in knitting and crochet design, DROPS Design offers one of the most extensive collections of free patterns on the internet - translated to 17 languages. As of today we count 304 catalogs and 11422 patterns - 11417 of which are translated into English (US/in).
We work hard to bring you the best knitting and crochet have to offer, inspiration and advice as well as great quality yarns at incredible prices! Would you like to use our patterns for other than personal use? You can read what you are allowed to do in the Copyright text at the bottom of all our patterns. Happy crafting!
Comments / Questions (65)
Buona sera. Mi scusi ma l ultima riga del dietro si lavora solo nelle due parti 27 maglie x lato taglia s o anche in quelle 24 saltate nella riga 3 x lo.scollo? E poi le spalle si cuciono al dritto o a rovescio? Grazie e saluti laura
01.08.2017 - 23:31DROPS Design answered:
Buonasera Laura. Lavora l'ultima riga solo sulle 27 maglie ai lati, non sulle 24 maglie dello scollo. Unisce le spalle sul diritto del lavoro nel filo più esterno delle maglie, oppure può seguire il metodo che usa abitualmente. La parte più spessa della cucitura si deve trovare sul rovescio del lavoro. Buon lavoro!
01.08.2017 - 23:53BUON GIORNO. MI SCUSI MA NELLA PARTE DEL DIETRO, QUANDO DICE DI AUMENTARE COME FATTO PER I DAVANTI ALLA RIGA 6 E 8 (TAGLIA S) DI OGNI RIPETIZIONE, SI INTENDENDE UN AUMENTO PER LATO VERO? IN MODO DA RICONGIUNGERSI CON GLI AUMENTI FATTI SU DAVANTI QUANDO SI CUCIONO LE SPALLE? GRAZIE E SALUTI LAURA
01.08.2017 - 12:55DROPS Design answered:
Buongiorno Laura. Gli aumenti sono su entrambi i lati e sono uguali a quelli fatti sul davanti. Buon lavoro!
01.08.2017 - 13:01Buona sera, solo una conferma. Nei due davanti gli aumenti per taglia M devono essere fatti alla riga 6 e 8 di ogni ripetizione di M1(QUINDI IN TOTALE 4 AUMENTI?)? Grazie!! Laura
31.07.2017 - 15:24DROPS Design answered:
Buonasera Laura. Sì è corretto. Buon lavoro!
31.07.2017 - 15:46Laura wrote:
Buona sera. Non capisco nel davanti dx quando si devono fare aumenti e quanto farne. Viene scritto alla riga 6 e 8 io sono s quindi non c è la 10 ..e intanto ogni 2.5 cm fare diminuzioni x scollo...quindi sono solo 2 aumenti x 2 volte e 4 diminuzioni? Grazie laura
29.07.2017 - 00:01DROPS Design answered:
Buongiorno Laura. Sì, per la taglia S è corretto. Verifichi di avere 27 m.a.d alla fine degli aumenti e delle diminuzioni. Buon lavoro!
29.07.2017 - 07:53Buona sera. Mi scusi nel dietro il diagramma m1 si ripete 2 volte nella taglia s giusto? Ed il primo aumento si fa nella seconda riga del diagramma e sempre nella seconda riga della seconda ripetizione?grazie e saluti laura
27.07.2017 - 22:03DROPS Design answered:
Buonasera Laura, sul dietro per la taglia S deve ripetere il diagramma M.1 sulle 60 maglie centrali: deve lavorare M.1A sulle prime 3 maglie, poi M.1B su 54 maglie che corrispondono a 9 ripetizioni e poi M.1C sulle ultime 3 maglie. Gli aumenti sono nelle righe dalla 6 alla 11 come indicato. Buon lavoro!
27.07.2017 - 22:18Buonasera. Mi scusi ma l unione dei quadrati si deve fare come dice il video _ cioè m.b. nel arco poi 2 cat m.b. altro quadrato e poi 5 cat...o come dice il modello posizionare 2 quadrati uno sull' altro fare 1 m.b. prendendo tutti e due insieme poi 5 cat 1 m.b. nell arco successivo...e via dicendo. In questo caso i quadrati devono essere sovrapposti entrambi a dritto uno sull' altro? Grazie laura
25.07.2017 - 22:50DROPS Design answered:
Buonasera Laura, può seguire meglio la tecnica guardando il video, ma segua le indicazioni specifiche del modello. Buon lavoro!
25.07.2017 - 23:21Sorry, correctie op mojn vraag. ....3 vierkantjes = 60 steken.....
28.07.2016 - 08:52Ik heb de 6 vierkantjes aan elkaar gehaakt en daarna moet ik beginnen met M.1A over de eerste 3 vierkantjes (20v per vierkantje + 60 st)en daarna M.1B op de volgende 114 v. Als ik op 3 vierkantjes heb gehaakt houd ik toch niet genoeg steken over om M1.B en daarna M.1C te haken? Wat doe ik niet goed?
27.07.2016 - 22:48DROPS Design answered:
Dit was een foutje in de vertaling, we hebben het aangepast. Waar 3 vierkantjes stond, is nu 3 v geworden, dus dit is de nieuwe zin: Haak 120-144-168-192-216 v op de onderkant van de strook vierkantjes (haak ca. 20-20-21-21-22 v in elk vierkantje) Keer en haak volgens M.1A over de eerste 3 v, herhaal M.1B op de volgende 114-138-162-186-210 v en eindig met M.1C.
05.08.2016 - 10:43Hej Inger, Nu er der lagt en ny forklaring i opskriften om hvordan du øger under nederdelen. God fornøjelse!
21.08.2015 - 09:56Hei I mønsteret på nederdelen står det: Samtidig når arb. måler ca 11 og 22 cm (dvs 2. og 3. gang 2. rad i M1 hekles) økes det 6 dbl-st jevnt fordelt på omg. Hekle totalt 2 rapporter av M1. Dette forstår eg ikkje. Korleis kan det økes på rad 2 3. gang når rapporten berre skal heklast 2 ganger? (Eg heklar str. M) Mvh Inger Nina
16.07.2015 - 10:30DROPS Design answered:
Hej Inge Nina, det skal vi se på, men om du øker når arb måler 11 og 22 cm, hvor i diagrammet er det?
30.07.2015 - 13:53