
Popular categories
Looking for a yarn?


|
|||||||||||||||||||||||||
DROPS 100-24 |
|||||||||||||||||||||||||
|
|
|||||||||||||||||||||||||
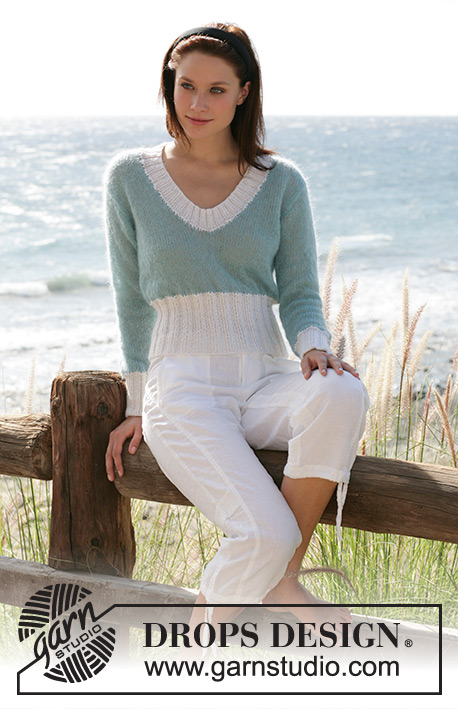
DROPS sleeveless tunic in “Muskat”
DROPS 100-24 |
|||||||||||||||||||||||||
|
Knitting tension: 21 sts x 28 rows on needles size 4 mm in stocking sts = 10 x 10 cm. Garter sts, back and forth on needle: knit all rows. Garter sts (round on circular needles): 1st round: K all sts, 2nd round: P all sts Pattern: See diagrams M.1 and M.2. The diagram is seen from the right side. Decreasing tip-1 (apply to back and front piece): Dec as follows after 1st and 3rd (MT): K2 tog Dec as follows when 2 sts left before 2nd and 4th MT: slip 1 st as if to knit, K1, psso Decreasing tip-2 (apply to armhole): All dec done from RS inside 3 garter sts. Dec as follows after 3 garter sts: slip 1 st as if to knit, K1, psso Dec as follows before 3 garter sts: K2 tog _____________________________________________________________________ Back and front piece: Knitted round on circular needle. Cast on 184-200-220-236-252 sts on circular needle size 4 mm in purple mix, knit 4 rows garter sts and continue in stocking sts (start of round = the side). When piece measures 22-23-24-25-26 cm insert 4 marking threads (MT) as follows: 23-25-28-30-32 sts, MT, 46-50-54-58-62 sts, MT, 46-50-56-60-64 sts, MT, 46-50-54-58-62 sts (= 23-25-28-30-32 sts left on round). Now dec 1 st after the 1st and 3rd MT and 1 st before 2nd and 4th MT – see Decreasing tip-1: on every 4th round a total of 10 times = 144-160-180-196-212 sts. When piece measures 36-37-38-39-40 cm change to lilac and knit 1 round in stocking sts. Now knit 1 round with K2, P2, at the same time inc evenly on round to 180-200-224-244-264 sts (i.e. inc in approx every 4th st). Now knit 4 cm of M.1 and dec evenly on the last round to 144-160-180-196-212 sts - measure piece from this point onwards. Change to purple and finish piece in M.2 (stripe pattern). At the same time after 2 rounds in M.2 insert 4 MT in piece as follows: 23-25-28-30-32 sts, MT, 26-30-34-38-42 sts, MT, 46-50-56-60-64 sts, MT, 26-30-34-38-42 sts, MT. Now inc 1 st after the 1st and 3rd MT and 1 st before 2nd and 4th MT by K 2 sts in 1 st. Repeat the inc on every 4th round a total of 6 times = 168-184-204-220-236 sts. When piece measures 10-11-12-13-14 cm knit 4 rows garter sts over the middle 4 sts at front (remaining sts as before) and then divide piece mid front for slit. To ensure the stripes continue uninterrupted cut the thread at the end of round and beg again mid front, knitting back and forth on needle with 2 garter sts each side towards the slit. When piece measures 12-12-12-13-14 cm knit next row as follows: 2 garter sts, 34-37-41-44-47 sts in stocking sts, 12-14-16-18-20 garter sts (= the side), 72-78-86-92-98 sts in stocking sts, 12-14-16-18-20 garter sts (= side), 34-37-41-44-47 sts in stocking sts and 2 garter sts. Continue like this until there are 4 rows garter sts each side and now cast off 6-8-10-12-14 sts each side for armhole (i.e. the middle sts of the garter st section) and finish back and front pieces separately. Back piece: = 78-84-92-98-104 sts. Continue with 3 garter sts each side. At the same time dec 1 st each side for armhole on every other row – see Decreasing tip-2: a total of 4-5-7-8-9 times = 70-74-78-82-86 sts. When piece measures 26-27-28-30-32 cm cast off the middle 42-42-44-46-48 sts for neck and dec to shape the neckline on every other row: 2 sts 1 time and 1 st 2 times = 10-12-13-14-15 sts left on each shoulder. Cast off remaining sts when piece measures 30-31-32-34-36 cm = total length approx 70-72-74-77-80 cm. Right front piece: = 39-42-46-49-52 sts. Dec for armhole as described for back piece = 35-37-39-41-43 sts. When piece measures 22-23-24-26-28 cm put 16-16-17-18-19 sts towards mid front on a thread for neck and dec to shape the neckline on every other row: 3 sts 1 time, 2 sts 2 times and 1 st 2 times = 10-12-13-14-15 sts left on shoulder. Cast off remaining sts when piece measures 30-31-32-34-36 cm – adjust to back piece. Left front piece: Like right front piece, but mirrored. Assembly: Sew shoulder seams. Neck: Knitted back and forth on circular needle from mid front. Pick up approx 120 to 140 sts round neck (incl sts from thread at front) on needle size 4 mm with lilac and knit 4 rows garter sts. Cast off. Crochet border: Crochet with crochet hook size 4 mm and lilac a row of dc round armholes. Crochet a chain measuring approx 25 cm, don’t cut the thread but continue with a row of dc round the slit, beg at the top on left side and finish at the top on right side with a chain measuring approx 25 cm (i.e a string each side of slit). |
|||||||||||||||||||||||||
Diagram explanations |
|||||||||||||||||||||||||
|
|||||||||||||||||||||||||

|
|||||||||||||||||||||||||
|
Have you made this or any other of our designs? Tag your pictures in social media with #dropsdesign so we can see them! Do you need help with this pattern?You'll find tutorial videos, a Comments/Questions area and more by visiting the pattern on garnstudio.com. © 1982-2024 DROPS Design A/S. We reserve all rights. This document, including all its sub-sections, has copyrights. Read more about what you can do with our patterns at the bottom of each pattern on our site. |
|||||||||||||||||||||||||


With over 40 years in knitting and crochet design, DROPS Design offers one of the most extensive collections of free patterns on the internet - translated to 17 languages. As of today we count 304 catalogues and 11422 patterns - 11422 of which are translated into English (UK/cm).
We work hard to bring you the best knitting and crochet have to offer, inspiration and advice as well as great quality yarns at incredible prices! Would you like to use our patterns for other than personal use? You can read what you are allowed to do in the Copyright text at the bottom of all our patterns. Happy crafting!
Comments / Questions (11)
Hi when we knit in flat and do garter stitch we knit all rows. Why is this different. To garter st doing on circular needle. Cause the first 4 rows should b knit. Then u knit 1 round and purl next round for Stockinette st ???
21.12.2019 - 21:29DROPS Design answered:
Dear Tracey, the piece is knitted on the round (up until the armholes/neck slit). Always knitting from the right site, thus to get the horisontally ribbed garter stitch you have to forst knit a roun, then purl a round, then knit again and purl again. Happy Knitting!
24.12.2019 - 17:18Hva kan jeg gjøre for at de 2 rillene i begynnelsen ikke skal rulle seg opp?
23.04.2019 - 10:25DROPS Design answered:
Hei Torill. Du kan prøve å strikke flere riller, eventuelt kan du prøve å dampe plagget lett når du er ferdig. God fornøyelse
30.04.2019 - 13:10Ich habe die Vorstellung, mir dies mit dieser wärmeren Wolle als Art Pullunder für en Winter zu stricken ueber einem langen T-Shirt.
14.02.2019 - 09:03DROPS Design answered:
Liebe Frau Purrath, versuchen Sie unseren Garnumrechner, um die unterschiedlichen Möglichkeiten zu sehen. Dann können Sie auf jeder Qualität klicken, und so mehr über jede Wolle lesen. Viel Spaß beim stricken!
14.02.2019 - 11:38Mir gefaellt dieses Modell sehr gut und mir gefaellt das Garn Big Delight sehr gut. Ich wuerde es gern probieren dieses Garn fuer dieses Modell. IIch weiss, dass man dann so einiges umrechnen muss. Wuerden Sie das nicht empfehlen, da das Garn zu anders ist, oder koennte man das schon probieren.
13.02.2019 - 22:27DROPS Design answered:
Liebe Frau Purrath, dieses Modell wird mit Muskat gestrickt, dh mit einem Garn der Garngruppe B, Big Delight gehört zur Garngruppe C und ist hier keine Alternative. Am besten schauen Sie die Modellen für Gruppe C, wo Sie Big Delight ersetzen können. Sonnst sollen Sie die ganze Anleitung anpassen (Maschenprobe wird unterschiedlich sein). Viel Spaß beim stricken!
14.02.2019 - 11:19Chris wrote:
Thank you for the prompt response! I just didn't want to get my work inside out :)
06.06.2016 - 10:33Chris wrote:
After knitting 4 rows of garter stitch, to continue in stocking stitch, do I need to turn the work inside out?
05.06.2016 - 17:20DROPS Design answered:
Dear Chris, after the 4 rounds in garter st at the beg of piece, continue in stocking st in the round, ie K all rounds. Happy knitting!
06.06.2016 - 09:51I had too little muskat no 4 when I was knitting this pattern (large) and had to order another 50 g.
23.02.2012 - 11:31Da M.1 kræver flere masker, tager man først ud, strikker M.1 og tager derefter ind igen til samme maskeantal... God fornøjelse! mvh Garnstudio
12.02.2009 - 08:11Birgit wrote:
Det är nog inne med längre modeller i vår
09.12.2006 - 14:24Den her var veldig fin! Hadde bare strikket den litt lengre sånn at den ble til en kjole :o)
08.12.2006 - 21:43