
Popular categories
Looking for a yarn?


|
||||||||||||||||
DROPS 100-26 |
||||||||||||||||
|
|
||||||||||||||||
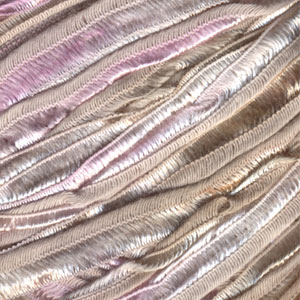
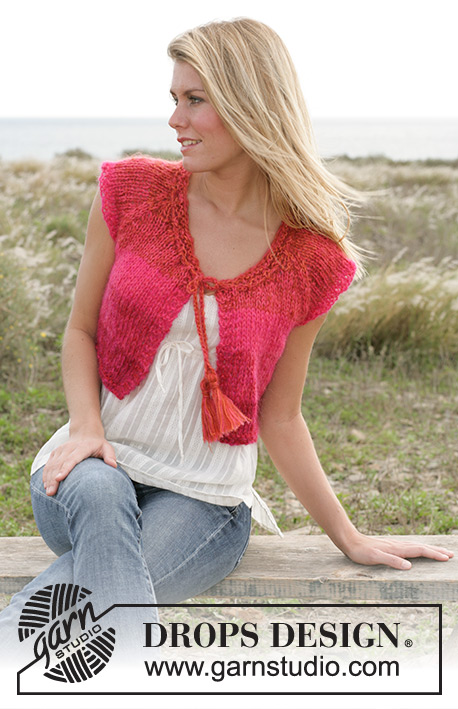
DROPS bolero jacket with leaf pattern in “Salsa”
DROPS 100-26 |
||||||||||||||||
|
Knitting gauge: 13 sts x 17 rows on needle size 8 mm = US 11 in stockinette st = 10 x 10 cm = 4" x 4" Pattern: See diagram M.1. The diagram is seen from the right side. Decreasing tip (apply to raglan): All dec are done from RS. Dec. on both sides of each marking thread (MT). Dec as follows after MT: K2 tog Dec as follows before MT: slip 1 st as if to knit, K1, psso Measurement tip: Because of the weight of the yarn, all measurements should be made whilst the garment is hanging. Buttonholes: Make buttonholes on right front band. 1 buttonhole: bind off 2nd st from edge and cast on 1 new st on return row. Make buttonholes when piece measures: Size XS: 2, 10, 17, 24 and 31 cm = ¾", 4", 6¾", 9½" and 12¼" Size S: 2, 10, 17, 25 and 32 cm = ¾", 4", 6¾", 9¾" and 12½" Size M: 2, 10, 18, 26 and 33 cm = ¾", 4", 7", 10¼" and 13" Size L: 2, 10, 18, 26 and 34 cm = ¾", 4",7", 10¼" and 13⅜" Size XL: 3, 12, 20, 28 and 36 cm = 1⅛", 4¾", 8", 11" and 14¼" Back piece: Knitted back and forth on circular needle. Read the entire section before knitting it! Fold circular needle size 8 mm = US 11 double and cast on 41-47-51-59-63 sts (includes 1 edge st each side) over 2 needles (to make sure edge becomes elastic). Remove 1 needle and knit 2 rows garter sts and 2 rows stockinette sts (1st row = RS). Knit next row as follows from RS: Size XS: 1 edge st, 5 stockinette sts, M.1B on the next 28 sts, 6 stockinette sts and 1 edge st. Size S: 1 edge st, 1 stockinette st, M.1A (=7 sts), M.1B over the next 28 sts, M.1C (= 8 sts) 1 stockinette sts and 1 edge st. Size M: 1 edge st, 3 stockinette sts, M.1B on the next 42 sts, 4 stockinette sts and 1 edge st. Size L: 1 edge st, M.1B on the next 56 sts, 1 stockinette st and 1 edge st. Size XL: 1 edge st, 2 stockinette sts, M.1A (= 7 sts), M.1B on the next 42 sts, M.1C (= 8 sts), 2 stockinette sts and 1 edge st. Continue in pattern like this until you have knitted 2 vertical repeats. NB! In size XS knit M.1A and M.1C on both sides of M.1B in the second repeat of M.1. After M.1 continue in stockinette sts. At the same time when piece measures 5 cm = 2" inc 1 st each side on every 3-3-4-4-4 cm = 1⅛"-1⅛"-1½"-1½"-1½" a total of 5 times = 51-57-61-69-73 sts – knit inc sts in stockinette sts. When piece measures 23-24-25-26-27 cm = 9"-9½"-9¾"-10¼"-10⅝" bind off 1 edge st each side = 49-55-59-67-71 sts. Put piece aside and knit front pieces. Right front piece: Fold circular needle size 8 mm = US 11 double and cast on 25-28-30-34-36 sts (incl 1 edge st at side and 4 front band sts) over 2 needles (to make sure edge becomes elastic). Remove 1 needle and knit 2 rows garter sts and 2 rows stockinette sts (1st row = RS), with the 4 front band sts in garter sts. Knit next row as follows from RS, i.e. from mid front: Size XS: 4 front band sts, M.1B (= 14 sts), 6 stockinette and 1 edge st. Size S: 4 front band sts, M.1B (= 14 sts), M.1C (= 8 sts), 1 stockinette and 1 edge st. Size M: 4 front band sts, M.1A (= 7 sts, M.1B (= 14 sts), 4 stockinette and 1 edge st. Size L: 4 front band sts, M.1B on the next 28 sts, 1 stockinette and 1 edge st. Size XL: 4 front band sts, M.1A (= 7 sts), M.1B (= 14 sts), M.1C (= 8 sts), 2 stockinette sts and 1 edge st. Continue in pattern like this until you have knitted 2 vertical repeats. – remember the button holes at the front band – see explanation above., continue in stockinette sts (remember to knit as follows: for size XS knit M.1C after M.1B in the second repeat of M.1 ). At the same time when piece measures 5 cm = 2" inc 1 st at side as described for back piece = 30-33-35-39-41 sts. When piece measures 23-24-25-26-27 cm = 9"-9½"-9¾"-10¼"-10⅝" bind off 1 edge st at side = 29-32-34-38-40 sts. Put piece aside and knit the other front piece. Left front piece: Cast on and knit as right front piece, but mirrored, i.e. knit 1st row of M.1 as follows from the side: Size XS: 1 edge st, 5 stockinette sts, M.1B (= 14 sts), 1 stockinette st and 4 front band sts. Size S: 1 edge st, 1 stockinette st, M.1A (= 7 sts), M.1B (= 14 sts), 1 stockinette st and 4 front band sts. Size M: 1 edge st, 3 stockinette sts, M.1B (= 14 sts), M.1C (= 8 sts) and 4 front band sts. Size L: 1 edge st, M.1B on the next 28 sts, 1 stockinette st and 4 front band sts. Size XL: 1 edge st, 2 stockinette sts, M.1A (= 7 sts), M.1B (= 14 sts), M.1C (= 8 sts) and 4 front band sts. Yoke: Put the 29-32-34-38-40 sts from right front piece on needle, cast on 43-45-47-49-51 sts for sleeve (use 2 needles to ensure the cast on row becomes elastic), put the 49-55-59-67-71 sts from back piece on needle, cast on 43-45-47-49-51 sts for sleeve (on 2 needles) and put the 29-32-34-38-40 sts from left front piece on needle = 193-209-221-241-253 sts in total. Insert a marking thread (MT) in all transitions between body pieces and sleeves = 4 MT. Continue to knit M.1 as follows (1st row = RS): Size XS: 4 front band sts, M.1B, M.1C, 3 stockinette sts, MT, 7 stockinette sts, M.1A, M.1B, M.1C, 7 stockinette sts, MT, 3 stockinette sts, M.1A, M.1B on the next 28 sts, M.1C, 3 stockinette sts, MT, 7 stockinette sts, M.1A, M.1B, M.1C, 7 stockinette sts, MT, 3 stockinette sts, M.1A, M.1B, 1 stockinette st and 4 front band sts. Size S: 4 front band sts, M.1B, M.1C, 6 stockinette sts, MT, 8 stockinette sts, M.1A, M.1B, M.1C, 8 stockinette sts, MT, 6 stockinette sts, M.1A, M.1B on the next 28 sts, M.1C, 6 stockinette sts, MT, 8 stockinette sts, M.1A, M.1B, M.1C, 8 stockinette sts, MT, 6 stockinette sts, M.1A, M.1B, 1 stockinette st and 4 front band sts. Size M: 4 front band sts, M.1A, M.1B, M.1C, 1 stockinette sts, MT, 9 stockinette sts, M.1A, M.1B, M.1C, 9 stockinette sts, MT, 1 stockinette sts, M.1A, M.1B on the next 42 sts, M.1C, 1 stockinette sts, MT, 9 stockinette sts, M.1A, M.1B, M.1C, 9 stockinette sts, MT, 1 stockinette sts, M.1A, M.1B, M.1C and 4 front band sts. Size L: 4 front band sts, M.1B on the next 28 sts, 6 stockinette sts, MT, 3 stockinette sts, M.1B on the next 42 sts, 4 stockinette sts, MT, 5 stockinette sts, M.1B on the next 56 sts, 6 stockinette sts, MT, 3 stockinette sts, M.1B on the next 42 sts, 4 stockinette st, MT, 5 stockinette sts, M.1B on the next 28 sts, 1 stockinette st and 4 front band sts Size XL: 4 front band sts, M.1A, M.1B, M.1C, 7 stockinette sts, MT, 4 stockinette sts, M.1A, M.1B on the next 28 sts, M.1C, 4 stockinette sts, MT, 7 stockinette sts, M.1A, M.1B on the next 42 sts, M.1C, 7 stockinette sts, MT, 4 stockinette sts, M.1A, M.1B on the next 28 sts, M.1C, 4 stockinette sts, MT, 7 stockinette sts, M.1A, M.1B, M.1C and 4 front band sts. Continue pattern like this and knit 1 repeat of M.1. After M.1 complete piece in stockinette sts. At the same time on 3rd row of M.1 beg dec for raglan. Dec 1 st on both sides of all MT (= 8 dec per row) – see Decreasing tip – on every other row a total of 12-13-14-15-16 times. Knit sts not fitting into pattern in stockinette st. Neckline: At the same time when piece measures 32-33-34-35-37 cm = 12½"-13"-13⅜"-13¾"-14½" put 7-8-8-9-10 sts each side towards mid front on a thread for neck and dec to shape the neckline on every other row: 2 sts 3-3-3-4-4 times and 1 st 2-3-4-4-4 times. After all dec for raglan and neckline are complete = approx 67-71-73-79-81 sts left on needle. Neck: Pick up approx 14 to 22 sts on each front neckline (incl sts on thread) and put all sts on needle size 8 mm = US 11 = approx 95 to 125 sts in total. K 1 row from WS, at the same time dec evenly to approx 66-70-72-76-78 sts (do not dec over front band sts). Bind off on next row from RS. Assembly: Sew side seams inside 1 edge st. Sew on buttons. |
||||||||||||||||
Diagram explanations |
||||||||||||||||
|
||||||||||||||||

|
||||||||||||||||
|
Have you made this or any other of our designs? Tag your pictures in social media with #dropsdesign so we can see them! Do you need help with this pattern?You'll find tutorial videos, a Comments/Questions area and more by visiting the pattern on garnstudio.com. © 1982-2024 DROPS Design A/S. We reserve all rights. This document, including all its sub-sections, has copyrights. Read more about what you can do with our patterns at the bottom of each pattern on our site. |
||||||||||||||||


With over 40 years in knitting and crochet design, DROPS Design offers one of the most extensive collections of free patterns on the internet - translated to 17 languages. As of today we count 304 catalogs and 11422 patterns - 11417 of which are translated into English (US/in).
We work hard to bring you the best knitting and crochet have to offer, inspiration and advice as well as great quality yarns at incredible prices! Would you like to use our patterns for other than personal use? You can read what you are allowed to do in the Copyright text at the bottom of all our patterns. Happy crafting!
Comments / Questions (24)
J aimerais comprendre la façon de commencé ce beau patron. La broche plier en deux et suivre le diagramme. Merci de votre aide.
17.03.2022 - 12:36DROPS Design answered:
Bonjour Mme Laperrière, cette vidéo montre comment monter les mailles sur 2 aiguilles circulaires; et cette leçon explique comment lire des diagrammes. En espérant que ceci puisse vous aider; bon tricot!
17.03.2022 - 17:14Thank you for all your help! One more question: If I were to use a sport weight yarn to substitute for "Salsa" in the DROPS 100-26 bolero jacket with leaf pattern , how many threads would you recommend I use? I sure wish you guys still made the Salsa yarn! Thanks again, Carlene
12.02.2020 - 06:01DROPS Design answered:
Dear Carlene, DROPS Salsa was yarn group D - you can read more about all alternatives here, ie for example 3 threads yarn group A. Happy knitting!
12.02.2020 - 08:24Hi, On the DROPS 100-26 bolero jacket with leaf pattern, in the instructions for "back piece", the last paragraph says "Continue in pattern like this until you have knitted 2 vertical repeats. NB!" Can you tell me what NB! means? Thanks so much for your help, Carlene
11.02.2020 - 06:11DROPS Design answered:
NB! is the Norwegian form of NOTE! Sorry, it has been overlooked in the translation. Happy knitting!
11.02.2020 - 07:08Hi, I want to make your pattern 100-26, the bolero jacket in leaf pattern. I know the DROPS Salsa yarn from Garnstudio (color no 02, off-white/pink mix) has been discontinued, but do you know of anyone or any shop that happens to have any left? Thank you so much for your help, Carlene
14.01.2020 - 16:31DROPS Design answered:
Dear Mrs Dawson, you can contact the DROPS stores individually and/or check their website. Happy knitting!
15.01.2020 - 08:45Hi, I want to make the DROPS 100-26 bolero jacket with leaf pattern. You no longer sell the Salsa yarn and I don't care for the Melody substitute. Is the pictured jacket made with the Salsa yarn? It seems like it would be too heavy weight of yarn. I would like it to look like the photo of the jacket. Is it acceptable to make the jacket with either DK or Aran worsted yarn? Thank you for your help! Carlene
10.01.2020 - 02:38DROPS Design answered:
Dear Mrs Dawson, the pictured jacket has been worked with DROPS Salsa, but this yarn is now discontinued. Melody is the only yarn same group we have now in asortment, but you can find more alternatives here. Your DROPS store will also be able to provide you any further individual advices, even per mail or telephone. Happy knitting!
10.01.2020 - 09:19Ik vind dit een geweldig patroon en zou deze graag willen maken met Drops SALSA. Ik lees echter dat deze niet meer in de collectie zit. Is Drops SALSA toch nog ergens verkrijgbaar of komt het misschien weer terug in de collectie?(ik hoop het zo!!!) Want met name de aparte structuur van dit materiaal maakt het vestje zo bijzonder. Graag hoor ik uw reactie.
30.10.2013 - 16:34DROPS Design answered:
Beste Tamara. DROPS Salsa is inderdaad niet meer in het assortiment en op dit moment zijn er geen plannen om het garen terug te nemen. Salsa was een "lintjesgaren" en deze soort garen is verkrijgbaar van andere merken. Vraag eventueel advies bij jouw garenwinkel. Veel breiplezier.
31.10.2013 - 13:39This is such a great pattern. Please translate this into American English. Thank you.
15.07.2010 - 19:31Problems with stitch number under Yoke directions, when putting all stitches on. After the 2nd marker, when adding the back piece, the directions are missing for 7 stitches. Help!!
03.11.2008 - 15:03Graag zou ik willen weten of je bij het breien van het telpatroon en de tweede herhaling ervan ook de 3 rijen lege hokjes erboven moet breien in tricotsteek. graag verneem ik dit van u met vriendelijke groet s.veltkamp
21.05.2007 - 14:29Utrolig sød model, glæder mig til at kunne strikke den til et par smarte tynde sommer bukser
17.02.2007 - 16:58