DROPS Vivaldi
DROPS Vivaldi
56% Mohair, 30% Polyamide, 14% Wool
Discontinued
find alternatives
DROPS Cotton Viscose
54% Cotton, 46% Viscose
Discontinued
find alternatives
DROPS SS24

Crystal Waters

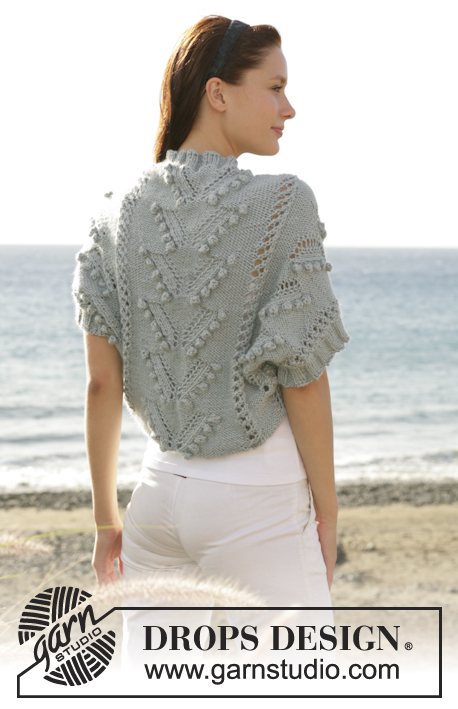
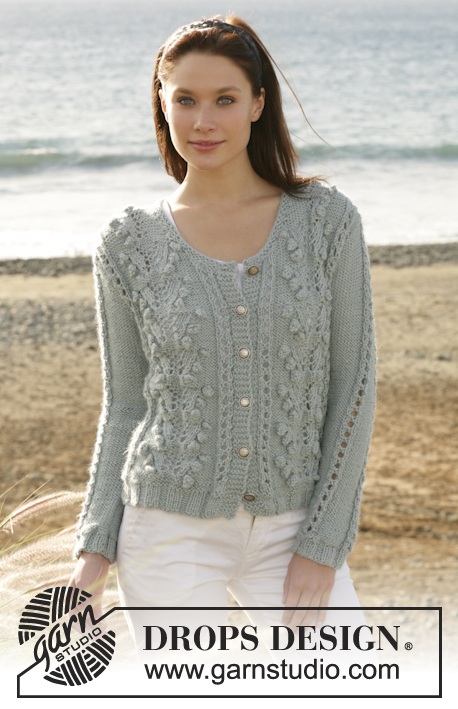
DROPS Jacket in “Vivaldi” with crochet borders in “Cotton Viscose” and “Vivaldi”.

DROPS 101-8
Size: S – M – L – XL – XXL
The jacket becomes approx 5 cm longer when worn because of the crochet border.

Materials: DROPS Vivaldi from Garnstudio
100-150-150-150-150 g colour no 07, white
and use: DROPS Cotton Viscose from Garnstudio
100-100-150-150-150 g colour no 01, white

DROPS pointed needle size 7 mm or size needed to obtain the correct knitting tension.

DROPS crochet hook size 4.5 mm (for border) and 3 mm (for button covers)

DROPS light wooden button, no 501, 2 pcs

-------------------------------------------------------

Alternative Yarn – See how to change yarns here
Yarn Groups A to F – Use the same pattern and change the yarn here
Yarn usage using an alternative yarn – Use our yarn converter here

-------------------------------------------------------

DROPS Vivaldi
DROPS Vivaldi
56% Mohair, 30% Polyamide, 14% Wool
Discontinued
find alternatives
DROPS Cotton Viscose
54% Cotton, 46% Viscose
Discontinued
find alternatives

Pattern instructions

NOTE: This pattern is written in British English. All measurements in charts are in cm. For conversion from cm to inches - click here. There are different terms for crocheting in British and American English. If this pattern includes crochet, click for "crochet terms" here. For this pattern in American English, please click here.
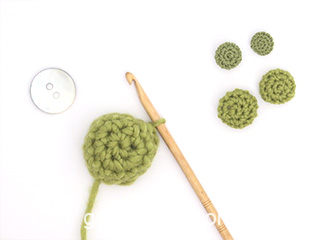
Knitting tension: width of 13 sts on needle size 7 mm in Vivaldi = 10 cm

Crochet tension: width of 20 dc = 10 cm

Garter st, back and forth on needle: Knit all rows

Decreasing tip (apply to neckline): All dec are done from RS! Dec mid front by K2 tog.

Pattern: See diagrams M.1 – M.6. The diagrams are seen from the right side.
____________________________________________________________________

BACK PIECE
Cast on 54-59-64-72-80 sts (includes 1 edge st each side) on needle size 7 mm (use 2 needles to ensure the edge becomes elastic) with 2 threads Vivaldi. Remove 1 needle and continue in garter sts with 1 thread Vivaldi. When piece measures 36-37-38-39-40 cm cast on new sts loosely each side for sleeves on every other row (i.e. at the end of row) as follows: 5 sts 5-4-3-1-0 times, 3 sts 2-2-3-5-5 times, 2 sts 1-3-3-4-5 times = 120-123-124-128-130 sts. When piece measures 54-56-58-60-62 cm cast off the middle 12-13-14-14-16 sts for neck and dec 1 st on neckline on next row = 53-54-54-56-56 sts left on each shoulder/sleeve. Cast off with 2 threads Vivaldi when piece measures 56-58-60-62-64 cm.

LEFT FRONT PIECE
Cast on 27-30-32-36-40 sts (incl 1 edge st at side) on needle size 7 mm (use 2 needles to ensure the edge becomes elastic) with 2 threads Vivaldi. Remove 1 needle and continue in garter sts with 1 thread Vivaldi. When piece measures 34-35-36-37-38 cm dec 1 st to shape the neckline on every 4th row a total of 7-8-8-8-9 times – see Decreasing tip! At the same time when piece measures 36-37-38-39-40 cm cast on new sts for sleeve as described for back piece. After all dec for neck and inc for sleeve are complete = 53-54-54-56-56 sts on shoulder/sleeve. Cast off with 2 threads Vivaldi when piece measures 56-58-60-62-64 cm.

RIGHT FRONT PIECE
Like left front piece, but mirrored.

ASSEMBLY
Crochet approx 82 to 86 dc with 1 thread of each quality on crochet hook size 4.5 mm along the cast off edge on shoulders/sleeves on all pieces (i.e. 4 rows in total. Make sure the edge is even). Sew shoulder/sleeve seams with Vivaldi. Sew under-arm seams and side seams loosely with Vivaldi.

CROCHET BORDER
Crochet 48-48-52-52-56 dc with 1 thread of each quality on crochet hook size 4.5 mm round sleeve edges. Now crochet M.1 over the first 4 dc and M.2 over the next 40-40-44-44-48 dc and finish the round with M.3 over the last 4 dc. Continue and crochet the entire pattern diagram, border measures approx 10 cm. Repeat on the other sleeve.
Crochet a border round the entire jacket (beg mid back, down along left front piece, round bottom edge, up along right front piece and round the neckline) as follows: 1 dc in the first st *1 ch, skip 1 st, 1 dc in next st*, repeat from *-* number of dc should be divisible by 4+5. Now crochet M.4 over the first 4 dc, M.5 over the remaining sts and then M.6. Crochet the entire pattern diagram, border measures approx 3.5 cm. Cut the thread.

CROCHET BUTTON COVER
Crochet covers for 2 buttons with Cotton Viscose and crochet hook size 3 mm as follows:
1st round: 2 ch, 16 tr in the first ch and finish with 1 sl st in first tr.
2nd round: 1 dc in each tr and finish with 1 sl st in dc from beg of round
3rd round: 1 tr in every other dc and finish with 1 sl st in first tr from beg of round (= 8 tr)
Put button inside cover, sew round the opening and pull tight. Sew on buttons to left front piece, the lower one approx 30 cm from bottom edge and the other approx 8 cm from neckline. Use the crochet border on right front piece as buttonholes.

Diagram

symbols = 1 ch
symbols = 1 dc in st
symbols = 1 dc (crochet in ch-loop)
symbols = 1 tr (crochet in ch-loop)
symbols = 5 tr tog (i.e. 5 sts on hook before the last st is pulled through. Crochet all tr in ch-loop)
symbols = 1 dc in 3rd ch from beg of row
symbols = 1 sl st in first st from beg of row
symbols = 1 dc in the middle of loop at beg of row
symbols = instructions are given in pattern, beg 2nd row.
diagram
Do you have a question? See a list of frequently asked questions (FAQ)

Knitting tension is what determines the final measurements of your work, and is usually measured per 10 x 10 cm. It is provided like so: number of stitches in width x number of rows in height - eg: 19 stitches x 26 rows = 10 x 10 cm.

The knitting tension is very individual; some people knit/crochet loosely while others work tightly. You adjust the knitting tension with the needle size, which is why the suggested needle size is only meant as a guide! You need to adjust this (up or down) to ensure that YOUR knitting tension matches the knitting tension provided in the pattern. If you work with a different knitting tension than provided you will have a different yarn consumption, and your work will have different measurements than what the pattern suggests.

The knitting tension also determines which yarns can replace each other. As long as you achieve the same knitting tension you can replace one yarn with another.

See DROPS lesson: How to measure your tension/gauge

See DROPS video: How to make a gauge tension swatch

The required amount of yarn is provided in grams, eg: 450 g. To calculate how many balls you’ll need you first need to know how many grams are in 1 ball (25g, 50g or 100g). This information is available if you click on the individual yarn quality on our pages. Divide the amount required with the amount of each ball. For example, if each ball is 50g (the most common amount), the calculation will be as follows: 450 / 50 = 9 balls.

The important thing when changing from one yarn to another is that the knitting/crochet tension remains the same. This is so that the measurements of the finished piece will be the same as on the sketch provided. It is easier to achieve the same knitting tension using yarns from the same yarn group. It is also possible to work with multiple strands of a thinner yarn to achieve the knitting tension of a thicker one. Please try our yarn converter. We recommend you to always work a test swatch.

Please NOTE: when changing yarn the garment might have a different look and feel to the garment in the photo, due to individual properties and qualities of each yarn.

See DROPS lesson: Can I use a different yarn than the one mentioned in the pattern?

All our yarns are categorised into yarn groups (from A to F) according to thickness and knitting tension – group A contains the thinnest yarns and group F the thickest. This makes it easier for you to find alternative yarns to our patterns, should you wish to switch yarn. All yarns within the same group have a similar knitting tension and can easily replace each other. However, different yarn qualities have different structures and properties which will give the finished work a unique look and feel.

Click here for an overview of the yarns in each yarn group

At the top of all our patterns you’ll find a link to our yarn calculator, which is a helpful tool should you wish to use a different yarn than suggested. By filling in the yarn quality you wish to replace, the amount (in your size) and number of strands, the calculator will present good alternative yarns with the same knitting tension. Additionally it will tell you how much you’ll require in the new qualities and whether you’ll need to work with multiple strands. Most skeins are 50g (some are 25g or 100g).

If the pattern is worked with multiple colours, every colour will have to be calculated separately. Similarly, if the pattern is worked with several strands of different yarns (for example 1 strand Alpaca and 1 strand Kid-Silk) you will have to find alternatives for each, individually.

Click here to see our yarn calculator

Since different yarns have different qualities and textures we have chosen to keep the original yarn in our patterns. However, you can easily find options among our available qualities by using our yarn calculator, or simply pick a yarn from the same yarn group.

It is possible that some retailers still have discontinued yarns in stock, or that someone has a few skeins at home that they would like to find patterns for.

The yarn calculator will provide both alternative yarn as well as required amount in the new quality.

If you think it's hard to decide what size to make, it can be a good idea to measure a garment you own already and like the size of. Then you can pick the size by comparing those measures with the ones available in the pattern's size chart.

You'll find the size chart at the bottom of the pattern.

See DROPS lesson: How to read size chart

The needle size provided in the pattern serves only as a guide, the important thing is to follow the knitting tension. And since knitting tension is very individual, you will have to adjust the needle size to ensure that YOUR tension is the same as in the pattern – maybe you’ll have to adjust 1, or even 2 needle sizes, up or down to achieve the correct tension. For this, we recommend that you work test swatches.

Should you work with a different knitting tension than the one provided, the measurements of the finished garment might deviate from the measurement sketch.

See DROPS lesson: How to measure your tension/gauge

See DROPS video: How to make a tension/gauge swatch

Working a garment top-down provides more flexibility and room for personal adjustment. For example it is easier to try the garment on while working, as well as making adjustments to length of yoke and shoulder caps.

The instructions are carefully explaining every step, in the correct order. Diagrams are adjusted to the knitting direction and are worked as usual.

The diagram depicts all rows/rounds, and every stitch seen from the right side. It is read from bottom to top, from right to left. 1 square = 1 stitch.

When working back and forth, every other row is worked from the right side and every other row is worked from the wrong side. When working from the wrong side, the diagram will have to be worked reversed: from left to right, knit stitches are purled, purl stitches are knit etc.

When working in the round every round is worked from the right side and the diagram are worked from right to left on all rounds.

See DROPS lesson: How to read knitting diagrams

The diagram depicts all rows/rounds, and every stitch seen from the right side. It is worked from bottom to top, from right to left.

When working back and forth every other row is worked from the right side: from right to left and every other row is worked from the wrong side: from left to right.

When working in the round, every row in the diagram are worked from the right side, from right to left.

When working a circular diagram you start in the middle and work your way outwards, counter clockwise, row by row.

The rows usually start with a given number of chain stitches (equivalent to the height of the following stitch), this will either be depicted in the diagram or explained in the pattern.

See DROPS lesson: How to read crochet diagrams

Instructions for working several diagrams after each other on the same row/round, will often be written like so: “work A.1, A.2, A.3 a total of 0-0-2-3-4 times". This means you work A.1 once, then A.2 is worked once, and A.3 is repeated (in width) the number of times provided for your size – in this case like so: S = 0 times, M = 0 times, L=2 times, XL= 3 times and XXL = 4 times.

The diagrams are worked as usual: begin with the first row in A.1, then work the first row in A.2 etc.

See DROPS lesson: How to read knitting diagrams

See DROPS lesson: How to read crochet diagrams

The total width of the garment (from wrist-to-wrist) will be larger in the larger sizes, despite the actual sleeves being shorter. The larger sizes have longer sleeve caps and wider shoulders, so there will be a good fit in all sizes.

The measurement sketch/schematic drawing provides information regarding the full length of the garment. If it’s a jumper or a jacket the length is measured from the highest point on the shoulder closest to the neckline, and straight down to the bottom of the garment. It is NOT measured from the tip of shoulder. Similarly, the length of yoke is measured from the highest point on the shoulder and down to where yoke is split into body and sleeves.

On a jacket measures are never taken along bands, unless specifically stated. Always measure inside band stitches when measuring the length.

See DROPS lesson: How to read a schematic drawing

Diagrams are often repeated on the round or in height. 1 repeat is the diagram the way it appears in the pattern. If it says to work 5 repeats of A.1 in the round, then you work A.1 a total of 5 times after/next to each other in the round. If it says to work 2 repeats of A.1 vertically/in height you work the entire diagram once, then begin again at the start and work the entire diagram one more time.

Chain stitches are slightly narrower than other stitches and to avoid working the cast-on edge too tight, we simply chain more stitches to begin with. The stitch count will be adjusted on the following row to fit the pattern and measurement sketch.

The rib edge is more elastic and will contract slightly compared to, for example, stocking stitch. By increasing before the rib edge, you avoid a visible difference in width between the rib edge and the rest of the body.

It’s very easy to cast off too tightly, and by making yarn overs while casting off (and simultaneously casting these off) you avoid a too tight cast off edge.

See DROPS video: How to bind off with yarn overs (yo)

To achieve an even increase (or decrease) you can increase on, for example: every 3rd and 4th row alternately, like so: work 2 rows and increase on the 3rd row, work 3 rows and increase on the 4th. Repeat this until the increase is complete.

See DROPS lesson: Increase or decrease 1 st on every 3rd and 4th row alternately

Should you prefer to work in the round instead of back and forth, you may of course adjust the pattern. You’ll need to add steeks mid-front (usually 5 stitches), and follow the instructions. When you would normally turn and work from the wrong side, simply work across the steek and continue in the round. At the end you’ll cut the piece open, pick up stitches to work bands, and cover the cut edges.

See DROPS video: How to knit steeks and cut open

Should you prefer to work back and forth instead of in the round, you may of course adjust the pattern so you work the pieces separately and then assemble them at the end. Divide the stitches for the body in 2, add 1 edge stitch in each side (for sewing) and work the front and back pieces separately.

See DROPS lesson: Can I adapt a pattern for circular needles into straight needles?

Pattern repeats can vary slightly in the different sizes, in order to get the correct proportions. If you’re not working the exact same size as the garment in the photo, yours might deviate slightly. This has been carefully developed and adjusted so that the complete impression of the garment is the same in all sizes.

Make sure to follow instructions and diagrams for your size!

If you have found a pattern you like which is available in women’s size it’s not very difficult to convert it to men’s size. The biggest difference will be the length of sleeves and body. Start working on the women size that you think would fit across the chest. The additional length will be worked right before you cast off for the armhole/sleeve cap. If the pattern is worked top-down you can add the length right after the armhole or before the first decrease on sleeve.

Regarding additional yarn amount, this will depend on how much length you add, but it is better with a skein too many than too few.

All yarns will have excess fibres (from production) that might come off as lint or shedding. Brushed yarns (ie hairier yarns) have more of these loose, excess fibres, causing more shedding.

Shedding also depends on what is worn under or over the garment, and whether this pulls at the yarn fibres. It’s therefore not possible to guarantee that there will be no shedding

Below are some tips on how to get the best result when working with hairier yarns:

1. When the garment is finished (before you wash it) shake it vigorously so the looser hairs come off. NOTE: do NOT use a lint roller, brush or any method that pulls at the yarn.

2. Place the garment in a plastic bag and put it in your freezer - the temperature will cause the fibres to become less attached to each other, and excess fibres will come off easier.

3. Leave in the freezer for a few hours before taking it out and shaking it again.

4. Wash the garment according to the instructions on the yarn label.

Pilling is a natural process that happens to even the most exclusive of fibers. It's a natural sign of wear and tear that is hard to avoid, and that is most visible in high friction areas of your garment like a sweater's arms and cuffs.

You can make your garment look as new by removing the pilling, using a fabric comb or a pill/lint remover.

Still can't find the answer you need? Then scroll down and leave your question so one of our experts can try to help you. This will be done normally within 5 to 10 working days.
In the meantime, you can read the questions and answers that others have left to this pattern or join the DROPS Workshop on Facebook to get help from fellow knitters/crocheters!

You might also like...

Post a comment to pattern DROPS 101-8

We would love to hear what you have to say about this pattern!

If you want to leave a question, please make sure you select the correct category in the form below, to speed up the answering process. Required fields are marked *.

Comments / Questions (13)

country flag Claudia wrote:

Hallo, ich habe eine Frage zur Häkelkante. In der Anleitung steht ein Faden jeder Qualität. Ich arbeite mit Kid Silk und Cotton Viskose . Bedeutet das nun,dass ich die Häkelkante nicht nur mit einem Faden Cotton Viskose , sondern auch zugleich mit einem Faden Kid Silk arbeiten soll? Vielen Dank im Voraus für ihre Hilfe.

18.07.2020 - 19:44

DROPS Design answered:

Liebe Claudia, 1 Faden jeder Qualität bedeutet ja, daß Sie mit 1 Faden Kid-Silk + 1 Faden Cotton Vicose (= 2 Fäden zusammen) häkeln. Viel Spaß beim häkeln!

20.07.2020 - 09:31

country flag Will wrote:

Hoe kan ik het beste voor dit patroon de steken meerderen aan het eind van de nld(volgens beschrijving)

07.09.2015 - 19:28

DROPS Design answered:

Hoi Will. Gaat het om het opzetten van de nieuwe steken voor de mouw aan het einde van de nld. Dan doe je als volgt:

08.09.2015 - 15:35

country flag Drops Design France wrote:

Bonjour Guiffard, les quantités indiquées pour la taille XXL sont bien de 150 g Cotton Viscose + 150 g Vivaldi.

22.08.2011 - 10:02

country flag Guiffard wrote:

Bonjour, pouvez- vous me dire si ces bien 150g de vilvadi et 150gde cotton viscose pour la taille xxlpour le modéle 101-8 merci de votre réponse salutation.

22.08.2011 - 09:05

country flag Edna Berg wrote:

Forklar hvordan det er mulig å få en pen heklekant når nest siste rad "snurpes" inn med kun 3 m øverst pr mønster og resten av heklingen er adskillig bredere. Siste rad består jo også kun av 3 fm pr mønster, men de foranliggende rader har adskillig flere m. Takknemlig for forklaring. Med vennlig hilsen Edna Berg

10.07.2007 - 10:19

country flag Tove M. Hervik wrote:

En rålekker jakke med fin blanding av grove og sarte detaljer. Har lyst til å strikke den.

19.02.2007 - 11:39

country flag Birthe B.C wrote:

kanon flot , den har jeg virkelig lyst til at lave

27.01.2007 - 09:29

country flag Susan Hedemand wrote:

Den er rigtig flot, den bør ejes....

15.01.2007 - 19:25

country flag Marianne wrote:

Super flot

03.01.2007 - 19:24

country flag Anne-marie wrote:

wauuuu smuk, jeg kan godt lide den finhed og den grovhed der er blandet sammen. og som Anette skiver klassisk og nytænkning i et... flot :0)

13.12.2006 - 22:17