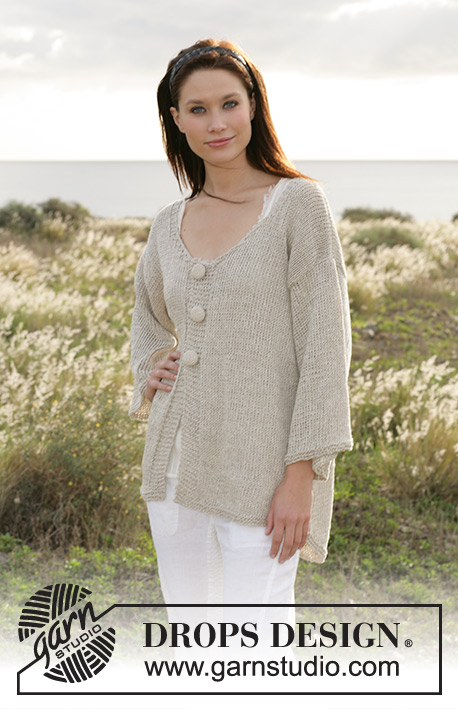
Boardwalk Afternoons

DROPS short cardigan with cables, moss sts and ¾ sleeves in ”Cotton Viscose”

DROPS 100-6
Size: S - M - L - XL – XXL

Finished measurements:
Chest measurements: 80-90-98-100-122 cm = 31½"-35½"-38½"-39⅜"-48"
Full length: 40-42-44-46-48 cm = 15¾"-16½"-17¼"-18"-19"

All measurements in charts are in cm.

Materials: DROPS Cotton Viscose from Garnstudio
450-500-500-550-600 g color no 17, light beige

DROPS needle size 4.5 mm = US 7 – or the needle size needed to obtain correct knitting gauge.

DROPS needle size 4 mm = US 6 – for moss stich

DROPS crochet hook size 3 mm = US C – for button cover.
4-5-5-5-5 buttons – approx 2 cm = ¾" in diameter.

-------------------------------------------------------

Alternative Yarn – See how to change yarns here
Yarn Groups A to F – Use the same pattern and change the yarn here
Yarn usage using an alternative yarn – Use our yarn converter here

-------------------------------------------------------

Pattern instructions

NOTE: This pattern is written in American English. All measurements in charts are in cm. For conversion from inches to cm - click here. There are different terms for crocheting in American and British English. If this pattern includes crochet, click for "crochet terms" here. For this pattern in British English, please click here.
Knitting gauge: 17 sts x 22 rows stockinette st with 2 threads = 10 x 10 cm = 4" x 4"

Moss stitch: 1st row: * K1, P1 *, repeat from *-*. 2nd row: K over P and P over K. Repeat 2nd row.

Pattern: See diagram M.1 and M.2 – pattern shown from RS.

Tips for measurement: Due to weight of yarn, hold yarn up for all measurements or garment will be too long on completion.

Buttonholes: Bind off for buttonhole on right front edge from RS as follows: Bind off 3rd and 4th edge st. On next row cast on 2 new sts over bind off sts.
Bind off for buttonhole when piece measures:
Size S: 3,11,19 and 27 cm = 1⅛", 4⅜", 7½" and 10⅝"
Size M: 3, 9, 16, 22 and 29 cm = 1⅛", 3½", 6¼", 8¾" and 11⅜"
Size L: 3, 10, 17, 24 and 31 cm = 1⅛", 4", 6¾", 9½" and 12¼"
Size XL: 3 ,10, 18, 25 and 33 cm = 1⅛", 4", 7", 9¾" and 13"
Size XXL: 3, 11, 19, 27 and 35 cm = 1⅛", 4⅜", 7½", 10⅝" and 13¾"
____________________________________________________________________

Back piece: Cast on 62-70-78-87-97 sts (includes 1 edge st each side) on needle size 4 mm = US 6 with 2 threads Cotton Viscose and knit moss sts – see explanation above until piece measures 4.5 cm = 1¾". Change to needle size 4.5 mm = US 7 and knit as follows – seen from RS:
Size S, M, L: 1 edge st, P 3-4-5 , * M.1, P 6-8-10 *, repeat from *-* 3 times, M.1, P 3-4-5, and finish with 1 edge st.
Size XL, XXL: 1 edge st, P4, M.2, P 7-9, *M.1, P 7-9 *, repeat from *-* 4 times, M.2 , P4, 1 edge st. At the same time when piece measures 5 cm = 2" inc within 1 sts of edge st each side every 5 cm = 2" x 4 times in total = 70-78-86-95-105 sts – knit new sts in P – seen from RS. When piece measures 23-24-25-26-27 cm = 9"-9½"-9¾"-10¼"-10⅝" bind off for armhole each side on every other row: 3 sts 1-1-1-2-2 times, 2 sts 0-1-2-2-4 times and 1 st 2-2-2-3-3 times = 60-64-68-69-71 sts. Continue pattern with 1 edge st each side until piece measures 38-40-42-44-46 cm = 15"-15¾"-16½"-17¼"-18", bind off middle 34-36-38-39-41 sts at neckline and bind off 1 sts on next row at neckline = 12-13-14-14-14 sts left on each shoulder. Bind off when piece measures approx 40-42-44-46-48 cm = 15¾"-16½"-17¼"-18"-19" – adjust after a whole pattern repeat in height.

Right front piece: Bind off for button hole on right front piece – see explanation above. Cast on 38-41-44-50-54 sts (includes 1 edge st on side and 6 band st mid front) on needle size 4 mm = US 6 with 2 threads Cotton Viscose and knit moss st over all sts – see explanation above, until piece measures 4.5 cm = 1¾". Change to needle size 4.5 mm = US 7 and knit as follows from RS:
Size S, M, L: 6 sts moss sts (= front edge), P4, M.1, P 6-8-10, M.1, P 3-4-5, and 1 edge st.
Size XL and XXL: 6 sts moss sts (= front edge), P4, * M.1, P 7-9 *, repeat from *-* 2 times, M.2, P4, and 1 edge st.
At the same time when piece measures 5 cm = 2" inc on edge as on back piece = 42-45-48-54-58 sts. When piece measures 23-24-25-26-27 cm = 9"-9½"-9¾"-10¼"-10⅝" bind off for armhole as back piece = 37-38-39-41-41 sts. Continue pattern until piece measures 28-30-31-32-34 cm = 11"-11¾"-12¼"-12½"-12⅜", put 13-13-13-15-15 sts at mid front on a thread or a sts holder for neck and cast at neckline on every other row as follows: 2 sts x 2 times, 1 st x 8 times = 12-13-14-14-14 sts left on shoulder. Bind off when piece measures approx 40-42-44-46-48 cm = 15¾"-16½"-17¼"-18"-19" – adjust to a complete pattern repeat in height.

Left front piece: Knit right piece reversed.

Sleeve: Cast on 44-46-48-50-52 sts (includes 1 edge st each side) on needle size 4 mm = US 6 with 2 threads Cotton Viscose. Knit moss stitch - see explanation above, until piece measures 4.5 cm = 1¾". Change to needle size 4.5 mm = US 7 and knit from RS as follows: 1 edge st, P 7-8-9-10-11, M.1, P 10, M.1, P 7-8-9-10-11, 1 edge st. When piece measures 8 cm = 3⅛" inc 1 st each side on every 5 -5 -4 -4 -3 cm = 2"-2"-1½"-1½"-1⅛" in total of 5-5-6-7-9 times = 54-56-60-64-70 sts. Knit new sts in P. When piece measures 32-33-33-33-32 cm = 12½"-13"-13"-13"-12½" bind off for sleeve cap each side on every other row: 3 sts 1 times, 2 sts 3 times, 1 st 2-2-2-3-5 times. Bind off 2 sts each side until piece measures 39-40-41-42-43 cm = 15¼"-15¾"-16⅛"-16½"-17", then bind off 3 sts 1 times each side. Bind off remaining sts, piece measures approx. 40-41-42-43-44 cm = 15¾"-16⅛"-16½"-17"-17¼" – adjust to complete pattern repeat.

Diagram

All measurements in charts are in cm.

symbols = K from RS, P from WS
symbols = P from RS, K from WS
symbols = yo
symbols = slip 1 st as if to knit, K2, psso
symbols = st not included in this round
diagram
Do you have a question? See a list of frequently asked questions (FAQ)

Knitting tension is what determines the final measurements of your work, and is usually measured per 10 x 10 cm. It is provided like so: number of stitches in width x number of rows in height - eg: 19 stitches x 26 rows = 10 x 10 cm.

The knitting tension is very individual; some people knit/crochet loosely while others work tightly. You adjust the knitting tension with the needle size, which is why the suggested needle size only serve as a guide! You need to adjust this (up or down) to ensure that YOUR knitting tension matches the knitting tension provided in the pattern. If you work with a different knitting tension than provided you will have a different yarn consumption, and your work will have different measurements than what the pattern suggests.

The knitting tension also determines which yarns can replace each other. As long as you achieve the same knitting tension you can replace one yarn with another.

See DROPS lesson: How to measure your tension/gauge

See DROPS video: How to make a gauge tension swatch

The required amount of yarn is provided in grams, eg: 450 g. To calculate how many balls you’ll need you first need to know how many grams are in 1 ball (25g, 50g or 100g). This information is available if you click on the individual yarn quality on our pages. Divide the amount required with the amount of each ball. For example, if each ball is 50g (the most common amount), the calculation will be as follows: 450 / 50 = 9 balls.

The important thing when changing from one yarn to another is that the knitting/crochet tension remains the same. This is so that the measurements of the finished piece will be the same as on the sketch provided. It is easier to achieve the same knitting tension using yarns from the same yarn group. It is also possible to work with multiple strands of a thinner yarn to achieve the knitting tension of a thicker one. Please try our yarn converter. We recommend you to always work a test swatch.

Please NOTE: when changing yarn the garment might have a different look and feel to the garment in the photo, due to individual properties and qualities of each yarn.

See DROPS lesson: Can I use a different yarn than the one mentioned in the pattern?

All our yarns are categorised into yarn groups (from A to F) according to thickness and knitting tension – group A contains the thinnest yarns and group F the thickest. This makes it easier for you to find alternative yarns to our patterns, should you wish to switch yarn. All yarns within the same group have a similar knitting tension and can easily replace each other. However, different yarn qualities have different structures and properties which will give the finished work a unique look and feel.

Click here for an overview of the yarns in each yarn group

At the top of all our patterns you’ll find a link to our yarn converter, which is a helpful tool should you wish to use a different yarn than suggested. By filling in the yarn quality you wish to replace, the amount (in your size) and number of strands, the converter will present good alternative yarns with the same knitting tension. Additionally it will tell you how much you’ll require in the new qualities and whether you’ll need to work with multiple strands. Most skeins are 50g (some are 25g or 100g).

If the pattern is worked with multiple colours, every colour will have to be converted separately. Similarly, if the pattern is worked with several strands of different yarns (for example 1 strand Alpaca and 1 strand Kid-Silk) you will have to find alternatives for each, individually.

Click here to see our yarn converter

Since different yarns have different qualities and textures we have chosen to keep the original yarn in our patterns. However, you can easily find options among our available qualities by using our yarn converter, or simply pick a yarn from the same yarn group.

It is possible that some retailers still have discontinued yarns in stock, or that someone has a few skeins at home that they would like to find patterns for.

The yarn converter will provide both alternative yarn as well as required amount in the new quality.

If you think it's hard to decide what size to make, it can be a good idea to measure a garment you own already and like the size of. Then you can pick the size by comparing those measures with the ones available in the pattern's size chart.

You'll find the size chart at the bottom of the pattern.

See DROPS lesson: How to read size chart

The needle size provided in the pattern serves only as a guide, the important thing is to follow the knitting tension. And since knitting tension is very individual, you will have to adjust the needle size to ensure that YOUR tension is the same as in the pattern – maybe you’ll have to adjust 1, or even 2 needle sizes, up or down to achieve the correct tension. For this, we recommend that you work test swatches.

Should you work with a different knitting tension than the one provided, the measurements of the finished garment might deviate from the measurement sketch.

See DROPS lesson: How to measure your tension/gauge

See DROPS video: How to make a gauge tension swatch

Working a garment top-down provides more flexibility and room for personal adjustment. For example it is easier to try the garment on while working, as well as making adjustments to length of yoke and shoulder caps.

The instructions are carefully explaining every step, in the correct order. Diagrams are adjusted to the knitting direction and are worked as usual.

The diagram depicts all rows/rounds, and every stitch seen from the right side. It is read from bottom to top, from right to left. 1 square = 1 stitch.

When working back and forth, every other row is worked from the right side and every other row is worked from the wrong side. When working from the wrong side, the diagram will have to be worked reversed: from left to right, knit stitches are purled, purl stitches are knit etc.

When working in the round every round is worked from the right side and the diagram are worked from right to left on all rounds.

See DROPS lesson: How to read knitting diagrams

The diagram depicts all rows/rounds, and every stitch seen from the right side. It is worked from bottom to top, from right to left.

When working back and forth every other row is worked from the right side: from right to left and every other row is worked from the wrong side: from left to right.

When working in the round, every row in the diagram are worked from the right side, from right to left.

When working a circular diagram you start in the middle and work your way outwards, counter clockwise, row by row.

The rows usually start with a given number of chain stitches (equivalent to the height of the following stitch), this will either be depicted in the diagram or explained in the pattern.

See DROPS lesson: How to read crochet diagrams

Instructions for working several diagrams after each other on the same row/round, will often be written like so: “work A.1, A.2, A.3 a total of 0-0-2-3-4 times". This means you work A.1 once, then A.2 is worked once, and A.3 is repeated (in width) the number of times provided for your size – in this case like so: S = 0 times, M = 0 times, L=2 times, XL= 3 times and XXL = 4 times.

The diagrams are worked as usual: begin with the first row in A.1, then work the first row in A.2 etc.

See DROPS lesson: How to read knitting diagrams

See DROPS lesson: How to read crochet diagrams

The total width of the garment (from wrist-to-wrist) will be larger in the larger sizes, despite the actual sleeves being shorter. The larger sizes have longer sleeve caps and wider shoulders, so there will be a good fit in all sizes.

The measurement sketch/schematic drawing provides information regarding the full length of the garment. If it’s a jumper or a jacket the length is measured from the highest point on the shoulder (usually closest to the neckline), and straight down to the bottom of the garment. It is NOT measured from the tip of shoulder. Similarly, the length of yoke is measured from the highest point on the shoulder and down to where yoke is split into body and sleeves.

See DROPS lesson: How to read a schematic drawing

Diagrams are often repeated on the round or in height. 1 repeat is the diagram the way it appears in the pattern. If it says to work 5 repeats of A.1 in the round, then you work A.1 a total of 5 times after/next to each other in the round. If it says to work 2 repeats of A.1 vertically/in height you work the entire diagram once, then begin again at the start and work the entire diagram one more time.

Chain stitches are slightly narrower than other stitches and to avoid working the cast-on edge too tight, we simply chain more stitches to begin with. The stitch count will be adjusted on the following row to fit the pattern and measurement sketch.

The rib edge is more elastic and will contract slightly compared to, for example, stocking stitch. By increasing before the rib edge, you avoid a visible difference in width between the rib edge and the rest of the body.

It’s very easy to cast off too tightly, and by making yarn overs while casting off (and simultaneously casting these off) you avoid a too tight cast off edge.

See DROPS video: How to bind off with yarn overs (yo)

To achieve an even increase (or decrease) you can increase on, for example: every 3rd and 4th row alternately, like so: work 2 rows and increase on the 3rd row, work 3 rows and increase on the 4th. Repeat this until the increase is complete.

See DROPS lesson: Increase or decrease 1 st on every 3rd and 4th row alternately

Should you prefer to work in the round instead of back and forth, you may of course adjust the pattern. You’ll need to add steeks mid-front (usually 5 stitches), and follow the instructions. When you would normally turn and work from the wrong side, simply work across the steek and continue in the round. At the end you’ll cut the piece open, pick up stitches to work bands, and cover the cut edges.

See DROPS video: How to knit steeks and cut open

Should you prefer to work back and forth instead of in the round, you may of course adjust the pattern so you work the pieces separately and then assemble them at the end. Divide the stitches for the body in 2, add 1 edge stitch in each side (for sewing) and work the front and back pieces separately.

See DROPS lesson: Can I adapt a pattern for circular needles into straight needles?

Pattern repeats can vary slightly in the different sizes, in order to get the correct proportions. If you’re not working the exact same size as the garment in the photo, yours might deviate slightly. This has been carefully developed and adjusted so that the complete impression of the garment is the same in all sizes.

Make sure to follow instructions and diagrams for your size!

If you have found a pattern you like which is available in women’s size it’s not very difficult to convert it to men’s size. The biggest difference will be the length of sleeves and body. Start working on the women size that you think would fit across the chest. The additional length will be worked right before you cast off for the armhole/sleeve cap. If the pattern is worked top-down you can add the length right after the armhole or before the first decrease on sleeve.

Regarding additional yarn amount, this will depend on how much length you add, but it is better with a skein too many than too few.

All yarns will have excess fibres (from production) that might come off as lint or shedding. Brushed yarns (ie hairier yarns) have more of these loose, excess fibres, causing more shedding.

Shedding also depends on what is worn under or over the garment, and whether this pulls at the yarn fibres. It’s therefore not possible to guarantee that there will be no shedding

Below are some tips on how to get the best result when working with hairier yarns:

1. When the garment is finished (before you wash it) shake it vigorously so the looser hairs come off. NOTE: do NOT use a lint roller, brush or any method that pulls at the yarn.

2. Place the garment in a plastic bag and put it in your freezer - the temperature will cause the fibres to become less attached to each other, and excess fibres will come off easier.

3. Leave in the freezer for a few hours before taking it out and shaking it again.

4. Wash the garment according to the instructions on the yarn label.

Pilling is a natural process that happens to even the most exclusive of fibers. It's a natural sign of wear and tear that is hard to avoid, and that is most visible in high friction areas of your garment like a sweater's arms and cuffs.

You can make your garment look as new by removing the pilling, using a fabric comb or a pill/lint remover.

Still can't find the answer you need? Then scroll down and leave your question so one of our experts can try to help you. This will be done normally within 5 to 10 working days.
In the meantime, you can read the questions and answers that others have left to this pattern or join the DROPS Workshop on Facebook to get help from fellow knitters/crocheters!

You might also like...

Post a comment to pattern DROPS 100-6

We would love to hear what you have to say about this pattern!

If you want to leave a question, please make sure you select the correct category in the form below, to speed up the answering process. Required fields are marked *.

Comments / Questions (45)

country flag Christine wrote:

Hei, hvilke garn kan man bruke istedenfor 2 tråder DROPS Cotton Viscose?

18.12.2020 - 22:20

DROPS Design answered:

Hei Christine. Du kan bruke andre garnkvaliteter i garngruppe A. Men husk å få den samme strikkefastheten som er oppgitt i oppskriften. mvh DROPS design

21.12.2020 - 13:44

country flag Joe wrote:

BONJOUR - je tricote ce modèle et je pense que la mesure de l'échantillon donnée est erronée "ECHANTILLON 17 m x 22 rangs = 10 x 10 cm au point mousse avec 2 fils de Coton Viscose" il doit être de 17 x 32 au point mousse. De plus, pour les débutants comme moi, il serait utile de signaler que tous les rangs sur l'envers se tricotent à l'envers. Je n'ai rien vu de marquer à ce propos. Merci pour ce très beau modèle..

16.09.2018 - 17:37

DROPS Design answered:

Bonjour Joe, l'échantillon de 17 mx 22 rangs se tricote en jersey, la correction a été faite, merci. Sur l'envers, tricotez les mailles comme elles se présentent (celles entre les diagrammes se tricotent à l'endroit sur l'envers et celles des diagrammes comme indiqué dans la légende). Bon tricot!

17.09.2018 - 10:02

country flag Viktoria wrote:

Ich habe diese Jacke mit doppeltem Faden Drops Alpaka und etwas längerer Version gestrickt. Mir gefehlt das Modell ausgesprochen gut, die Umrechnung war auch ganz einfach! Herzlichen Dank für die Anleitung! Viele Grüße, Viktoria

09.10.2016 - 20:37

country flag Marie-France wrote:

Oui c'est indiqué = 1 m env sur l'end, end sur l'env dans le diagramme. cest pourquoi je me demande si je tricote la maille sur l'endroit de l'ouvrage ou de la maille. merci

11.07.2016 - 12:42

DROPS Design answered:

Bonjour Marie-France, les cases blanches (à l'end sur l'end de l'ouvrage, env sur l'env de l'ouvrage) se tricotent en jersey endroit et les cases avec une croix se tricotent en jersey env (= à l'env sur l'end de l'ouvrage et à l'end sur l'env de l'ouvrage). Bon tricot!

11.07.2016 - 13:14

country flag Marie-France wrote:

Quand ils disent tricoter endroit sur l'envers , est-ce que c'est l'endroit de l'ouvrage ou de la maille

30.06.2016 - 05:09

DROPS Design answered:

Bonjour Marie-France, quand il est indiqué de "tricoter à l'endroit sur l'envers", on tricote toutes les mailles à l'endroit sur l'envers de l'ouvrage - sous réserve de vérification dans le modèle (ex. non trouvé dans celui-ci). Bon tricot!

30.06.2016 - 08:56

country flag Martine wrote:

Bonjour, Je ne comprends pas, si je tricote M1 j'ai plus que 5 mailles en M1 et non 7 ? Sur le "glisser 1 m à l'end, 2m end, passer la m glissée sur la m tricotée" j'ai 2 mailles en moins.... Au rang suivant il n'y a qu'1 jetée. Pouvez-vous m'expliquer comment faire ?

14.02.2014 - 23:22

DROPS Design answered:

Bonjour Martine, dans M.1 et M.2, on tricote sur 3 m ainsi: glissez 1 m à l'end, tricotez les 2 m suivantes à l'end, puis passez la m glissée par-dessus les m tricotées, ainsi, vous diminuez 1 m, il reste 1 m. Au rang suivant, faites 1 jeté entre ces 2 m, vous avez de nouveau 3 m. Bon tricot!

17.02.2014 - 10:31

country flag Hoola wrote:

Jeg tror det er godt at modellen er så kort, det bliver tungt med dobbelt garn.

26.03.2013 - 09:47

country flag Martin Geneviève wrote:

Merci encore. Je vais diminuer 1m de moins côté encolure...et 1m de plus coté emmanchure, avec le poids de la manche, ça devrait le faire ( je verrai bien)

16.04.2012 - 11:35

country flag Martin Geneviève wrote:

Merci pour votre réponse.Comme j'ai hâte de porter ce petit gilet, j'ai passé un moment à bien étudier le point : je serre au maximum les mailles concernées et c'est déjà mieux. J'ai un autre souci: je tricote la taille S et j'ai beau respecter les explications, sur l'épaule le point fantaisie n'est pas centré. J'ai étudié toutes les possibilités de calcul mais rien à faire. Celà m'ennuie de faire la taille supérieure car les mesures de la taille S me vont parfaitement.

16.04.2012 - 10:05

DROPS Design answered:

Si vous souhaitez centrer le motif, il vous faudra changer les indications des diminutions, en diminuant moins pour l'encolure par exemple, mais elle sera moins échancrée alors. Bon tricot !

16.04.2012 - 10:59

country flag Martin Geneviève wrote:

Je suis en train de réaliser ce modèle mais quand je fais le point M1, la dernière maille endroit du point est lâche, ainsi que la première m envers suivante :de quoi celà provient-il ? Merci pour votre aide et félicitations pour vos modèles, plus beaux les uns que les autres.

14.04.2012 - 10:29

DROPS Design answered:

Bonjour Geneviève, c'est peut-être une question de tension. Tricotez un échantillon et lavez le en le mettant aux mesures indiquées pour voir si les mailles se positionnent correctement après "blocage". Bon tricot !

16.04.2012 - 09:39