
Popular categories
Looking for a yarn?


|
|||||||||||||
DROPS 100-15 |
|||||||||||||
|
|
|||||||||||||
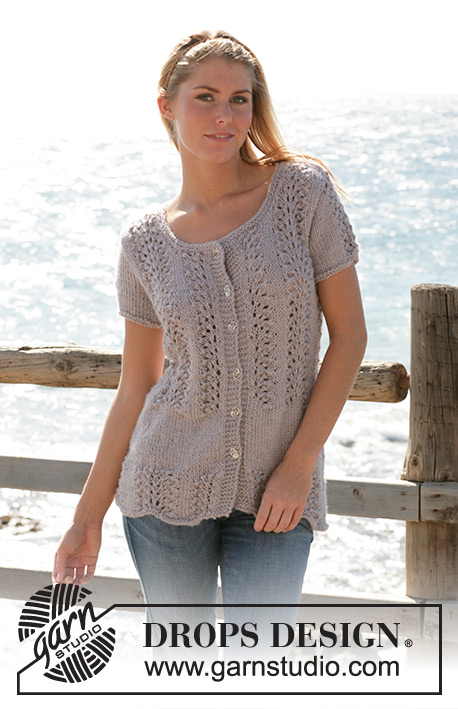
DROPS small jersey with short sleeves knitted in lace pattern with “Silke-Alpaca”.
DROPS 100-15 |
|||||||||||||
|
Pattern: See diagram M.1. The diagram is seen from the RS. Decreasing tips: When dec. for the neck and armholes, knit the sts, which are not divisible into the pattern, in stockinette sts. Measurement tips: Because of the weight in the yarn, all measurements should be done when holding up the garment, to avoid it becomes too long when worn. K 4 twisted tog: To twist sts knit into the back part of the st instead of the front part. Garter sts (on circular needles): K 1st round, P 2nd round. BODY Read measurement tips! Knit the work round on circular needle. Cast on 134-146-158-176-196 sts on circular needles size 4.5 mm = US 7 with Silke-Alpaca. Knit 4 rows of garter sts and continue in stockinette sts. When the piece measures 10 cm = 4" dec. 10 sts evenly distributed on round = 124-136-148-166-186 sts. Continue to knit the next row as follows (seen from the RS): M.1, K 1-4-7-3-8 sts, *M.1, K4*, repeat from *-* a totals of 2-2-2-3-3 times, *M.1, K 1-4-7-3-8 sts*, repeat from *-* a total of 2 times, *M.1, K4*, repeat from *-* a total of 2-2-2-3-3 times, M.1, K 1-4-7-3-8 sts. Continue this pattern. When the piece measures 20 cm = 8" inc. 1 st each time you K 1-4-7-3-8 sts (this means K 1-4-7-3-8 sts becomes K 2-5-8-4-9 sts , and so on. Inc. as follows: K 2 sts in the first st = a total of 4 sts increased per round). Inc. on every 7-7-5-5-5 cm = 2¾"-2¾"-2"-2"-2" a total of 3-3-4-4-4 times = 136-148-164-182-202 sts. When the piece measures 41-42-43-44-45 cm = 16⅛"-16½"-17"-17¼"-17¾" knit in stockinette sts over the 1st and the 5-5-5-6-6 repeat of M.1, at the same time bind off the mid 5 sts in each of these repeats for the armholes = 63-69-77-86-96 sts for the front piece and 63-69-77-86-96 sts for the back piece. Finish each part separately. Back piece: Continue to bind off for the armhole each side – read decreasing tips: 3 sts 0-0-1-1-2 times, 2 sts 0-1-1-2-3 times and 1 st 2-2-2-3-2 times = 59-61-63-66-68 sts. When the piece measures 56-58-60-62-64 cm = 22"-22¾"-23⅝"-24⅜"-25¼" bind off the mid 25-25-27-28-28 sts for the neck – read decreasing tips. Continue to bind off 1 st towards each neck side = 16-17-17-18-19 sts left for each shoulder. Bind off remaining sts when the piece measures 58-60-62-64-66 cm = 22¾"-23⅝"-24⅜"-25¼"-26". Front piece: Bind off for the armholes as done for the back piece. When the piece measures 46-48-50-52-54 cm = 18"-19"-19¾"-20½"-21¼" put the mid 15-15-15-16-16 sts on a thread or a stitch holder for the neck. Continue to bind off 1 st each neck side on every other row a total of 3-3-4-4-4 times and on every 4th row: 3 times – read decreasing tips. When all dec. are completed there are 16-17-17-18-19 sts left for each shoulder. Bind off remaining sts when the piece measures 58-60-62-64-66 cm = 22¾"-23⅝"-24⅜"-25¼"-26". Sleeve: Knit the work back and forth on pointed needlse. Cast on 53-57-61-65-69 sts (includes 1 edge st each side) on needle size 4.5 mm = US 7 with Silke-Alpaca. Knit 4 rows of garter sts. Knit the next row as follows from the RS: 1 edge st, K 19-21-23-25-27 sts, M.1, K 19-21-23-25-27 sts, 1 edge st. Continue this pattern. When the piece measures 8-8-8-6-6 cm = 3⅛"-3⅛"-3⅛"-2⅜"-2⅜" bind off for the sleeve cap each side on every other row: 3 sts 1 time, 2 sts 2 times, 1 sts 2-3-4-6-7 times. Continue to bind off 2 sts each side until the piece measures 14-15-16-16-17 cm = 5½"-6"-6¼"-6¼"-6¾" and the bind off 3 sts each side 1 time. Bind off remaining sts when the piece measures 15-16-17-17-18 cm = 6"-6¼"-6¾"-6¾"-7". Assembly: Sew the shoulder seams. Sew in the sleeve to the body and sew the sleeve seams. Neck edge: Pick up approx. 74-82 sts (incl. of the sts from the thread or stitch holder at the front) around the neck and knit 4 rows of garter sts. Bind off. |
|||||||||||||
Diagram explanations |
|||||||||||||
|
|||||||||||||

|
|||||||||||||
|
Have you made this or any other of our designs? Tag your pictures in social media with #dropsdesign so we can see them! Do you need help with this pattern?You'll find tutorial videos, a Comments/Questions area and more by visiting the pattern on garnstudio.com. © 1982-2024 DROPS Design A/S. We reserve all rights. This document, including all its sub-sections, has copyrights. Read more about what you can do with our patterns at the bottom of each pattern on our site. |
|||||||||||||


With over 40 years in knitting and crochet design, DROPS Design offers one of the most extensive collections of free patterns on the internet - translated to 17 languages. As of today we count 304 catalogs and 11422 patterns - 11417 of which are translated into English (US/in).
We work hard to bring you the best knitting and crochet have to offer, inspiration and advice as well as great quality yarns at incredible prices! Would you like to use our patterns for other than personal use? You can read what you are allowed to do in the Copyright text at the bottom of all our patterns. Happy crafting!
Comments / Questions (17)
I’m having difficult understanding the decreasing for the front piece, when it states “Continue to bind off 1 st each neck side on every other row a total of 3-3-4-4-4 times and on every 4th row: 3 times.” Does this mean (for size medium), RS bind off 1, WS, RS bind off 1, WS, RS bind off 1 then count 4 rows and bind off on that 4th row? Then continue 4 more rows and bind off again two more times?
01.04.2024 - 02:57DROPS Design answered:
Hi Steph, The binding off every 2nd row is just as you have understood it. However, the binding off every 4th row is with 3 rows between each bind off, rather than 4. Do this 2 more times (again with 3 rows between each bind off). Happy knitting!
02.04.2024 - 06:55Danke für die schnelle Antwort. Noch eine (letzte) Frage. Auf dem Diagramm - Video werden "4 Maschen re zu" und "4 M re verschränkt zu" anders gestrickt als in den Einzelanleitungen, nämlich wirklich alle 4 Maschen auf ein Mal (und nicht einzel und dann übereinander). Ist es optisch dasselbe Ergebnis? Ich finde nämlich das Stricken der einzelnen Maschen einfacher, so kenne ich es von früheren Arbeiten. Schönes Wochenende :)
19.01.2018 - 22:28DROPS Design answered:
Liebe Frau Daub, es sollte das gleiche Ergebnis geben, nun kann es etwwas schwierig sein 4 M rechts zusammen stricken, deshalb zeigen wir dieser Art um diese Abnahmen zu stricken. Viel Spaß beim stricken!
22.01.2018 - 09:01Hallo nochmal, zeigt das Video 168-15 dasselbe Muster? Das ist dort sehr gut erklärt. Allerdings wäre dann hier 100-15 ein Fehler. Bei der Legende zum Diagramm müsste es "4 verschränkt re zusammen" heißen, nicht li. Liebe Grüße
19.01.2018 - 00:42DROPS Design answered:
Liebe Frau Daub, ja genau, das Diagram wird wie A.2 im 168-15 gestrickt - Danke für den Hinweis, Legende wird korrigiert! Viel Spaß beim stricken!
19.01.2018 - 10:54Hallo, Ich verstehe folgenden Hinweis nicht und ich habe auch kein Video dazu gefunden: "4 verschränkt re. zusammenstricken: Die Maschen werden in das hintere anstelle des vorderen Gliedes gestrickt". Was mich besonders verwirrt: im M1 werden 4 Maschen re zusammen o d e r 4 Maschen li verschränkt zusammen gestrickt. Der Hinweis passt nicht zum Text. Was ich vermisse, ist eine Suchfunktion für die Tutorium (nicht nur Filter). Vielen Dank und liebe Grüße.
18.01.2018 - 22:03DROPS Design answered:
Liebe Frau Daub, 2 neue Videos zu 4 M re zs und 4 M re verschränkt zs sind jetzt in dieser Anleitung gelistet - siehe am Ende der Seite. Viel Spaß beim stricken!
19.01.2018 - 10:52Salve; non mi ritrovo con gli aumenti nelle 7m.dritte:se vengono aumentate 4maglie nel giro e devo ripetere gli aumenti ogni 5cm x 4 volte (x la mia taglia) vengono aumentate in tutto 16 m; mentre tra le m. iniziali 158 e quelle dopo gli aumenti indicati (164) ci sono sole 66 mm.di differenza.
19.08.2014 - 20:06DROPS Design answered:
Buonasera Caterina. Quando il lavoro misura 10 cm, deve diminuire 10 m nel corso del giro. In questo modo le m diventano 148. Dopo gli aumenti, avrà 148 + 16 m = 164 m. Buon lavoro!
19.08.2014 - 21:41Förstår jag rätt att man varannan gång har 1rm (storlek small) mellan varje M1 och varannan gång 4rm emellan? När man tittar på tröjan ser det ut som att det är 4rm hela vägen
21.01.2014 - 13:41DROPS Design answered:
Hej Monika. Ja, det er korrekt. Modellen har en anden storlek paa som har flere masker imellem mönstrene.
21.01.2014 - 16:15Ja riktig det økes bare i de som heter "1-4-7-3-8 r" .
24.11.2009 - 09:06Aha, noen ganger står det *M1,4 r* og andre steder *M1, 1-4-7-3-8 r* Det skal være to 1-4-7-3-8 r partier foran da, og to bak? det er der det skal økes, og ikke i sidene?
23.11.2009 - 19:47Skal man strikke M1 noen ganger uten rettpartier mellom da, for å komme rundt..?
23.11.2009 - 14:16Da har jeg misforstått denne teksten ihvertfall: Neste p strikkes slik - sett fra retten: M.1, 1-4-7-3-8 r, * M.1, 4 r *, gjenta fra *-* totalt 2-2-2-3-3 ganger, * M.1, 1-4-7-3-8 r *, gjenta fra *-* totalt 2 ganger, * M.1, 4 r *, gjenta fra *-* totalt 2-2-2-3-3 ganger, M.1, 1-4-7-3-8 r. får stave meg gjennom og se om jeg får 8 til å bli 4...
23.11.2009 - 14:12