
Popular categories
Looking for a yarn?


|
|||||||||||||
Fishing Net |
|||||||||||||
 |
 |
||||||||||||
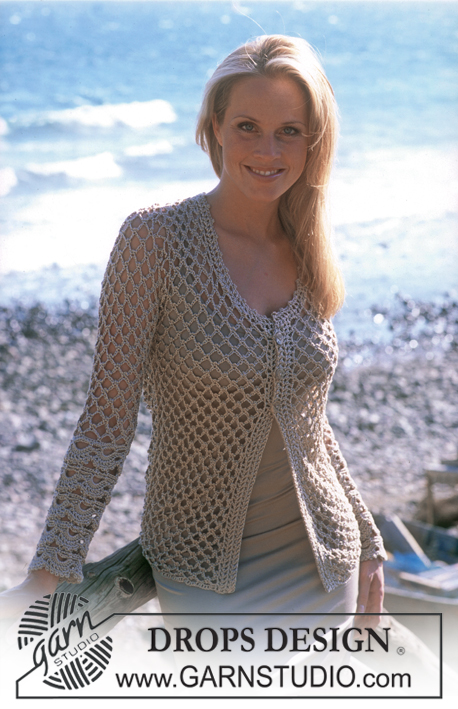
DROPS Crocheted cardigan in Cotton Viscose
DROPS 81-22 |
|||||||||||||
|
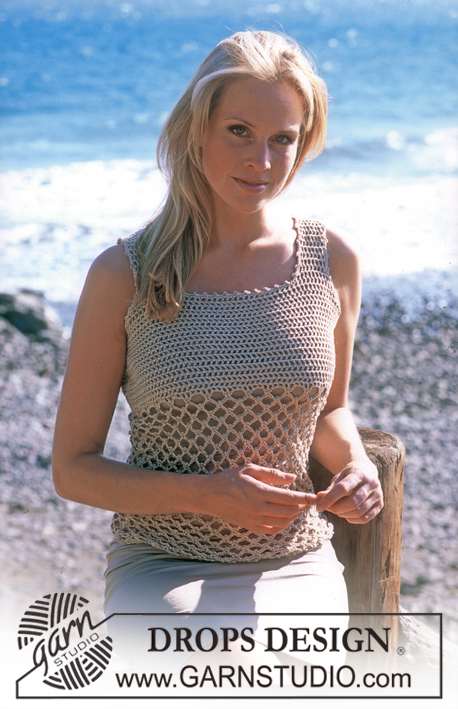
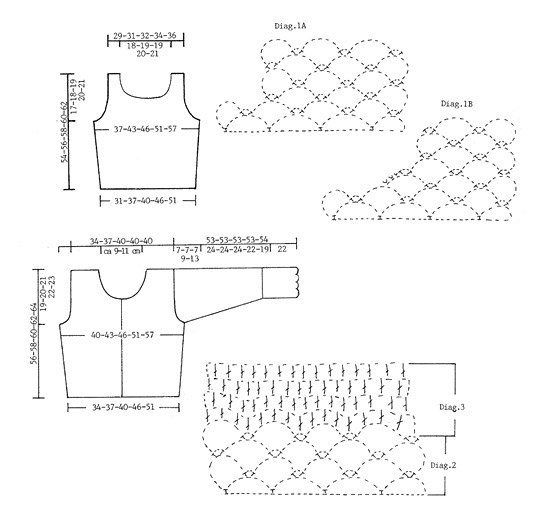
CARDIGAN: Crochet gauge: approx. 3.5 ch-spaces in width and 9 rows in height = 10 x 10 cm. Measuring-tips: Make all width measurements when piece is lying flat and all length measurements when the piece is held up. Diagrams: See diagrams. The pattern is seen from the right side and shows the armhole shaping. Back: Ch 97-105-113-129-145. Row 1 crochet as follows: 1 sc in 9th ch from hook, * ch 7, skip over 7 ch, 1 sc in the next st *, repeat from * - * = 12-13-14-16-18 ch-spaces, turn the work. Then crochet the next row and following rows as follows: ch 8, 1 sc in 4th ch in first ch-space, ch 2, 1 sc in the same ch, * ch 7, 1 sc in 4th ch in the next ch-space, ch 2, 1 sc in the same ch *, repeat from *-* across row, turn the work. When the piece measures 20 cm inc 1 ch-space at each side by making 1 extra bow (i.e repeat *-* twice) in the next to last ch-space at each side = 14-15-16-18-20 ch-spaces on row. Armhole: When the piece measures 37-38-39-40-41 cm bind off for armhole each side as follows: Sizes XS + S/M + M/L: Crochet until 1 ch-space remains, turn the work, crochet back and repeat bind off at the other side – see diagram1A. Sizes XL + XXL: Crochet until 1 ch-space remains, turn the work, sl st to the center of first ch-space, continue across row and repeat bind off at the other side – see diagram 1B. 1-1-1-2-2 ch-spaces bound off at each side = 12-13-14-14-16 ch-spaces remain on row. Continue until the piece measures 54-56-58-60-62 cm, then bind off for the neck by crocheting 2 rows over only 4-5-5-5-5 ch-spaces at each shoulder (do not crochet over the center 4-3-4-4-6 ch-spaces). The piece measures approx. 56-58-60-62-64 cm, cut yarn. Right front: Ch 49-57-57-65-73. Then crochet as on back = 6-7-7-8-9 ch-spaces. When the piece measures 20 cm inc 1 ch-space at the side as on back = 7-8-8-9-10 ch-spaces. When the piece measures 37-38-39-40-41 cm bind off for armhole at the side as on back = 6-7-7-7-8 ch-spaces. When the piece measures 38-40-42-44-46 cm bind off for the neck as follows in all Sizes: Follow directions for armhole bind off for Sizes XL+XXL 1 time. Neck shaping is now complete for Sizes XS, S/M, M/L and XL. Size XXL: Follow directions for armhole bind off for Sizes S+S/M+ M/L 1 time. You have bound off 2-2-2-2-3 spaces and 4-5-5-5-5 ch-spaces remain on shoulder. Continue until the piece measures 56-58-60-62-64 cm, cut yarn. Left front: Crochet the same as the right, reversing all shaping. Sleeve: Ch 65-65-81-81-89. Crochets as on Body = 8-8-10-10-11 ch-spaces. After 2 row inc by making 1 extra ch-space in the next to last space at one side, crochet 3 rows and inc on the other side in the same manner. Repeat inc at each side 1 more time with 3 rows between each inc = 12-12-14-14-15 ch-spaces on row. Continue until the piece measures 24-24-24-22-19 cm. Bind off for sleeve cap by crocheting 6-6-6-8-12 rows with 1 ch-space fewer at the end of each row, cut yarn. The piece measures approx. 31-31-31-31-32 cm. Assembly: Crochet shoulders together as follows: 1 sl st in first ch-space on back, ch 4, 1 sc in first ch-space on front, ch 4, 1 sc in the next ch-space on back, and so on. Crochet together the sleeve and side seams in the same manner. Then crochet the sleeves in. Cuffs: Now crochet an edge at lower edge of sleeves as follows: Round 1: 51-51-61-61-61 sc around lower edge of sleeve – that is, approx. 5-7 sc in each ch-space, and end with 1 sl st in 1st sc at start of row. Round 2: ch 1, 1 sc in first sc, * ch 5, skip over 3 sc, 1 sc in the next sc, ch 7, skip over 5 sc, 1 sc in the next sc *, repeat from * - * a total of 5-5-6-6-6 times, but replace the last sc with 1 sl st in 1st sc at start of row (= 10-10-12-12-12 ch-spaces). Round 3: Sl st to the center of the first ch-space, 1 sc in ch-space, * 11 dc in the next ch-space (= 7 ch-spaces), 1 sc in the next ch-space (= 5 ch-spaces) *, repeat from * - * a total of 4-4-5-5-5 times and finish with 11 dc in the last ch-space and 1 sl st in 1st sc at start of row (= 5-5-6-6-6 dc-groups). Round 4: Sl st to the 3rd dc in the dc-group, ch 4, * 1 dc in the next dc, ch 1 *, repeat from * - * a total of 5 times, 1 dc in the next dc, ** 1 dc in 3rd dc of dc-group, (ch 1, 1 dc in the next dc), repeat ( ) a total of 6 times **, repeat from ** - ** a total of 4-4-5-5-5 times, end with 1 sl st in 3rd ch at start of row. Round 5: 1 picot = ch 3, 1 sl st in 3rd ch from hook. * ch 1, 1 sc in first ch, (1 picot, 1 sc in the next ch), repeat ( ) a total of 5 times, ch 1, 1 sc between dc-group *, repeat from * - * a total of 5-5-6-6-6 times, end with ch 1 and 1 sl st in 1st ch at start of row. Round 6: ch 5, * 1 sc in 2nd picot of dc-group, ch 7, 1 sc in 4th picot in the same dc-group, ch 5 *, repeat from * - * a total of 4-4-5-5-5 times and finish with 1 sc in 2nd picot of dc-group, ch 7, 1 sc in 4th picot in the same dc-group, ch 3 and 1 sl st in 2nd ch at start of row (= 10-10-12-12-12 ch-spaces). Round 7: ch 3, 1 sc in first sc, * ch 7, 1 sc in the next sc, ch 5, 1 sc in the next sc *, repeat from * - * a total of 4-4-5-5-5 times and finish with ch 7, 1 sc in the next sc, ch 3 and 1 sl st in 1st ch at start of row. Round 8: ch 3, 1 sc in the next sc, * ch 7, 1 sc in the next sc, ch 5, 1 sc in the next sc *, repeat from * - * a total of 4-4-5-5-5 times and finish with ch 7, 1 sc in the next sc, ch 3 and 1 sl st in 1st ch at start of row. Repeat Rounds 3 to 8 another 3 times. On round 3 do not sl st to the center of the first ch-space. Then crochet Rounds 3 to 5 one more time – the cuff measures approx. 22 cm. Left button band: Crochet 4 rows as follows: * 1 dc, ch 1 *, repeat from * - * over all sts along left front. There will be approx. 2 dc in each ch-space and 1 dc between each space = approx. 52-62 dc with 1 ch between each, turn each row with ch 4. Right button band: Crochet the same as the left, after the 2nd row make 3 buttonholes evenly distributed at the top of buttonband. The top buttonhole should be 2 dc from edge and the others with approx. 6 dc between each. 1 buttonhole = ch 2, skip over 1 ch, 1 dc in the next ch. On the next row crochet 2 dc in the ch 2 with 1 ch between each. Neckband: Crochet 2 rows with * 1 dc, ch 1 *, repeat from * - * around the neck (incl. over buttonbands) – crochet approx. 2 dc in each space and 1 dc between each space – be careful not to make the edge too tight or too loose. Then crochet 1 row with sc and picots as follows: 1 picot = ch 3, 1 sl st in 3rd ch from hook. Crochet 1 sc in first ch, 1 picot, 1 sc in the same ch, * 1 sc in each of the2 following ch, 1 sc in the next ch, 1 picot, 1 sc in the same ch-space *, repeat from * - * across row, cut yarn. Sew on buttons. CROCHETED TOP IN COTTON VISCOSE: Sizes: XS - S/M - M/L - XL - XXL Finished measurements: Bust: 74-86-92-102-114 cm [29⅛" - 33⅞" - 36.25" - 40⅛" - 44⅞"] Hem: 62-74-80-92-102 cm [24⅜" - 29⅛" - 31.5" - 36.25" - 40⅛"] The measurements seem a little small, but the garment will be very stretchy, so make your usual size. Materials: DROPS COTTON-VISCOSE from Garnstudio 200-200-250-250-300 gr nr 17, beige DROPS 3.5 mm [US D] crochet hook, or size needed to obtain correct gauge. Crochet gauge: Ch-spaces: approx. 3.5 ch-spaces wide and 9 rows = 10 x 10 cm. Double crochet: 14 dc wide with 1 ch between each and 14 rows = 10 x 10 cm. Crochet info (for diagr. 3): At the start of each row replace 1 dc + 1 ch with ch 4. Measuring-tips: Make all measurements when the piece is lying flat. Pattern: See chart. Use the chart on the lower right (Diag. 2 and Diag. 3). Front: Ch 96-112-120-136-152. Crochet the first row as follows: 1 sc in 16th ch from hook, * ch 7, skip over 7 ch, 1 sc in the next ch *, repeat from * * = 11-13-14-16-18 ch-spaces, turn the work. Then crochet all rows as follows: ch 8, 1 sc in 4th ch in first ch-space, ch 2, 1 sc in the same ch, * ch 7, 1 sc in 4th ch on the next ch-space, ch 2, 1 sc in the same ch *, repeat from * - * across row, turn the work. Continue in this manner – see diagr.2. When the piece measures 10 cm increase 1 space at each side by making 1 extra space in the next to last space at each side = 13-15-16-18-20 ch-spaces on row. When the piece measures 26 cm crochet the next row as follows (right side row) – see diagr.3: ch 4 (= 1 dc + 1 ch), then 3 dc in each of the large ch-spaces and 1 dc in each of the small ch-spaces, with 1 ch between each dc. Finish with 3 dc in the last ch-space = 52-60-64-72-80 dc on row with 1 ch between each, turn the work. Now crochet as follows: ch 4, * 1 dc in next ch, 1 ch *, repeat from * - * and finish with 1 dc in last ch. Count to be sure you still have the same number of dc on the row. Read the entire section before crocheting: Armhole: When the piece measures 37-38-39-40-41 cm bind off for armhole at each side as follows: crochet to last 5-7-8-8-8 dc at end of row, turn the work. Continue with dc and 1 ch between each and repeat bind off at the other side, turn the work. Then sl st in each of the 2-3-3-4-4 first ch, continue with dc and 1 ch between each to last 2-3-3-4-4 dc, turn the work. Armhole bind off is complete for Sizes XS + S/M + M/L. Continue to bind off for size XL as follows: sl st in the first 2 ch, continue with dc and 1 ch between each to last 2 dc on row, turn piece and continue as before. Continue to bind off for Size XXL as follows: sl st in the first 3 ch, continue with dc and 1 ch between each to last 3 dc on row, turn the work, sl st in each of the first 2 ch, continue with dc and 1 ch between each to last 2 dc on row, turn the work. Armhole bind off is complete for all Sizes and there are 41-43-45-48-51 dc on row. Continue as before. Neckband: When the piece measures 38-40-42-44-46 cm bind off for the neck as follows (right side row): 10-10-11-12-13 dc with 1 ch between each, turn the work, sl st in the first ch, ch 4, crochet same as before across row, turn the work. Crochet dc with 1 ch between each to last dc, turn piece and crochet as before. There are now 8-8-9-10-11 dc on strap. Continue until the piece measures 54-56-58-60-62 cm and place a marker (= center of shoulder). Continue until strap measures 10 cm from the marker. Now inc at the side for the neck by crocheting 1 extra dc with 1 ch between in the outermost ch, turn piece and crochet back. Turn the work, crochet back and inc 1 dc more on the same side = 10-10-11-12-13 dc on row, cut yarn. Repeat on the other side of neck. Back: Cast on and crochet the same as the front. Bind off for armhole as on front and continue until the piece measures 42-44-46-48-50 cm, cut yarn. Assembly: Sew side seams. Sew straps at each side on back. Picot-edge: Crochet one row with picot around armhole and neck as follows: 1 sc in ch-space, * 1 sc in the next ch-space, ch 3, 1 sc in 1st ch from hook, 1 sc in the same ch-space, 1 sc in the next ch-space *, repeat from * - * and finish with 1 sl st in first sc at start of row. |
|||||||||||||
Diagram explanations |
|||||||||||||
|
|||||||||||||
|
|||||||||||||
|
Have you made this or any other of our designs? Tag your pictures in social media with #dropsdesign so we can see them! Do you need help with this pattern?You'll find tutorial videos, a Comments/Questions area and more by visiting the pattern on garnstudio.com. © 1982-2024 DROPS Design A/S. We reserve all rights. This document, including all its sub-sections, has copyrights. Read more about what you can do with our patterns at the bottom of each pattern on our site. |
|||||||||||||


With over 40 years in knitting and crochet design, DROPS Design offers one of the most extensive collections of free patterns on the internet - translated to 17 languages. As of today we count 304 catalogs and 11422 patterns - 11417 of which are translated into English (US/in).
We work hard to bring you the best knitting and crochet have to offer, inspiration and advice as well as great quality yarns at incredible prices! Would you like to use our patterns for other than personal use? You can read what you are allowed to do in the Copyright text at the bottom of all our patterns. Happy crafting!
Comments / Questions (45)
Can you please explain the instruction for top "when the piece measures 10 cm increase 1 space at each side by making 1 extra space in the next to last space at each side?" Thank you in advance.
03.06.2018 - 21:23DROPS Design answered:
Dear Chi, work first ch-space at the beg of row as before, then work 2 ch-spaces in the 2nd ch-space on row (= crochet a total of 2 times in the same ch-space: ch 7, 1 sc in 4th ch in the next ch-space, ch 2, 1 sc in the same ch), then continue as before until 2 ch-spaces remain before end of row, work 2 ch-spaces in the next ch-space and finish row as before. Happy crocheting!
04.06.2018 - 09:35Thank you very much for your last answer. I would really love to make this beautiful cardigan so I am wondering if you could clarify the following: work 2 (= work * ch 7, 1 sc in 4th ch in the next ch-space, ch 2, 1 sc in the same ch * a total of 2 times) do you this twice in the same check 2 space? Will it even out in following rows? When I do this it looks extremely crowded in that one chain to space and seems confusing.
14.05.2018 - 17:49DROPS Design answered:
Dear Donna, you need to increase one large ch-space on each side, you will crochet 2 large ch-spaces in the 2nd ch-space from beg of row and in the next to last ch-space at the end of row = you will have 2 more large ch-spaces on row. Happy crocheting!
15.05.2018 - 08:29Is there a link to a visual tutorial regarding back increase after 20cm? I have searched your youtube channel. I desperately need a visual to understand this increase. Many thanks.
12.05.2018 - 21:22DROPS Design answered:
Dear Donna, there is no video yet to this increase: you will increase 1 ch-space on each side of piece inside 1 ch-space, ie at the beg of row work first ch-space as before, then in 2nd ch-space work 2 (= work * ch 7, 1 sc in 4th ch in the next ch-space, ch 2, 1 sc in the same ch * a total of 2 times) and continue until 2 ch-spaces remain at the end of row, work 2 times from *-* (= as at the beg of row) and finish working in last ch-space on row as before. Happy crocheting!
14.05.2018 - 10:17I am aware that this question has been asked and answered but it seems that the answer given is always just to repeat the pattern directions. After reaching the 20cm the inc seems to make a loop shape instead of the diamond. Is that what it is supposed to do? out. If not then please help us understand what we are meant to do. Photos would definitely help
21.01.2017 - 22:30DROPS Design answered:
Dear Mrs Johnson, when piece measures 20 cm, crochet 2 ch-space instead of only 1 in the 2nd + in the next to last ch-space on row = there are now 2 more ch-space on row. Happy crocheting!
23.01.2017 - 10:18I am just beginning this sweater. I don't understand the gauge instructions. 3.5 ch-space in width. What does that mean?
06.09.2015 - 03:56DROPS Design answered:
Dear Terri, crochet in ch-spaces over some sts for a swatch and measure in width to get 3,5 ch spaces (= 3 ch-spaces + 1 half ch-space) = 10 cm. Happy crocheting!
07.09.2015 - 11:07Would u please clarify this part Bind off for sleeve cap by crocheting 6-6-6-8-12 rows with 1 ch-space fewer at the end of each row, cut yarn. The piece measures approx. 31-31-31-31-32 cm.
03.05.2015 - 03:28DROPS Design answered:
Dear Christine, you dec 1 ch-space at the end of each of the next 6-8-12 rows. After these rows have been worked, sleeve will measures 31-32 cm in total. Happy crocheting!
04.05.2015 - 09:13Would u please explain how to increase after the back piece measures 20 cm?
31.03.2015 - 18:24DROPS Design answered:
Dear Christine, when piece measures 20 cm, you will crochet 2 ch-spaces in the 2nd ch-space and 2 ch-spaces in the next to last ch-space on row, repeating twice in the same ch-space: *ch 7, 1 sc in 4th ch in the next ch-space, ch 2, 1 sc in the same ch* = you will have 2 ch-spaces more at the end of this inc row. Happy crocheting!
01.04.2015 - 09:17Buenas tardes. Estoy haciendo el patrón y he empezado por la espalda tal y como indica. Cuando lleve 20cm hay que aumentar una blonda en cada lado en la penúltima blonda. Hay algun video que explique como hacerlo??? Gracias!
04.03.2015 - 18:10DROPS Design answered:
Hola Virginia, no hay un video de como aumentar una blonda trabajando 2 blondas en una. Se trabaja un 2º arco o blonda pinchando en el mismo sitio.
09.03.2015 - 10:38PS ik vroeg me ook af of je bij het keren na de eerste toer ook niet dat 2losse-boogje moet maken... Want aan het eind van he 2e toer doe je dat wel en dan heb je dus verschil in de ene (rechter) en andere kant (linker) van je werk.
02.04.2014 - 17:07PS ik vroeg me ook af of je bij het keren na de eerste toer ook niet dat 2losse-boogje moet maken... Want aan het eind van he 2e toer doe je dat wel en dan heb je dus verschil in de ene (rechter) en andere kant (linker) van je werk.
02.04.2014 - 16:38