
Popular categories
Looking for a yarn?


|
|||||||||||||
Fishing Net |
|||||||||||||
 |
 |
||||||||||||
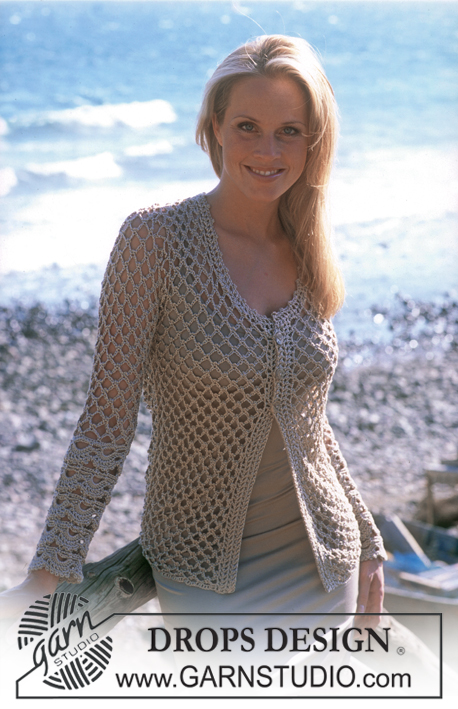
DROPS Crocheted cardigan in Cotton Viscose
DROPS 81-22 |
|||||||||||||
|
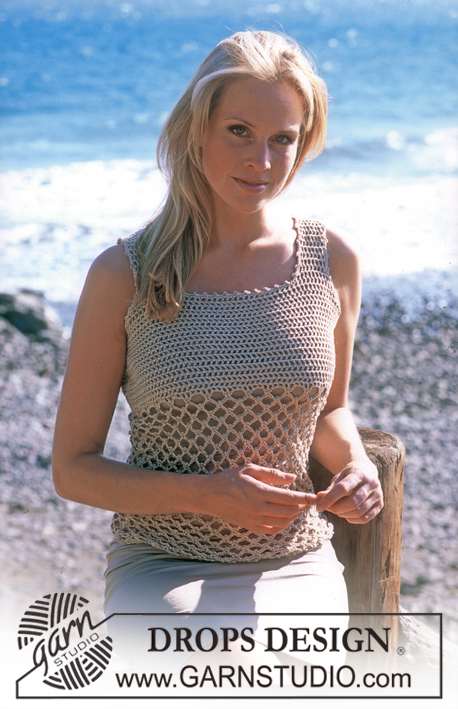
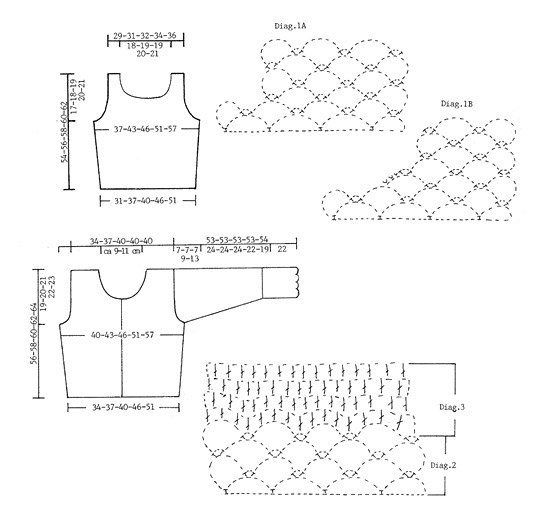
CARDIGAN: Crochet gauge: approx. 3.5 ch-spaces in width and 9 rows in height = 10 x 10 cm. Measuring-tips: Make all width measurements when piece is lying flat and all length measurements when the piece is held up. Diagrams: See diagrams. The pattern is seen from the right side and shows the armhole shaping. Back: Ch 97-105-113-129-145. Row 1 crochet as follows: 1 sc in 9th ch from hook, * ch 7, skip over 7 ch, 1 sc in the next st *, repeat from * - * = 12-13-14-16-18 ch-spaces, turn the work. Then crochet the next row and following rows as follows: ch 8, 1 sc in 4th ch in first ch-space, ch 2, 1 sc in the same ch, * ch 7, 1 sc in 4th ch in the next ch-space, ch 2, 1 sc in the same ch *, repeat from *-* across row, turn the work. When the piece measures 20 cm inc 1 ch-space at each side by making 1 extra bow (i.e repeat *-* twice) in the next to last ch-space at each side = 14-15-16-18-20 ch-spaces on row. Armhole: When the piece measures 37-38-39-40-41 cm bind off for armhole each side as follows: Sizes XS + S/M + M/L: Crochet until 1 ch-space remains, turn the work, crochet back and repeat bind off at the other side – see diagram1A. Sizes XL + XXL: Crochet until 1 ch-space remains, turn the work, sl st to the center of first ch-space, continue across row and repeat bind off at the other side – see diagram 1B. 1-1-1-2-2 ch-spaces bound off at each side = 12-13-14-14-16 ch-spaces remain on row. Continue until the piece measures 54-56-58-60-62 cm, then bind off for the neck by crocheting 2 rows over only 4-5-5-5-5 ch-spaces at each shoulder (do not crochet over the center 4-3-4-4-6 ch-spaces). The piece measures approx. 56-58-60-62-64 cm, cut yarn. Right front: Ch 49-57-57-65-73. Then crochet as on back = 6-7-7-8-9 ch-spaces. When the piece measures 20 cm inc 1 ch-space at the side as on back = 7-8-8-9-10 ch-spaces. When the piece measures 37-38-39-40-41 cm bind off for armhole at the side as on back = 6-7-7-7-8 ch-spaces. When the piece measures 38-40-42-44-46 cm bind off for the neck as follows in all Sizes: Follow directions for armhole bind off for Sizes XL+XXL 1 time. Neck shaping is now complete for Sizes XS, S/M, M/L and XL. Size XXL: Follow directions for armhole bind off for Sizes S+S/M+ M/L 1 time. You have bound off 2-2-2-2-3 spaces and 4-5-5-5-5 ch-spaces remain on shoulder. Continue until the piece measures 56-58-60-62-64 cm, cut yarn. Left front: Crochet the same as the right, reversing all shaping. Sleeve: Ch 65-65-81-81-89. Crochets as on Body = 8-8-10-10-11 ch-spaces. After 2 row inc by making 1 extra ch-space in the next to last space at one side, crochet 3 rows and inc on the other side in the same manner. Repeat inc at each side 1 more time with 3 rows between each inc = 12-12-14-14-15 ch-spaces on row. Continue until the piece measures 24-24-24-22-19 cm. Bind off for sleeve cap by crocheting 6-6-6-8-12 rows with 1 ch-space fewer at the end of each row, cut yarn. The piece measures approx. 31-31-31-31-32 cm. Assembly: Crochet shoulders together as follows: 1 sl st in first ch-space on back, ch 4, 1 sc in first ch-space on front, ch 4, 1 sc in the next ch-space on back, and so on. Crochet together the sleeve and side seams in the same manner. Then crochet the sleeves in. Cuffs: Now crochet an edge at lower edge of sleeves as follows: Round 1: 51-51-61-61-61 sc around lower edge of sleeve – that is, approx. 5-7 sc in each ch-space, and end with 1 sl st in 1st sc at start of row. Round 2: ch 1, 1 sc in first sc, * ch 5, skip over 3 sc, 1 sc in the next sc, ch 7, skip over 5 sc, 1 sc in the next sc *, repeat from * - * a total of 5-5-6-6-6 times, but replace the last sc with 1 sl st in 1st sc at start of row (= 10-10-12-12-12 ch-spaces). Round 3: Sl st to the center of the first ch-space, 1 sc in ch-space, * 11 dc in the next ch-space (= 7 ch-spaces), 1 sc in the next ch-space (= 5 ch-spaces) *, repeat from * - * a total of 4-4-5-5-5 times and finish with 11 dc in the last ch-space and 1 sl st in 1st sc at start of row (= 5-5-6-6-6 dc-groups). Round 4: Sl st to the 3rd dc in the dc-group, ch 4, * 1 dc in the next dc, ch 1 *, repeat from * - * a total of 5 times, 1 dc in the next dc, ** 1 dc in 3rd dc of dc-group, (ch 1, 1 dc in the next dc), repeat ( ) a total of 6 times **, repeat from ** - ** a total of 4-4-5-5-5 times, end with 1 sl st in 3rd ch at start of row. Round 5: 1 picot = ch 3, 1 sl st in 3rd ch from hook. * ch 1, 1 sc in first ch, (1 picot, 1 sc in the next ch), repeat ( ) a total of 5 times, ch 1, 1 sc between dc-group *, repeat from * - * a total of 5-5-6-6-6 times, end with ch 1 and 1 sl st in 1st ch at start of row. Round 6: ch 5, * 1 sc in 2nd picot of dc-group, ch 7, 1 sc in 4th picot in the same dc-group, ch 5 *, repeat from * - * a total of 4-4-5-5-5 times and finish with 1 sc in 2nd picot of dc-group, ch 7, 1 sc in 4th picot in the same dc-group, ch 3 and 1 sl st in 2nd ch at start of row (= 10-10-12-12-12 ch-spaces). Round 7: ch 3, 1 sc in first sc, * ch 7, 1 sc in the next sc, ch 5, 1 sc in the next sc *, repeat from * - * a total of 4-4-5-5-5 times and finish with ch 7, 1 sc in the next sc, ch 3 and 1 sl st in 1st ch at start of row. Round 8: ch 3, 1 sc in the next sc, * ch 7, 1 sc in the next sc, ch 5, 1 sc in the next sc *, repeat from * - * a total of 4-4-5-5-5 times and finish with ch 7, 1 sc in the next sc, ch 3 and 1 sl st in 1st ch at start of row. Repeat Rounds 3 to 8 another 3 times. On round 3 do not sl st to the center of the first ch-space. Then crochet Rounds 3 to 5 one more time – the cuff measures approx. 22 cm. Left button band: Crochet 4 rows as follows: * 1 dc, ch 1 *, repeat from * - * over all sts along left front. There will be approx. 2 dc in each ch-space and 1 dc between each space = approx. 52-62 dc with 1 ch between each, turn each row with ch 4. Right button band: Crochet the same as the left, after the 2nd row make 3 buttonholes evenly distributed at the top of buttonband. The top buttonhole should be 2 dc from edge and the others with approx. 6 dc between each. 1 buttonhole = ch 2, skip over 1 ch, 1 dc in the next ch. On the next row crochet 2 dc in the ch 2 with 1 ch between each. Neckband: Crochet 2 rows with * 1 dc, ch 1 *, repeat from * - * around the neck (incl. over buttonbands) – crochet approx. 2 dc in each space and 1 dc between each space – be careful not to make the edge too tight or too loose. Then crochet 1 row with sc and picots as follows: 1 picot = ch 3, 1 sl st in 3rd ch from hook. Crochet 1 sc in first ch, 1 picot, 1 sc in the same ch, * 1 sc in each of the2 following ch, 1 sc in the next ch, 1 picot, 1 sc in the same ch-space *, repeat from * - * across row, cut yarn. Sew on buttons. CROCHETED TOP IN COTTON VISCOSE: Sizes: XS - S/M - M/L - XL - XXL Finished measurements: Bust: 74-86-92-102-114 cm [29⅛" - 33⅞" - 36.25" - 40⅛" - 44⅞"] Hem: 62-74-80-92-102 cm [24⅜" - 29⅛" - 31.5" - 36.25" - 40⅛"] The measurements seem a little small, but the garment will be very stretchy, so make your usual size. Materials: DROPS COTTON-VISCOSE from Garnstudio 200-200-250-250-300 gr nr 17, beige DROPS 3.5 mm [US D] crochet hook, or size needed to obtain correct gauge. Crochet gauge: Ch-spaces: approx. 3.5 ch-spaces wide and 9 rows = 10 x 10 cm. Double crochet: 14 dc wide with 1 ch between each and 14 rows = 10 x 10 cm. Crochet info (for diagr. 3): At the start of each row replace 1 dc + 1 ch with ch 4. Measuring-tips: Make all measurements when the piece is lying flat. Pattern: See chart. Use the chart on the lower right (Diag. 2 and Diag. 3). Front: Ch 96-112-120-136-152. Crochet the first row as follows: 1 sc in 16th ch from hook, * ch 7, skip over 7 ch, 1 sc in the next ch *, repeat from * * = 11-13-14-16-18 ch-spaces, turn the work. Then crochet all rows as follows: ch 8, 1 sc in 4th ch in first ch-space, ch 2, 1 sc in the same ch, * ch 7, 1 sc in 4th ch on the next ch-space, ch 2, 1 sc in the same ch *, repeat from * - * across row, turn the work. Continue in this manner – see diagr.2. When the piece measures 10 cm increase 1 space at each side by making 1 extra space in the next to last space at each side = 13-15-16-18-20 ch-spaces on row. When the piece measures 26 cm crochet the next row as follows (right side row) – see diagr.3: ch 4 (= 1 dc + 1 ch), then 3 dc in each of the large ch-spaces and 1 dc in each of the small ch-spaces, with 1 ch between each dc. Finish with 3 dc in the last ch-space = 52-60-64-72-80 dc on row with 1 ch between each, turn the work. Now crochet as follows: ch 4, * 1 dc in next ch, 1 ch *, repeat from * - * and finish with 1 dc in last ch. Count to be sure you still have the same number of dc on the row. Read the entire section before crocheting: Armhole: When the piece measures 37-38-39-40-41 cm bind off for armhole at each side as follows: crochet to last 5-7-8-8-8 dc at end of row, turn the work. Continue with dc and 1 ch between each and repeat bind off at the other side, turn the work. Then sl st in each of the 2-3-3-4-4 first ch, continue with dc and 1 ch between each to last 2-3-3-4-4 dc, turn the work. Armhole bind off is complete for Sizes XS + S/M + M/L. Continue to bind off for size XL as follows: sl st in the first 2 ch, continue with dc and 1 ch between each to last 2 dc on row, turn piece and continue as before. Continue to bind off for Size XXL as follows: sl st in the first 3 ch, continue with dc and 1 ch between each to last 3 dc on row, turn the work, sl st in each of the first 2 ch, continue with dc and 1 ch between each to last 2 dc on row, turn the work. Armhole bind off is complete for all Sizes and there are 41-43-45-48-51 dc on row. Continue as before. Neckband: When the piece measures 38-40-42-44-46 cm bind off for the neck as follows (right side row): 10-10-11-12-13 dc with 1 ch between each, turn the work, sl st in the first ch, ch 4, crochet same as before across row, turn the work. Crochet dc with 1 ch between each to last dc, turn piece and crochet as before. There are now 8-8-9-10-11 dc on strap. Continue until the piece measures 54-56-58-60-62 cm and place a marker (= center of shoulder). Continue until strap measures 10 cm from the marker. Now inc at the side for the neck by crocheting 1 extra dc with 1 ch between in the outermost ch, turn piece and crochet back. Turn the work, crochet back and inc 1 dc more on the same side = 10-10-11-12-13 dc on row, cut yarn. Repeat on the other side of neck. Back: Cast on and crochet the same as the front. Bind off for armhole as on front and continue until the piece measures 42-44-46-48-50 cm, cut yarn. Assembly: Sew side seams. Sew straps at each side on back. Picot-edge: Crochet one row with picot around armhole and neck as follows: 1 sc in ch-space, * 1 sc in the next ch-space, ch 3, 1 sc in 1st ch from hook, 1 sc in the same ch-space, 1 sc in the next ch-space *, repeat from * - * and finish with 1 sl st in first sc at start of row. |
|||||||||||||
Diagram explanations |
|||||||||||||
|
|||||||||||||
|
|||||||||||||
|
Have you made this or any other of our designs? Tag your pictures in social media with #dropsdesign so we can see them! Do you need help with this pattern?You'll find tutorial videos, a Comments/Questions area and more by visiting the pattern on garnstudio.com. © 1982-2024 DROPS Design A/S. We reserve all rights. This document, including all its sub-sections, has copyrights. Read more about what you can do with our patterns at the bottom of each pattern on our site. |
|||||||||||||


With over 40 years in knitting and crochet design, DROPS Design offers one of the most extensive collections of free patterns on the internet - translated to 17 languages. As of today we count 304 catalogs and 11422 patterns - 11417 of which are translated into English (US/in).
We work hard to bring you the best knitting and crochet have to offer, inspiration and advice as well as great quality yarns at incredible prices! Would you like to use our patterns for other than personal use? You can read what you are allowed to do in the Copyright text at the bottom of all our patterns. Happy crafting!
Comments / Questions (45)
Hoi, ik probeer te snappen hoe ik in het rugpand moet meerderen als ik 20cm ben gekomen. Als ik de opmerkingen hieronder bekijk dan zie ik in het Engels dezelfde vraag gesteld. Klopt het dan dat ik in 1 en hetzelfde punt (nl de 4e losse van het 1 na laatste boogje) 2x een boogje plus de bijbehorende 2losse-boogjes moet maken? Alvast bedankt.
02.04.2014 - 16:36DROPS Design answered:
Je haakt gewoon 2 bogen in een, dus haak na de eerste nog een l en sluit met een v in dezelfde boog.
08.04.2014 - 20:30Vervolg, hoort nog bij mijn vorige vraag. Als het goed is hoor je na alle minderingen voor maat S/M 43 stokjes op de toer te hebben. Ik kom op 42 uit. Kunt u het voor mij nakijken wat ik verkeerd doe? Heel er dank, mvg Barbara
19.03.2014 - 22:16DROPS Design answered:
Helaas, dat kunnen we vanaf hier niet beoordelen. Wellicht kunt u met uw werk bij een DROPS-verkooppunt langs gaan of als die niet in de buurt zit, een hakende vriend(in) vragen of even mee te kijken naar uw werk.
08.04.2014 - 20:45Bedankt voor uw antwoorden! Toch begrijo ik de 7 minderingen nog niet goed omdat als je aan het eind van een toer mindert en dan keert, hoe kan ik verder haken zonder dat ik aan een nieuwe toer begin? Ik haak dan toch boven mijn vorige stokjes? Alvast heel erg bedankt voor uw hulp.
19.03.2014 - 21:35DROPS Design answered:
Je mindert door de laatste steek niet meer te haken en dan keer je. Zo blijf je op dat punt en kun je verder haken.
08.04.2014 - 20:49Hallo, alvast een vraagje voor na het minderen van de 7 stokjes, het stukje met de halve vasten begrijp ik ook niet. Haak hv over de eerste 3 l, wordt er bedoeld losse? En niet stokjes? Omdat je ah einde van de toer moet haken tot de laatste 3 stokjes. Sorry voor alle vragen. Dit is mijn eerste kledingstuk dat ik haak.
19.03.2014 - 09:46DROPS Design answered:
Hoi Barbara. Het moet stokjes zijn - je haakt hv over de eerste 3 stokjes van de toer. Ik pas het aan.
19.03.2014 - 17:16Hallo, sorry ik heb toch nog een vraagje over de top. Ik ben nu bij de armsgaten aangekomen. Er staat haak tot de laatste 7 stokjes en keer haak dan verder en minder weer aan het einde van de toer. Klopt het dan dat het ongelijk is omdat de minderingen niet op dezelfde toer gedaan worden?
18.03.2014 - 17:41DROPS Design answered:
Hoi Barbara. Nee, omdat je keert en haakt terug tot er 7 stk over zijn aan de andere kant, dan komen de -7 stk in dezelfde toer.
19.03.2014 - 17:06Hallo, ik heb inmiddels het antwoord achterhaalt, dus u hoeft niet meer te reageren op mijn vraag over de meerderingen.
09.03.2014 - 15:37Hallo. Ik ben met het topje bezig en stuit nu op de meerdering na 10 cm gehaakt te hebben aan beide zijden. Er staat meerder aan weerskanten in het voorlaatste boogje. Moet je dan ook meerderen in het tweede boogje aan het begin van die rij? Dus aan het begin en einde van de toer een boogje meerderen? Alvast heel erg bedankt!
08.03.2014 - 17:22DROPS Design answered:
Hoi Barbara. Goed om te horen dat je verder bent.
10.03.2014 - 10:31Barbara wrote:
Hallo, ik ben met het topje bezig en stuit nu op de meerdering na 10 cm aan beide zijden. Er staat meerder aan weerskanten in het voorlaatste boogje. Maar er is in een rij toch maar 1 voorlaatste boogje? Moet je dan ook meerderen in het tweede boogje aan het begin van die rij? Dus aan het begin en einde van de toer? Alvast hartelijk dank!
08.03.2014 - 17:02Vivement le soleil pour confectionner ce joli twin set!!
28.10.2013 - 19:28Ik heb een vraag over dit werk, ben al een tijdje bezig met haken, maar dit snap ik niet helemaal Voorpand: Haak 96-112-120-136-152 l Moet ik dit in een langen ketting haken dus eerst 96, dan 112 er achteraan??
10.09.2013 - 16:55DROPS Design answered:
Hoi Natasja. Dit zijn de aantallen lossen te haken per maat. Dus haak je maat XS begin je met 96 l, maat S/M 112 l en zo voort.
11.09.2013 - 10:39