
Popular categories
Looking for a yarn?


|
|
Just Peachy |
|
 |
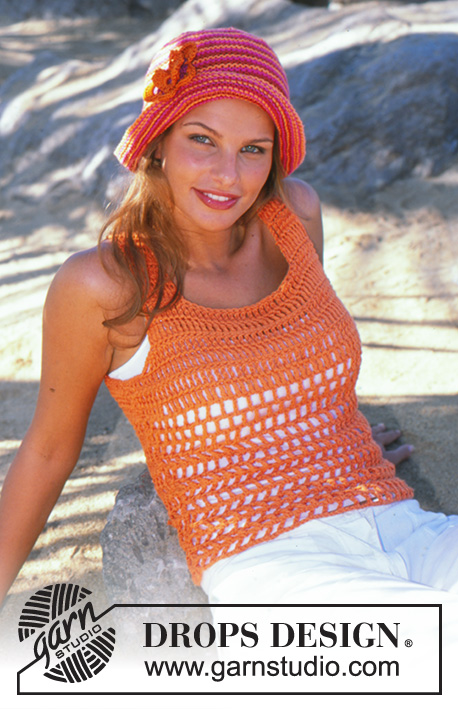 |
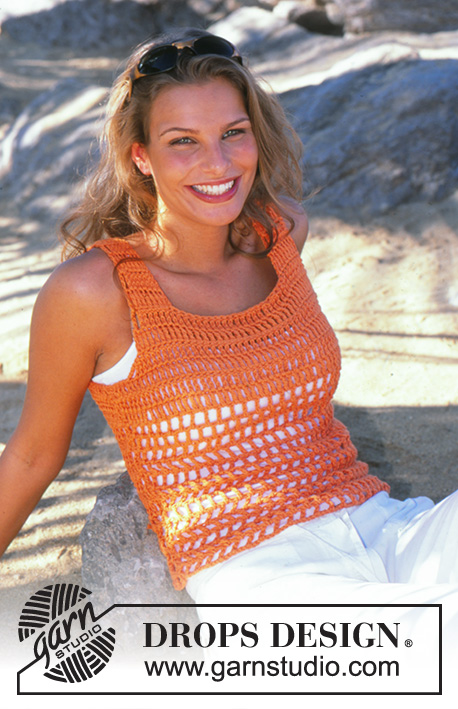
Crocheted top with lace pattern in DROPS Paris. Size XS-XXL
DROPS 82-2 |
|
|
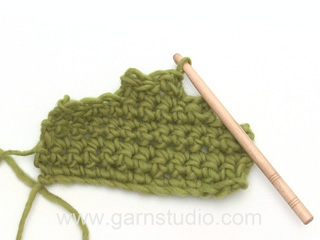
Crochet gauge: Ch-loops: 6 ch-loops x 5 rows = 10 x 10 cm. Treble crochet (tc): 12 tc x 4.5 rows = 10 x 10 cm. Crochet tips (armhole and neck): Bind off as follows: At beginning of row: replace 1 tc with 1 sl st, for the number of tc you want to bind off. At the end of the row: turn piece when the number of tc remains that you want to bind off, and crochet back. Crochet info (for yoke): Replace the first tc of every row with ch 4 and end every row with 1 tc in the ch 4 from previous row. Front: Ch 65-74-80-89-98. Crochet the first row as follows: 1 tc in 8th ch from hook, * ch 1, skip over 2 ch, 1 tc in the next ch *, repeat from * - * = 20-23-25-28-31 ch-loops, turn the work. Then crochet as follows: ch 5, 1 tc in ch-loop, * ch 1, 1 tc in the next ch-loop *, repeat from * - *. Repeat this row until the piece measures 12 cm, then inc 1 bow at each side by crocheting 1 extra ch-loop in the next to outermost loop at each side. Repeat inc when the piece measures 22 cm = 24-27-29-32-35 ch-loops. Read the rest of Front section before crocheting: Yoke: When the piece measures 23 cm crochet the next row as follows: ch 4, * 1 tc in ch-loop, 1 tc in ch *, repeat from * - * and finish with 1 tc in last ch-loop = 48-54-58-64-70 tc. Continue with 1 tc in each tc from previous row – crochet in each tc, not between tcs. Place a marker at center front. Armhole: When the piece measures 31-32-33-34-35 cm bind off for armhole at each side every row – see crochet tips: 3-5-7-8-10 tc 1 time, then bind off 2 tc 1 time and 1 tc 1-1-1-2-2 times. Neckband: When the piece measures 37-39-41-41-43 cm bind off for the neck as follows: Crochet until 9-9-9-10-10 tc remain before the marker, then bind off 1 tc for the neck every row 2 times – see crochet tips. After all armhole and neck shaping is complete 7-8-8-8-9 tc remain on each strap. Continue until the piece measures 48-50-52-54-56 cm, cut yarn. Repeat on the other side of neck. Back: Crochet the same as the front. Bind off for armhole as on front = 36-38-38-40-42 tc. When the piece measures 44-46-48-50-52 cm place a marker at center back. Now bind off sts for the neck as follows: Crochet until 10-10-10-11-11 tc remain before the marker, then bind off 1 tc for the neck on the next row – see crochet tips. Crochet 1 more row, the piece measures approx. 48-50-52-54-56 cm, cut yarn. Repeat on the other side of neck.. Assembly: Sew shoulder seams and side seams edge to edge with small sts. |
|

|
|
|
Have you made this or any other of our designs? Tag your pictures in social media with #dropsdesign so we can see them! Do you need help with this pattern?You'll find tutorial videos, a Comments/Questions area and more by visiting the pattern on garnstudio.com. © 1982-2024 DROPS Design A/S. We reserve all rights. This document, including all its sub-sections, has copyrights. Read more about what you can do with our patterns at the bottom of each pattern on our site. |
|


With over 40 years in knitting and crochet design, DROPS Design offers one of the most extensive collections of free patterns on the internet - translated to 17 languages. As of today we count 304 catalogs and 11422 patterns - 11417 of which are translated into English (US/in).
We work hard to bring you the best knitting and crochet have to offer, inspiration and advice as well as great quality yarns at incredible prices! Would you like to use our patterns for other than personal use? You can read what you are allowed to do in the Copyright text at the bottom of all our patterns. Happy crafting!
Comments / Questions (17)
Beste Drops DEsign, hartelijk dank voor het aanbieden van dit gratis patroon. Ik raakte even in de war door de term 'afkanten'. Is dit hetzelfde als minderen? En ik had hier nog een vraag over: Hals: Kant bij een hoogte van 37-39-41-41-43 cm af voor de hals als volgt: Haak tot er nog 9-9-9-10-10 dstk resteren voor de merkdraad, kant dan 2 x1 dstk af voor de hals in elke toer – Betekent dit dat ik dan ook aan de rechterkant middenvoor moet minderen? Hartelijk dank alvast!
21.02.2022 - 09:24DROPS Design answered:
Dag Marit,
Nee afkanten is niet hetzelfde als minderen. Je kant de steken af zoals bovenaan aangegeven bij tips voor het haken. Bij minderen zorg je dat je minder steken op de toer krijgt door bijvoorbeeld steken samen te haken. Dit wordt bij sommige patronen bijvoorbeeld in de zijnaad gedaan. Bij afkanten werk je de steken af, meestal op het eind van een patroondeel, zoals in dit geval bij de hals of het armsgat.
Je doet dit inderdaad ook aan de rechterkant midden voor, dus je kant op dezelfde manier af, maar dan in spiegelbeeld.
21.02.2022 - 12:07Graag wil ik dit patroon haken in de afgebeelde oranje kleur, Drops 45, is deze nog verkrijgbaar? Ik kon hem niet vinden. Alvast bedankt!
17.06.2020 - 18:45DROPS Design answered:
Dag Sibylla,
Nee, deze kleur oranje is helaas uit de handel. Wat het meest in de buurt komt is kleurnr 13. Het kan soms voorkomen dat een verkooppunt nog wat van de kleur die uit de handel is, heeft liggen, dus je kunt altijd bij je verkooppunt vragen.
18.06.2020 - 09:18Ik zou dit topje graag van Safran willen haken 1 draad, hoeveel ben ik dan nodig?
09.06.2018 - 17:32DROPS Design answered:
Dag Sylvia, Hiervoor kijk je naar de totale looplengte. Bijvoorbeeld als je voor Paris 200 gram nodig hebt, dat is 4 bollen, dus 4 x de totale looplengte van Paris. Dit getal deel je door de looplengte per bol van Safran en dan kom je, bij benadering, op het aantal bollen dat je nodig hebt.
12.06.2018 - 10:07Bonjour, à 23 cm de haut. tot., doit-on continuer avec 4 ml au début de ce rang? "Continuer avec 1 DB dans chaque DB du rang précédent – piquer le crochet dans les m pas entre les mailles." Merci.
09.05.2018 - 14:27DROPS Design answered:
Bonjour Sonia, tout à fait, on continue avec 1 DB dans chaque DB du rang précédent en remplaçant la 1ère DB du rang par 4 ml. Bon crochet!
09.05.2018 - 14:42Bonjour, juste un petit mot pour vous remercier pour vos réponses à mes questions et pour la vidéo sur les diminutions. Je n'avais pas du tout pensé à les faire de cette façon. Je peux enfin terminer ce joli top! Un gros merci de m'avoir répondu si rapidement et pour vos réponses très claires! :-)
08.05.2018 - 04:09Bonjour, à cette étape: "À 23 cm de hauteur totale, [...] et finir par 1 DB dans le dernier arceau = 48-54-58-64-70 DB.", on dit de finir par 1 DB dans le dernier arceau, mais dans l'INFO CROCHET on dit "dans la 4e ml du début du rg précédent". Je suis confuse! Dans l'arceau ou dans la ml? Merci.
06.05.2018 - 14:43DROPS Design answered:
Bonjour Sonia, sur ce rang, on termine par 1 DB dans le dernier arceau pour avoir un total de 54 DB. Bon crochet!
07.05.2018 - 09:22Bonjour, à cette étape: "À 31-32-33-34-35 cm de hauteur totale, former les emmanchures en dim de chaque côté tous les rangs : 1 fois 3-5-7-8-10 DB, puis 1 fois 2DB et 1-1-1-2-2 fois 1 DB", pour la 2e taille (1 fois 5 DB) est-ce que cela veut dire que je dois prendre 6 DB à la fois et les crocheter ensemble; il en restera une seule, donc 5 en moins? Même chose pour 1 fois 2 DB (3 DB ensemble) et 1 fois 1 DB (2 DB ensemble)? Merci.
06.05.2018 - 14:24DROPS Design answered:
Bonjour Sonia, pour diminuer 1 x 5 DB cf réponse ci-dessous. Pour diminuer 2 DB, procédez de la même façon: crochetez 1 mc dans les 2 premières DB et crochetez jusqu'à ce qu'il reste 2 DB à la fin du rang, tournez = vous avez diminué 2 DB de chaque côté. On procède de même pour diminuer 1 DB (= 1 mc dans la 1ère DB et on tourne quand il reste 1 DB à la fin du rang). Bon crochet!
07.05.2018 - 09:19Bonjour, je ne comprends pas comment faire les diminutions aux emmanchures et à l'encolure: "remplacer une DB par une m coulée"? Comment fait-on cela? Et comment fait-on pour diminuer 1 X 5 DB.... puis une fois 1 DB aux emmanchures? Et que veut-on dire par "crocheter le rang jusqu’à ce qu’il reste 9-9-9-10-10 DB avant le marqueur..."? Crocheter comment, quelle sorte de point? Aidez-moi svp, je suis bloquée aux diminutions... Merci.
06.05.2018 - 04:56DROPS Design answered:
Bonjour Sonia, cette vidéo montre comment diminuer des brides de chaque côté, vous allez procéder de la même façon avec les double-brides: pour diminuer 5 DB de chaque côté, en début de rang, crochetez 1 mc dans les 5 premières DB, continuez en DB et arrêtez le rang quand il reste 5 DB, tournez et crochetez le rang suivant = vous avez diminué 5 DB de chaque côté. Pour l'encolure, crochetez comme avant (même point que précédemment) et tournez quand il reste 9-10 DB avant le marqueur. Bon crochet!
07.05.2018 - 09:04Bonjour, Il est indiqué d'assembler à points soignés. Mais qu'est-ce que les points soignés. Merci.
08.08.2017 - 20:06DROPS Design answered:
Bonjour Mme Venderlin, ce sont des coutures réalisées soigneusement pour qu'elles soient nettes. Bon assemblage!
09.08.2017 - 08:35Hvordan kan det være, at hatten er strikket, når toppen er hæklet? Virker mærkværdigt og ganske uforståeligt - og så skal man både have hæklenål og strikkepinde. I har et hav af smukke hæklede hatte/huer. Mvh CH
17.07.2015 - 11:21