
Popular categories
Looking for a yarn?


|
|
Pom Pom Adore Slippers |
|
|
|
|
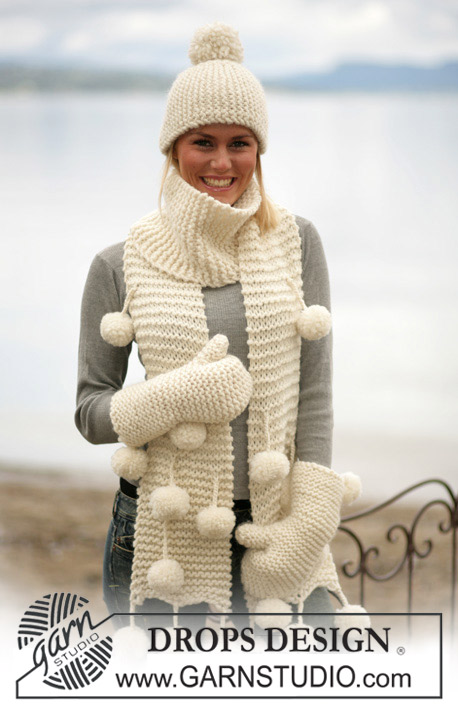
DROPS Crochet slippers in Snow
DROPS 98-7 |
|
|
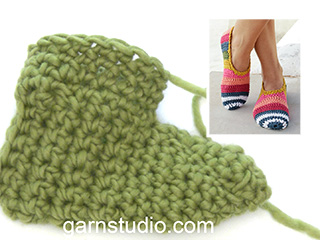
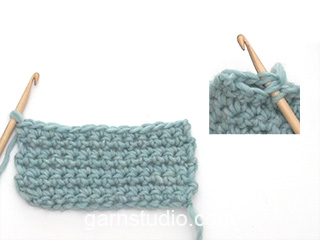
Crochet gauge: 11 sc = 10 cm [4"] in the width. Crochet info: Substitute the first sc at the beginning of round/row with 1 ch. Finish each round with 1 sl st in the ch from beg of previous round (1 sl st in the ch from beg of previous row when crocheting back and forth). Foot: Beginning with the toe, crochet in Snow and hook size 8 mm [US L/11] as follows: 1st round: Crochet 3 ch and make a loop with a sl st in the first ch. 2nd round: Crochet 5-5-6 sc around the loop – read crochet info! 3rd round: 2 sc in each sc = 10-10-12 sc. 4th round: *1 sc in the first sc, 2 sc in the next sc*, repeat from *-* = 15-15-18 sc. 5th – 7th round: Crochet 1 sc in each sc. 8th round: *1 sc in the first sc, 1 sc in the second sc and 2 sc in the third sc*, repeat from *-* = 20-20-24 sc. Continue to crochet 1 sc into each sc until the piece measures approx 11-13-14 cm [4,4"- 5,1"- 5½"]. Heel: Now divide the piece and crochet back and forth from the centre top of the foot – remember crochet info – 1 sc into each sc. When the slipper measures approx 22-25-28 cm [8,75"- 9,75"- 11"] place it flat and crochet it tog at the centre back with a row of sc through both layers. Cut the thread and sew. Leg: Crochet 1 round of sc round the opening of the slipper (beginning at the centre front). Continue around with 1 sc in each sc until the leg measures 11 cm [4,4"], continue to crochet back and forth from the centre front as follows: 1st row: Turn the piece and crochet back until 1 sc left (which should be left un-worked from now on). 2nd row: Turn the piece and crochet back over the sts from previous row until 1 sc left (which should be left un-worked from now on) = 2 sts at the centre front. 3rd row: Turn the piece and crochet over the sts from previous row. Cut the thread. Continue to crochet around the edge of the leg in Puddel as follows. 1st round: 1 sc in each sc around all of the leg (incl the slit at the centre front). Finish with a sl st in the first sc. 2nd round: *3 ch, 1 sc in the following sc*, repeat from *-*, and finish with a sl st in the first ch from beg of round. Cut the thread. Assembly: Make a pompom with a diameter of 5 cm [2"] in Puddel (please see Garnstudio’s School of Handicraft on the pattern front page). Sew the pompom to the slipper at the centre front between the leg and the foot. |
|
|
Have you made this or any other of our designs? Tag your pictures in social media with #dropsdesign so we can see them! Do you need help with this pattern?You'll find tutorial videos, a Comments/Questions area and more by visiting the pattern on garnstudio.com. © 1982-2024 DROPS Design A/S. We reserve all rights. This document, including all its sub-sections, has copyrights. Read more about what you can do with our patterns at the bottom of each pattern on our site. |


With over 40 years in knitting and crochet design, DROPS Design offers one of the most extensive collections of free patterns on the internet - translated to 17 languages. As of today we count 304 catalogs and 11422 patterns - 11417 of which are translated into English (US/in).
We work hard to bring you the best knitting and crochet have to offer, inspiration and advice as well as great quality yarns at incredible prices! Would you like to use our patterns for other than personal use? You can read what you are allowed to do in the Copyright text at the bottom of all our patterns. Happy crafting!
Comments / Questions (66)
Hello, I'm considering this pattern as a starter crochet project, reading through the pattern I understand it until it says 'Heel: Now divide the piece and crochet back and forth from the centre top of the foot' how is it divided? do you do one side at a time from the centre front = 1 dc into 10 dc, then join the heel. Thank you.
17.05.2015 - 21:55DROPS Design answered:
Dear Caroline, after you have worked foot in the round, you continue back and forth from the middle on top of foot, working 1 dc in each dc. When the slipper has reached the correct measurement, fold piece double with opening (for leg) at the top and crochet 1 row dc in both layers (see video below). Happy crocheting!
18.05.2015 - 10:32Deemah wrote:
Sorry but I didn't understand this part and there is no video for it ..the of the heel!
22.10.2014 - 08:39DROPS Design answered:
Dear Deemah, the video below shows how to fold the piece in double and crochet together through both layers to "close" heel. Happy crocheting!
22.10.2014 - 10:12Deemah wrote:
Hello it's a nice pattern but would you do a video for it please because so many things I didn't understand it please do a video it good when we see some one works !?
18.10.2014 - 14:34DROPS Design answered:
Dear Deemah, you will find several relevant videos to this pattern on the right side of the picture under tab "video". You start on the toe working in the round, then continue back and forth (for the opening of leg), then crochet tog the mid back. Finish then crocheting in the round around the opening of leg for the cuff. Happy crocheting!
20.10.2014 - 10:00How do I download the pattern?
07.08.2014 - 00:40DROPS Design answered:
Dear Mrs Stowell, click on the "print" button to either print it with a printer or save it with a virtual pdf printer. Happy crocheting!
07.08.2014 - 10:15Lusi wrote:
Continue to crochet around the edge of the leg in Puddel as follows. 1st round: 1 sc in each sc around all of the leg (incl the slit at the centre front). Finish with a sl st in the first sc. 2nd round: *3 ch, 1 sc in the following sc*, repeat from *-*, and finish with a sl st in the first ch from beg of round. Cut the thread. can you explain this i dont quite understand
19.03.2014 - 12:13DROPS Design answered:
Dear Lusi, with Puddel, you will work first 1 round sc all around of the leg (=1 sc in each sc around), then on 2nd round work a ch-loop edge: *ch 3, 1 sc in next sc*, repeat from *-* around. Happy crocheting!
19.03.2014 - 13:47Luci wrote:
What does it mean to crochet back until 1sc left?
19.03.2014 - 11:48DROPS Design answered:
Dear Lucy, work 1 row sc leaving 1 sc unworked at the end of row. Happy crocheting!
19.03.2014 - 11:55Luci wrote:
What does it mean to crochet back until 1sc left?
19.03.2014 - 11:46When I join at the back of the heel I end up with a weird little point at the bottom. It's not rounded like the slipper in the picture appears. I've gone over and over the pattern and don't see that I'm missing a step. It seems like to have a pretty rounded heel I'm going to have to alter the pattern. Did I miss something?
31.10.2013 - 13:32DROPS Design answered:
Dear Mrs Green, a little point may appear when crocheting heel together, but when wearing them, it shouldn't be that visible. Happy crocheting!
31.10.2013 - 15:49Este patron tiene una forma elegante y la figura del pie se ve bonita quiero probar haber como queda!
05.08.2013 - 22:55Hallo, wenn in Runde 2 steht: "5 fM häkeln", heißt das dann 1 LM + 4 fM oder 1 LM + 5 fM? Wie wird das generell in Ihren Anleitungen gehandhabt? Vielen Dank im Voraus
17.01.2013 - 12:05DROPS Design answered:
Liebe Maria, in der Häkelinfo finden Sie die Information dazu: „Die erste fM jeder R. wird mit 1 Lm ersetzt“, es wird also nicht in jeder Runde nochmals speziell erwähnt. Viel Spaß beim Häkeln!
17.01.2013 - 13:16