
Popular categories
Looking for a yarn?


|
|
Swing |
|
|
|
|
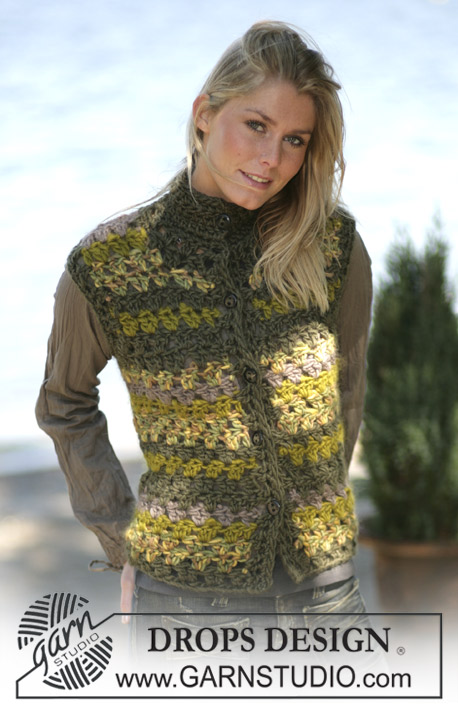
DROPS Tailored cardigan knitted in “Alpaca
DROPS 97-18 |
|
|
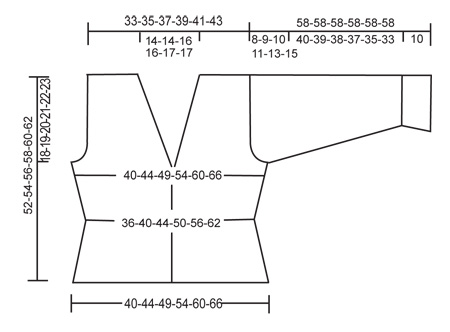
Gauge: 23 sts x 30 rows on needles size 3.5 mm in stocking sts = 10 x 10 cm. Garter sts (back and forth on needle): Knit all rows. Decreasing tips-1 (apply for the cut at the sides): All decreases are done from the RS! Dec as follows after the marking thread: K2 tog. Dec as follows before the marking thread: Slip a st as if to knit, K1, psso. Decreasing tips-2 (apply for the armholes and the neck): All dec are done from the RS! Dec. inside 3 edge sts at the armhole and inside 12 sts of garter sts for the neck side. Dec as follows before 3/12 sts: K2 tog. Dec as follows after 3/12 sts: Slip a st as if to knit, K1, psso. Increasing tips: Inc as follows: Pick up 1 st from previous row and K it. ------------------------------------------------------------------ Back piece: Cast on 94-104-114-126-140-154 sts (includes1 edge st each side) on needles size 3.5 mm/US 4 in Alpaca. K the 1st row from the WS and continue in stocking sts throughout. Insert a marker 24-26-29-32-35-39 sts in from each side (= 46-52-56-62-70-76 sts between the marking threads). When the piece measures 6-7-8-9-10 cm dec by each marker for the cut at each side. Dec after the 1st marker and before the 2nd marker – see decreasing tips-1: Dec on every 6th row a total of 5 times = 84-94-104-116-130-144 sts. When the piece measures 17-18-19-20-21-22 cm inc again by the marker – inc after the 1st marker and before the 2nd marker – see increasing tips. Inc on every 6th row a total of 5 times = 94-104-114-126-140-154 sts. When the piece measures 34-35-36-37-38-39 cm bind off 4-5-6-8-10-12 sts each side for the armholes. Continue to dec 1 st each side on every other row – see decreasing tips-2: 5-7-8-10-13-15 times = 76-80-86-90-94-100 sts. When the piece measures 48-50-52-54-56-58 cm knit 4 rows of garter sts over the centre 52-52-56-56-60-60 sts (continue to knit other sts as before) then bind off the centre 28-28-32-32-36-36 sts for the neck. Continue to bind off 1 st towards the neck on every other row inside 12 sts of garter sts a total of 2 times – see decreasing tips-2: = 22-24-25-27-27-30 sts left on each shoulder. Bind off remaining sts when the piece measures 52-54-56-58-60-62 cm. Left front piece: Cast on 53-58-63-69-76-83 sts (includes 1 edge st at the side and 12 sts for the centre front band) on needles size 3.5 mm/US 4. K the 1st row from the WS. Continue in stocking sts but work the 12 band sts in garter sts throughout. Insert a marker 24-26-29-32-35-39 sts in from the side. When the piece measures 6-7-8-9-10-11 cm dec 1 st before the marker for the cut – see decreasing tips-1: On every 6th row a total of 5 times = 48-53-58-64-71-78 sts. When the piece measures 17-18-19-20-21-22 cm inc 1 st before the marker – see increasing tips: On every 6th row a total of 5 times = 53-58-63-69-76-83 sts. Please read all of the following section before continuing! Neck shaping: When the piece measures 29-30-31-32-33-34 cm dec for the neck shape inside the 12 band sts – see decreasing tips-2: Dec 1 st on every other row a total of 18 times and then on every 4th row a total of 4-4-6-6-8-8 times. Armhole: At the same time when the piece measures 34-35-36-37-38-39 cm bind off for the armhole as done for the back piece. When all dec are completed for the neck and armhole = 22-24-25-27-27-30 sts left on the shoulder. Bind off remaining sts when the piece measures 52-54-56-58-60-62 cm Right front piece: Cast on and knit as left front piece but reverse. Note! Dec and inc for the cut after the markers. In addition bind off for 3 button holes at the front band edge. 1 buttonhole= bind of the 5th and 6th st from the edge and cast on 2 new sts at the same place on the returning row. Bind off for button holes when the piece measures: Size XS: 21, 24 and 27 cm Size S: 20, 24 and 28 cm Size M: 21, 25 and 29 cm Size L: 22, 26 and 30 cm Size XL: 21, 26 and 31 cm Size XXL: 22, 27 and 32 cm Sleeve: Cast 56-58-62-64-68-70 sts (includes 1 edge st each side) on needles size 3.5 mm/US 4. K 1 row from the WS. Continue in stocking sts. When the piece measures 10 cm dec 10 sts evenly distributed on row = 46-48-52-54-58-60 sts. Continue to inc 1 st each side on every 8-7-7-6-5-5 row a total of 15-16-16-18-19-20 times =76-80-84-90-96-100 sts. When the piece measures 50-49-48-47-45-43 cm bind off for sleeve cap each side on every other row: 4 sts 1 time, 3 sts 1 time 2 sts 2 times, 1 st 5-6-8-9-12-15 times, continue to cast off 2 sts each side until the piece measures 57 cm, then cast off 3 sts 1 time each side. Bind off remaining sts when the piece measures approx 58 cm. Assembly: Sew the shoulder seams, insert the sleeves and sew the sleeve and side seams inside 1 edge st. Sew in the buttons. |
|
|
|
|
Have you made this or any other of our designs? Tag your pictures in social media with #dropsdesign so we can see them! Do you need help with this pattern?You'll find tutorial videos, a Comments/Questions area and more by visiting the pattern on garnstudio.com. © 1982-2024 DROPS Design A/S. We reserve all rights. This document, including all its sub-sections, has copyrights. Read more about what you can do with our patterns at the bottom of each pattern on our site. |


With over 40 years in knitting and crochet design, DROPS Design offers one of the most extensive collections of free patterns on the internet - translated to 17 languages. As of today we count 304 catalogs and 11422 patterns - 11417 of which are translated into English (US/in).
We work hard to bring you the best knitting and crochet have to offer, inspiration and advice as well as great quality yarns at incredible prices! Would you like to use our patterns for other than personal use? You can read what you are allowed to do in the Copyright text at the bottom of all our patterns. Happy crafting!
Comments / Questions (137)
Huhu, ich habe eine Frage zum Ärmel. Was bedeutet gegen die Schulter abnehmen? Ich habe am Rand abgenommen. Ist das richtig? Oder verwirrt mich nur die Formulierung "gegen die Schulter"? Danke für die Hilfe und liebe Grüße Susanne
14.01.2017 - 15:56DROPS Design answered:
Liebe Frau Rienas, beim Ärmel muss man am Anfang jeder Reihe auf beiden Seiten so abk: 4 M. 1 Mal, 3 M. 1 Mal, 2 M. 2 Mal, 1 M. 5-6-8-9-12-15 Mal, dann soll man 2 M am Anfang jeder Reihe auf beiden Seiten abk, bis die Arbeit 57 cm misst, dann noch 3 M 1 M auf beiden Seiten abk. Viel Spaß beim stricken!
16.01.2017 - 09:18Bonjour, J'ai un souci avec les diminutions et augmentations des deux parties devant du gilet. J'ai l'impression que le cintrage du gilet est dans le mauvais sens... Pour la partie devant gauche, on commence par diminuer en faisant 2 m ens avant le marqueur, ce qui fait partir le tricot vers la droite ... Hors il devrait partir vers la gauche non ? Merci d'avance pour vos éclaircissements!
02.12.2016 - 12:27DROPS Design answered:
Bonjour Florence, pour le devant gauche, on diminue (2 m ens à l'end) et on augmente avant le marqueur, pour le devant droit, on diminue (1 surjet simple) et on augmente après le marqueur. Bon tricot!
02.12.2016 - 13:12Bonjour, 8 pelotes pour 1 xxl sont elles vraiment suffisantes ? cordialement
29.10.2016 - 19:17DROPS Design answered:
Bonjour Madame Durand. Oui, il faut bien 8 pelotes en taille XXL (400 g / 50 g une pelote Alpaca = 8) soit 1336 m. Bon tricot!
30.10.2016 - 11:40Jeg har lidt problemer med optællingen af Masker til venstre forstrik. Jeg ender op med at have 37 m istedet for 27 som man skal have tilsidst i str. L. Inden indtagningen og halsuskræring skal der være 69 masker. Derefter skal der tages 18 masker ud på hver 2. Pind, derefter yderligere 6 på hver 4 pind og ud over det 8 masker til ærmegab. Mit regnestykke bliver 69-18-6-8=37 ( og ikke 27) hvad gør jeg galt , eller er der en fejl?
10.02.2016 - 18:33DROPS Design answered:
Hej Trine, Du har 69m tager 18m ind, 6m ind, 8m ind, 10 m ind (de to sidste er for ærmegab. = 27 m. God fornøjelse!
03.03.2016 - 14:18Ik zou graag wat meer willen weten over de maten. Dit vestje gaat van XS tot XXL en ik heb geen idee welke maat ik moet maken. Is er een overzichtje waar bijvoorbeeld bijstaat welke bovenwijdte, taillewijdte en heupwijdte hoort bij deze maten? Dan is het wat makkelijker om de juiste maat te kiezen. Aan de hand van de tekening kom ik er niet uit. Het is best dunne wol, veel (leuk!) werk dus en ik wil geen valse start maken. Vast veel dank voor het antwoord! Groeten, Tineke
16.01.2016 - 17:02DROPS Design answered:
Hoi Tineke. De afmetingen vind je onderaan het patroon in cm per maat. Je kan deze vergelijken met jezelf - of nog beter als je een soortgelijk vest hebt, neem van deze de afmetingen af en vergelijk om de juiste maat te kiezen.
19.01.2016 - 15:14Hola! ¿El punto de orillo está incluido dentro de los puntos que hay que montar? Muchas gracias.
04.03.2015 - 16:46DROPS Design answered:
Hola Charo, efectivamente está incluido.
09.03.2015 - 10:32Hei Ohjeessa Swing hihan lisäykset x 8-7-7-6-5-5- KERROKSEN välein. Siis ei sentin, kuten ohjeessa lukee.
12.02.2015 - 16:55Selma wrote:
Bonjour.arrivee a la derniere etape des manches(rabattre)en t.xs.si j ai bien compris on rabat:1x4m,5fois.1x3m,5fois et 2x2m,5fois?ce que je n'ai pas compris c'est le 1maille,juste en fin de ligne de l'explication.que veut dire ce "1m"?.merci d'avance
11.12.2014 - 12:48DROPS Design answered:
Bonjour Selma, on rabat pour l'arrondi de la manche de chaque côté tous les 2 rangs (= au début de chaque rang de chaque côté : 1x 4 m, 1x 3 m, 2x2 m, 5x 1 m (en taille S), puis 2 m de chaque côté jusqu'à ce que la manche mesure 57 cm et enfin 1x3 m de chaque côté également. Bon tricot!
11.12.2014 - 13:53Selma wrote:
Merci pour vos explications et la video,c'est plus clair a present pour moi.bonne semaine!!
08.12.2014 - 11:37Selma wrote:
Bonsoir.je vais bientot finir mon ouvrage et je voudrais savoir si pour le montage des manches il faut d'abord coudre le bord(des manches)et ensuite les fixer aux emmanchures,ou les fixer d abord aux emmanchures et coudre ensuite les bords.auriez-vous une video qui montre comment assembler les differentes parties d'un pull?merci.
05.12.2014 - 18:26DROPS Design answered:
Bonjour Selma, on commence par coudre les épaules, puis on monte les manches au dos et au devant et on termine par faire la couture des manches et des côtés. Vous trouverez les différentes vidéos relatives à ces techniques sous l'onglet "vidéos", à droite de la photo. Bon assemblage!
07.12.2014 - 12:04