
Popular categories
Looking for a yarn?


|
|||||||||||||||||||
DROPS 97-16 |
|||||||||||||||||||
|
|
|||||||||||||||||||
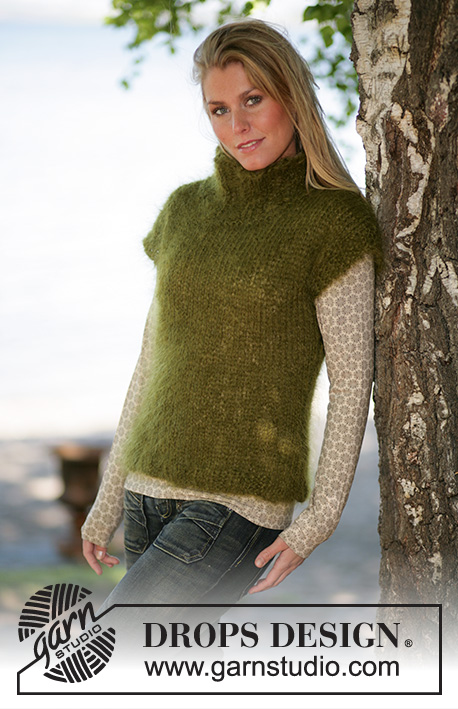
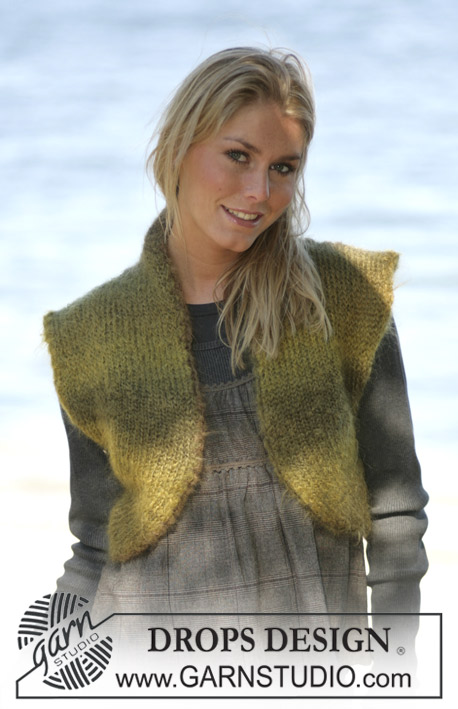
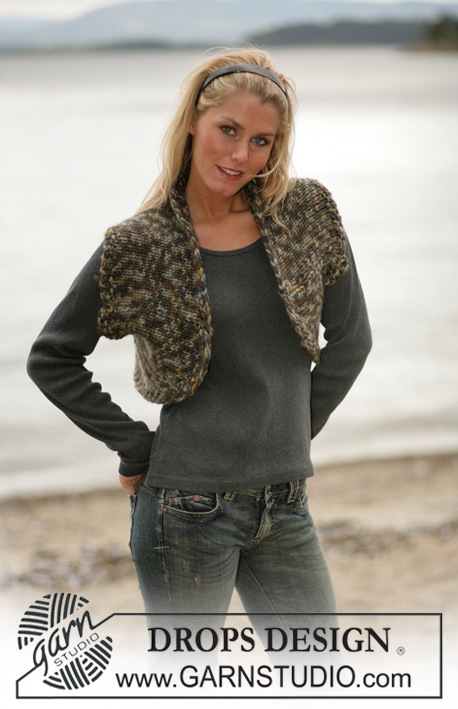
DROPS Cardigan with shawl collar in garter stitches and “Alpaca”
DROPS 97-16 |
|||||||||||||||||||
|
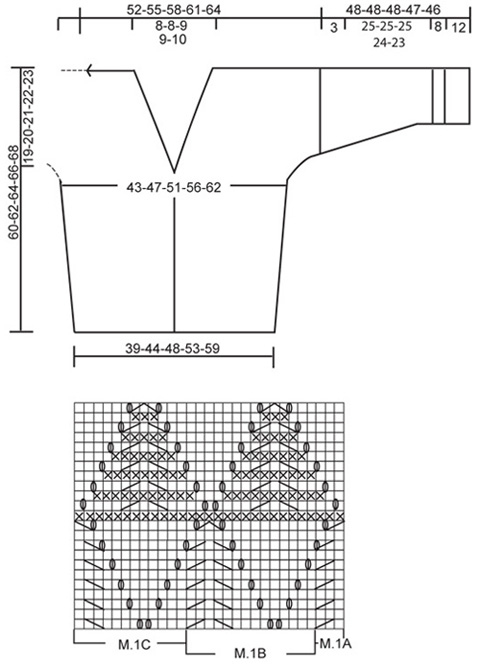
Knitting tension: 23 sts x 46 rows on needles size 3.5 mm in garter sts = 10 x 10 cm. Diagram: The diagram is seen from the right side. English Translations for the wording in the diagram are given at the bottom of this pattern, and they are given in the vertical order in which they appear in the diagram. Garter sts (back and forth on needle): Knit all rows. Button hole: Cast off for button holes at the right front edge band. 1 button hole = cast off the 3rd and the 4th st from the edge and cast on 2 new sts at the same place on the following row. Cast off for buttonholes when the piece measures: Size S: 8, 15, 21, 28 and 35 cm Size M: 8, 15, 22, 29 and 36 cm Size L: 9, 16, 23, 30 and 37 cm Size XL: 9, 16, 24, 31 and 38 cm Size XXL: 9,16, 24, 32 and 39 cm Front edge and collar: Knit the outermost 2 sts at the centre front in double thread throughout. Texture pattern (1st row = RS): *3 rows of stocking sts, K 1 row from the WS*, repeat from *-* Lace pattern: See diagram M.1. The diagram is shown from the RS Increasing tips (applies for the collar): Inc. inside the outermost edge st towards the centre front. Make a yo, on the returning row twist and K the yo (i.e. knit into the back of the st instead of the front). Decreasing tips (applies for the neckline): All dec are done from the RS. Dec inside the 7 front band sts + the new sts for the collar. Dec as follows before the band sts: K2 tog. Dec as follows after the band sts: K 2 twisted tog. – knit in the back of the sts. Measurement tips: Do all measures holding up the garment. Uneven sts will stretch out when washing the garment. All pieces are knitted back and forth on circular needles (this is done to get enough space for all sts after the increases at the sides). Back piece: Cast on 92-103-112-124-138 sts (incl. of 1 edge st each side) on circular needle size 3.5 mm in Alpaca. Knit in garter sts. When the piece measures 10 cm inc 1 st each side on every 8-8-8-12-12 cm a total of 4-4-4-3-3 times = 100-111-120-130-144 sts. When the piece measures 41-42-43-44-45 cm cast on new sts each side for the wide shoulder/sleeve. Cast on, on every other row (this means at the end of each row) as follows: Size S: 2 sts 5 times. Size M: 1 st 2 times and 2 sts 3 times. Size L: 1 st 3 times and 2 sts 2 times. Size XL: 1 st 5 times. Size XXL: On every 4th row (not on every other row): 1 st 2 times = 120-127-134-140-148 sts. When the piece measures 58-60-62-64-66 cm cast off the centre 14-15-16-16-18 sts for the neck. Continue to cast off at each side towards the neck on every other row: 1 st 2 times = 51-54-57-60-63 sts left for each shoulder/sleeve. Cast off when the piece measures 60-62-64-66-68 cm Left front piece: Cast on 53-59-63-69-76 sts (incl. of 1 edge st at the side and 7 front band sts) on circular needle size 3.5 mm in Alpaca. Knit garter sts back and forth- NB: The 2 outermost sts at the centre front are knitted in double thread throughout (wind up an extra small ball of Alpaca which follows the work as it proceeds). Please read all of the next section before continuing! Side increases: When the piece measures 10 cm inc. at the side as done for the back. Collar: When the piece measures 36-37-38-39-40 cm (make sure the next row is the WS) inc 2 sts inside the first edge st at the centre front (inc the 2 sts as follows: Alternating between knitting at the back and at the front of the st continue until 3 sts on needle). Continue to knit 4 rows of garter sts but only over the 9 front band sts (do not knit over the other sts). Then knit over all sts – at the same time inc 1 st inside the outermost front band st – read increasing tips: on every other row 31-32-33-33-34 times and then on every 4th row 8-8-8-9-9 times = 41-42-43-44-45 sts increased for the collar – knit new sts and the front band sts in garter sts. Neck line: At the same time when the piece measures 38-39-40-41-42 cm dec 1 st for the neck line – read decreasing tips: on every 6th row: 6-7-7-7-8 times and 1 st on every 4th row: 10 times. Wide shoulder/ sleeve: At the same time when the piece measures 41-42-43-44-45 cm cast on new sts for the wide shoulder/sleeve as done for the back piece. When all inc and dec are completed = 92-96-100-104-108 sts left for the shoulder. When the piece measures 60-62-64-66-68 cm cast off the outermost 51-54-57-60-63 sts for the shoulder = 41-42-43-44-45 collar sts left on needle. Collar: Continue in garter sts for the collar as follows: *2 rows of garter sts over all sts, 2 rows of garter sts, but only over the outermost 28 sts towards the centre front*, repeat from *-* until the collar measures approx. 4-4-4.5-4.5-5 cm inside (it will then measure approx 8-8-9-9-10 cm at the outside) insert a marking thread. Right front: Cast on and knit as the left front but reverse. I addition cast off for the button holes at the front edge – see explanation above. Sleeve: Pick up sts along the armhole and knit the sleeve from the top and downwards. Pick up 77-83-89-95-99 sts (incl. of 1 edge each side) on circular needles size 3.5 mm in Alpaca. P the 1st row from the WS and continue in texture pattern – see explanation above. When the sleeve measures 2 cm cast off 1 st each side on every 3-2.5-2-1.5-1.5 cm a total of 8-10-12-14-15 times = 61-63-65-67-69 cm. When the sleeve measures 30-30-30-29-28 cm – adjust so the last 2 rows are in stocking sts – knit the following row from the RS as follows: 1 edge st, 1-2-3-4-5 sts of garter sts, M.1A (= 3 sts), M.1B a total of 3 times (= 42 sts), M.1C (= 12 sts), 1-2-3-4-5 sts of garter sts, 1 edge st. After 1 repeat of M.1 continue in Texture pattern. Cast off when the sleeve measures 48-48-48-47-46 cm (becomes shorter on the larger sizes because of the longer length of the armholes). Repeat along the other armhole. Assembly: Sew the shoulder seams. Sew the collar tog at the centre back with invisible mattress sts and sew the collar to the neckline at the back of the nape of the neck. Sew the sleeves and the side seams inside 1 edge st. Belt: Cast on 14 sts on needles size 3.5 mm in Alpaca and knit in garter sts. Knit the outermost 2 sts each side in double thread as done for the front edge. Cast off when the belt measures approx. 120 to 150 cm. |
|||||||||||||||||||
Diagram explanations |
|||||||||||||||||||
|
|||||||||||||||||||
|
|||||||||||||||||||
|
Have you made this or any other of our designs? Tag your pictures in social media with #dropsdesign so we can see them! Do you need help with this pattern?You'll find tutorial videos, a Comments/Questions area and more by visiting the pattern on garnstudio.com. © 1982-2024 DROPS Design A/S. We reserve all rights. This document, including all its sub-sections, has copyrights. Read more about what you can do with our patterns at the bottom of each pattern on our site. |
|||||||||||||||||||


With over 40 years in knitting and crochet design, DROPS Design offers one of the most extensive collections of free patterns on the internet - translated to 17 languages. As of today we count 304 catalogues and 11422 patterns - 11422 of which are translated into English (UK/cm).
We work hard to bring you the best knitting and crochet have to offer, inspiration and advice as well as great quality yarns at incredible prices! Would you like to use our patterns for other than personal use? You can read what you are allowed to do in the Copyright text at the bottom of all our patterns. Happy crafting!
Comments / Questions (28)
Dace wrote:
Hello, could you please explain about decreasing for neck line? Where the dec should be done - just wherever inside the front band stitch? I'm a beginner and the dec tips here are very confusing for me.
24.05.2017 - 20:27DROPS Design answered:
Dear Dace, the decreases should be done right next to the front band stitches. This means that in every row there is a decrease you should work this way: The front band stitches, decrease, knit as established according to the pattern, until you have teh band stitches and 2 stitch on your needle, decrease, and then knit the front band's stitches. I hope this helps. Happy Knitting!
25.05.2017 - 07:30Merci à vous. Mais c'est pour le débuter que je ne comprends pas bien. A 37 cm..... Merci beaucoup. Bonne journée
29.12.2016 - 14:36DROPS Design answered:
Bonjour Mme Bruodtan, à 37 cm, tricotez 3 fois la même maille alternativement dans le brin avant et le brin arrière (= 2 augmentations) - tricotez ensuite 4 rangs sur les 9 m de bordure devant seulement (rangs raccourcis) puis augmentez 1 m pour le col 32x tous les 2 rangs+ 8 x tous les 4 rangs (pour augmenter, faites 1 jeté à 1 m du bord cf "AUGMENTATIONS"). Bon tricot!
29.12.2016 - 15:51Bonjour. Pouvez vous m expliquer pour commencer le col? Merci à vous
25.12.2016 - 21:26DROPS Design answered:
Bonjour Mme Brodtan, quand il vous reste les 41-45 m (cf taille) du col, tricotez en rangs raccourcis à partir de la bordure devant (sur l'envers pour le devant gauche): 2 rangs sur toutes les mailles, 2 rangs sur les 28 premières m seulement. Répétez ainsi ces 4 rangs jusqu'à ce que le col mesure 4-5 cm depuis les mailles rabattues pour l'épaule. Bon tricot!
29.12.2016 - 14:04Hi - I am wondering where I should increase stitches for collar in front piece of jacket - is it the 7th stitch from the front edge? Look forward to hearing from you Teresa
25.09.2015 - 15:04DROPS Design answered:
Dear Mrs Sellars, increase for collar should be done inside the edge st towards mid front - see Increasing tips" a the beg of the pattern. Happy knnitting!
25.09.2015 - 18:00Carin Jeraeus wrote:
Roligt om det kommer en lite tuffare kofta i Alpaca.
07.08.2006 - 18:10Nanna wrote:
Veldig fin og enkel modell
04.08.2006 - 11:18Pæn og enkel trøje.
02.08.2006 - 16:12Hilde wrote:
Ja! Denne må med!
01.08.2006 - 20:23wrote:
Praktisk, og sikkert god.
20.07.2006 - 23:19Gitte wrote:
yderst anvendelig trøje
11.07.2006 - 19:09