
Popular categories
Looking for a yarn?


|
|
DROPS 97-6 |
|
|
|
|
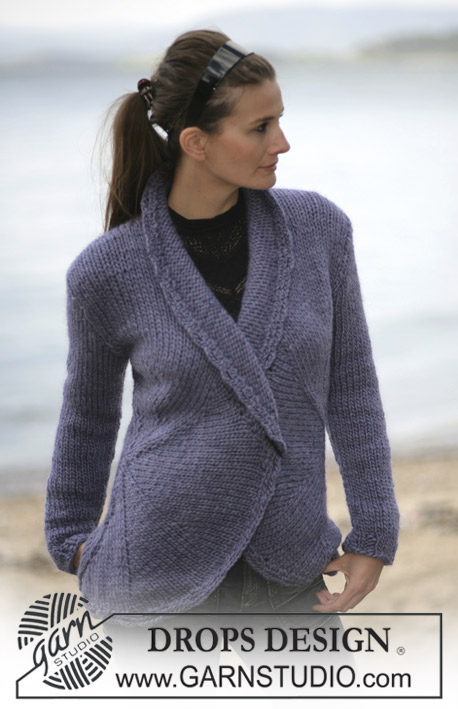
DROPS Crochet cardigan in “Karisma” with edges in Vienna
DROPS 97-6 |
|
|
Crochet Tension: 14 dc/dtr in the width and 4 texture rows in the height (this means 1 row of dc + 1 row of dtr x 4) = 10x10 cm. Crochet info: Substitute the first dc on every dc row with a ch and the first dtr on every dtr row with 4 ch’s. Finish every dc row with a dc in the 4th ch from previous row and every dtr row with a dtr in the 1st ch from previous row. Texture pattern: *1 row of dc and 1 rows of dtr*, repeat from *-* until finished – Note: Crochet into the dc/dtr from previous row not in between. Increasing tip: Inc 1 dc/dtr each side as follows: Crochet 1 extra dc/dtr in the 2nd outermost dc/dtr each side. Decreasing tips: Note: Only dec on dtr rows. Dec as follows in the beginning of row: Substitute 1 dtr with 1 sl st. Dec as follows at the end of row: Turn the piece when the number of dtr to dec are left on row. Back piece Read Crochet info-1! Crochet loosely 70-78-85-94-105 ch (incl. of 4 ch to turn with) on hook size 4.5 in Karisma. Crochet the first row as follows: Crochet 1 dtr in the 5th. ch from hook, *skip a ch, 1dtr in each of the following 4 ch*, repeat from *-* until end of row. Note: For size M finish with a dtr in each of the last 2 ch ( instead of each of the last 4 ch) and for size XL finish with 1 dtr in each of the last 3 ch = 54-60-66-73-82 dtr, turn the piece. Continue to crochet the texture pattern – see explanation above. When the piece measures 5, 10 and 15 cm – make sure the following row is a dtr row - inc. 1 dtr each side = 60-66-72-79-88 dc/dtr – read increasing tips. When the piece measures 35-36-37-38-39 cm cast off for the armhole each side on every dtr row – see decreasing tips: 3 dtr 1-1-1-2-2 times, 2 dtr 0-1-2-2-4 times and 1 dtr 2-2-2-2-2 times = 50-52-54-55-56 dc/dtr. When the piece measures approx. 51-53-55-57-59 cm (only 1 row left with dc + 1 row with dtr), crochet 1 row, but only over the 18-19-19-19-19 dc/dtr at each side (do not crochet over the centre 14-14-16-17-18 dc/dtr = neckline). Crochet one more row, the piece measures approx. 54-56-58-60-62 cm. Left front piece: Crochet loosely 37-40-44-48-54 ch (incl. of 4 ch to turn with) on hook size 4.5 in Karisma. Crochet the first row as follows: Crochet 1 dtr in the 5th. ch from hook, *skip a ch, 1dtr in each of the following 4 ch*, repeat from *-* until end of row. NB:- For size S finish with a dtr in the last ch ( instead of each of the last 4 ch) and for size L + XL finish with 1 dtr in each of the last 3 ch, for size XL finish with a dtr in each of the last 2 ch = 27-30-33-36-41 dtr, turn the piece. Continue to crochet the texture pattern as done for the back piece. When the piece measures 8, 13 and 20 cm inc. in side as done for the back piece= 30-33-36-39-44 dc/dtr. When the piece measures 35-36-37-38-39 cm – adjust it to fit the length of the back piece- cast off for the armhole as done for the back piece = 25-26-27-27-28 dc/dtr. When the piece measures approx. 44-45-48-50-52 cm cast off the outermost 4-4-4-4-5 dtr at the centre front – see decreasing tip. Continue to cast off towards the neck side on every dtr row as follows: 2 dtr 1 time and 1 dtr 1-1-2-2-2 times = 18-19-19-19-19 dc/dtr left for the shoulder. Crochet until the piece measures the same as the back piece and cut the thread. Right front piece: Crochet as left front but reverse. Sleeve: Crochet loosely 42-43-45-47-48 ch (incl. of 4 ch to turn with) on hook size 4.5 in Karisma. Crochet the first row as follows: Crochet 1 dtr in the 5th. ch from hook, *skip a ch, 1dtr in each of the following 4 ch*, repeat from *-* until end of row. Note: For size S+XL finish with a dtr in the last ch (instead of each of the last 4 ch), for size M + XXL finish with 1 dtr in each of the last 2 ch = 31-32-34-35-36 dtr, turn the piece. Continue to crochet the texture pattern as done for the back and front pieces. When the piece measures 5 cm insert a marking thread at each side (= the bow) – continue to do measures from this point onwards! When the piece measures 10 cm inc. at each side as follows: Crochet 1 extra dc/dtr in the 2nd outermost dc/dtr each side on every 5.5-5-4-3.5-2.5 cm a total of 7-8-9-10-13 times = 45-48-52-55-62 dc/dtr. When the piece measures 47-47-46-46-46 cm cast off for the sleeve cap each side on every dtr row – see decreasing tips: 5-5-6-6-7 dtr 2 times, continue to cast off 2 dtr each side until the piece measures approx. 56-57-57-58-58 cm, cut the thread. Assembly: Sew the shoulder seams edge against edge with small neat stitches. Insert the sleeves. Sew the sleeve and side seams – sew edge against edge with small neat stitches. Front edge: Crochet 60 - 72 dc along the left front piece on hook size 4.5 in Karisma (crochet approx 2 dc around each dtr and 1 dc around each dc) – making sure the front edge becomes even and neat with neither too many nor too few dc’s. Continue to crochet 1 row of dc, 1 row of dtr and 1 row of dc before cutting the thread. Repeat for the right front. Sew in the 5 buttons evenly distributed up towards the neck. Button them up in between the dtr stitches. Collar: Crochet approx. 46-60 dc around the neck (not on the front edges) on hook size 4.5 in Karisma – begin from the RS. Continue to crochet in the texture pattern as before with 1 row of dtr and 1 row of dc. When the piece measures approx 3 cm inc. 5 dc/dtr evenly distributed from shoulder to shoulder = approx. 51-65 dc/dtr. At the same time inc. 1 dtr at each front edge of the collar when the piece measures approx. 4, 8 and 12 cm = 57 - 71dc/dtr. When the collar measures 13 cm - adjust to finish with a dtr row - cut the thread. The last edge: Crochet 1 row of dc on hook size 4.5 in Vienna – crochet around the collar and at the bottom of each sleeve. Turn up the bottom 5 cm on each sleeve and sew a couple of stitches to keep the turn in place. |
|

|
|
|
Have you made this or any other of our designs? Tag your pictures in social media with #dropsdesign so we can see them! Do you need help with this pattern?You'll find tutorial videos, a Comments/Questions area and more by visiting the pattern on garnstudio.com. © 1982-2024 DROPS Design A/S. We reserve all rights. This document, including all its sub-sections, has copyrights. Read more about what you can do with our patterns at the bottom of each pattern on our site. |


With over 40 years in knitting and crochet design, DROPS Design offers one of the most extensive collections of free patterns on the internet - translated to 17 languages. As of today we count 304 catalogues and 11422 patterns - 11422 of which are translated into English (UK/cm).
We work hard to bring you the best knitting and crochet have to offer, inspiration and advice as well as great quality yarns at incredible prices! Would you like to use our patterns for other than personal use? You can read what you are allowed to do in the Copyright text at the bottom of all our patterns. Happy crafting!
Comments / Questions (67)
Bei der Blende steht nach dem Häkeln der ersten festen Maschen im Text : \" Danach 1 R. mit Lm, ...\". Ist dies vielleicht ein Schreibfehler und sollen das eigentlich feste Maschen sein ?
17.03.2023 - 14:00DROPS Design answered:
Liebe Frau Jendritzki, ja genau es sollte "feste Masche" anstatt sein, eine Korrektur erfolgt, danke für den Hinweis. Viel Spaß beim häkeln!
17.03.2023 - 15:07Ik heb steeds hetzelfde aantal steken. Het is wel zo dat mijn dubbele stokjes overhellen naar één kant. Heb je daar misschien een tip voor.?
15.10.2021 - 18:20DROPS Design answered:
Dag Henny,
Bij haken is het normaal dat stokjes naar een kant overhellen. Als je steeds dubbele stokjes heen en weer zou breien, zou dit elkaar a.h.w. opheffen, maar omdat je nu afwisselen toeren van vasten en dubbele stokjes hebt is dat niet zo. Waarschijnlijk trekt het bij het in elkaar zetten en oppersen van het werk wel weg. Er is ook nog een ander optie en dat is door steeds in de achterste lus van de vorige steek te haken in plaats van beide lussen, allen krijgt de steek dan wat een ander karakter en dat is eigenlijk niet de bedoeling van het oorspronkelijke patroon.
19.10.2021 - 13:24Het patroon is 1 toer (rij) vasten en 1 toer ( rij) dubbele stokjes. Maar dan trekt mijn haakwerk scheef. Wat kan ik doen om dat te voorkomen?
13.10.2021 - 11:34DROPS Design answered:
Dag Henny,
Als je steeds heen en weer haakt, zou dit niet mogen gebeuren. Heb je wel steeds hetzelfde aantal steken? Dus dat er niet per ongeluk steken bij komen aan een kan?
15.10.2021 - 17:57Bonjour, pour le col il faut monte 60 DB pour une taille M, puis continuer avec un rang de DB puis ms.....? Donc 2 rangs de DB avant de passer au point fantaisie... Puis à 3 cm on diminue et on obtient 65 mailles ? Plus de mailles qu'au départ....? Merci d'avance
04.10.2020 - 16:49DROPS Design answered:
Bonjour Marine, pour le col, on crochète entre 46 à 60 mailles serrées (et non double-brides, la correction a été faite) et on crochète effectivement le point texturé en commençant par 1 rang de DB, et on va augmenter et non diminuer entre les épaules (correction faite également, merci). Bon crochet!
05.10.2020 - 10:59Pour l'échantillon, je ne comprends pas comment 4 mailles peut faire 10 cm en largeur...?
18.08.2020 - 19:40DROPS Design answered:
Bonjour Henriette, effectivement, vous devez avoir 14mailles et non 4, la correction a été faite, merci pour votre retour :) Bon crochet!
19.08.2020 - 07:52Bonjour, pour réaliser l'échantillon, je ne comprends pas combien de mailles on doit faire. Ensuite il faudra crocheter un rang de ms, suivi d'un rang de double bride.....? Pourquoi est-il question de brides ? Merci d'avance.
17.08.2020 - 23:05DROPS Design answered:
Bonjour Henriette, pour vérifier votre tension, vous devez avoir 4 mailles sur 4 rangs du point fantaisie = 10 x 10 cm. Le point fantaisie se crochète alternativement en mailles serrées et en double-brides, vous devrez donc avoir (1 rang de mailles serrées, 1 rang de double-brides) x 4 = 10 cm - (pas de brides, faute corrigée, merci). Crochetez un échantillon plus large en largeur et en hauteur et mesurez bien au milieu pour vérifier votre tension. Bon crochet!
18.08.2020 - 08:55Hej igen! Glöm frågan om ökningen på framstycket, jag som inte kan läsa ordentligt 😂! Frågan om var jag bäst kortar av ärmarna vill jag fortfarande gärna ha hjälp med 😊! Mvh Anna-Karin
28.06.2018 - 10:36DROPS Design answered:
Hej, du ska avm för ärmkullen vid det mått som anges i din storlek: När arb mäter 47-47-46-46-45 cm avm för ärmkulle i varje sida på varje varv med dst - se avm.tips: 5-5-6-6-7 dst 2 ggr, sedan avm 2 dst i varje sida tills arb mäter ca 56-57-57-58-58 cm, klipp tråden. Du kan även pröva ärmen på och eventuellt tillpassa längden.
28.06.2018 - 17:38Har börjat virka denna fina kofta. Jag har dock några frågor. När jag ska öka på framstycket, ska det göras vid 13, 18 och 23 cm, eller vid 5,10 och 15 cm? Den andra frågan är var jag bäst kortar av ärmarna? Mvh Anna-Karin
28.06.2018 - 10:26Har börjat virka denna fina kofta. Jag har dock några frågor. När jag ska öka på framstycket, ska det göras vid 13, 18 och 23 cm, eller vid 5,10 och 15 cm? Den andra frågan är var jag bäst kortar av ärmarna? Mvh Anna-Karin
28.06.2018 - 10:26On the back, where the increases start when the piece measures 5cm , are the increases made at each end of the next three rows or only on the dtr rows?
19.03.2018 - 21:58DROPS Design answered:
Hi Janet, When the piece measures 5 cm you increase 1 dtr on the next row of dtr. This is the same at 10 and 15 cm, so always on a row of dtr. Happy crocheting!
20.03.2018 - 08:15