
Popular categories
Looking for a yarn?


|
||||||||||||||||
Rainbow Kiss |
||||||||||||||||
|
|
||||||||||||||||
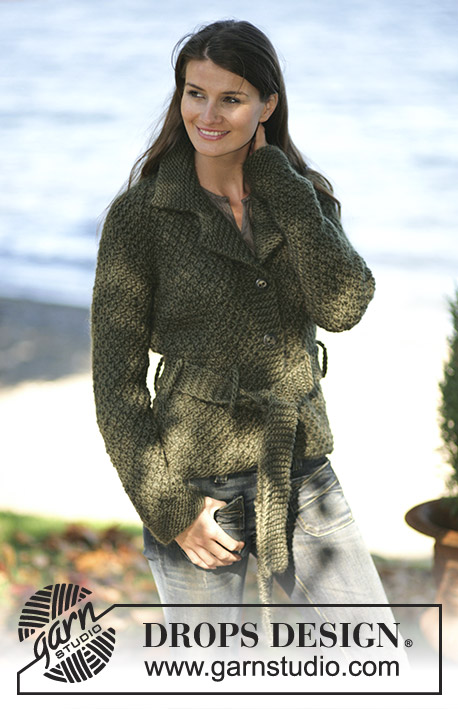
DROPS Crochet cardigan in “INKA”, size S - XXL
DROPS 97-3 |
||||||||||||||||
|
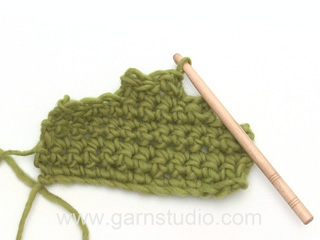
Yarn tips: To obtain similar color ways on both front pieces, crochet front pieces with balls beginning with the same color. Crochet tips: Substitute the first dc on each row with 3 ch Decreasing tip-1 (for the shoulder at the front pieces): To ensure the shoulder is straight, skip 1 dc at the centre front when crochet from the centre front and towards the side and then crochet 2 dc in the last. Bind off tip-2: To bind off dc’s at the end of a row crochet until the number of dc’s to be bound off are left on row, turn the piece. To bind off at the beginning of row crochet 1 sl st in each dc’s to be bound off. ________________________________________ Front piece: Read Yarn tips! Crochet a half circle. Begin at the side seam and crochet outwards.Crochet 5 ch and make a loop with a sl st in 1st ch. 1st row: 6 dc in the loop – see crochet tip, turn the piece. 2nd row: 2 dc in each dc = 12 dc, turn the piece. 3rd row: *2 dc in 1 dc, 1 dc in the next dc*, repeat from *-* = 18 dc, turn the piece. 4th row: *2 dc in 1 dc, 1 dc in each of the next 2 dc*, repeat from *-* = 24 dc, turn the piece. Repeat the inc with 1 more dc in dc before 2 dc in 1 dc (i.e. next round 1 dc in the next 3 dc etc) until: Size S and M: 9 rows Size L, XL and XXL: 8 rows = 54-54-48-48-48 dc. Continue as follows: Size S: Cut the thread. 10th row: Begin in the 5th dc from the edge (=armhole) 1 dc in each of the following 17 dc, turn the piece. Crochet another 7 rows with 1 dc in each dc – see decreasing tip-1- at the same time bind off towards the neck side as follows: When crochet from the armhole and towards the centre front turn when 1 dc left, repeat 1 more time = 15 dc. At this point the crochet is completed up to the shoulder at the side of the armhole. Cut the thread. Begin to crochet again at the centre front. Crochet the next row as follows: 1 dc in each of the first 9 dc, 1 sc in the next dc, 1 sl st in the next dc, turn the piece. Next row: 1 ch, skip 1 st, 1 sl st in the next st, 1 sc in the st, 1 dc in each of the following 8 dc, turn the piece. At this point the crochet is completed up to the shoulder at the neck side. Collar: Crochet 3 rows of dc in each of the outermost 6 dc, cut the thread. Crochet another front piece the same way but reverse. Size M: 10th row: *2 dc in 1 dc, 1 dc in each of the following 8 dc*, repeat from *-* until 5 dc left (= armhole) = 55 dc, turn the piece. 11th row: 1 dc in each of the first 18 dc, turn the piece. Crochet another 7 rows with 1 dc in each dc – see decreasing tip-1- at the same time bind off towards the neck side as follows: When crochet from the armhole and towards the centre front turn when 1 dc left, repeat 1 more time = 16 dc. At this point the crochet is completed up to the shoulder at the side of the armhole. Cut the thread. Begin to crochet again at the centre front. Crochet the next row as follows: 1 dc in each of the first 10 dc, 1 sc in the next dc, 1 sl st in the next dc, turn the piece. Next row: 1 ch, skip 1 st, 1 sl st in the next st, 1 sc in the dc, 1 dc in each of the following 9 dc, turn the piece. At this point the crochet is completed up to the shoulder at the neck side. Collar: Crochet 3 rows of dc in each of the outermost 6 dc, cut the thread. Crochet another front piece the same way but reverse. Size L: 9th row: *2 dc in 1 dc, 1 dc in each of the following 7 dc*, repeat from *-* until 6 dc left (= armhole) = 48 dc, turn the piece. 10th -12th row: Crochet another 3 rows and inc. the same way as done for row 9 = 66 dc. Cut the thread. 13th row: Begin to crochet at the armhole side again – crochet 19 dc from the armhole towards the centre front, turn the piece. Crochet another 4 rows with 1 dc in each dc – see decreasing tip-1- at the same time bind off towards the neck side as follows: When crochet from the armhole and towards the centre front turn when 1 dc left, repeat 1 more time = 17 dc. At this point the crochet is completed up to the shoulder at the side of the armhole. Crochet the next row starting at center front as follows: 1 dc in each of the first 11 dc, 1 sc in the next dc, 1 sl st in the next dc, turn the piece. Next row: 1 ch, skip 1 st, 1 sl st in the next st, 1 sc in the st, 1 dc in each of the following 10 dc, turn the piece. At this point the crochet is completed up to the shoulder at the neck side. Collar: Crochet 4 rows of dc in each of the outermost 7 dc, cut the thread. Crochet another front piece the same way but reverse. Size XL: 9th row: *2 dc in 1 dc, 1 dc in each of the following 7 dc*, repeat from *-* until 8 dc left (= armhole) = 45 dc, turn the piece. 10th -13th row: Crochet another 4 rows and inc. the same way as done before. Cut the yarn. 14th row: Crochet 20 dc from the armhole towards the centre front, turn the piece. Crochet another 4 rows with 1 dc in each dc – see decreasing tip-1- at the same time bind off towards the neck side as follows: When crochet from the armhole and towards the centre front turn when 1 dc left, repeat 1 more time = 18 dc. At this point the crochet is completed up to the shoulder at the side of the armhole. Crochet the next row starting at center front as follows: 1 dc in each of the first 11 dc, 1 sc in the next dc, 1 sl st in the next dc, turn the piece. Next row: 1 ch, skip 1 st, 1 sl st in the next st, 1 sc in the st, 1 dc in each of the following 10 dc, turn the piece. At this point the crochet is completed up to the shoulder at the neck side. Collar: Crochet 4 rows of dc in each of the outermost 8 dc, cut the thread. Crochet another front piece the same way but reverse. Size XXL: 9th row: *2 dc in 1 dc, 1 dc in each of the following 7 dc*, repeat from *-* until 10 dc left (= armhole) = 43 dc, turn the piece. 10th -14th row: Crochet another 5 rows and inc. the same way as done for row 9 = 79 dc, cut the thread. 15th row: Begin to crochet at the armhole side again – crochet 20 dc from the armhole towards the centre front, turn the piece. Crochet another 4 rows with 1 dc in each dc – see decreasing tip-1- at the same time bind off towards the neck side as follows: When crochet from the armhole and towards the centre front turn when 1 dc left, repeat 1 more time = 18 dc. At this point the crochet is completed up to the shoulder at the side of the armhole. Crochet the next row starting at center front as follows: 1 dc in each of the first 12 dc, 1 sc in the next dc, 1 sl st in the next dc, turn the piece. Next row: 1 ch, skip 1 st, 1 sl st in the next st, 1 sc in the st, 1 dc in each of the following 11 dc, turn the piece. At this point the crochet is completed up to the shoulder at the neck side. Collar: Crochet 4 rows of dc in each of the outermost 8 dc, cut the thread. Crochet another front piece the same way but reverse. Back piece: Crochet loosely 36-40-44-49-55ch (includes 3 ch to turn with). Crochet 1 dc in each ch beginning at the 4th ch from hook = 34-38-42-47-53 dc (first dc = 3 ch). Continue with 1 dc in each dc, but on the 4th and 7th row bind off 1 dc each side – see bind off tip-2 = 30-34-38-43-49 dc. Crochet 1 dc in each dc until the piece measures 22-24-26-26-28 cm [8 ¾"-9½"-10 ¼"-10 ¼"-11"], continue to inc. 1 dc each side on every 3rd row a total of 3 times – inc. as follows: Crochet 2 dc in the outermost dc each side = 36-40-44-49-55 dc. When the piece measures approx. 40-42-44-47-49 cm [15¾"-16½"-17 ¼"-18½"-19 ¼"] bind off 4-5-6-8-10 dc each side – see bind off tip-2 = 28-30-32-33-35 dc. Crochet 1 dc in each dc until the piece measures 56-60-62-67-71 cm [22"-23⅝"-24⅜"-26⅜"-28"], then crochet 1 row over the outermost 9-10-10-10-11 dc each side (neck line = 10-10-12-13-13 dc). Cut the thread, the piece measures approx. 58-62-64-69-73 cm [22 ¾"-24⅜"-25 ¼"-27⅛"-28 ¾"] up to the shoulder. Sleeve: Sew the shoulder seam edge against edge so the seam doesn’t become too chunky. The sleeves are crochet from the armhole and downwards. Crochet 28-32-33-35-39 dc along one of the armholes (do not crochet in the first 3 dc bound off at each side). Continue to crochet as follows: Size S and M: 2nd row: 3 sl st, 6 sc, 10–14 dc, 6 sc, 3 sl st, turn the piece. 3rd row: 2 sl st, 5 sc, 14-18 dc, 5 sc, 2 sl st, turn the piece. 4th row: 1 sl st, 4 sc, 18-22 dc, 4 sc, 1 sl st, turn the piece. 5th. row: 3 sc, 22-26 dc, 3 sc, turn the piece. Continue to crochet 1 dc in each st. Size L, XL and XXL: 2nd row: 4 sl st, 6 sc, 13-15-19 dc, 6 sc , 4 sl st, turn the piece. 3rd row: 3 sl st, 5 sc, 17-19-23 dc, 5 sc, 3 sl st, turn the piece. 4th row: 2 sl st, 4 sc, 21-23-27 dc, 4 sc, 2 sl st, turn the piece. 5th row: 1 sl st, 3 sc, 25-27-31 dc, 3 sc, 1 sl st, turn the piece. 6th row: 2 sc, 29-31-35 dc, 2 sc, turn the piece. Continue to crochet 1 dc in each st. All sizes: After a total of 6-6-7-8-9 rows from the armhole bind off 1 dc each side – see bind off tip 2 – on every 4th-3rd-4th-3rd-2nd row a total of 4-6-4-5-7 times = 20-20-25-25-25 tr. When the sleeve measures 54 cm [21¼"] crochet the next row as follows: In the 3rd dcfrom the edge crochet 3 dc, 2 ch, 3 dc, *skip 4 dc, 3 dc, 2 ch, 3 dc in the next dc*, repeat from *-* until finished, cut the thread. The sleeve measures approx. 57 cm [22½"] Assembly: Sew the sleeve and the side seams – sew edge against edge to avoid a chunky seam. Crochet an edge around the whole opening of the cardigan as follows: - begin at the centre back neck: 3 dc, 2 ch, 3 dc in the same st, *skip approx 2 rows/3 dc, 3 dc, 2 ch, 3 dc in the next st *, repeat from *-* down along one front pieces, around the bottom edge of the cardigan, up along the other front piece and back towards the centre back neck. Finish the round with a sl st in the 1st dc. Sew 3 buttons at the left front piece so they can be buttoned up in the 3 centre ch loops of the crochet edge. |
||||||||||||||||
Diagram explanations |
||||||||||||||||
|
||||||||||||||||

|
||||||||||||||||

|
||||||||||||||||
|
Have you made this or any other of our designs? Tag your pictures in social media with #dropsdesign so we can see them! Do you need help with this pattern?You'll find tutorial videos, a Comments/Questions area and more by visiting the pattern on garnstudio.com. © 1982-2024 DROPS Design A/S. We reserve all rights. This document, including all its sub-sections, has copyrights. Read more about what you can do with our patterns at the bottom of each pattern on our site. |
||||||||||||||||


With over 40 years in knitting and crochet design, DROPS Design offers one of the most extensive collections of free patterns on the internet - translated to 17 languages. As of today we count 304 catalogs and 11422 patterns - 11417 of which are translated into English (US/in).
We work hard to bring you the best knitting and crochet have to offer, inspiration and advice as well as great quality yarns at incredible prices! Would you like to use our patterns for other than personal use? You can read what you are allowed to do in the Copyright text at the bottom of all our patterns. Happy crafting!
Comments / Questions (173)
Pochopila jsem správně, že rukávy se přímo háčkují na průramky? A poté se rukáv háčkuje v kruhových řadách až na konec ? Trochu mne ale mate sešívání rukávů. Jak je to? Jinak jsem přední i zadní díl zvládla dobře. Děkuji za odpověď.
16.03.2024 - 21:18DROPS Design answered:
Milá Helen, ano - rukávy háčkujeme přímo na průramek. Dál ale háčkujeme rukáv v řadách (líc a rub), proto jej nakonec sešíváme. Šev je dobré začít u zápěstí, postupovat do podpaží a dále plynule přejít k sešívání trupu (= postranní šev). Hodně zdaru! Hana
22.03.2024 - 05:53Opskriften er uduelig - umuligt at forstå og fyldt med manglende forklaringer - Jeg har brugt mange forgæves timer på den😏
15.03.2024 - 12:39I wuld love to attempt this, it is gorgeous. But if Inka is no longer available, what should I use? I do not want to use multiple strands of yarn, but I would like to keep the lovely colours. Thank you...Hilary
23.03.2023 - 03:11DROPS Design answered:
Hi Hilary, You can replace Drops Inka with Drops Andes, Snow or Wish and use the same quantities and stitch numbers as they are all in yarn group E. Drops Snow is the yarn with the most variety of colours. Happy crocheting!
23.03.2023 - 07:54Hi, I would like to make this this pattern DROPS 97-3, but can't find the Inka yarn anywhere, I've tried to work out what wool would work with this pattern from your find an alternative yarn section, but I don't understand it. Could you help or advise me on which type of wool to use please.
18.01.2022 - 11:55DROPS Design answered:
Dear Mrs Parker, DROPS Inka is now discontinued correct, use our yarn converter to check alternatives; you might like for example use instead 2 strands DROPS Big Delight (2 strands yarn group C = 1 strand yarn group E as Inka was) - raed more about alternatives and possibilities here. Happy knitting!
18.01.2022 - 14:15I don’t understand this “ Repeat the inc with 1 more dc in dc before 2 dc in 1 dc (i.e. next round 1 dc in the next 3 dc etc)
24.11.2021 - 19:10DROPS Design answered:
Dear Monika, continue increasing 6 dc as before, ie on row 4 work: *2 dc in 1 dc, 1 dc in each of the next 3 dc*, on 6th row work: *2 dc in 1 dc, 1 dc in eeach of the next 4 dc*, and so on, ie you work 1 more dc between every inc. Happy crocheting!
25.11.2021 - 08:48For size medium, after the 11th row with having 18 dc, it says to crochet 7 more rows while at the same time binding off. I reached 16 dc after crocheting 5 rows. But it says to crochet 7 rows. Where do I crochet the extra two rows? It states completed after reaching 16dc so I am confused. Am I to continue two more rows once I've reached 16dc? Thank you
03.07.2021 - 04:29DROPS Design answered:
Dear Angela, you crochet a total of 8 rows over the 18 dc (including the 11th row), and at the same time you will decrease 1 stitch towards neck 2 times = 2 rows with decrease = 16 sts remain. Happy crocheting!
05.07.2021 - 07:33Danke für die schnelle Antwort ! Jetzt verstehe ich, wie es gemeint ist. Das Rückenteil ist inzwischen schon fertig, da hatte ich keine Probleme mit der Anleitung. Nochmals danke und herzliche Grüße !
01.06.2021 - 14:52Sehr schönes Modell ! Beim Vorderteil habe ich eine Frage ab der 5.R. Wie ist das gemeint : Mit 1 Stb mehr zwischen "2 Stb in das Stb" ? 3 einzelne Stb anstelle 2 wie in der 4.R. ? Leider ist bei Grösse S nicht die Gesamtanzahl der Stb in der 9.R. angegeben bzw. bei den anderen Grössen in ab - und nicht aufsteigender Anzahl, was mich verwirrt. Hat sich da vielleicht ein Fehler eingeschlichen ? Können Sie mir bittehelfen ? Danke !!
30.05.2021 - 22:19DROPS Design answered:
Liebe Christine, bei der 5. Reihe häkeln Sie *2 Stb in das Stb, 1 Stb in jedes der nächsten 3 Stb*, bei der 6. Reihe * 2 Stb in das Stb, 1 Stb in jedes der nächsten 4 Stb*, dh immer ein Stb mehr zwischen die Zunahmen (= 2 Stb in das Stb), bis es 54 Stb in S sind = nach 9 Reihen. Viel Spaß beim häkeln!
31.05.2021 - 07:59This sweater is gorgeous! I saw a circle sweater like this in Annie’s Catalogue. It too had the circle design along the seam, but it was more Bo Ho looking with. Only one color. This is nice and bright for summer. Thank you!!
16.05.2021 - 19:13How many stitches in the half circle to begin?
29.03.2021 - 23:28