
Popular categories
Looking for a yarn?


|
|
DROPS 97-2 |
|
 |
 |
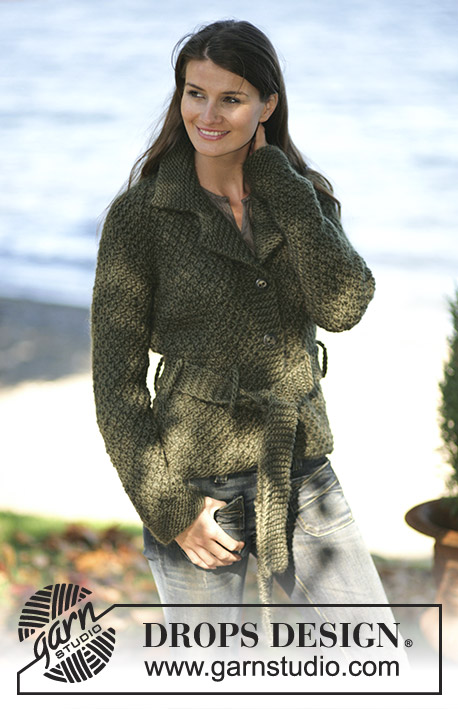
Tailored cardigan with belt in moss stitch, in DROPS Snow
DROPS 97-2 |
|
|
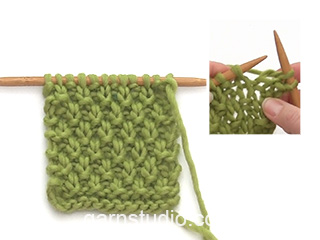
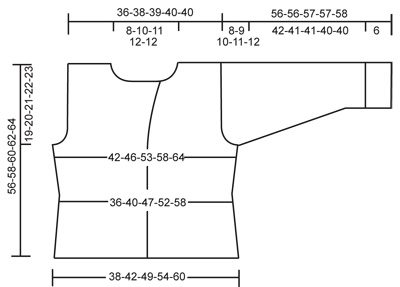
Knitting tension: 10 sts x 14 rows on needles size 9mm in double moss sts = 10 x 10 cm. Double moss sts: 1st row: *K1, P1*, repeat from *-* 2nd row: K over K and P over P 3rd row: P over K and K over P 4th row: P over P and K over K Garter sts (back and forth on needle): Knit on all rows. Increasing tips: Inc. inside 1 edge st as follows: Make a yo, on returning row twist and knit the st (To twist the st knit into the back of st instead of the front of st). Decreasing tips ( for the armhole): Dec. inside 4 edge sts knitted in garter sts. All dec. are done from the RS. Dec. as follows after 4 sts: Slip 1 st as if to knit, K1, psso. Dec. as follows before 4 edge sts: K 2 tog. Buttonholes: Make buttonholes on right front piece as follows: Cast off 4th st from front edge and K2 sts in next st. Make button holes when piece measure: Size S: 10, 23 and 36 cm Size M: 10, 23 and 36 cm Size L: 10, 19, 28 and 37 cm Size XL: 10, 20, 29 and 39 cm Size XXL: 10, 20, 30 and 40 cm Back piece: Loosely cast on 38-42-49-54-60 sts on needles size 9 mm in Snow. Knit 2 rows of garter sts (1st row =WS). Continue with double moss sts until finished measurements – see explanation above. When the piece measures 14-15-16-17-18 cm cast off 1 st each side = 36-40-47-52-58 sts. When piece measures 20-21-22-23-24 cm inc. 1 st each side on every 6th cm a total of 3 times = 42-46-53-58-64 sts. When the piece measures 36-37-38-39-40 cm knit 2 rows of garter sts over the outermost 5-6-7-8-8 sts each side ( knit other sts as before). On the next row cast off the outermost 1-2-3-4-4 sts each side for armholes. Continue to cast off 1 st for the armhole on every other row – see decreasing tips a total of 2-2-4-5-8 times = 36-38-39-40-40 sts. Continue in double moss sts with 4 sts of garter sts each side towards the armhole. When the piece measures 54-56-58-60-62 cm cast off the centre 6-8-9-10-10 sts for neck. Cast off 1 st on neckline 1 time = 14 sts left on each shoulder. Continue the pattern with 4 sts of garter sts towards the armhole. Cast off remaining sts when the piece measures 56-58-60-62-64 cm. Right front: Loosely cast on 25-27-31-33-36 sts (incl 6 edge sts at front edge) on needles size 9 mm in Snow. Knit 2 rows of garter sts (1st row = the WS). Please read all of the next section before knitting it! Continue in double moss sts – but knit the 6 outermost centre front edge sts in garter sts until finished measurements. Remember buttonholes - see above. When the piece measures 14-15-16-17-18 cm cast off 1 st at the side as done for the back piece = 24-26-30-32-35 sts. When the piece measures 20-21-22-23-24 cm inc. 1 st at the side as done for the back = 27-29-33-35-38 sts. Armhole: When the piece measures 36-37-38-39-40 cm cast off for armhole as done for the back. Remember to knit the 4 outermost sts towards the armhole in garter sts. Collar: At the same time when the piece measures 38-39-40-41-42 cm inc. 1 st towards mid front on every 4th row – see increasing tips: 4 times ( knit new sts in garter sts). When the piece measures 48-50-52-54-56 cm loosely cast off the outermost 11-12-13-13-13 sts mid front (insert a marker where the cast off ends towards the neck). Continue to cast off towards the neck on every other row: 1 st 3 times = 14 sts left on shoulder. Continue the pattern with 4 sts of garter sts towards the side of the armhole. Cast off when the piece measures 56-58-60-62-64 cm. Left front: Cast on and knit as right front but reversed. Sleeve: Loosely cast on 25-27-28-29-29 sts on needle size 9 mm in Snow. Knit 6 cm of garter sts. Continue to knit in double moss sts until finished measurements. At the same time when the piece measures 8 cm inc. 1 st each side on every 9-9-7-6-4.5 cm a total of 5-5-6-7-9 times = 35-37-40-43-47 sts. When the piece measures 48-47-47-40-40 cm cast off for sleeve cap each side on every other row: 3 sts 1 time, 2 sts 1 time and 1 st 1-2-3-3-4 times, now cast off 2 sts each side until the piece measures 55-55-56-56-57 cm and then 3 sts 1 time. Cast off remaining sts when the piece measures 56-56-57-57-58 cm. Assembly: Sew the shoulder seams. Collar: Pick up approx. 50 – 60 sts from the WS on needle size 9 in Snow and begin by the marker on left front piece, continue up to the back neck and finish by the marker on right front. Knit in garter sts until the piece measures 3 cm. Insert a marker on each shoulder and centre back. Knit towards the 1st marker, make a yo, K1 and make another yo. Repeat at the other 2 markers. On the next row twist the yo’s to avoid a hole. Knit until the collar measures 12 cm and cast off. Insert the sleeves. Sew the sleeve and the side seams as one– sew in the most outer part of the outermost st to avoid a chunky seam. Sew the collar to the cape with mattress sts, but leave 6 cm for the outer part each side. Belt: Cast on 8 sts on needles size 9 with Snow. Knit garter sts until the belt measures approx. 130 – 150 cm, cast off. Belt loop: Crochet 8 belt loops in loose ch’s (each one approx 9 cm long) on hook size 8 and in Snow- Note: Leave approx 20 cm of the thread each end to sew with. Attach the loops to the cardigan as follows: 2 at each front piece and 4 evenly distributed on the back piece. Sew the loops to the cardigan approx. 14-15-16-17-18 cm from the bottom edge. |
|
|
|
|
Have you made this or any other of our designs? Tag your pictures in social media with #dropsdesign so we can see them! Do you need help with this pattern?You'll find tutorial videos, a Comments/Questions area and more by visiting the pattern on garnstudio.com. © 1982-2024 DROPS Design A/S. We reserve all rights. This document, including all its sub-sections, has copyrights. Read more about what you can do with our patterns at the bottom of each pattern on our site. |
|


With over 40 years in knitting and crochet design, DROPS Design offers one of the most extensive collections of free patterns on the internet - translated to 17 languages. As of today we count 304 catalogues and 11422 patterns - 11422 of which are translated into English (UK/cm).
We work hard to bring you the best knitting and crochet have to offer, inspiration and advice as well as great quality yarns at incredible prices! Would you like to use our patterns for other than personal use? You can read what you are allowed to do in the Copyright text at the bottom of all our patterns. Happy crafting!
Comments / Questions (56)
Bonjour Je bloque sur les augmentations du dos je ne comprends pas que lorsqu'il est dit : augmenter 3 fois 1m de chaque côté il n'y ait que 4 mailles supplémentaires. Dans mon calcul j'en ai 6! Merci
14.02.2024 - 09:38DROPS Design answered:
Bonjour Aurélie, en fait il manquait une info en bas du dos: A 14-15-16-17-18 cm, rabattre 1 maille de chaque côté= 36-40-47-52-58 m., phrase désormais ajoutée, merci pour votre retour. Bon tricot!
14.02.2024 - 16:20Bonjour Ce modèle me plaît énormément mais je ne tolère pas du tout la moindre trace de laine ; or je ne trouve aucun fil sans laine suffisamment gros : que puis-je faire dans ce cas s'il-vous-plaît ? Beaucoup de modèles d'hiver me plaisent mais je suis coincée à cause de cette allergie... MERCI !
11.10.2021 - 23:16DROPS Design answered:
Bonjour Aurélie, Consultez notre convertisseur pour voir les alternatives possibles, si vous ne supportez aucune laine (ni alpaga, ni laine mérinos), vous pouvez essayer les cotons, votre magasin DROPS saura vous apporter les conseils personnalisés nécessaires, même par mail ou téléphone. Bon tricot!
12.10.2021 - 08:49Kedves DROPS Design! A minta leírása sajnos nem a kardigáné, hanem egy zoknihoz tartozik.
26.09.2021 - 19:42I went to my local knit store where I bought my yarn and they weren't able to help me with my question and hopefully you can. I love your patterns and this one has just come out beautifully. My question is in the Assembly section the instructions ask you to "Sew the collar too the cape with mattress sts, but leave 6 cm for the outer part each side." I don't understand what the cape is and I'm wondering if the collar is referring to the back of the base of the neck.
05.04.2014 - 02:28DROPS Design answered:
Dear Mrs Living, increase edge in collar will be sewn tog to the cast-off edge on front band starting from pick-up edge towards outwards leaving 6 cm open (first sts cast off for neckline). Happy knitting!
07.04.2014 - 08:40I believe there is an error in this pattern in the right front instructions. After casting off one st for waist indent, number of stitches in row is incorrect (eg. XXL starts with 34 stitches and decreases to 35?). Number of stitches left on needle after 3 increases (on one side only) is also incorrect.
27.01.2014 - 22:08DROPS Design answered:
Dear Mrs Charron, no of sts to cast on has been edited, thank you. Happy knitting!
29.01.2014 - 17:47De meerderingen in de kraag, bij de 4 merkdraden, eenmaal toepassen of om de naald?
14.07.2013 - 18:18DROPS Design answered:
Hoi Leonie. Volgens het patroon meerder je maar 1 keer.
15.07.2013 - 20:25Bonsoir Tassin, Les boutonnières ont été rajoutées, merci.
08.02.2011 - 21:02Merci pour vos modeles qui sont super. dans ce model que je suis en train de faire à aucun moment vous mentioné les boutonnieres ? Merci de me repondre. MICHELINE
08.02.2011 - 20:11Det er de første pinde du strikkede på kraven som skal syes til forkanten, så der bliver en blød overgang. Lad de yderste 6 cm være. God fornøjelse!
22.10.2010 - 10:00wrote:
helt
31.08.2006 - 13:31