
Popular categories
Looking for a yarn?


|
|||||||||||||
DROPS 39-29 |
|||||||||||||
|
|
|||||||||||||
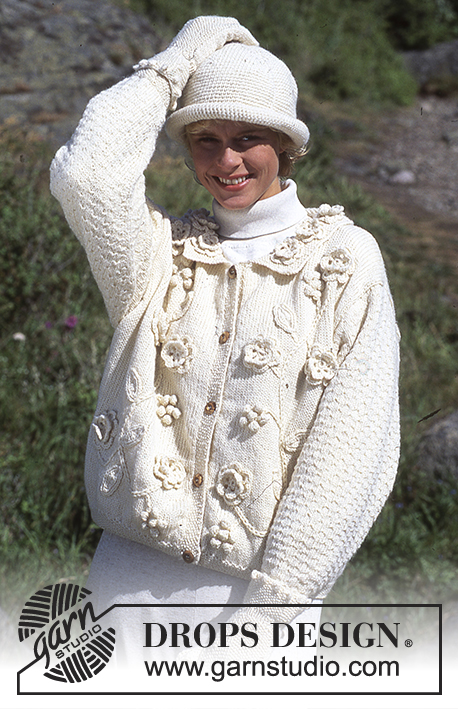
DROPS jumper and gloves in “Alpaca”, sleeveless jumper in “Ull-Flame” and crochet hat in “Alaska”.
DROPS 39-29 |
|||||||||||||
|
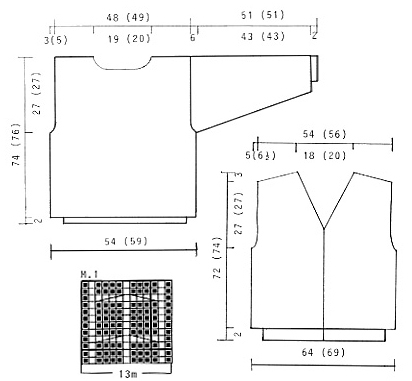
Knitting Tension: 18 x 22 sts on needle size 5 mm in pattern = 10 x 10 cm Garter st, back and forth on needle: K all rows. Garter st, in the round: K 1 round, P 1 round. Moss st: first row: K1, P1. Second row: P over K and K over P. Repeat second row. Rib: *K2, P2*, repeat from *-*. Pattern: *K 3 sts, 1 moss st*, repeat from *-*. Stripes: *12 rounds off-white/grey (1 thread of each colour), 2 rounds with double thread off-white*, repeat from *-*. Back and front piece: Knitted in the round with double thread Alpaca. Cast on 174-182 sts on circular needle size 3.5 mm with grey/off-white and work 4 rounds garter st, Change to needle size 5 mm and continue in stripe pattern (see above), at the same time inc 22-30 sts evenly on first round = 196-212 sts. Remember the knitting tension! When piece measures 47-49 cm cast off 4 sts each side for armhole and now complete each piece separately. Front piece: = 94-102 sts. Dec to shape the armhole on every other row: 2 sts 1-2 times, 1 st 2-3 times = 86-88 sts. When piece measures 66-68 cm cast off the middle 8-10 sts for neck and dec to shape the neckline on every other row: 3 sts twice, 2 sts 3 times, 1 st 1 time. Cast off remaining when piece measures approx 74-76 cm. Back piece: = 94-102 sts. Dec to shape the armhole as described for front piece = 86-88 sts. When piece measures 72-74 cm cast off the middle 30-32 sts for neck and dec 2 sts on neckline on next row. Cast off remaining when piece measures approx 74-76 cm. Sleeves: Cast on 36-40 sts on double pointed needles size 3.5 mm with grey/off-white and work 4 rounds garter st. Change to needle size 5 mm and continue in stripe pattern (see above), at the same time inc 6-2 sts evenly on round = 42-42 sts. At the same time after the garter st inc 2 sts mid under arm 27-27 times on every 3rd round = 96-96 sts. When piece measures 45-45 cm cast off 6 sts mid under arm and complete sleeve back and forth on needle. Dec to shape the sleeve cap each side on every other row: 5 sts 5 times. Cast off when piece measures 51 cm. Assembly: Join shoulders. Pick up approx 120 sts round the neck on double pointed needles size 4 mm with grey/off-white, P 1 round and then 6 cm in Rib and stripe pattern, change to double pointed needles size 3.5 mm and continue in Rib and stripes until collar measures 12 cm. Cast off. Set in sleeves. SLEEVELESS JUMPER: Size S/M - M/L Knitting Tension: 9 x 14 sts on needle size 9 mm in pattern = 10 x 10 cm Garter st, back and forth on needle: K all rows. Buttonhole: 1 buttonhole = cast of 3rd st from edge, cast on 1 new st on return row. Make buttonholes on right front piece when piece measures: 1-1, 13-13, 25-25, 37-37 and 49-49 cm. Pattern, right front piece: Work 5 P sts in the following places: When piece measures 10-12 cm, work 5 P sts 14-14 sts from mid front. When piece measures 20-22 cm work 5 P sts 7-7 cm from mid front. When piece measures 39-40 cm work 5 P sts 16-16 cm from mid front. When piece measures 51-53 cm work 5 P sts 11-11 sts from armhole. When piece measures 66-68 cm work 5 P sts 4-4 sts from armhole. Pattern, left front piece: Work 5 P sts in the following places: When piece measures 12-14 cm, work 5 P sts 24-24 sts from mid front. When piece measures 30-32 cm work 5 P sts 15-15 cm from mid front. When piece measures 40-42 cm work 5 P sts 8-8 cm from mid front. When piece measures 47-49 cm work 5 P sts 6-6 sts from armhole. When piece measures 69-71 cm work 5 P sts 5-5 sts from armhole. Pattern, back piece: Work 5 P sts in the same places as right and left front pieces put together. Right front piece: Cast on 33-35 sts (incl 1 edge st towards side) on needle size 9 mm. Work 4 rows garter st and continue in stocking st and pattern (see above) with 2 sts towards mid front in garter st throughout (= front band). Remember buttonholes! When piece measures 40-42 cm work 4 rows garter st on the outermost 5-5 sts towards armhole. Piece now measures approx 42-44 cm. Cast off 3 sts for armhole and continue in stocking st and pattern with 2 sts towards armhole in garter st. Dec to shape the armhole inside the 2 garter sts on every other row: 1 st 3-4 times = 27-28 sts. When piece measures 50-50 cm dec to shape the neckline inside front band on every 3rd row: 1 st 11-12 times. At the same time when piece measures 69-71 cm dec to shape the shoulder towards neckline on every other row: 8 sts 2 times. All sts are now cast off, piece measures approx 72-74 cm. Left front piece: Cast on and work like right front piece, but reversed and in pattern as described above. Back piece: Cast on 60-64 sts (incl 1 edge each side) on needle size 9 mm. Work 4 rows garter st and continue in stocking st and pattern (see above). When piece measures 40-42 cm work 4 rows garter st on the outermost 5-5 sts towards armhole each side. Piece now measures approx 42-44 cm. Cast off 3 sts for armhole each side and continue in stocking st and pattern with 2 sts towards armhole in garter st. Dec to shape the armhole inside the 2 garter sts each side on every other row: 1 st 3-4 times = 48-50 sts. When piece measures 68-70 work 4 rows garter st on the middle 20-22 sts. At the same dec to shape the shoulder towards neckline as described for front piece. At the same time when piece measures 70-72 cm cast off the middle 16-18 sts for neck and work 2 sts towards neckline in garter sts until finished measurements. All sts are now cast off, piece measures approx 72-74 cm. Assembly: Join shoulders and sew side seams. Sew on buttons. GLOVES: Size: Medium Knitting Tension: 24 sts x 30 rows on needle size 3 mm in Rib = 10 x 10 cm Rib: *K2, P2*, repeat from *-*. Pattern: See diagram, diagram is seen from RS. Right glove: Cast on 83 sts on double pointed needle size 3 mm and work pattern as follows: 18 sts Rib (beg round with P2 and insert a MT between these 2 sts), M.1 (= mid upper hand), 52 sts Rib (beg and finish with P2). When piece measures 24 cm dec 24 sts evenly on round (do not dec in M.1) = 59 sts. Continue with Rib on either side of M.1 (beg with P2). Now measure piece from here! When piece measures 2 cm continue for thumb as follows: inc 1 st on both sides of MT and inc 1 st on both sides of these 2 sts on every other round 6 times = 14 sts for thumb (incorporate the inc sts in Rib as you go along). Now put the 14 sts + 1 st either side = 16 sts on a thread and cast on 2 new sts behind these 16 sts = 59 sts on round. When piece measures 11 cm inc 1 st on M.1 = 60 sts, at the same time continue in Rib on all sts (finish M.1). Work next round as follows: work the 2 sts cast on over 16 sts on thread, work 21 sts, put 13 sts on thread for little finger, cast on 1 new st and work the remaining 24 sts. Work 4 rounds on these 48 sts. Now put the new st and 16 sts on either side of this on a thread. Continue for fingers as follows: Index finger: Work 15 sts and cast on 1 new st = 16 sts. Work 4 cm, cast off. Middle finger: Work 8 sts from under hand and cast on 1 new st, work 8 sts from upper hand and cast on 3 sts towards index finger = 20 sts. Work 4 cm, cast off. Ring finger: Work 17 sts and cast on 3 new sts towards middle finger = 20 sts. Work 4 cm, cast off. Little finger: Pick up 13 sts from thread and cast on 3 new sts towards ring finger = 16 sts. Work 4 cm, cast off. Thumb: Pick up 16 sts from thread and cast on 4 new sts behind these = 20 sts. Work 5 rounds, cast off. Left glove: Like right glove, but reversed. Inc for thumb at the end of second needle. Work little finger as follows: work 24 sts, put 13 sts on thread, cast on 1 new st and work 21 sts + the 2 inc sts over thumb. HAT: Size: S/M-M/L To fit head circumference: 50-52 cm Crochet Tension: 12 dc x 12 rows on crochet hook size 5 mm= 10 x 10 cm Crochet tip: Beg all rounds with a sl st to replace first dc and finish all rounds with a sl st. Crochet 4 ch and from a ring with a sl st. Round 1: 6 dc in ring. Round 2: 2 dc in each dc = 12 dc Round 3: *2 dc in first dc, 1 dc in next dc*, repeat from *-* = 6 inc = 18 dc Round 4: *2 dc in first dc, 2 dc*, repeat from *-* = 24 dc Now continue to inc like this with 1 extra dc in between each inc on every round until piece measures 6-8 cm from the centre. Now inc in the same way on every other round until piece measures 9-11 cm from the centre. Continue without inc until piece measures 17-19 cm and now dec 10 dc evenly on round (dec by skipping 1 dc). Crochet 2 rounds with 1 dc in each dc and continue for brim as follows: *2 dc, 2 dc in next dc*, repeat from *-*. Crochet 3 rounds without inc and crochet next round as follows: inc 1 dc in every 3 dc. Crochet 8 rounds without inc, finish last round with a sl st in dc and cut thread. |
|||||||||||||
Diagram explanations |
|||||||||||||
|
|||||||||||||
|
|||||||||||||
|
Have you made this or any other of our designs? Tag your pictures in social media with #dropsdesign so we can see them! Do you need help with this pattern?You'll find tutorial videos, a Comments/Questions area and more by visiting the pattern on garnstudio.com. © 1982-2024 DROPS Design A/S. We reserve all rights. This document, including all its sub-sections, has copyrights. Read more about what you can do with our patterns at the bottom of each pattern on our site. |
|||||||||||||


With over 40 years in knitting and crochet design, DROPS Design offers one of the most extensive collections of free patterns on the internet - translated to 17 languages. As of today we count 304 catalogues and 11422 patterns - 11422 of which are translated into English (UK/cm).
We work hard to bring you the best knitting and crochet have to offer, inspiration and advice as well as great quality yarns at incredible prices! Would you like to use our patterns for other than personal use? You can read what you are allowed to do in the Copyright text at the bottom of all our patterns. Happy crafting!