
Popular categories
Looking for a yarn?


|
|
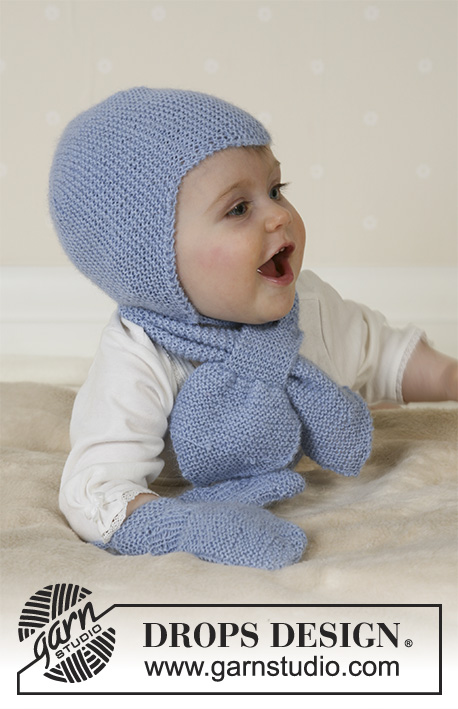
Baby Aviator Hat |
|
 |
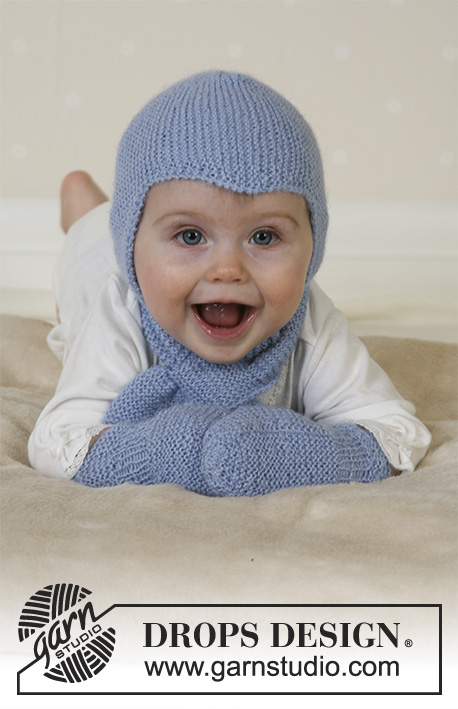 |
Set of knitted helm hat, scarf and gloves for baby in DROPS Alpaca. Sizes from 1 month to 4 years.
DROPS Baby 14-16 |
|
|
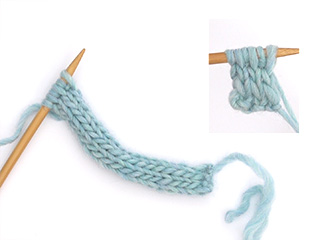
Tube knitting: *K1, put thread in front of piece, slip 1 st as if to purl, put thread behind piece*, repeat from *-* on all rows. This creates a round string. HAT: Cast on 33-38-42 (46-50) sts on needle size 2.5 mm [US 1]. Knit garter sts, at the same time inc 1 st at the right side and dec 1 st at the left side as follows: 1st row (=right side): K2, yo (= 1 inc), knit until there are 4 sts left on row and K2 tog, K2. 2nd row (=wrong side): Knit (knit yo into back of st). Repeat these two rows until piece measures 5.5-6-6.5 (7-8) cm [2,2"- 2,4"- 2,6" (2,75"-2,2")]. Now dec 1 st at the right side and inc 1 st at the left side as follows: Right side: K1, slip 1 st as if to knit, K1, psso, knit until there are 2 sts left, yo, K2 Wrong side: Knit (knit yo into back of st). Repeat these two rows until piece measures 11-12-13 (14-16) cm [4,4"- 4,75"- 5,2" (5½"-6,25")]. Continue to inc 1 st at the right side on every 4th row and dec 1 st at the left side on every other row until piece measures 15.5-16.5-17.5 (18-19) cm [6,1"- 6½"- 6,9" (7"-7½")]. Insert a marking thread each side. Continue as follows: Dec 1 st at the right side on every 4th row and inc 1 st at the left side on every other row until piece measures 20-21-22 (22-22) cm [8"- 8,25"- 8,75" (8,75"-8,75")]. Now dec 1 st at the left side on every other row and inc 1 st at the right side on every other row until piece measures 25.5-27-28.5 (29-30) cm [10"- 10,6"- 11,2" (11,4"-11,75")]. Dec 1 st at the right side on every other row and inc 1 st at the left side on every other row until finished measurements. = 31-33-35 (36-38) cm [12,25"- 13"- 13,75" (14,25"-15")]. Bind off. Assembly: Back of hat = the side of piece with 2 whole points and 2 half points. The middle of the 3 whole points on the other side of the hat = point sitting at the middle of the forehead. Sew seams together with small, neat sts as follows: Sew tog back of hat by sewing tog the first half point with the first half of the first whole point. Now sew tog the other half of the first whole point with the first half of the second whole point. Now sew tog the other half of the second whole point with the last half of point. Sew hat tog mid back. String: Cast on 4 sts on needle size 2.5 mm [US 1]. Knit tube as described above. bind off when tube measures approx 16-18-20 (22-24) cm [6,25"- 7"- 8" (8,75"-9½")]. Knit another tube and attach strings to each side of hat. ________________________________________ SCARF: Cast on 4 sts on needle size 2.5 mm [US 1] and knit garter sts, at the same time increasing as follows: Right side: Knit 2 sts in first st Left side: Knit 2 sts in last but one st. Inc on every other row a total of 10-11-12 (13-14) times = 24-26-28 (30-32) sts. Knit garter sts until piece measures 8-9-10 (11-12) cm [3,2"- 3½"- 4" (4,4"-4,75")]. Knit next row as follows: *K1, put 1 st on safety pin (or cable needle) behind the piece*, repeat from *-* until the end of row. There are now 12-13-14 (15-16) sts on row and 12-13-14 (15-15) sts on safety pin/cable needle. Knit 4-4-4 (5-5) cm [1½"- 1½"- 1½" (2"-2")] garter sts over sts on needle and put these on a new safety pin/cable needle. Put sts from the first safety pin/cable needle back on needle and knit garter sts over these until this piece is of the same length. Put the 2 pieces together again by knitting 1 st from needle and 1 st from safety pin/cable needle alternately until all sts are back on needle = 24-26-28 (30-32) sts. Knit garter sts until piece measures 40-42-46 (50-54) cm [15,75"- 16½"- 18" (19,75"-21,25")]. Continue in garter stitch at the same time as decreasing in each side by knitting the 2 second outermost sts together. Dec like this on every 2nd row until there are 4 sts left on needle. Bind off. The scarf measures approx 44-47-51 (55-60) cm [17,25"- 18½"- 20" (21,6"-23,6")]. ________________________________________ MITTENS: Garter sts (on circular needle): Knit 1st round, purl 2nd row. The 3 bigger sizes with thumbs, the 2 smaller sizes without. The mitten is knitted round on double pointed needles. Loosely cast on 34-36-38 (40-42) sts with Alpaca on needles size 2.5 mm [US 1] and knit 12 rounds garter sts – see explanation above – at the same time on the last round dec evenly to 28-30-32 (34-36) sts. Continue in Rib with K1/P1. When piece measures 3-3-3 (4-4) cm [1,1"- 1,1"- 1,1" (1½"-1½")] knit garter sts, at the same time on 1st round increasing evenly to 30-33-36 (39-42) sts – insert a marker and measure piece from here from now on. The 3 bigger sizes: After 1 (2-3) cm [0,4" (0,75"-1,1")], put the last 5 (5-6) sts on round on a thread for thumb. Cast on 5 (5-6) new sts over the thread on next row. All sizes: When piece measures 6-7-8 (9-10) cm [2,4"- 2,75"- 3,1" (3½"-4")] dec as follows on next knitted round: *K1, K2 tog*, repeat from *-* until the end of round = 20-22-24 (26-28) sts. *Purl 1 round, on next round knit tog all sts 2 and 2*, repeat from *-* 1 more time. Pull a double strand of Alpaca through remaining sts, pull tight and sew. Thumb: Put the 5 (5-6) sts from thread back on double pointed needles size 2.5 mm [US 1] and pick up 6 (6-7) sts behind these = 11 (11-13) sts. Knit garter sts until thumb measures 3 (4-5) cm [1,1" (1½"-2")]. Now knit all sts tog 2 and 2. Pull thread through remaining sts and sew. Knit another mitten, but knit the thumb the other side (applies to the 3 bigger sizes). String: Cast on 4 sts using Alpaca on needles size 2.5 mm [US 1] and knit a tube as follows: *K1, put thread in front of piece, slip 1 st as if to purl, put thread behind piece*, repeat from *-* on all rows until string measures approx 62-67-74 (86-96) cm [24"- 26"- 29" (34"-38")] (length between child’s wrists). Bind off and attach string to each mitten. |
|
|
Have you made this or any other of our designs? Tag your pictures in social media with #dropsdesign so we can see them! Do you need help with this pattern?You'll find tutorial videos, a Comments/Questions area and more by visiting the pattern on garnstudio.com. © 1982-2024 DROPS Design A/S. We reserve all rights. This document, including all its sub-sections, has copyrights. Read more about what you can do with our patterns at the bottom of each pattern on our site. |
|


With over 40 years in knitting and crochet design, DROPS Design offers one of the most extensive collections of free patterns on the internet - translated to 17 languages. As of today we count 304 catalogs and 11422 patterns - 11417 of which are translated into English (US/in).
We work hard to bring you the best knitting and crochet have to offer, inspiration and advice as well as great quality yarns at incredible prices! Would you like to use our patterns for other than personal use? You can read what you are allowed to do in the Copyright text at the bottom of all our patterns. Happy crafting!
Comments / Questions (155)
Hallo, habe nochmal genau gelesen, 4 Maschen müssen es sein. Der Schal ist bald fertig. BIs auf kleinere Schönheitsfehler ganz gut gelungen.
04.02.2016 - 15:25Hallo, ich möchte den Baby-Schal Aviator stricken. Mit wie vielen Maschen beginne ich?
03.02.2016 - 15:12Malena wrote:
Jag har försökt mej på beskrivningen till mössan två gånger nu, och även andra gången blev resultatet ett stycke som inte alls stämmer överens med beskrivningen för montering i sista stycket. Vet någon om ett diagram för mössan? Det vore stor hjälp att se hurdan form stycket har då det är färdigstickat.
26.01.2016 - 22:59DROPS Design answered:
Hej. Om du ser lite längre ner här på frågor och svar om detta mönster så ligger det en video på hur du monterar mössan. (Du hittar den även om du klickar på fliken "videor" bredvid bilden på detta mönster.) Hoppas den kan vara till hjälp!
27.01.2016 - 09:10Hoi, na een aantal keer uithalen vraag ik nu toch maar om hulp... Het patroon gaat goed tot een hoogte van 11-12-13 (14-16) cm. Vanaf 11cm moet je een steek meerderen op de goede kant in elke vierde naald en in elke tweede naald een steek minderen. Maar de goede kant is toch in de oneven naalden?
17.12.2015 - 22:49DROPS Design answered:
Hoi Julia. Ja, dat is zo, maar je telt als volgt na de eerste nld aan de goede kant en meerderen/minderen (nld 0), dan 1 nld verkeerder (nld 1), 1 nld op de goede kant (nld 2) - hier minderen, 1 nld op de verkeerde ant (nld 3) en dan komt de vierde nld en op de goede kant en hier weer meerderen. Enzovoort
18.12.2015 - 15:42Witam, Mam pytanie odnośnie szalika . Po nabraniu 4 oczek jak mam dodawać oczka , na której stronie robótki? Proszę o podpowiedź.
18.11.2015 - 10:43DROPS Design answered:
Dodajemy po 1 o. (przerabiając 2 o. w 1 o.) na początku każdego rzędu na prawej stronie robótki i na pocz. każdego rzędu na lewej stronie robótki 10-11-12 (13-14) razy (wybrać właściwą liczbę powtórzeń w zależności od rozmiaru). Mam nadzieję, że teraz jest jaśniej. W razie czego proszę pisać. POWODZENIA!
19.11.2015 - 22:32Mønstret består af 6 dele, første afsnit (5,5cm) går fint, men så kommer andet afsnit hvor man skal tage een løst af. Senere i opskriften kan jeg ikke se at man skal tage løst af igen? Men det burde man vel gøre, siden at man strikker tre afsnit til midten og så spejlvendt de sidste tre? Som jeg ser det burde man så ved femte afsnit også tage een maske løst af? På forhånd tak. Mvh Pipaluk
10.11.2015 - 14:01DROPS Design answered:
Hej Pipaluk, Jo du tager ud og ind på samme måde under hele opskriften, men vi beskriver det kun i detalje 1.gang. God fornøjelse!
26.11.2015 - 09:31The photo on the pattern doesn't seem to match the instructions, which have 3 points on the 'face' side. I haven't ended up with two long cheek sides as in the photo: there are 2 triangular points, like the one in the middle of the forehead but more acute. Do you attach the strings to these 2 points, or to the end corners, having only sewn a short way up the back seam. A simple plan of the end result, unsewn, would help. Yes, I have already watched the video.
16.10.2015 - 21:33DROPS Design answered:
Dear Mrs Woodward, the back of hat is the side with 2 whole pointss and 2 half points whiletThe middle of the 3 whole points on the other side of the hat = point sitting at the middle of the forehead. This is a very popular pattern that has been made a lot of time successfully. Remember you can get any personnal and individual help from your DROPS store. Happy knitting!
17.10.2015 - 14:28Bonjour. Vous allez finir par me trouver pénible... Est-ce bien l'avant-dernière et la dernière maille qui sont tricotées ensemble à chaque rang ? ou l'avant-avant-dernière et l'avant-dernière ? Encore mille fois merci !
13.10.2015 - 14:35DROPS Design answered:
Bonjour Irène, aucun souci :) ce sont bien les 2 avant-dernières mailles, soit 2 m ens à l'end juste avant la dernière m du rang. Bon tricot!
13.10.2015 - 14:59Euh pardon, je m'embrouille : 2 premières m et 2 dernières tricotées ensemble tous les 2 rangs !
12.10.2015 - 16:41Ne faudrait-il pas corriger aussi l'avant-dernière ligne ? "Ensuite, diminuer de chaque côté en tricotant ens les 2 dernières m tous les 2 rangs jusqu’à ce qu’il reste 4 m. Rabattre toutes les m." Si j'ai bien compris, on devra tricoter ensemble les 2 premières, et les 2 dernières m de chaque rang.
12.10.2015 - 16:39DROPS Design answered:
Bonjour Irène, cette phrase était effectivement aussi erronée, il fallait lire de tricoter ens à l'end les 2 avant-dernières m à la fin de chaque rang (1 seul côté, à la fin de chaque rang, tous les rangs, on diminue ainsi de chaque côté) - correction faite. Merci. Bon tricot!
13.10.2015 - 09:32