
Popular categories
Looking for a yarn?


|
|
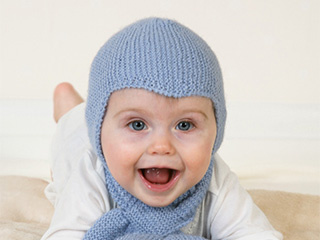
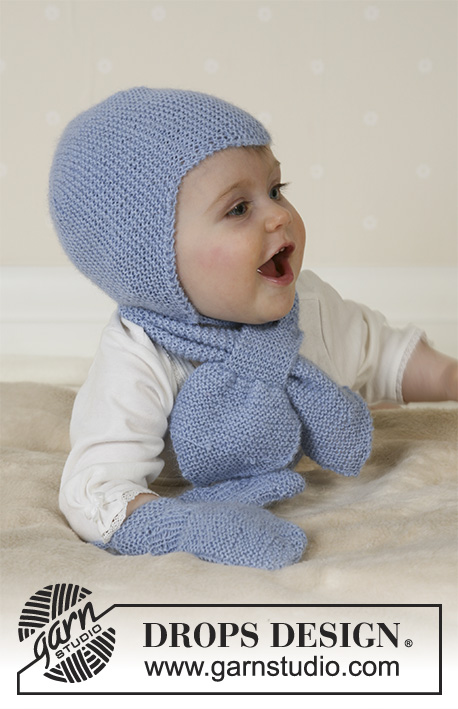
Baby Aviator Hat |
|
 |
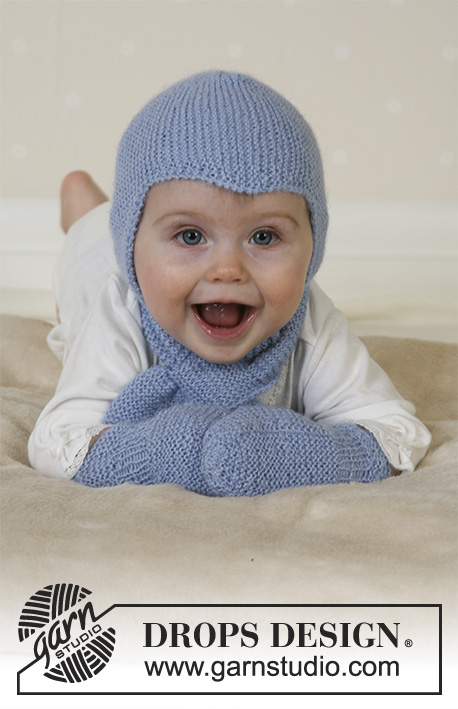 |
Set of knitted helm hat, scarf and gloves for baby in DROPS Alpaca. Sizes from 1 month to 4 years.
DROPS Baby 14-16 |
|
|
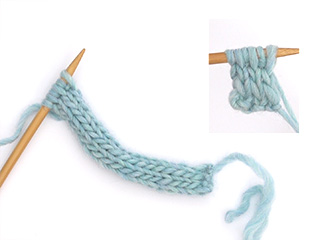
Tube knitting: *K1, put thread in front of piece, slip 1 st as if to purl, put thread behind piece*, repeat from *-* on all rows. This creates a round string. HAT: Cast on 33-38-42 (46-50) sts on needle size 2.5 mm [US 1]. Knit garter sts, at the same time inc 1 st at the right side and dec 1 st at the left side as follows: 1st row (=right side): K2, yo (= 1 inc), knit until there are 4 sts left on row and K2 tog, K2. 2nd row (=wrong side): Knit (knit yo into back of st). Repeat these two rows until piece measures 5.5-6-6.5 (7-8) cm [2,2"- 2,4"- 2,6" (2,75"-2,2")]. Now dec 1 st at the right side and inc 1 st at the left side as follows: Right side: K1, slip 1 st as if to knit, K1, psso, knit until there are 2 sts left, yo, K2 Wrong side: Knit (knit yo into back of st). Repeat these two rows until piece measures 11-12-13 (14-16) cm [4,4"- 4,75"- 5,2" (5½"-6,25")]. Continue to inc 1 st at the right side on every 4th row and dec 1 st at the left side on every other row until piece measures 15.5-16.5-17.5 (18-19) cm [6,1"- 6½"- 6,9" (7"-7½")]. Insert a marking thread each side. Continue as follows: Dec 1 st at the right side on every 4th row and inc 1 st at the left side on every other row until piece measures 20-21-22 (22-22) cm [8"- 8,25"- 8,75" (8,75"-8,75")]. Now dec 1 st at the left side on every other row and inc 1 st at the right side on every other row until piece measures 25.5-27-28.5 (29-30) cm [10"- 10,6"- 11,2" (11,4"-11,75")]. Dec 1 st at the right side on every other row and inc 1 st at the left side on every other row until finished measurements. = 31-33-35 (36-38) cm [12,25"- 13"- 13,75" (14,25"-15")]. Bind off. Assembly: Back of hat = the side of piece with 2 whole points and 2 half points. The middle of the 3 whole points on the other side of the hat = point sitting at the middle of the forehead. Sew seams together with small, neat sts as follows: Sew tog back of hat by sewing tog the first half point with the first half of the first whole point. Now sew tog the other half of the first whole point with the first half of the second whole point. Now sew tog the other half of the second whole point with the last half of point. Sew hat tog mid back. String: Cast on 4 sts on needle size 2.5 mm [US 1]. Knit tube as described above. bind off when tube measures approx 16-18-20 (22-24) cm [6,25"- 7"- 8" (8,75"-9½")]. Knit another tube and attach strings to each side of hat. ________________________________________ SCARF: Cast on 4 sts on needle size 2.5 mm [US 1] and knit garter sts, at the same time increasing as follows: Right side: Knit 2 sts in first st Left side: Knit 2 sts in last but one st. Inc on every other row a total of 10-11-12 (13-14) times = 24-26-28 (30-32) sts. Knit garter sts until piece measures 8-9-10 (11-12) cm [3,2"- 3½"- 4" (4,4"-4,75")]. Knit next row as follows: *K1, put 1 st on safety pin (or cable needle) behind the piece*, repeat from *-* until the end of row. There are now 12-13-14 (15-16) sts on row and 12-13-14 (15-15) sts on safety pin/cable needle. Knit 4-4-4 (5-5) cm [1½"- 1½"- 1½" (2"-2")] garter sts over sts on needle and put these on a new safety pin/cable needle. Put sts from the first safety pin/cable needle back on needle and knit garter sts over these until this piece is of the same length. Put the 2 pieces together again by knitting 1 st from needle and 1 st from safety pin/cable needle alternately until all sts are back on needle = 24-26-28 (30-32) sts. Knit garter sts until piece measures 40-42-46 (50-54) cm [15,75"- 16½"- 18" (19,75"-21,25")]. Continue in garter stitch at the same time as decreasing in each side by knitting the 2 second outermost sts together. Dec like this on every 2nd row until there are 4 sts left on needle. Bind off. The scarf measures approx 44-47-51 (55-60) cm [17,25"- 18½"- 20" (21,6"-23,6")]. ________________________________________ MITTENS: Garter sts (on circular needle): Knit 1st round, purl 2nd row. The 3 bigger sizes with thumbs, the 2 smaller sizes without. The mitten is knitted round on double pointed needles. Loosely cast on 34-36-38 (40-42) sts with Alpaca on needles size 2.5 mm [US 1] and knit 12 rounds garter sts – see explanation above – at the same time on the last round dec evenly to 28-30-32 (34-36) sts. Continue in Rib with K1/P1. When piece measures 3-3-3 (4-4) cm [1,1"- 1,1"- 1,1" (1½"-1½")] knit garter sts, at the same time on 1st round increasing evenly to 30-33-36 (39-42) sts – insert a marker and measure piece from here from now on. The 3 bigger sizes: After 1 (2-3) cm [0,4" (0,75"-1,1")], put the last 5 (5-6) sts on round on a thread for thumb. Cast on 5 (5-6) new sts over the thread on next row. All sizes: When piece measures 6-7-8 (9-10) cm [2,4"- 2,75"- 3,1" (3½"-4")] dec as follows on next knitted round: *K1, K2 tog*, repeat from *-* until the end of round = 20-22-24 (26-28) sts. *Purl 1 round, on next round knit tog all sts 2 and 2*, repeat from *-* 1 more time. Pull a double strand of Alpaca through remaining sts, pull tight and sew. Thumb: Put the 5 (5-6) sts from thread back on double pointed needles size 2.5 mm [US 1] and pick up 6 (6-7) sts behind these = 11 (11-13) sts. Knit garter sts until thumb measures 3 (4-5) cm [1,1" (1½"-2")]. Now knit all sts tog 2 and 2. Pull thread through remaining sts and sew. Knit another mitten, but knit the thumb the other side (applies to the 3 bigger sizes). String: Cast on 4 sts using Alpaca on needles size 2.5 mm [US 1] and knit a tube as follows: *K1, put thread in front of piece, slip 1 st as if to purl, put thread behind piece*, repeat from *-* on all rows until string measures approx 62-67-74 (86-96) cm [24"- 26"- 29" (34"-38")] (length between child’s wrists). Bind off and attach string to each mitten. |
|
|
Have you made this or any other of our designs? Tag your pictures in social media with #dropsdesign so we can see them! Do you need help with this pattern?You'll find tutorial videos, a Comments/Questions area and more by visiting the pattern on garnstudio.com. © 1982-2024 DROPS Design A/S. We reserve all rights. This document, including all its sub-sections, has copyrights. Read more about what you can do with our patterns at the bottom of each pattern on our site. |
|


With over 40 years in knitting and crochet design, DROPS Design offers one of the most extensive collections of free patterns on the internet - translated to 17 languages. As of today we count 304 catalogs and 11422 patterns - 11417 of which are translated into English (US/in).
We work hard to bring you the best knitting and crochet have to offer, inspiration and advice as well as great quality yarns at incredible prices! Would you like to use our patterns for other than personal use? You can read what you are allowed to do in the Copyright text at the bottom of all our patterns. Happy crafting!
Comments / Questions (155)
Hallo, ich würde diese Mütze gerne ohne das dreieck an der Stirn Stricken, also eine grade Kante vorne! Welche Zunahme oder Abnahme müsste ich dann weglassen? Danke schon einmal für die Hilfe
20.02.2018 - 23:57DROPS Design answered:
Liebe Steffi, wir können leider nicht jeder Anleitung nach jedem Geschmack anpassen, aber wenn Sie eine quergestrickte Mütze wollen, dann kann dieses Modell Ihnen gefallen. Viel Spaß beim stricken!
21.02.2018 - 09:25Hur lång kommer mössan vara från hjässtoppen till delen på pannan i de olika storlekarna? Alltså att man mäter på bredden istället för längden.
08.02.2018 - 21:32DROPS Design answered:
Hei Sandra. Disse målene er ikke skrevet inn i oppskriften, men det kan du sjekke med strikkefastheten som er opp gitt i oppskriften. Om du bruker pinne 2,5 = 26 masker på 10 cm og strikker du f.eks str. 6/9 mnd skal du legge opp 38 masker = ca 15 cm.God Fornøyelse!
09.02.2018 - 08:51Agne wrote:
I think there is a mistake in your baby hat (0-3 months) description, because if you follow the pattern: 5,5 cm-11 cm-15,5 cm-21 cm and so on, the middle part is assymetrical. Can that be true? I have also checked the other patterns, there you have 5,5 cm-11 cm-15,5 cm- 20 cm and so on.
05.02.2018 - 08:52DROPS Design answered:
Dear Agne, pattern is correct and will be symetrical. It is a very popular pattern that have been made hundred of times succesfully. Happy knitting!
05.02.2018 - 10:32Could I please know how to knit 2 stitches in first stitch in the scarf pattern. Is it the same as knit forward, knit backwards pattern?
15.11.2017 - 19:03DROPS Design answered:
Dear Audrey, when knitting two stitches in one, you should knit into the front and the back "leg" of the stitch, like this video shows: Happy Knitting!
16.11.2017 - 03:46Hej jeg er i gang med at strikke huen i sættet, i str. 12-18 mdr, og jeg har strikket om 3 gange nu. Første gang troede jeg at jeg havde misforstået eller glemt noget i opskriften, og det var derfor jeg manglede en spids bagsiden af huen, og at den var "skæv". Jeg har set videoen, det ligner ikke det som det sku ende med ifl. videoen og opskriften - er der en fejl i opskriften ang. størelse 12-18 mdr? Jeg kan ikke rigtig forstå hvordan opskriften går så galt? hilsen louise
21.09.2017 - 13:35DROPS Design answered:
Hej Louise, jo opskriften stemmer, hvis du følger opskriften, så får du 3 spidser i højre side hvor den midterste går ned i panden. Og så får du 2 spidser bagpå som skal syes sammen bag i nakken. God fornøjelse!
22.09.2017 - 09:40I opskriften på vanter står der at man skal begynde at lukke af, når arbejdet måler 6 centimeter i den mindste størrelse. Er det korrekt. For så måler ribben jo mere end selve hånd stykket.
23.07.2017 - 22:03DROPS Design answered:
Hej Lena, ja de er altså ikke store i den mindste størrelse :)
09.08.2017 - 15:23En la parte del gorro que pone: "aug 1 punto en el lado derecho cada 4 vueltas y disminuir 1 punto en el lado izquierdo en vueltas alternas", significa augmentar en la vuelta 1, disminuir en la vuelta 2 (reverso), y luego 2 vueltas en punto musgo normal? He mirado video, pero no me queda claro. Gracias Laia
19.02.2017 - 16:00DROPS Design answered:
Hola Laia. Por cada punto aumentado (cada 4 vuelta ) hay 2 puntos disminuidos (cada 2ª vuelta).
27.02.2017 - 20:44Hei. Jeg tenker å strikke kun skjerfet, så da lurer jeg på om garnmengden i oppskriften er angitt for hele settet?
19.12.2016 - 12:45DROPS Design answered:
Hej Marianne. Det er til hele settet der staar her.
19.12.2016 - 14:41Eawone wrote:
Muy hermoso son sus trabajos felicitaciones gracias por compartir con los que menos sabemos de todas las maravillas que se ven en babydrops desearia el paso a paso de esta maravilla para mi nieto que es mi ternurita.
08.10.2016 - 06:54Hallo, ich möchte die Mütze stricken. Bei der ersten Krausrippe, am Anfang der 2.re Reihe (Rück-R, rechte Seite) nehme ich eine Masche auf. Wann soll abgekettet werden? Außerdem möchte ich mit Alpaka silk arbeiten. Kann ich dafür auch Nadeln 2,5 verwenden oder lieber 3,5 wie angegeben? Vielen Dank im vorais
27.08.2016 - 15:32DROPS Design answered:
Liebe Christiane, bei diesem Modell ist es ganz wichtig, dass Sie ganz genau der Anleitung folgen. Die Zu-und Abnahmen sind hier beschrieben: Hin-R: 1 re., 1 M. re. abheben, 1 re., die abgehobene über die gestrickte ziehen, weiterstricken bis nur noch 2 M. übrig sind, 1 Umschlag, 2 re. Um die Passform zu gewährleisten, muss die Maschenprobe unbedingt stimmen, probieren Sie also aus, mit welcher Nadel Sie diese erreichen.
29.08.2016 - 09:08