
Popular categories
Looking for a yarn?


|
|
Little Miss Berry Cardigan |
|
 |
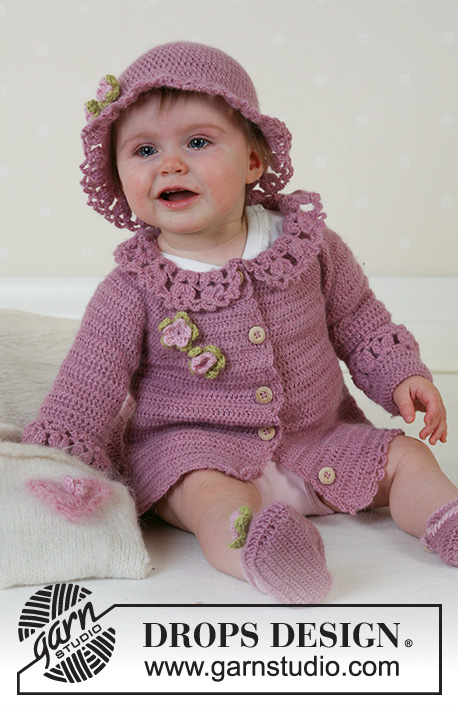 |
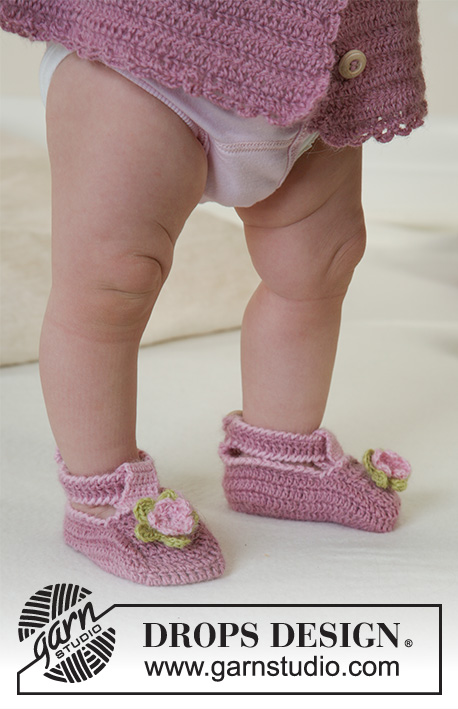
Crochet jacket with round yoke and lace collar, summer hat and slippers in DROPS Alpaca. Sizes for baby and children, 1 month to 4 years.
DROPS Baby 14-5 |
|
|
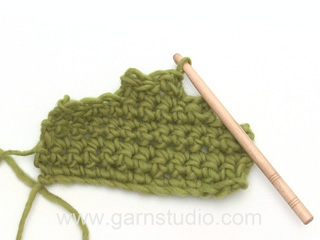
Crochet tension: 24 sts x 13 rows in Alpaca on hook no. 3 = 10 x 10 cm Binding off tips-1: Bind off 1 tr as follows: Crochet 2 tr tog. This means crochet 1 tr but wait with the last yrh and pull through (= 2 sts on hook), crochet 1 tr in the next tr and pull the last yrh through all 3 sts on hook. Binding off tips-2: Bind off as follows at beginning of row: Replace 1 dc/tr with a sl st. Bind off as follows at the end of row: Turn the piece when number of dc/tr left on row = number of st to bind off and crochet back. Crochet info: At the beginning of each row with tr replace 1st tr with 3 ch and at the end of row crochet the last tr in the 3rd ch from beginning of previous row. Crochet in to each tr (not in between). Crochet tips: When crocheting more dtr tog. do as follows: Crochet 1 dtr but wait with the last yrh and pull through (= 2 sts on hook), crochet the next dtr but wait with the last yrh and pull through (= 3 sts on hook) , continue this way until crochet the no. of dtr which need to be crochet tog. and pull the last yrh through all sts on hook. CARDIGAN Back piece: Read Crochet info! Crochet 110-120-129 (138-148) ch loosely (inclusive of 3 ch to turn with) on hook no. 3 and old rose Alpaca. Crochet first row as follows: 1 tr in the 4th ch from hook, *skip 1 ch, 1 tr in the next 3 ch* , repeat from *-* until end of row but in size 1/3 month and 2 years finish with a tr in each of the last 5 ch (instead of the last 3 ch) in Size 12/18 month finish with a tr in each of the last 4 = 82-89-96 (103-110) tr, turn the piece. Continue to crochet 1 tr in each tr at the same time bind off 1 tr each side a total of 12 times for Size 1/3 month + 6/9 month: Alternate between every and every other row, Size 12/18 month + 2 years: On every other row and Size 3 /4 years: Alternate between every 2nd and 3rd row – see bind off tips-1 = 58-65-72 (79-86) tr. When the piece measures approx. 17-18-21 (24-26) cm bind off for armhole each side – see bind off tips-2: 5-5-6 (6-7) tr = 48-55-60 (67-72) tr. Put the piece aside. Left front piece: Crochet 61-66-70 (76-80) ch loosely (inclusive of 3 ch to turn with) on hook no. 3 and old rose Alpaca. Crochet first row as follows: 1 tr in the 4th ch from hook, *skip 1 ch, 1 tr in the next 3 ch* , repeat from *-* until end of row but in size 1/3 month finish with a tr in each of the last 4 ch (instead of the last 3 ch) in Size 6/9 month + 12/18 month finish with a tr in each of the last 5 = 45-49-52 (56-59) tr, turn the piece. Continue to crochet 1 tr in each tr at the same time bind off 1 tr at the side as done for the back = 33-37-40 (44-47) tr. When the piece measures approx. 17-18-21 (24-26) cm –adjust to the length of the back piece -bind off for armhole as done for the back piece = 28-32-34(38-40) tr. Put the piece aside. Right front piece: Crochet as left front piece but opposite. In addition bind off for buttonhole on the right front edge. 1 buttonhole = crochet the 2 most outer tr as before, 1 ch, skip a tr, and continue to crochet as before with a tr in each tr. On the next row crochet 1 tr in the ch. Bind off for button hole when the piece measures: Size 1/3 months: 5, 11, 16, 22 and 27 cm Size 6/9 months: 6, 12, 18, 24 and 29 cm Size 12/18 months: 7, 13, 20, 26 and 33 cm Size 2 years: 9, 16, 23, 30 and 37 cm Size 3/4 years: 10, 17, 25, 32 and 40 cm Sleeve: Crochet 46-49-50 (52-53) ch loosely (inclusive of 3 ch to turn with) on hook no. 3 and old rose Alpaca. Crochet first row as follows: 1 tr in the 4th ch from hook, *skip 1 ch, 1 tr in the next 3 ch* , repeat from *-* until end of row but in size 1/3 month and 12/18 month finish with a tr in each of the last 5 ch (instead of the last 3 ch) in Size 6/9 month + 3 /4 year finish with a tr in each of the last 4 ch = 34-36-37 (38-39) tr, turn the piece. Continue to crochet 1 tr in each tr When the piece measures 4 cm insert a marking thread (= folding edge) - measure here from now on! When the piece measures 4 cm inc. at each side as follows: crochet 1 extra tr in the last but one tr each side on every 1.5 cm ( = approx every other row) a total of 6-7-9 (11-13) times = 46-50-55 (60-65) tr. When the piece measures approx. 15-16-18 (23-27) cm from the marking thread bind off 5-5-6 (6-7) tr each side – read bind off tips-2 = 36-40-43 (48-51) tr. Put the sleeve aside and crochet another one. Crochet the pieces together: Crochet the pieces together from the right side as follows: Crochet 1 tr in each tr at the right front piece, crochet 1 tr in each tr at the right sleeve, 1 tr for each tr at the back piece, 1 tr in each tr at the left sleeve, and 1 tr in each tr at the left front piece = 176-199-214 (239-254) tr. Crochet 2 rows with a tr in each tr. Continue with tr at the same time bind off 10-10-10 (11-11) tr evenly distributed on the next 10-12-13 (14-15) rows (do not bind off in the outermost 4 tr each side) se bind off tips-1. After the last bind off, crochet 1 row of tr at the same time bind off 16-17-20 (19-21) tr evenly distributed (not on the outermost 4 tr each side) = 60-62-64 (66-68) tr Assembly: Sew the sleeve seam edge against edge with small neat stitches. Sew the side seams the same way and the opening underneath the sleeves. Collar: Crochet with hook no. 3 and old rose Alpaca as follows –start and finish in the 3 tr from mid front: 1st row: Crochet a dc in each tr from previous row = 56-58-60 (62-64) dc, turn the piece 2nd row: Crochet 7 ch ( = 1 dtr + 3 ch),* skip approx 2 – 2.5 cm, and crochet 3 dtr tog. in the next dc – read the crochet tips above, crochet 3 ch and 3 dtr tog. in the same dc*, repeat from *-* around the neck and finish with 3 ch and 1 dtr in the last dc, turn the piece. 3rd row: Crochet 7 ch,*crochet 4 dtr tog. in the dc loop in the dtr group, 4 ch 4 dtr tog. and 4 ch*, repeat from *-* around the neck and finish with 1 dtr in the 4th ch from beginning of previous row, turn the piece. Finishing edge: Crochet 1 row of ch loops along the opening of the cardigan on hook no. 3 and old rose Alpaca as follows: 1 dc in the first st, *6 ch, skip 0.5 – 1 cm, 1 dc in the next ch* repeat from *-* and finish with 6 ch and 1 sl st in the first dc from beginning of round –NB: Around the collar crochet ch loops so there will be 1 dc at the top of each dtr group with 6 ch in between. Crochet edge around the sleeves: crochet 1st and 2nd round as explained above under the collar and then a finishing edge as for the cardigan. Crochet flower: Crochet 3 ch with hook no. 3 and light rose and make a loop with a sl st. 1st round: Crochet 5 dc around the loop and finish with a sl st in the dc from beginning of round. 2nd round: *4 ch, 1 tr in the 1st of the 4 ch, 1 dc in the next st*, repeat from *-* = 5 leaves, cut the thread. Crochet 3 ch with hook size 3 and lime and make a loop with a sl st. 1st round: Crochet 5 dc around the loop and finish with a sl st in the dc from beginning of round. 2nd round: *4 ch, 3 tr in the 1st of the 4 ch, 1 dc in the next st*, repeat from *-* = 5 leaves, cut the thread. Sew the light rose flower on to the lime flower. Make another flower and sew them on to the right front piece. Sew in the buttons. HAT: Size: 1/3 -6/18 month (2/4) years To fit head circumference: approx 40/42 –44/46 (48/50) cm Crochet info: On the beginning of each round with tr, replace the 1. tr with 3 ch and finish the round with a sl st in the 3rd ch from beginning of round. Crochet in each tr (not in between) Hat: Crochet 4 ch with hook no. 3 and old rose and make a loop with a sl st. 1st round: Crochet 12 tr around the loop –read Crochet info! 2nd round: Crochet 2 tr in each tr = 24 tr 3rd round: Crochet 1 tr in each tr = 24 tr 4th round: *1 tr in each of the 2 first tr, 2 tr in the next tr*, repeat from *-* until end of round = 32 tr. 5th round: *1 tr in each of the 3 first tr, 2 tr in the next tr*, repeat from *-* until end of round = 40 tr. 6th round: *1 tr in each of the 4 first tr, 2 tr in the next tr*, repeat from *-* until end of round = 48 tr. 7th round: *1 tr in each of the 5 first tr, 2 tr in the next tr*, repeat from *-* until end of round = 56 tr. 8th round: *1 tr in each of the 6 first tr, 2 tr in the next tr*, repeat from *-* until end of round = 64 tr. 9th round: *1 tr in each of the 7 first tr, 2 tr in the next tr*, repeat from *-* until end of round = 72 tr. 10th round: *1 tr in each of the 8 first tr, 2 tr in the next tr*, repeat from *-* until end of round = 80 tr. Finish the increases here for size 1/3 month 11th round: *1 tr in each of the 9 first tr, 2 tr in the next tr*, repeat from *-* until end of round = 88 tr. Finish the increases here for size 6/18 months 12th round: *1 tr in each of the 10 first tr, 2 tr in the next tr*, repeat from *-* until end of round = 96 tr. All sizes: Continue round with tr without any increases until the piece measures 13-14 (16) cm from the top. Crochet 1 round as follows: 2 tr in every 8th tr = 90-99 (108) tr on round. Crochet 1 round of tr without any increases and continue to crochet 1 round with 2 tr in every 6th tr ( for the middle size 3 tr left on round after the last increase instead of 6) = 105-115 (126) tr on round. Lace border: 1st round: Crochet 4 ch (= 1 dtr), crochet 2 dtr tog. – see crochet tips under dress, 3 ch and 3 dtr tog in the first tr, *skip approx. 2 – 2.5 cm, crochet 3 dtr tog. in the next tr, 3 ch and 3 dtr tog.*, repeat from *-* until end of round and finish with a sl st in the 4th ch crochet at beginning of round. 2nd round: Crochet 1 dc in the top of the first dtr group, *6 ch, 1 dc in the next dtr group*, repeat from *-* until end of round and finish with 6 ch and 1 sl st in the 1st dc from beginning of round. Cut and sew the thread, the hat measures approx. 18-19 (21) cm from the top. Crochet flower: Crochet 2 flowers as explained under the cardigan and sew the flowers to the hat. SHOES: Size: 1/3 -6/9 – 12/18 month (2 -3/4) years To fit foot length: 10-11-12 (14-15) cm Crochet info: At the beginning of each row with dc, replace the 1st dc with 1 ch and finish the row with a dc in the ch from beginning of previous row. At the beginning of each round with tr, replace the 1st tr with 3 ch and finish the row with a tr in the 3rd ch from beginning of previous row. Crochet in each dc/ tr (not in between) Binding off tips: Bind off as follows at beginning of row: Replace 1 dc/tr with a sl st. Bind off as follows at the end of row: Turn the piece when number of dc/tr left on row = number of st to bind off and crochet back. Left shoe: Read Crochet info and start with the sole. Crochet 15-18-20 (25-27) ch (inclusive of 1 ch to turn with) on hook no. 3 and old rose Alpaca. Crochet first row as follows: 1 dc in the 2nd ch from hook, 1 dc in the following 13-16-18 (23-25) ch = 15-18-20 (25-27) dc, turn the piece. Continue to crochet 1 dc in each dc from previous row at the same time inc 2 dc at the beginning and end of the first row as follows: crochet 3 dc in the first and last dc on row = 19-22-24 (29-31) dc. Crochet forth and back until 1 row left before the piece measures 3-4-4 (5-5) cm. Bind off 2 dc each side – read bind off tips = 15-18-20 (25-27) dc on row. The piece measures approx. 3-4-4 (5-5) cm. Cut and sew the thread. Insert a marking thread in each corner = 4 marking threads. Continue to crochet tr around the sole as follows: 1st row: Begin mid back (= mid one of the short sides)- crochet 1 dc in the first st, 3 ch (= 1tr), 1 tr in each of the following 2-3-3 (4-4) tr, 2 tr in the corner, 15-18-20 (25-27) tr along the side, 2 tr in the corner, 5-7-7 (9-9) tr along the other short side (= the toes), 2 tr in the corner, 15-18-20 (25-27) tr along the side, 2 tr in the corner and 2-3-3 (4-4) tr, finish with a sl st in the 3rd ch from beginning of round = 48-58-62 (76-80) tr. 2nd row: As first row –but crochet 2 tr tog at each corner by the toes = 46-56-60 (74-78) tr 3rd row and 4th row: Crochet 2 rows with tr without any bind offs. The piece now measures approx. 2 cm in the height. Ankle band: Crochet 2 rows of tr over the centre 5-5-5 (7-7) tr mid back for ankle band, continue to crochet 33-34-35 (36-37) ch at the end of the last row, turn the piece. Crochet 1 tr in the 4th ch from the hook, 1 tr in the next ch and 1 ch, skip a ch (= button hole), now crochet 1 tr in each of the remaining ch and 1 tr in each of the 5-5-5 (7-7) last tr. Cut and sew the thread. The top part: Crochet 1 tr in each of the 7-9-9 (11-11) tr at mid front of the shoe. Crochet forth and back until the top part measures 4-4-5 (5-6) cm. Cut and sew the thread. Sew the top part to the shoe each side with small neat stitches. Change to light rose and crochet lobster sts along the whole of the opening of the shoe and along the ankle band (lobster st = crochet dcs from the left towards the right). Centre strap: Crochet 5 dc over the middle sts at the front of the shoe with light rose Alpaca (crochet the 1st row from t he wrong side in lobster sts). Crochet forth and back until the strap measures 6 cm. Bend the strap in the middle and towards the wrong side and sew the strap at the inside of the shoe. Sew on a button at the centre back of the shoe approx. 0.5 cm from the edge. Crochet flower: Crochet 1 flower as explained under the cardigan and sew the flower to the top of the shoe. Right shoe: Crochet as left but opposite. DRESS: see pattern no 14-04 Bag: see pattern no 14-04 |
|

|
|
|
Have you made this or any other of our designs? Tag your pictures in social media with #dropsdesign so we can see them! Do you need help with this pattern?You'll find tutorial videos, a Comments/Questions area and more by visiting the pattern on garnstudio.com. © 1982-2024 DROPS Design A/S. We reserve all rights. This document, including all its sub-sections, has copyrights. Read more about what you can do with our patterns at the bottom of each pattern on our site. |
|


With over 40 years in knitting and crochet design, DROPS Design offers one of the most extensive collections of free patterns on the internet - translated to 17 languages. As of today we count 304 catalogues and 11422 patterns - 11422 of which are translated into English (UK/cm).
We work hard to bring you the best knitting and crochet have to offer, inspiration and advice as well as great quality yarns at incredible prices! Would you like to use our patterns for other than personal use? You can read what you are allowed to do in the Copyright text at the bottom of all our patterns. Happy crafting!
Comments / Questions (180)
Bonjour, j'aurais besoin d'explication pour les manches taille 6 mois je monte 49 mailles après le premier rang il reste 36 brides,, a 4 centimètres je dois mettre un marqueur je voudrais savoir exactement ou je dois le positionner ? est ce qu'il doit servir pour les diminutions ou simplement pour la mesure de la hauteur ? merci de votre réponse cordialement MC PLET
19.01.2021 - 10:59DROPS Design answered:
Bonjour Mme Plet, ce marqueur est placé sur les mailles du dernier rang, les mesures suivantes sont indiquées à partir de ce marqueur (début des diminutions par ex.). Quand le gilet est terminé, la manche est repliée ici sur l'endroit. Bon crochet!
19.01.2021 - 13:40Bonjour pouvez me dire pour la manche ou l'on doit faire 49 mailles pour commencer combien de centimètres ça mesure car je travaille avec une autre laine merci de votre réponse cordialement, j'ai bien reçu votre réponse donc 15 centimètres, pouvez vous me dire combien de centimètres, pouvez vous me dire combien de large fera la manche a 16 centimètre de haut (sans les diminutions des emmanchures , merci de votre réponse cordialement MC PLET
05.01.2021 - 11:45DROPS Design answered:
Bonjour Mme Plet, quand toutes les augmentations sont terminées en taille 6/9 mois, vous aurez 50 brides, autrement dit (= règle de 3 sur la base de l'échantillon: (50 x 10)/24= 21 cm environ. Bon crochet!
05.01.2021 - 14:30Bonjour pouvez me dire pour la manche ou l'on doit faire 49 mailles pour commencer combien de centimètres ça mesure car je travaille avec une autre laine merci de votre réponse cordialement PLET MC
04.01.2021 - 12:20DROPS Design answered:
Bonjour Mme Plet, rappelez-vous que ce modèle est calculé sur la base de 24 brides = 10 cm. Pour les manches, si vous montez 49 mailles en l'air (2ème taille), vous devez n'avoir que 36 brides au 1er rang; on monte volontairement plus de mailles en l'air car la chaînette de base est souvent trop serrée, et on saute des mailles en l'air au 1er rang. Vos 36 brides vous donneront ainsi 15 cm. Bon crochet
05.01.2021 - 10:29Hi, I have another question. What do you mean by bind off on each side? Does it means binding off on each side of every row or it means every side when the row is turned. Please if you can tell me if I am gradually decreasing it to 72 treble or I decrease the treble to 72 in my first row and just continue further till the desired length of 21 cm in case of 12-18 month size. Thank you
05.12.2020 - 03:20DROPS Design answered:
Dear Zainab, you decrease 1 stitch on each side on every other row (= 1 row decreasing 1 st at the beg + 1 st at the end of the row/ 1 row wihtout dec and repeat these 2 rows). You start with 96 sts and decrease 12 times 1 stitch on each side = 96 - (12x2) = 72 sts remain. When piece measures 21 cm in height, put aside and work front pieces + sleeves - yoke will be then worked over all pieces - see under Crochet the pieces together. Happy crocheting!
07.12.2020 - 07:31Hi Thank you for the lovely pattern. Can you please post a video about “bind off 1 tr each side a total of 12 times” in relation to 12-18 month old size. I am not able to follow the instructions. Sorry I am ver new to crocheting. Thank you
05.12.2020 - 02:23DROPS Design answered:
Dear Zainab, this will be worked as explained under Binding off tips-2 and as shown in this video. Happy crocheting!
07.12.2020 - 07:22The 110 chain for 0-3 month back panel seems extremely long for a 3 month old’s back, even after skipping every 4th chain in row 2 it is still way too long. Same is for front panels. Was this pattern verified?
11.08.2020 - 22:21DROPS Design answered:
Dear Mrs Rabes, Chain stitches are slightly narrower than other stitches and to avoid working the cast-on edge too tight, we simply chain more stitches to begin with. The stitch count will be adjusted on the following row to fit the pattern and measurement chart. Make sure to get the correct tension = 24 dc = 4" - then you will get 82 dc at the end of first row = 34 cm as shown in the chart. Happy crocheting!
12.08.2020 - 08:02Beskrivning på höger framstycke är att man ska virka lika som vänster- fast tvärtom. Till ålder 1 år skall man virka vä framstycke till 21 cm uppnås. Men på hö framstycke ska man ju göra knapphål vid 26 och 33 cm också? Förstår inte? Tacksam för förklaring!
22.03.2020 - 16:20DROPS Design answered:
Hei Ulrika. De 2 siste knapphullene hekles når forstykkene, bakstykket og ermene hekles sammen og har kommet til den lengden som er oppgitt (26 og 33 cm), og da hekles de som tidligere. God Fornøyelse!
23.03.2020 - 16:07Thank you. One more question. When you begin to work the Collar with a row of dc. Do you start on the right side or wrong side of the work.?Beautiful pattern!
05.11.2019 - 09:01DROPS Design answered:
Dear Mrs King, you can either start on RS (then the last row will be worked from RS), or from WS (then the 2nd row will be worked from RS), as you prefer. Happy crocheting!
05.11.2019 - 09:17Finishing Edge hook no. 3 and old rose Alpaca as follows: 1 dc in the first st, *6 ch, skip 0.5 – 1 cm, 1 dc in the next ch* repeat from *-* and finish with 6 ch and 1 sl st in the first dc from beginning of round –NB: Around the collar crochet ch loops so there will be 1 dc at the top of each dtr group with 6 ch in between. However on the photo it shows a shell pattern along the front opening and edges. Am I missing something ?
04.11.2019 - 18:51DROPS Design answered:
Dear Mrs King, this is the finished crocheted edge worked around whole opening of jacket, ie chain-spaces, adjust the width/height of ch-spaces skipping more or less cm (= 0,5 to 1 cm). Happy crocheting!
05.11.2019 - 08:46Hello, thank you for the lovely pattern. Is it right that on the back you have to decrease at each end of every other row to 72 sts (12-18mths). This is causing the front to slant rather than be straight. Should I be decreasing where the side seams would be so that it slants at the sides rather than the front. Please advise
10.08.2019 - 15:31DROPS Design answered:
Dear Mrs Thickett, on back piece you decrease 1 st on each side on every other row, you should decrease the same number of stitch on each side to get the correct slanting. Happy crocheting!
12.08.2019 - 07:30