
Popular categories
Looking for a yarn?


|
|
Little Miss Berry |
|
 |
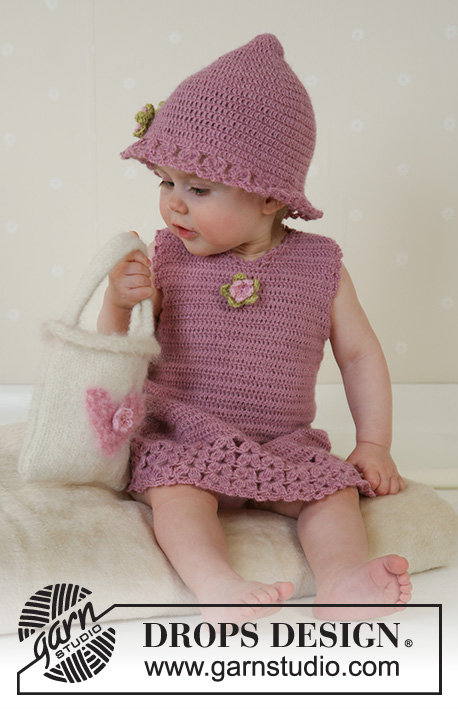 |
Crochet dress and summer hat in DROPS Alpaca. Knitted and felted bag in DROPS Alaska. Sizes for baby and children, 1 month to 4 years.
DROPS Baby 14-4 |
|
|
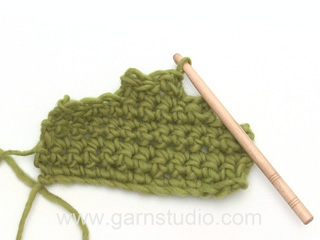
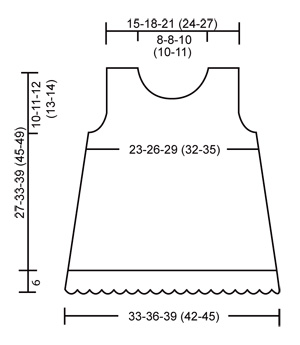
Crochet tension: 24 sts (= tr) x 13 rows in Alpaca on hook no. 3 = 10 x 10 cm Knitting tension: 16 sts x 20 rows on needles size 5.5 mm with Alaska in stocking sts = 10 x 10 cm Binding off tips-1: Bind off 1 tr as follows: Crochet 2 tr tog. This means crochet 1 tr but wait with the last yrh and pull through (= 2 sts on hook), crochet 1 tr in the next tr and pull the last yrh through all 3 sts on hook. Binding off tips-2: Bind off as follows at beginning of row: Replace 1 dc/tr with a sl st. Bind off as follows at the end of row: Turn the piece when number of dc/tr left on row = number of st to bind off and crochet back. Crochet info: At the beginning of each row with tr replace 1st tr with 3 ch and at the end of row crochet the last tr in the 3rd ch from beginning of previous row. Crochet in to each tr (not in between). DRESS: Front piece: Read Crochet info! Crochet 106-116-126 (135-145) ch loosely (inclusive of 3 ch to turn with) on hook no. 3 and old rose Alpaca. Crochet first row as follows: 1 tr in the 4th ch from hook, *skip 1 ch, 1 tr in the next 3 ch* , repeat from *-* until end of row –NB: In size 1/3 month + 12/18 month finish with a tr in each of the last 5 ch (instead of the last 3 ch) in Size 2 years finish with a tr in each of the last 6 ch (instead of the last 3 ch) ) and in Size 3/4 years finish with a tr in each of the last 4 ch = 79-86-94 (101-108) tr, turn the piece. Continue to crochet 1 tr in to each tr at the same time bind off 1 tr each side a total of 12 times – see bind off tips – 1: on Size 1/3 month: alternate between every and every other row, Size 6/9+ 12/18 month: On every other row and Size 2 + 3 /4 years: On every 3rd row = 55-62-70 (77-84) tr. When the piece measures approx. 17-22-27 (32-35) cm bind off for armhole each side on every row – see bind off tips-2: 5 tr 1 time, 2 tr 1 time and 1 tr 3 times = 35-42-50 (57-64) tr. When the piece measures 23-29-35 (40-44) cm insert a marking thread in the middle of the piece (For size 1/3 month and 2 years insert a marking thread in the middle st). Then bind off for the neck as follows: Crochet from the shoulder and in towards the neck until 2-3-5 (5-6) tr left before the marking thread (for size 1/3 month and 2 years the number of tr is before the tr with the marking thread) turn the piece. Continue to bind off for the neck on every row –read bind off tips-2: 2 tr 2 times and 1 tr 3 times = 8-11-13-(16-19) tr left for shoulder. Cut and sew the thread when the piece measures approx. 27-33-39 (45-49) cm and repeat for the other side of the neck. Back piece: Crochet as front piece - insert a marking thread in the middle of the piece (For size 1/3 month and 2 years insert a marking thread in the middle st). Bind off for armholes as for the front but when the piece measures 19-25-31 (37-41) cm split the piece mid back to a slit and continue to crochet each part separately (For size 1/3 month and 2 years do not crochet the middle tr with the marking thread). When the piece measures approx. 25-31-37 (43-47) cm bind off for the neck as follows: crochet 9-12-14 (17-20) tr from the shoulder in towards the neck, turn the piece and bind off 1 tr on the next row – read Bind off tips -2. Crochet until end of row and cut and sew the thread when the piece measures approx. 27-33-39 (45-49) cm. Repeat for the other side. Assembly: Sew the shoulder seams. Sew the side seams edge against edge, with small neat sts. Crochet edge: At last crochet an edge along the neck opening (and the slit at the back) and around both armholes with hook no. 3 and old rose Alpaca as follows: 1 dc in the first st, *6 ch, skip approx. 1 to 1.5 cm, 1 dc in the next st*, repeat from *-* and finish with 6 ch and 1 sl st in the first dc from beginning of round. Sew 2 buttons along the right slit at the back (approx. 0.5 cm from the slit edge) –the top button should be placed 0.5 – 1 cm from the top edge, and use the ch loops at the opposite slit edge as button holes). Lace Border: Crochet a lace border along the bottom edge of the dress with hook no. 3 and old rose Alpaca as follows: Crochet tips: When crocheting more dtr tog. do as follows: Crochet 1 dtr but wait with the last yrh and pull through (= 2 sts on hook), crochet the next dtr but wait with the last yrh and pull through (= 3 sts on hook) , continue this way until crochet the no. of dtr which need to be crochet tog. and pull the last yrh through all sts on hook. 1st round: Begin at the side. 1 dc in the 1st tr, 4 ch (= 1 dtr), crochet 2 dtr tog. in the same tr, 3 ch and 3 dtr tog. still in the same tr, *skip approx. 2 – 2.5 cm, crochet 3 dtr tog. in the next tr, 3 ch and 3 dtr tog.*, repeat from *-* until end of round and finish with a sl st in the 4th ch crochet at beginning of round. 2nd round: Crochet sl st until first ch-loop, 4 ch (=1 dtr), crochet 3 dtr tog. around the same ch-loop, 4 ch, 4 dtr tog. around the same ch-loop, *in the next ch-loop crochet 4 dtr tog., 4 ch and 4 dtr tog.*, repeat from *-* until end of round and finish with a sl st in the 4th ch crochet at beginning of round. 3rd round: Crochet as 2nd round. 4th round: Crochet as 2nd round but crochet 5 ch in each ch-loop (instead of 4 ch). 5th round: Crochet 1 dc in the top of the first dtr group, *6 ch, 1 dc in the next dtr group*, repeat from *-* until end of round and finish with 6 ch and 1 sl st in 1. dc at beginning of round. Crochet flower: Crochet 3 ch with hook no. 3 and light rose and make a loop with a sl st. 1st round: Crochet 5 dc around the loop and finish with a sl st in the dc from beginning of round. 2nd round: *4 ch, 1 tr in the 1st of the 4 ch, 1 dc in the next st*, repeat from *-* = 5 leaves, cut the thread. Crochet 3 ch with hook size 3 and lime and make a loop with a sl st. 1st round: Crochet 5 dc around the loop and finish with a sl st in the dc from beginning of round. 2nd round: *4 ch, 3 tr in the 1st of the 4 ch, 1 dc in the next st*, repeat from *-* = 5 leaves, cut the thread. Sew the light rose flower on to the lime flower and sew the flower to the dress at mid front. HAT: Size: 1/3 -6/18 month (2/4) years To fit head circumference: approx 40/42 –44/46 (48/50) cm Crochet info: At the beginning of each round with tr, replace the 1. tr with 3 ch and finish the round with a sl st in the 3. ch from beginning of round. Crochet in each tr (not in between) Hat: Crochet 4 ch with hook no. 3 and old rose and make a loop with a sl st. 1st round: Crochet 12 tr around the loop –read Crochet info! 2nd round: Crochet 2 tr in each tr = 24 tr 3rd round: Crochet 1 tr in each tr = 24 tr 4th round: *1 tr in each of the 2 first tr, 2 tr in the next tr*, repeat from *-* until end of round = 32 tr. 5th round: *1 tr in each of the 3 first tr, 2 tr in the next tr*, repeat from *-* until end of round = 40 tr. 6th round: *1 tr in each of the 4 first tr, 2 tr in the next tr*, repeat from *-* until end of round = 48 tr. 7th round: *1 tr in each of the 5 first tr, 2 tr in the next tr*, repeat from *-* until end of round = 56 tr. 8th round: *1 tr in each of the 6 first tr, 2 tr in the next tr*, repeat from *-* until end of round = 64 tr. 9th round: *1 tr in each of the 7 first tr, 2 tr in the next tr*, repeat from *-* until end of round = 72 tr. 10th round: *1 tr in each of the 8 first tr, 2 tr in the next tr*, repeat from *-* until end of round = 80 tr. Finish the increases here for size 1/3 month 11th round: *1 tr in each of the 9 first tr, 2 tr in the next tr*, repeat from *-* until finish round = 88 tr. Finish the increases here for size 6/18 month 12th round: *1 tr in each of the 10 first tr, 2 tr in the next tr*, repeat from *-* until finish round = 96 tr. All sizes: Continue round with tr without any increases until the piece measures 13-14 (16) cm from the top. Crochet 1 round as follows: 2 tr in every 8th tr = 90-99 (108) tr on round. Crochet 1 round of tr without any increases and continue to crochet 1 round of tr with 2 tr in every 6th tr ( for the middle size 3 tr left on round after the last increase instead of 6) = 105-115 (126) tr on round. Lace border: 1st round: Crochet 4 ch (= 1 dtr), crochet 2 dtr tog. –see crochet tips under dress, 3 ch and 3 dtr tog in the first tr, *skip approx. 2 – 2.5 cm, crochet 3 dtr tog. in the next tr, 3 ch and 3 dtr tog.*, repeat from *-* until end of round and finish with a sl st in the 4th ch crochet at beginning of round. 2nd round: Crochet 1 dc in the top of the first dtr group, *6 ch, 1 dc in the next dtr group*, repeat from *-* until end of round and finish with 6 ch and 1 sl st in the 1st dc at beginning of round. Cut and sew the thread, the hat measures approx. 18-19 (21) cm from the top. Crochet flower: Crochet 2 flowers as explained under the dress and sew the flowers to the hat. BAG: Measures: Before felting: Approx. 16 cm wide and 24 cm long After feltning: Approx. 12 cm wide and 15 cm long. Felting: Felt the bag in the washing machine on a normal cycle 40 deg + spin with a tbsp of washing powder without enzymes – read more about felting on our homepage www.garnstudio.com Bag: Cast on loosely 27 sts (inclusive of an edge st each side) on needles size 5.5 mm and off white Vienna. Knit 2 rows of garter sts and change to Alaska and knit in stocking sts until the piece measures approx. 47 cm –Adjust so that the next row is knitted from the wrong side. Change back to off white Vienna, and knit 2 rows of garter sts. Bind off loosely. Strap: Cast on 5 sts on needle size 5.5 with Alaska and knit in stocking sts until the strap measures approx. 25 cm, bind off. Fold the strap double – lengthwise and purl side against purl side and sew it tog. in the most outer part of the outer st. Assembly: Fold the bag double and sew the side seams inside the edge st. Sew the strap to the bag each side. Felt the bag in the washing machine – see explanation above. Crochet Heart: Crochet 2 ch on hook size 6 with rose Vienna and crochet 1 dc in the first of the 2 ch, turn the piece. Crochet 1 ch, crochet 3 dc in dc from previous row, turn the piece. Crochet 1 ch, 2 dc in the first dc, 1 dc in the next dc and 2 dc in the last dc = 5 dc, turn the 1 ch, 2 dc in the first dc, 1 dc in the next dc, 2 dc in the following dc, 1 dc in the next dc and 2 dc in the last dc = 8 dc, turn the piece. *Crochet 1 ch, skip a dc, 1 dc in each of the next 3 dc, turn the piece. Crochet 1 ch skip 1 dc, 1 dc in each of the next 2 dc, turn the piece. Crochet 1 ch, 1 dc in each of the 2 dc, turn the piece. Crochet 1 ch and 1 sl st in the ch from beginning of previous row, cut and sew the thread*. Repeat from *-* for the other side of the heart and sew the heart to the bag. Crochet flower: Crochet 3 ch with hook no. 3 and light rose Alpaca and make a loop with a sl st. 1st round: Crochet 5 dc around the loop and finish with a sl st in the dc from beginning of round. 2nd round: *4 ch, 1 tr in the 1st of the 4 ch, 1 dc in the next st*, repeat from *-* = 5 leaves, cut the thread. Sew the flower to the heart. AFTER FELTING: If the piece is not felted enough and is too big: Wash the piece one more time in the washing machine while it is still wet add a terry towel that measures approx. 50 x 70 cm - NOTE: Do not use a short program. If the piece has been felted too much and is too small: While the piece is still wet stretch it to the correct measurements, if the piece is dry, make sure to soak it first. Remember: All subsequent washes are as a normal wool garment. |
|
|
|
|
Have you made this or any other of our designs? Tag your pictures in social media with #dropsdesign so we can see them! Do you need help with this pattern?You'll find tutorial videos, a Comments/Questions area and more by visiting the pattern on garnstudio.com. © 1982-2024 DROPS Design A/S. We reserve all rights. This document, including all its sub-sections, has copyrights. Read more about what you can do with our patterns at the bottom of each pattern on our site. |
|


With over 40 years in knitting and crochet design, DROPS Design offers one of the most extensive collections of free patterns on the internet - translated to 17 languages. As of today we count 304 catalogues and 11422 patterns - 11422 of which are translated into English (UK/cm).
We work hard to bring you the best knitting and crochet have to offer, inspiration and advice as well as great quality yarns at incredible prices! Would you like to use our patterns for other than personal use? You can read what you are allowed to do in the Copyright text at the bottom of all our patterns. Happy crafting!
Comments / Questions (173)
Når man starter på blondekanden nederst på kjolen, skal man så hækle fra ydersiden eller indersiden af kjolen? Det har ret stor betydning for, hvordan mønstret ser ud.
26.08.2014 - 22:56DROPS Design answered:
Hej Tina. Du skal haekle fra retten.
27.08.2014 - 15:20Luizinha wrote:
Olá,gosto muito dos modelos de bebe e queria fazer alguns para os novos bebes da família mas estou com alguma dificuldade ,há alguns modelos que não consigo em português e não entendo o inglês,o que tenho de fazer?obrigado,BJS
28.07.2014 - 11:00DROPS Design answered:
Procure seguir os vídeos que explicam muitas técnicas. Basta seleccionar o separador videos ao lado da fotografia do modelo nas explicações. Pode também aderir à página de fãs da DROPS no Facebook e pedir ajuda a outras tricotadeiras. Bom tricô!
28.07.2014 - 14:25Bjr. Malgré tous mes efforts pour realiser le modèle, je pense qu'il y aurait peut-être une erreur au niveau des mesures. Pour la taille 1/3mois,j'ai fait comme vs me l'avez expliqué sauf qu'a 17cm j'obtiens 66brides.en alternant 1/2rang,je suis loin d'avoir fini les diminutions 1 et ne peut dc pas commencer les diminutions pour les emmanchures.Je vais essayer de continuer mais je pense qu'il faudrait revoir les explications surtout pour les débutantes comme moi. Merci
09.07.2014 - 14:21DROPS Design answered:
Bonjour Mme Makristo, quand on diminue 12 fois 1 B de chaque côté, on diminue un total de 24 B soit 79 - 24 = 55 B. Pensez à bien vérifier votre échantillon pour avoir 17 rangs = 10 cm. Pour toute aide complémentaire, vous pouvez vous adresser à votre magasin DROPS ou sur le forum DROPS. Bon crochet!
09.07.2014 - 14:41Merci. Ce que je voulais savoir c'est cmt diminuer en debut de rang parce que si je fais comme indiqué (reponse mme deloustal ci dessous), les diminutions sont faites toujours du mm côté et l'ouvrage ne me semble pas symétrique. Peut être ai je mal compris ?
07.07.2014 - 15:12DROPS Design answered:
Bonjour Mme Makristo, vous devez diminuer 1 B de chaque côté (cf diminutions 1), en début de rang, vous pouvez remplacer la 1ère B par 2 ml (au lieu de 3) pour la diminution uniquement. Les diminutions doivent bien être de chaque côté: au début et à la fin des rangs indiqués. Bon crochet!
07.07.2014 - 16:13Bjr. Cela est il normal que les diminutions 1 se fassent toujours du même côté pour la taille 1/3mois?
07.07.2014 - 12:57DROPS Design answered:
Bonjour Mme Makristo, pour le devant et le dos, on diminue pour toutes les tailles 12 fois 1 B de chaque côté, alternativement tous les rangs et tous les 2 rangs pour la 1ère taille. Bon crochet!
07.07.2014 - 14:36Bonjour, Que veut dire diminuer alternativement tous les rangs et tous les 2 rangs ? Merci
18.06.2014 - 17:29DROPS Design answered:
Bonjour Mme Deloustal, vous crochetez ainsi: *1 rang avec diminution, 1 rang sans diminution, 1 rang avec diminution*, et vous répétez de *-* ainsi le nombre de fois indiqué. Bon crochet!
18.06.2014 - 18:18Salve. ...diminuzione scalfi....ho capito primo giro 5 Diminuzioni secondo due e terzo per tre volte 1...ma come faccio a farlo per ogni lato? ? ? Se diminuisco 5ma con 5 punti bassissimi poi come faccio a fare primo punto alto??? ? Graziemille
11.04.2014 - 23:21DROPS Design answered:
Buongiorno Claudia. Per gli scalfi, se deve diminuire p.es 5 m, lavori così: 5 m.bss nelle prime 5 m, 1 m.bss e 3 cat nella m successiva, lavori adesso 1 m.a in ogni m e si fermi quando rimangono le ultime 5 m. Provi a guardare il seguente video: Buon lavoro!
12.04.2014 - 09:04Read comment about armholes but still confused. It says see bind off tips-2: 5 tr 1 time,2 tr 1 time and 1 tr 3 times = 35-42-50(57-64)tr which isn't explained. You said to follow bind off tip 2 but don't understand "Bind off as follows at the end of row: Turn the piece when number of dc/tr left on row = number of st to bind off and crochet back". I sl st 1 tr in beg of row, don't know what to do in the end. Re-stating instructions won't help me. Thank you.
04.04.2014 - 07:31DROPS Design answered:
Dear Mrs Delingpole-Paddock, the video below shows how to dec sts at beg & and of row. Happy crocheting!
04.04.2014 - 08:55Bonjour ces modèles de robe, bonnet et sac sont très jolis merci de nous les partager mais comment faire pour avoir les explications du manteau ou gilet assortis.
27.03.2014 - 12:18Gibt es eine Videoanleitung, in der gezeigt wird, wie man Vorder- und Rückenteil zusammennäht, so dass es eine schöne, gleichmäßige Naht gibt?
08.02.2014 - 19:17DROPS Design answered:
Liebe Alannah, wir werden Ihren Wunsch an das Videoteam weiterleiten.
10.02.2014 - 09:32