DROPS Alpaca
DROPS Alpaca
100% Alpaca
from 4.85 $ /50g
Get the yarn to make this pattern from 24.25$.

The yarn cost is calculated from the pattern’s smallest size and the yarn’s cheapest product type. Looking for an even better price? You might find it on the DROPS Deals!

DROPS SS24

Lille Trille

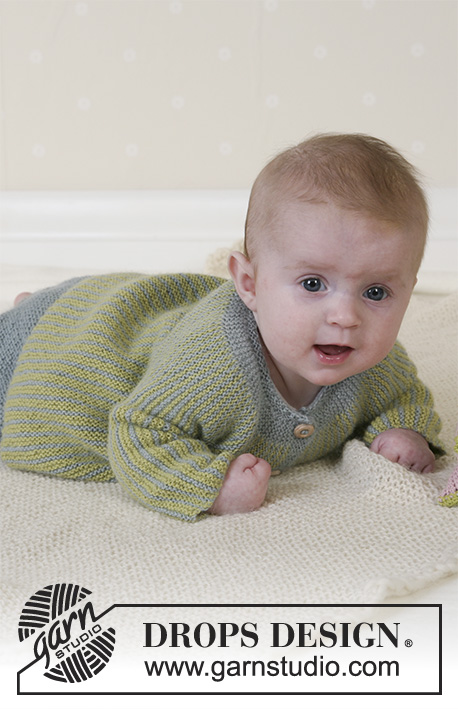
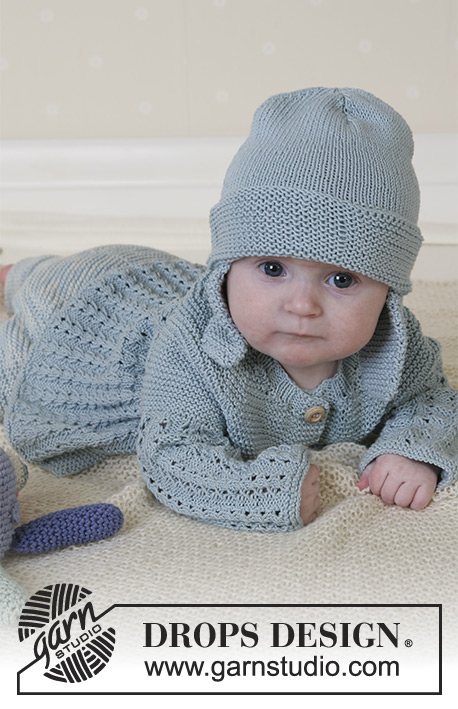
Knitted jacket with round yoke and cables, hat with pompons, mittens and socks in DROPS Alpaca for baby and children. Size 1 to 3 years.

DROPS Baby 14-2
Size: 1/3 – 6/9 – 12/18 months (2/3 years)
All measurements in charts are in cm.

Materials: DROPS Alpaca from Garnstudio
Jacket: 150-150-200 (250) g color no 7120, light mint
DROPS mother of pearl button, no 521, 4-4-4- (5) pcs

Hat, mittens and socks: 100-100-150 (150) g color no 7120, light mint

DROPS circular needle and double pointed needle size 2.5 mm / US 1or2

-------------------------------------------------------

Alternative Yarn – See how to change yarns here
Yarn Groups A to F – Use the same pattern and change the yarn here
Yarn usage using an alternative yarn – Use our yarn converter here

-------------------------------------------------------

DROPS Alpaca
DROPS Alpaca
100% Alpaca
from 4.85 $ /50g
Get the yarn to make this pattern from 24.25$.

The yarn cost is calculated from the pattern’s smallest size and the yarn’s cheapest product type. Looking for an even better price? You might find it on the DROPS Deals!

Pattern instructions

NOTE: This pattern is written in American English. All measurements in charts are in cm. For conversion from inches to cm - click here. There are different terms for crocheting in American and British English. If this pattern includes crochet, click for "crochet terms" here. For this pattern in British English, please click here.
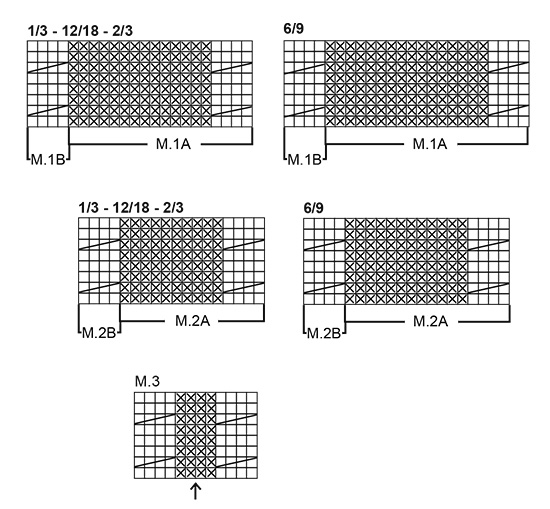
Gauge: 26 sts x 34 rows on needles size 2.5 mm / US 1or2 in stockinette sts = 10 x 10 cm / 4" x 4".

Pattern: See diagrams M.1 to M.3. The diagrams show all the rows in the pattern seen from the right side.

Garter sts (back and forth): Knit all rows

Garter sts (in the round on circular needle): knit 1 round, purl 1 round

Button holes: Make button holes on right front band from the right side as follows:
Knit tog 2nd and 3rd st from the edge, 1 yo (knit yo on next row).
Make buttonholes as follows:
Size 1/3 months: 5, 12, 19 and 26.5 cm / 2",4¾",7½",10½"
Size 6/9 months: 7, 14, 21 and 28.5 cm / 2¾",5½",8¼",11¼"
Size 12/18 months: 8, 16, 24 and 32.5 cm / 3⅛",6¼",9½",12¾"
Size 2/3 years: 9, 16, 23, 30 and 37.5 cm / 3½",6¼",9",11¾",14¾"

JACKET:
Front and back piece:
Knit the jacket back and forth on circular needle from mid front. Remember buttonholes on right front band – see above.
Cast on 179-199-213 (246) sts (includes 5 front band sts, knitted in garter sts throughout) with Alpaca on needle size 2.5mm/US 1 or 2 and knit 6 rows garter sts (1st row = right side). Continue with 1 row stockinette sts, at the same time inc 15-15-17 (20) sts evenly on row (do not inc over front band sts) = 194-214-230 (266) sts.
Work next row as follows from the wrong side: 5 front band sts, M.1B (= 4 sts), M.1A over the next 180-200-216 (252) sts (chose diagram for appropriate size - from wrong side, read the diagram from left to right) and finish with 5 front band sts.
Continue the pattern. At the same time, when piece measures 4-5-5 (6) cm / 1½"-2"-2" (2⅜") dec 1 st in each purled section by purling the 2 middle P sts tog (seen from the right side).
Repeat the dec on every 3.5-3.5-4.5 (5) cm / 1¼"-1¼"-1¾" (2") a total of 3 times until there are 10-12-10 (10) P sts left in each purled section = 154-174-182 (210) sts on row.
When piece measures 17-18-20 (23) cm / 6¾"-7"-8" (9"), work next row as follows: K 39-43-45 (52) sts (= front piece), bind off 6-8-8- (8) sts for armhole, K 64-72-76 (90) sts (= back piece), bind off 6-8-8 (9) sts for armhole, K 39-43-45 (52) sts (= front piece).
Put the piece aside and work the sleeves.

Sleeve:
Cast on 40-42-44 (48) sts with Alpaca on double pointed needles size 2.5mm / US 1or2 and work garter sts in the round on needles.
When piece measures 5 cm / 2", insert a markermeasure piece from here.
Continue in garter sts until piece measures 5 cm / 2" and then work 1 round stockinette sts, at the same time inc 4-6-18 (20) sts evenly on round = 44-48-62 (68) sts.
Work next round as follows – remember diagram for appropriate size:
Size 1/3 months: M.2B (= 4 sts), P4, M.2A over the next 28 sts, M.2B (= 4 sts), P4
Size 6/9 months: M.2B (= 4 sts), P4, M.2A over the next 32 sts, M.2B (= 4 sts), P4
Size 12/18 months: P1, M.2A over the next 56 sts, M.2B (= 4 sts), P1
Size 2/3 years: M.2B (= 4 sts), P2, M.2A over the next 56 sts, M.2B (= 4 sts), P2
Insert a marker at the beginning of round and let the marker follow the piece as you progress (for size 1/3 months + 6/9 months + 2/3 years, insert the marker in the middle of the first cable on round) = mid underarm.
Continue in pattern as described above – at the same time when piece measures 6 cm / 2⅜" inc 2 sts mid under arm (for size 1/3 months + 6/9 months + 2/3 years, inc 1 st on each side of cable). Inc 2 sts a total of 5-8-5 (9) times, for size 1/3 months: on every 6th round, for size 6/9 months: on every 5th round, for size 12/18 months: on every 8th round, for size 2/3 years: on every 7th round = 54-64-72 (86) sts – purl new sts.
When piece measures 15-17-17 (24) cm / 6"-6¾"-6¾" (9½") – adjust so that next row is worked on the same row in diagram as back and front pieces so that pattern continues when body and sleeves are put in on the same needle – bind off 6-8-8 (8) sts mid under arm = 48-56-64 (78) left.
Put sts on a holder and work the other sleeve.

Yoke: Put sleeves in on the same needle as body piece where you bound off for armholes = 238-270-294 (350) sts. There are now 10-12-10 (10) purled sts (seen from the right side) between each cable all the way round.
Continue in pattern as before. Work 3 or 4 rows (for size 2/3 years, work 7 or 8 rows) before starting the decreases – make sure that 1st row with dec are worked from the right side.
Now dec 1 st in each purled section by purling tog the 2 middle P sts from the right side.
Dec on every 6th row: 0-0-6 (8) times, on every 4th row: 8-8-2- (0) times and on every other row 0-2-0 (0) times.
After the last dec there are 2 purled sts between each cable all the way round and there are 110-110-134 (158) sts on row.
Discontinue the pattern after 1 row after a cable.
Now work 1 row from the right side, at the same time adjusting number of sts to 63-65-69 (73) (do not dec over the front band sts). Knit 3 rows garter sts and knit next row as follows (holes): K5, *yo, K2 tog*, repeat from *-* until there are 4 sts left and knit these in garter sts. Knit 2 rows garter sts and bind off loosely from wrong side.

Assembly:
Sew the openings under the sleeves. Sew on buttons. Fold 5 cm / 2" on each sleeve edge towards the right side and attach with small, neat sts.


HAT:
Size: 1/3 – 6/9 – 12/18 months (2/4 years)
To fit head circumference: 40/42 – 42/44 – 44/46 (48/50) cm / 16"-17"-17½" (19½")

The hat is worked in the round.
Loosely cast on 104-109-114 (120) sts with Alpaca on circular needle size 2.5 mm / US 1or2 and work in garter sts.
When piece measures 5-6-6 (7) cm / 2"-2½"-2½" (2¾") insert a marker (folding edge) - measure piece from here.
When piece measures 5-6-6 (7) cm / 2"-2½"-2½" (2¾") knit 1 round, at the same time inc evenly to 112-128-126 (140) sts.
Now work diagram M.2A (remember diagram for appropriate size).
When piece measures 12-12-14 (16) cm / 4¾"-4¾"-5½" (6¼") dec 1 st in each purled section by purling tog the 2 middle P sts on each round (the last time P tog 1 P and 1 K st) until there are 32-32-36 (40) sts left.
Pull a double strand of Alpaca through the remaining sts and pull tight.
The hat measures approx 15-16-17 (19) cm / 6"-6¼"-6¾" (7½") from marker.
Fold the bottom edge towards the right side and attach each side with neat sts.

Pompon:
Make a pompon with a diameter of approx 5-6 cm / 2"-2½" and attach to top of hat.


MITTENS:
Size: 1/3 – 6/9 – 12/18 months (2/4 years)

The 2 bigger sizes have thumbs, the 2 smaller sizes are without..
The mitten is worked in the round.
Loosely cast on 34-36-36 (38) sts with Alpaca on double pointed needles size 2.5mm/US 1or2 and work garter sts – se explanation above – until piece measures 2 cm / ¾".
Now K1 round and at the same time dec 6-4-4- (2) sts evenly = 28-32-32- (36) sts. Continue in Rib with K2/P2.
When piece measures 4-4-5 (6) cm / 1½"-1½"-2" (2½") K1 round, at the same time increasing evenly to 32-36-39 (40) sts – insert a marker at the beginning of round and a marker after 16-18-18 (20) sts – measure piece from here.
Now purl all sts and at the same time working M.3 over the middle 12 sts on top of hand (the first 16-18-18 (20) sts = top of hand) – arrow in diagram marks the middle.
The 2 bigger sizes: At the same time, after 1 (2) cm / ½"-¾" in pattern, put the last 5 (6) sts on round on a holder for thumb. Cast on 5 (6) new sts over the holder on next row.
All sizes: When piece measures 6-7-8 (9) cm / 2½"-2¾"-3" (3½") – adjust after 1 or 2 rounds after a cable – dec 8-9-9 (10) sts evenly on every other round a total of 3 times = 8-9-9 (10) sts left (dec 1 st by P2 tog).
Pull a double strand of Alpaca through remaining sts, pull tight and sew.

Thumb: Put the 5 (6) sts from holder back on double pointed needles size 2.5mm/US 1or2 and pick up 7 (8) sts behind these = 12 (14) sts.
Purl until thumb measures 3 (4) cm / 1" (1½"). Now P2 tog around.
Pull yarn through remaining sts and sew.
Make another mitten, but make thumb in the other side (applies to the 2 bigger sizes).

String: Cast on 4 sts using Alpaca on needles size 2.5mm/US 1 or 2 and knit a tube as follows: *K1, put yarn in front of piece, slip 1 st as if to purl, put yarn behind piece*, repeat from *-* on all rows until string measures approx 62-67-74 (86 to 96) cm / 24½"-26½"-29" (334" to 38") (length between child’s wrists).
Bind off and attach string to each mitten.


SOCKS:
Size: 1/3 – 6/9 – 12/18 months (2/4 years)
To fit foot length: 10-11-12 (14) cm / 4"-4½"-4¾" (5½")

The sock is worked in the round top down.
Cast on 44-48-52 (56) sts using Alpaca on double pointed needles size 2.5mm/ US 1or2. K1 round and continue in Rib with K2/P2 until piece measures 8-8-9 (10) cm / 3"-3¼"-3½" (4"). K1 round, at the same time dec 4-8-8 (8) sts evenly = 40-40-44 (48) sts.
Now work heel as follows: work 3-3.5–3.5 (4.5) cm / 1"-1¼"-1¼" (1¾") in stockinette stitch back and forth over 16-16-16 (18) sts mid back.

Heel decreases:
(1st row = right side): K 9-9-9 (10), K2 tog into back of st, K1, turn the piece,
2nd row: slip 1 st as if to knit, P 3-3-3 (4), P2 tog, P1, turn the piece,
3rd row: slip 1 st as if to knit, K 4-4-4 (5), K2 tog into back of st, K1, turn the piece,
4th row: slip 1 st as if to knit, P 5-5-5 (6), P2 tog, P1, turn the piece,
5th row: slip 1 st as if to knit, K 6-6-6 (7), K2 tog into back of st, K1, turn the piece,
6th row: slip 1 st as if to knit, P 7-7-7 (8), P2 tog, P1, turn the piece,
7th row: K2 tog, K 6-6-6 (8), K2 tog into back of st = 8-8-8 (10) sts on row ( = total 32-32-36 (40) sts.
Pick up 7-8-8- (11) sts on each side of heel and put all sts on same needle = 46-48-52 (62) sts.
Continue in stockinette st over all sts. At the same time, dec 1 st on each side of the upper 18-20-22 (26) sts: on every other row a total of 7 times = 32-34-38 (48) sts.
When foot measures 8-9-9 (11) cm / 3"-3½"-3½" (4½") from the beginning of the dec for heel, insert a marker each side.
Now dec on both sides of each marker (= 4 dec per round) on every round a total of 7-7-8 (10) times.
Pull yarn though remaining sts and sew.

BLANKET: see pattern 14-20
RATTLE: see pattern 14-30

This pattern has been corrected.

Updated online: 24.03.2014
under Sleeve:
Cast on 40-42-44 (48) sts with Alpaca on double pointed needles size 2.5mm / US 1or2 and work garter sts in the round on needles.
...
Updated online: 28.07.2023
JACKET, Body: ... Repeat the dec on every 3.5-3.5-4.5 (5) cm = 1 1/4"-1 1/4"-1 5/8" (5) a total of 3 times until there are 10-12-10 (10) P sts left in each purled section = 154-174-182 (210) sts on row.

Diagram

All measurements in charts are in cm.

symbols = K from RS, P from WS
symbols = P from RS, K from WS
symbols = put 2 st on cable needle behind the piece, K2, K2 from cable needle
diagram
diagram
Do you have a question? See a list of frequently asked questions (FAQ)

Knitting tension is what determines the final measurements of your work, and is usually measured per 10 x 10 cm. It is provided like so: number of stitches in width x number of rows in height - eg: 19 stitches x 26 rows = 10 x 10 cm.

The knitting tension is very individual; some people knit/crochet loosely while others work tightly. You adjust the knitting tension with the needle size, which is why the suggested needle size only serve as a guide! You need to adjust this (up or down) to ensure that YOUR knitting tension matches the knitting tension provided in the pattern. If you work with a different knitting tension than provided you will have a different yarn consumption, and your work will have different measurements than what the pattern suggests.

The knitting tension also determines which yarns can replace each other. As long as you achieve the same knitting tension you can replace one yarn with another.

See DROPS lesson: How to measure your tension/gauge

See DROPS video: How to make a gauge tension swatch

The required amount of yarn is provided in grams, eg: 450 g. To calculate how many balls you’ll need you first need to know how many grams are in 1 ball (25g, 50g or 100g). This information is available if you click on the individual yarn quality on our pages. Divide the amount required with the amount of each ball. For example, if each ball is 50g (the most common amount), the calculation will be as follows: 450 / 50 = 9 balls.

The important thing when changing from one yarn to another is that the knitting/crochet tension remains the same. This is so that the measurements of the finished piece will be the same as on the sketch provided. It is easier to achieve the same knitting tension using yarns from the same yarn group. It is also possible to work with multiple strands of a thinner yarn to achieve the knitting tension of a thicker one. Please try our yarn converter. We recommend you to always work a test swatch.

Please NOTE: when changing yarn the garment might have a different look and feel to the garment in the photo, due to individual properties and qualities of each yarn.

See DROPS lesson: Can I use a different yarn than the one mentioned in the pattern?

All our yarns are categorised into yarn groups (from A to F) according to thickness and knitting tension – group A contains the thinnest yarns and group F the thickest. This makes it easier for you to find alternative yarns to our patterns, should you wish to switch yarn. All yarns within the same group have a similar knitting tension and can easily replace each other. However, different yarn qualities have different structures and properties which will give the finished work a unique look and feel.

Click here for an overview of the yarns in each yarn group

At the top of all our patterns you’ll find a link to our yarn converter, which is a helpful tool should you wish to use a different yarn than suggested. By filling in the yarn quality you wish to replace, the amount (in your size) and number of strands, the converter will present good alternative yarns with the same knitting tension. Additionally it will tell you how much you’ll require in the new qualities and whether you’ll need to work with multiple strands. Most skeins are 50g (some are 25g or 100g).

If the pattern is worked with multiple colours, every colour will have to be converted separately. Similarly, if the pattern is worked with several strands of different yarns (for example 1 strand Alpaca and 1 strand Kid-Silk) you will have to find alternatives for each, individually.

Click here to see our yarn converter

Since different yarns have different qualities and textures we have chosen to keep the original yarn in our patterns. However, you can easily find options among our available qualities by using our yarn converter, or simply pick a yarn from the same yarn group.

It is possible that some retailers still have discontinued yarns in stock, or that someone has a few skeins at home that they would like to find patterns for.

The yarn converter will provide both alternative yarn as well as required amount in the new quality.

If you think it's hard to decide what size to make, it can be a good idea to measure a garment you own already and like the size of. Then you can pick the size by comparing those measures with the ones available in the pattern's size chart.

You'll find the size chart at the bottom of the pattern.

See DROPS lesson: How to read size chart

The needle size provided in the pattern serves only as a guide, the important thing is to follow the knitting tension. And since knitting tension is very individual, you will have to adjust the needle size to ensure that YOUR tension is the same as in the pattern – maybe you’ll have to adjust 1, or even 2 needle sizes, up or down to achieve the correct tension. For this, we recommend that you work test swatches.

Should you work with a different knitting tension than the one provided, the measurements of the finished garment might deviate from the measurement sketch.

See DROPS lesson: How to measure your tension/gauge

See DROPS video: How to make a gauge tension swatch

Working a garment top-down provides more flexibility and room for personal adjustment. For example it is easier to try the garment on while working, as well as making adjustments to length of yoke and shoulder caps.

The instructions are carefully explaining every step, in the correct order. Diagrams are adjusted to the knitting direction and are worked as usual.

The diagram depicts all rows/rounds, and every stitch seen from the right side. It is read from bottom to top, from right to left. 1 square = 1 stitch.

When working back and forth, every other row is worked from the right side and every other row is worked from the wrong side. When working from the wrong side, the diagram will have to be worked reversed: from left to right, knit stitches are purled, purl stitches are knit etc.

When working in the round every round is worked from the right side and the diagram are worked from right to left on all rounds.

See DROPS lesson: How to read knitting diagrams

The diagram depicts all rows/rounds, and every stitch seen from the right side. It is worked from bottom to top, from right to left.

When working back and forth every other row is worked from the right side: from right to left and every other row is worked from the wrong side: from left to right.

When working in the round, every row in the diagram are worked from the right side, from right to left.

When working a circular diagram you start in the middle and work your way outwards, counter clockwise, row by row.

The rows usually start with a given number of chain stitches (equivalent to the height of the following stitch), this will either be depicted in the diagram or explained in the pattern.

See DROPS lesson: How to read crochet diagrams

Instructions for working several diagrams after each other on the same row/round, will often be written like so: “work A.1, A.2, A.3 a total of 0-0-2-3-4 times". This means you work A.1 once, then A.2 is worked once, and A.3 is repeated (in width) the number of times provided for your size – in this case like so: S = 0 times, M = 0 times, L=2 times, XL= 3 times and XXL = 4 times.

The diagrams are worked as usual: begin with the first row in A.1, then work the first row in A.2 etc.

See DROPS lesson: How to read knitting diagrams

See DROPS lesson: How to read crochet diagrams

The total width of the garment (from wrist-to-wrist) will be larger in the larger sizes, despite the actual sleeves being shorter. The larger sizes have longer sleeve caps and wider shoulders, so there will be a good fit in all sizes.

The measurement sketch/schematic drawing provides information regarding the full length of the garment. If it’s a jumper or a jacket the length is measured from the highest point on the shoulder (usually closest to the neckline), and straight down to the bottom of the garment. It is NOT measured from the tip of shoulder. Similarly, the length of yoke is measured from the highest point on the shoulder and down to where yoke is split into body and sleeves.

See DROPS lesson: How to read a schematic drawing

Diagrams are often repeated on the round or in height. 1 repeat is the diagram the way it appears in the pattern. If it says to work 5 repeats of A.1 in the round, then you work A.1 a total of 5 times after/next to each other in the round. If it says to work 2 repeats of A.1 vertically/in height you work the entire diagram once, then begin again at the start and work the entire diagram one more time.

Chain stitches are slightly narrower than other stitches and to avoid working the cast-on edge too tight, we simply chain more stitches to begin with. The stitch count will be adjusted on the following row to fit the pattern and measurement sketch.

The rib edge is more elastic and will contract slightly compared to, for example, stocking stitch. By increasing before the rib edge, you avoid a visible difference in width between the rib edge and the rest of the body.

It’s very easy to cast off too tightly, and by making yarn overs while casting off (and simultaneously casting these off) you avoid a too tight cast off edge.

See DROPS video: How to bind off with yarn overs (yo)

To achieve an even increase (or decrease) you can increase on, for example: every 3rd and 4th row alternately, like so: work 2 rows and increase on the 3rd row, work 3 rows and increase on the 4th. Repeat this until the increase is complete.

See DROPS lesson: Increase or decrease 1 st on every 3rd and 4th row alternately

Should you prefer to work in the round instead of back and forth, you may of course adjust the pattern. You’ll need to add steeks mid-front (usually 5 stitches), and follow the instructions. When you would normally turn and work from the wrong side, simply work across the steek and continue in the round. At the end you’ll cut the piece open, pick up stitches to work bands, and cover the cut edges.

See DROPS video: How to knit steeks and cut open

Should you prefer to work back and forth instead of in the round, you may of course adjust the pattern so you work the pieces separately and then assemble them at the end. Divide the stitches for the body in 2, add 1 edge stitch in each side (for sewing) and work the front and back pieces separately.

See DROPS lesson: Can I adapt a pattern for circular needles into straight needles?

Pattern repeats can vary slightly in the different sizes, in order to get the correct proportions. If you’re not working the exact same size as the garment in the photo, yours might deviate slightly. This has been carefully developed and adjusted so that the complete impression of the garment is the same in all sizes.

Make sure to follow instructions and diagrams for your size!

If you have found a pattern you like which is available in women’s size it’s not very difficult to convert it to men’s size. The biggest difference will be the length of sleeves and body. Start working on the women size that you think would fit across the chest. The additional length will be worked right before you cast off for the armhole/sleeve cap. If the pattern is worked top-down you can add the length right after the armhole or before the first decrease on sleeve.

Regarding additional yarn amount, this will depend on how much length you add, but it is better with a skein too many than too few.

All yarns will have excess fibres (from production) that might come off as lint or shedding. Brushed yarns (ie hairier yarns) have more of these loose, excess fibres, causing more shedding.

Shedding also depends on what is worn under or over the garment, and whether this pulls at the yarn fibres. It’s therefore not possible to guarantee that there will be no shedding

Below are some tips on how to get the best result when working with hairier yarns:

1. When the garment is finished (before you wash it) shake it vigorously so the looser hairs come off. NOTE: do NOT use a lint roller, brush or any method that pulls at the yarn.

2. Place the garment in a plastic bag and put it in your freezer - the temperature will cause the fibres to become less attached to each other, and excess fibres will come off easier.

3. Leave in the freezer for a few hours before taking it out and shaking it again.

4. Wash the garment according to the instructions on the yarn label.

Pilling is a natural process that happens to even the most exclusive of fibers. It's a natural sign of wear and tear that is hard to avoid, and that is most visible in high friction areas of your garment like a sweater's arms and cuffs.

You can make your garment look as new by removing the pilling, using a fabric comb or a pill/lint remover.

Still can't find the answer you need? Then scroll down and leave your question so one of our experts can try to help you. This will be done normally within 5 to 10 working days.
In the meantime, you can read the questions and answers that others have left to this pattern or join the DROPS Workshop on Facebook to get help from fellow knitters/crocheters!

You might also like...

Post a comment to pattern DROPS Baby 14-2

We would love to hear what you have to say about this pattern!

If you want to leave a question, please make sure you select the correct category in the form below, to speed up the answering process. Required fields are marked *.

Comments / Questions (105)

country flag DROPS Design wrote:

Hej, Mönster och diagram är rätt, andra varvet på stl 1/3 börjas med en fläta och avslutas med 4 aviga maskor. Mönster och diagram läses alltid från höger till vänster.

08.06.2010 - 09:55

country flag Sandra wrote:

Hej, jag har samma problem som Ann ang. stl 1/3mån, ärmen. Det blir två flätor bredvid varandara. De sista fyra maskorna är räta på M.2A och de fyra första på M.2B är räta i slutet på varvet(=8 räta=två flätor). Jag förstår inte var i mönstret jag gör fel, hjälp!

05.06.2010 - 11:57

country flag DROPS Design wrote:

Hej, enligt diagramtexten skall X stickas am på rätsidan, rm på avigsidan. Om du fortfarande inte förstår, bör du ta med dig din stickning till garnaffären där du köpt ditt garn.

20.01.2010 - 15:03

country flag Ann wrote:

Ang. stl 1/3 månader, ärmen. Mitt maskantal stämmer med 44 m. Först stickar jag M.2B (=4m), sen stickar jag 4 am. Sen när jag stickar M.2A över de övriga 28 m så slutar jag rapporten med att sticka rm på rätsidan, sen ska man sticka M.2B (=4m) vilket också betyder rm på rätsidan. Då får jag det till att det blir 8 rm bredvid varandra. Då jag stickar på rundstickor är jag på rätsidan hela tiden. Sen kommer de 4 am i slutet av varvet vilket det ska göra. Jag kan inte förstå vad jag gör för fel!

20.01.2010 - 11:59

country flag DROPS Design wrote:

Hej Ann, När du gjort de ökningar du skall i strl 1/3 mnd skall du ha 44 m på st. Sedan skall du sticka M.2B (= 4 m), sedan stickar du 4 aviga maskor, sedan stickar du M.2A över de följande 28 m, sedan kommer M.2B (= 4 m) och till slut 4 aviga maskor. Flätorna kommer inte bredvid varandra. Lycka till!

20.01.2010 - 11:05

country flag Ann wrote:

Är mönstret till koftan fel när det gäller ärmen till stl:1/3 månader? Det blir nämligen 2st flätor bredvid varandra.

19.01.2010 - 23:31

country flag Ann wrote:

Beskrivningen till koftan måste vara fel när det gäller ärmen till stl:1/3 månader. Om man inte utesluter M.2B i slutet på varvet blir det två flätor bredvid varandra.

19.01.2010 - 23:05

country flag Drops Design wrote:

Hej Midt under ærmet bliver der hvor du sætter mærketråden: I Str 2/3 år sættes mærketråden midt i den første snoning på omg)du skal da tage ud på hver side af snoningen midt under ærmet. God fornøjelse!

30.03.2009 - 13:24

country flag Jeanette Sørensen wrote:

Strikker trøjen i str. 2/3 år men kan ikke få snoningsmønsteret til at passe på ærmet. Snoningerne sidder alt for tæt midt under ærmet. Skal de to vrangmasker ikke flyttes?

27.03.2009 - 23:00

country flag Anne wrote:

Helt nydelig jakke, lett og forstå seg på oppskriften, selv for en "nybegynner" på fletting.. Denne kommer nok til å bli mye brukt!!

12.02.2009 - 13:24