DROPS Alpaca
DROPS Alpaca
100% alpaka
od 95.00 Kč /50g
DROPS Snow
DROPS Snow
100% vlna
od 57.00 Kč /50g
Přízi na tento model můžete mít už za 342.00Kč.

Cenu za klubka počítáme podle spotřeby při výrobě modelu v nejmenší velikosti a nejlevnější variantě příze. Rádi byste ještě lepší cenu? Třeba ji najdete mezi DROPS Deals!

Little Sprout

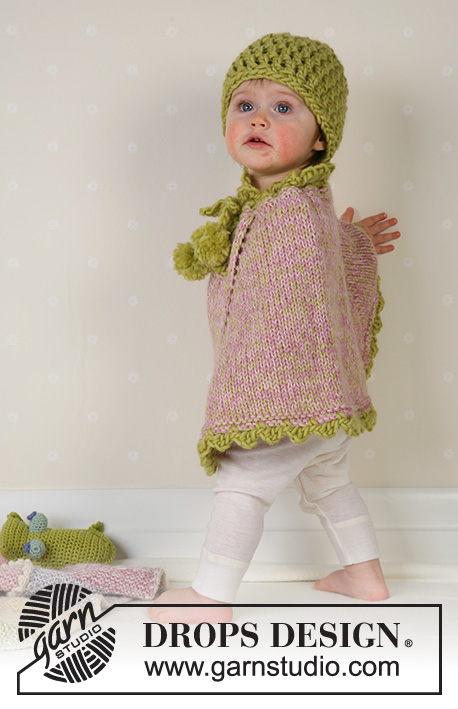
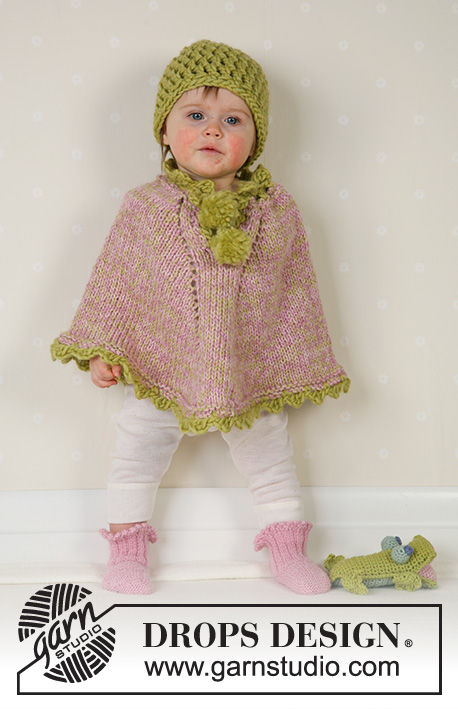
Pončo s bambulemi a ponožky pletené z příze DROPS Alpaca a čepice háčkovaná z příze DROPS Snow. Velikosti pro miminka i děti, od 1 měsíce do 4 let.

DROPS Baby 14-1
DROPS design: model č.
Skupina přízí: A + A + A a E
-----------------------------------------------------------
PONČO:
Velikost: 1/3 - 6/9 - 12/18 měsíců (2 – 3/4 roky)
Velikost v cm: 50/56 – 62/68 – 74/80 (92 – 98/104)
Délka vpředu v cípu: asi 32-34-36 (38-41) cm

Materiál: DROPS ALPACA firmy Garnstudio
50-50-50 (100-100) g, barva č. 3140, světlá růžová
50-50-50 (100-100) g, barva č. 3720, růžová
50-50-50 (100-100) g, barva č. 7300, jablková
a
DROPS SNOW firmy Garnstudio
50 g pro všechny velikosti, barva č. 35, limetková

DROPS KRUHOVÁ JEHLICE č.6 – nebo velikosti potřebné k upletení zkušebního vzorku o rozměrech 14 ok x 18 řad lícovým žerzejem 3 vlákny příze Alpaca = 10 x 10 cm.
DROPS HÁČEK č.8 – na lemy.
-------------------------
ČEPICE:
Velikost: 1/3 - 6/9 - 12/18 měsíců (2 – 3/4 roky)
Obvod hlavy: 40/42 – 42/44 – 44/46 (46/48 – 50/52) cm

Materiál: DROPS SNOW firmy Garnstudio
50-50-50 (100-100) g, barva č. 35, limetková

DROPS HÁČEK č.8 – nebo velikosti potřebné k uháčkování zkušebního vzorku o rozměrech 8 DS x 5 řad = 10 x 10 cm.
-----------------------------
PONOŽKY:
Velikost: 1/3 - 6/9 - 12/18 měsíců (2 roky)
Délka chodidla: 10-11-12 (14) cm

Materiál: DROPS ALPACA firmy Garnstudio
50 g pro všechny velikosti, barva č. 3140, světlá růžová

DROPS JEHLICE č.2,5 – nebo velikosti potřebné k upletení zkušebního vzorku o rozměrech 26 ok x 34 řad lícovým žerzejem a 26 ok x 52 řad vroubkovým vzorem = 10 x 10 cm.
DROPS HÁČEK č.2,5 – na lemy.

-------------------------------------------------------

Náhradní příze – Podívejte se, jak změnit přízi
Skupina přízí A až F – Neměňte návod, změňte přízi
Spotřeba příze při použití náhradní příze – Využijte náš převodník

-------------------------------------------------------

DROPS Alpaca
DROPS Alpaca
100% alpaka
od 95.00 Kč /50g
DROPS Snow
DROPS Snow
100% vlna
od 57.00 Kč /50g
Přízi na tento model můžete mít už za 342.00Kč.

Cenu za klubka počítáme podle spotřeby při výrobě modelu v nejmenší velikosti a nejlevnější variantě příze. Rádi byste ještě lepší cenu? Třeba ji najdete mezi DROPS Deals!

DROPS Super Sale

SAVE 30% on 6 cotton favourites!
Platí do 12.04.2024

Návod

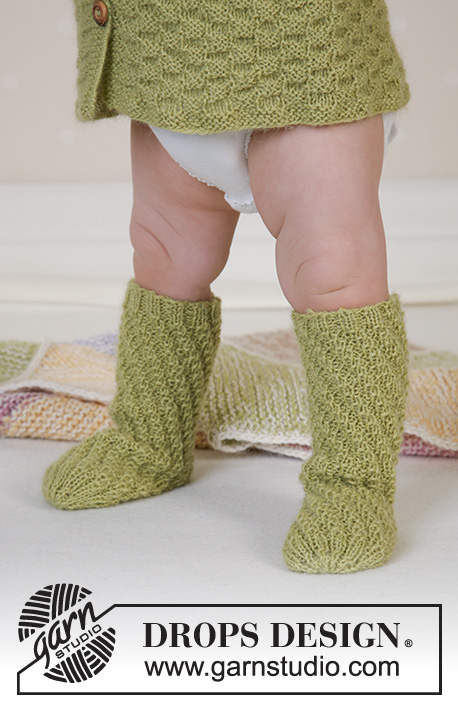
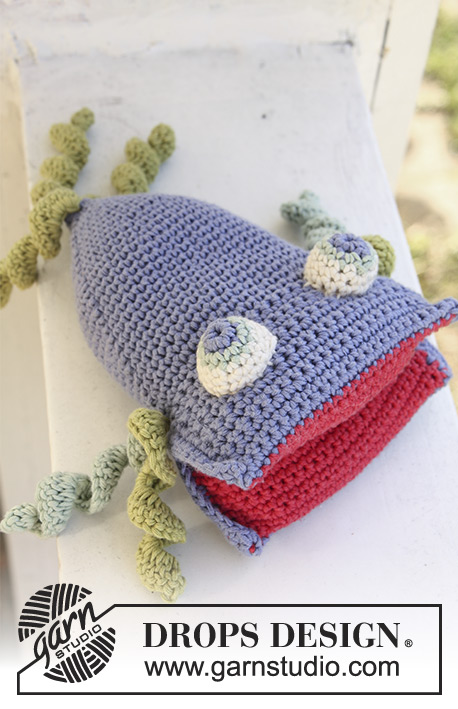
PONČO:
Pleteme shora dolů, od průkrčníku k cípu.
Na kruhovou jehlici č.6 nahodíme 1 vláknem od každé barvy příze Alpaca (= trojitou přízí) 54-56-58 (60-62) ok a vložíme značku mezi 2 středová oka (= střed zadní strany). Upleteme 2 řady vroubkovým vzorem v řadách od středu přední strany (= konce řady) a pokračujeme stále v řadách, takto (= pleteme rozparek výstřihu na přední straně): pleteme lícovým žerzejem se 2 vnějšími oky na každé straně vroubkovým vzorem (= okraj výstřihu).
SOUČASNĚ přidáme v každé 2. řadě 4 oka (přidáváme v lícových řadách), takto: upleteme 4 oka, 1x nahodíme, pak 1x nahodíme na každé straně středových 8 ok a 1x nahodíme před posledními 4 oky v řadě. V následující řadě pleteme nahození hladce běžným způsobem – v pletenině pak vzniknou ozdobné dírky.
Ve výši 6-7-8 (9-10) cm výstřih ukončíme a pleteninu spojíme – pokračovat budeme v kruhových řadách, pleteme stále hladce.
Pokračujeme v přidávání v každé 2. kruhové řadě, tj. na každé straně středových 8 ok na přední i na zadní straně.
Když máme v kruhové řadě 138-148-158 (168-178) ok, upleteme 1 kruhovou řadu obrace. Pak pleteme 1 kruhovou řadu hladce a SOUČASNĚ rozpleteme každé 4. oko v kruhové řadě na dvě.
V následující kruhové řadě všechna oka obrace uzavřeme.

HÁČKOVANÉ LEMY:
Háčkem č.8 obháčkujeme dolní okraj ponča přízí Snow, takto: 1 KS do 1. oka, *4 řo, 1 DS do 1. ze 4 právě uháčkovaných DS, 3 oka vynecháme, 1 KS do následujícího oka*, *-* opakujeme a končíme 1 pevným okem do 1. KS.
Průkrčník i výstřih obháčkujeme, takto – začínáme v levém horním rohu výstřihu: 1 KS do 1. oka, *1 řo, 2 oka/řady vynecháme, 1 KS do následujícího oka/řady*, *-* opakujeme a končíme 1 pevným okem do 1. KS. Po obvodu průkrčníku (mimo rozparek) háčkujeme takto: 1 KS do 1. oka, *4 řo, 1 DS do 1. ze 4 právě uháčkovaných řo, 1 řo vynecháme, 1 KS do následujícího řo*, *-* opakujeme.
Uháčkujeme si šňůrku – řetízek dlouhou asi 60-65-70 (75-80) cm a provlečeme ji 1. háčkovanou řadou po obvodu průkrčníku. Z příze Snow si vyrobíme 2 malé bambulky a přišijeme je na konce šňůrky.
-------------------------------
ČEPICE:

TIP:
První DS v každé kruhové řadě nahrazujeme 3 řo.

Háčkujeme shora dolů. Z příze Snow uháčkujeme 6 řo a spojíme je pevným okem do kroužku.
1. KRUHOVÁ ŘADA: do kroužku z řo uháčkujeme 10 DS – viz TIP!
2. KRUHOVÁ ŘADA: 1 DS do 1. DS, *1 řo, 1 DS do následujícího DS*, *-* opakujeme a končíme 1 řo a 1 pevným okem do 1. DS ze začátku kruhové řady.
3. KRUHOVÁ ŘADA: *1 DS do prvního DS, 2 DS do obloučku z řo*, *-* opakujeme a končíme 1 řo a 1 pevným okem do 1. DS ze začátku kruhové řady ( = 30 DS).
4. KRUHOVÁ ŘADA: 1 DS do prvního DS, *1 řo, 1 DS vynecháme, 1 DS do následujícího DS*, *-* opakujeme a končíme 1 řo a 1 pevným okem do 1. DS ze začátku kruhové řady (= 15 DS)
5. KRUHOVÁ ŘADA: pokračujeme DS, ale 0-2-4 (6-8) DS v kruhové řadě rozháčkujeme na dva – toto přidávání rovnoměrně rozmístíme v kruhové řadě = 30-32-34 (36-38) DS.
Nyní uháčkujeme 2-3-3 (4-4) kruhové řady DS.
Následující kruhovou řadu háčkujeme takto: 1 KS do 1. DS, *2 řo, 1 DS vynecháme, 1 KS do následujícího DS*, *-* opakujeme a končíme 1 řo a 1 pevným okem do 1. KS ze začátku kruhové řady. Přízi odstřihneme.
Čepice je vysoká asi 15-17-17 (19-19) cm od vrcholku k dolnímu okraji.
---------------------------------
PONOŽKY:

PRUŽNÝ VZOR:
Pleteme střídavě 2 oka hladce, 2 obrace.

Pleteme v řadách od středu zadní strany.
Na jehlice č. 2,5 nahodíme dvojitou přízí Alpaca 48-52-56 (56) ok. Pak jedno vlákno příze odstraníme a dál pleteme jen jedním vláknem. Upleteme 5-6-6 (7) cm výšky pružným vzorem – končíme lícovou řadou. Pak pleteme 1 řadu obrace a SOUČASNĚ ujmeme rovnoměrně 14-14-18 (14) ok = 34-38-38 (42) ok.
Verze s dírkovou řadou:
Následující lícovou řadu pleteme takto: 1 oko hladce, *2 oka spleteme hladce, 1x nahodíme*, *-* opakujeme a končíme 1 okem hladce. Upleteme 1 rubovou řadu obrace.
Verze bez dírkové řady:
Upleteme 1 lícovou řadu hladce a 1 rubovou řadu obrace.

Nyní odložíme vnějších 12-13-13 (15) ok na každé straně dílu na pomocnou jehlici. Nad prostředními 10-12-12 (12) oky (= nárt) upleteme 4-4,5-5,5 (6,5) cm výšky lícovým žerzejem. Odložená oka vrátíme z pomocných jehlic zpět na jehlice a na každé straně nártu nabereme 10-11-13 (16) ok = 54-60-64 (74) ok. Upleteme 3-4-5 (5) cm výšky lícovým žerzejem nad všemi oky a SOUČASNĚ po 1,5-2-2,5 (3,5) cm výšky ujmeme 1 oko na začátku a 1 oko na konci řady a na každé straně 2 středových ok spleteme 2 oka hladce; toto ujímání opakujeme v každé 2. řadě. Když je chodidlo dlouhé 10-11-12 (14) cm, všechna oka uzavřeme a chodidlo i patu sešijeme.
U verze s dírkovou řadou provlečeme dírkami stužku a zavážeme.

HÁČKOVANÝ LEM:
Háčkem č.2,5 háčkujeme přízí Alpaca lem kolem horního okraje ponožky, takto: 1 KS do 1. oka, *3 řo, 1 DS do 1. ze 3 právě uháčkovaných řo , po 1 KS do každého z následujících 3 ok*, *-* opakujeme a končíme pevným okem do KS ze začátku kruhové řady.

Každý náš návod je doprovázen speciálními video-ukázkami, které vás navedou.

Chcete se na něco zeptat? Projděte si seznam nejčastějších otázek (FAQ).

Knitting tension is what determines the final measurements of your work, and is usually measured per 10 x 10 cm. It is provided like so: number of stitches in width x number of rows in height - eg: 19 stitches x 26 rows = 10 x 10 cm.

The knitting tension is very individual; some people knit/crochet loosely while others work tightly. You adjust the knitting tension with the needle size, which is why the suggested needle size is only meant as a guide! You need to adjust this (up or down) to ensure that YOUR knitting tension matches the knitting tension provided in the pattern. If you work with a different knitting tension than provided you will have a different yarn consumption, and your work will have different measurements than what the pattern suggests.

The knitting tension also determines which yarns can replace each other. As long as you achieve the same knitting tension you can replace one yarn with another.

See DROPS lesson: How to measure your tension/gauge

See DROPS video: How to make a gauge tension swatch

The required amount of yarn is provided in grams, eg: 450 g. To calculate how many balls you’ll need you first need to know how many grams are in 1 ball (25g, 50g or 100g). This information is available if you click on the individual yarn quality on our pages. Divide the amount required with the amount of each ball. For example, if each ball is 50g (the most common amount), the calculation will be as follows: 450 / 50 = 9 balls.

The important thing when changing from one yarn to another is that the knitting/crochet tension remains the same. This is so that the measurements of the finished piece will be the same as on the sketch provided. It is easier to achieve the same knitting tension using yarns from the same yarn group. It is also possible to work with multiple strands of a thinner yarn to achieve the knitting tension of a thicker one. Please try our yarn converter. We recommend you to always work a test swatch.

Please NOTE: when changing yarn the garment might have a different look and feel to the garment in the photo, due to individual properties and qualities of each yarn.

See DROPS lesson: Can I use a different yarn than the one mentioned in the pattern?

All our yarns are categorised into yarn groups (from A to F) according to thickness and knitting tension – group A contains the thinnest yarns and group F the thickest. This makes it easier for you to find alternative yarns to our patterns, should you wish to switch yarn. All yarns within the same group have a similar knitting tension and can easily replace each other. However, different yarn qualities have different structures and properties which will give the finished work a unique look and feel.

Click here for an overview of the yarns in each yarn group

At the top of all our patterns you’ll find a link to our yarn calculator, which is a helpful tool should you wish to use a different yarn than suggested. By filling in the yarn quality you wish to replace, the amount (in your size) and number of strands, the calculator will present good alternative yarns with the same knitting tension. Additionally it will tell you how much you’ll require in the new qualities and whether you’ll need to work with multiple strands. Most skeins are 50g (some are 25g or 100g).

If the pattern is worked with multiple colours, every colour will have to be calculated separately. Similarly, if the pattern is worked with several strands of different yarns (for example 1 strand Alpaca and 1 strand Kid-Silk) you will have to find alternatives for each, individually.

Click here to see our yarn calculator

Since different yarns have different qualities and textures we have chosen to keep the original yarn in our patterns. However, you can easily find options among our available qualities by using our yarn calculator, or simply pick a yarn from the same yarn group.

It is possible that some retailers still have discontinued yarns in stock, or that someone has a few skeins at home that they would like to find patterns for.

The yarn calculator will provide both alternative yarn as well as required amount in the new quality.

If you think it's hard to decide what size to make, it can be a good idea to measure a garment you own already and like the size of. Then you can pick the size by comparing those measures with the ones available in the pattern's size chart.

You'll find the size chart at the bottom of the pattern.

See DROPS lesson: How to read size chart

The needle size provided in the pattern serves only as a guide, the important thing is to follow the knitting tension. And since knitting tension is very individual, you will have to adjust the needle size to ensure that YOUR tension is the same as in the pattern – maybe you’ll have to adjust 1, or even 2 needle sizes, up or down to achieve the correct tension. For this, we recommend that you work test swatches.

Should you work with a different knitting tension than the one provided, the measurements of the finished garment might deviate from the measurement sketch.

See DROPS lesson: How to measure your tension/gauge

See DROPS video: How to make a tension/gauge swatch

Working a garment top-down provides more flexibility and room for personal adjustment. For example it is easier to try the garment on while working, as well as making adjustments to length of yoke and shoulder caps.

The instructions are carefully explaining every step, in the correct order. Diagrams are adjusted to the knitting direction and are worked as usual.

The diagram depicts all rows/rounds, and every stitch seen from the right side. It is read from bottom to top, from right to left. 1 square = 1 stitch.

When working back and forth, every other row is worked from the right side and every other row is worked from the wrong side. When working from the wrong side, the diagram will have to be worked reversed: from left to right, knit stitches are purled, purl stitches are knit etc.

When working in the round every round is worked from the right side and the diagram are worked from right to left on all rounds.

See DROPS lesson: How to read knitting diagrams

The diagram depicts all rows/rounds, and every stitch seen from the right side. It is worked from bottom to top, from right to left.

When working back and forth every other row is worked from the right side: from right to left and every other row is worked from the wrong side: from left to right.

When working in the round, every row in the diagram are worked from the right side, from right to left.

When working a circular diagram you start in the middle and work your way outwards, counter clockwise, row by row.

The rows usually start with a given number of chain stitches (equivalent to the height of the following stitch), this will either be depicted in the diagram or explained in the pattern.

See DROPS lesson: How to read crochet diagrams

Instructions for working several diagrams after each other on the same row/round, will often be written like so: “work A.1, A.2, A.3 a total of 0-0-2-3-4 times". This means you work A.1 once, then A.2 is worked once, and A.3 is repeated (in width) the number of times provided for your size – in this case like so: S = 0 times, M = 0 times, L=2 times, XL= 3 times and XXL = 4 times.

The diagrams are worked as usual: begin with the first row in A.1, then work the first row in A.2 etc.

See DROPS lesson: How to read knitting diagrams

See DROPS lesson: How to read crochet diagrams

The total width of the garment (from wrist-to-wrist) will be larger in the larger sizes, despite the actual sleeves being shorter. The larger sizes have longer sleeve caps and wider shoulders, so there will be a good fit in all sizes.

The measurement sketch/schematic drawing provides information regarding the full length of the garment. If it’s a jumper or a jacket the length is measured from the highest point on the shoulder closest to the neckline, and straight down to the bottom of the garment. It is NOT measured from the tip of shoulder. Similarly, the length of yoke is measured from the highest point on the shoulder and down to where yoke is split into body and sleeves.

On a jacket measures are never taken along bands, unless specifically stated. Always measure inside band stitches when measuring the length.

See DROPS lesson: How to read a schematic drawing

Diagrams are often repeated on the round or in height. 1 repeat is the diagram the way it appears in the pattern. If it says to work 5 repeats of A.1 in the round, then you work A.1 a total of 5 times after/next to each other in the round. If it says to work 2 repeats of A.1 vertically/in height you work the entire diagram once, then begin again at the start and work the entire diagram one more time.

Chain stitches are slightly narrower than other stitches and to avoid working the cast-on edge too tight, we simply chain more stitches to begin with. The stitch count will be adjusted on the following row to fit the pattern and measurement sketch.

The rib edge is more elastic and will contract slightly compared to, for example, stocking stitch. By increasing before the rib edge, you avoid a visible difference in width between the rib edge and the rest of the body.

It’s very easy to cast off too tightly, and by making yarn overs while casting off (and simultaneously casting these off) you avoid a too tight cast off edge.

See DROPS video: How to bind off with yarn overs (yo)

To achieve an even increase (or decrease) you can increase on, for example: every 3rd and 4th row alternately, like so: work 2 rows and increase on the 3rd row, work 3 rows and increase on the 4th. Repeat this until the increase is complete.

See DROPS lesson: Increase or decrease 1 st on every 3rd and 4th row alternately

Should you prefer to work in the round instead of back and forth, you may of course adjust the pattern. You’ll need to add steeks mid-front (usually 5 stitches), and follow the instructions. When you would normally turn and work from the wrong side, simply work across the steek and continue in the round. At the end you’ll cut the piece open, pick up stitches to work bands, and cover the cut edges.

See DROPS video: How to knit steeks and cut open

Should you prefer to work back and forth instead of in the round, you may of course adjust the pattern so you work the pieces separately and then assemble them at the end. Divide the stitches for the body in 2, add 1 edge stitch in each side (for sewing) and work the front and back pieces separately.

See DROPS lesson: Can I adapt a pattern for circular needles into straight needles?

Pattern repeats can vary slightly in the different sizes, in order to get the correct proportions. If you’re not working the exact same size as the garment in the photo, yours might deviate slightly. This has been carefully developed and adjusted so that the complete impression of the garment is the same in all sizes.

Make sure to follow instructions and diagrams for your size!

If you have found a pattern you like which is available in women’s size it’s not very difficult to convert it to men’s size. The biggest difference will be the length of sleeves and body. Start working on the women size that you think would fit across the chest. The additional length will be worked right before you cast off for the armhole/sleeve cap. If the pattern is worked top-down you can add the length right after the armhole or before the first decrease on sleeve.

Regarding additional yarn amount, this will depend on how much length you add, but it is better with a skein too many than too few.

All yarns will have excess fibres (from production) that might come off as lint or shedding. Brushed yarns (ie hairier yarns) have more of these loose, excess fibres, causing more shedding.

Shedding also depends on what is worn under or over the garment, and whether this pulls at the yarn fibres. It’s therefore not possible to guarantee that there will be no shedding

Below are some tips on how to get the best result when working with hairier yarns:

1. When the garment is finished (before you wash it) shake it vigorously so the looser hairs come off. NOTE: do NOT use a lint roller, brush or any method that pulls at the yarn.

2. Place the garment in a plastic bag and put it in your freezer - the temperature will cause the fibres to become less attached to each other, and excess fibres will come off easier.

3. Leave in the freezer for a few hours before taking it out and shaking it again.

4. Wash the garment according to the instructions on the yarn label.

Pilling is a natural process that happens to even the most exclusive of fibers. It's a natural sign of wear and tear that is hard to avoid, and that is most visible in high friction areas of your garment like a sweater's arms and cuffs.

You can make your garment look as new by removing the pilling, using a fabric comb or a pill/lint remover.

Pořád se nemůžete dobrat odpovědi, kterou hledáte? Pak posuňte stránku dolů a napište nám svůj dotaz, naši specialisté se vám pokusí poradit. Obvykle to zvládneme během 5 až 10 pracovních dnů..
Mezitím si můžete pročíst otázky a odpovědi, které k tomuto modelu položili ostatní, nebo navštívit skupinu DROPS Workshop na Facebooku, kde vám může poradit některá spřízněná duše!

Mohly by se vám líbit...

Přidejte komentář k návodu DROPS Baby 14-1

Rádi bychom věděli, co si o tomto modelu myslíte!

Pokud se chcete na něco zeptat, dbejte prosím na to, abyste ve formuláři níže vybrali správnou kategorii - díky tomu se dříve dozvíte, co potřebujete vědět. Povinná pole jsou označena *.

Komentáře / Otázky (34)

country flag Barbara wrote:

Buon giorno. È possibile avere le misure delle lunghezze del poncho? Grazie

04.05.2019 - 07:36

DROPS Design answered:

Buongiorno Barbara. A seconda della taglia, la lunghezza al centro sul davanti è ca: 32-34-36 (38-41) cm. Trova l’indicazione all’inizio delle spiegazioni, prima del materiale occorrente . Buon lavoro!

04.05.2019 - 08:57

country flag Annalisa wrote:

Buonasera, volevo chiederti se esiste un tutorial di inizio, a parte l avvio, come si svolgono i giri seguenti, non capisco l apertura iniziale, grazie

29.11.2018 - 14:56

DROPS Design answered:

Buongiorno Annalisa. Dopo aver avviato le maglie, lavora inizialmente in ferri di andata e di ritorno. Lavora 2 ferri a punto legaccio e poi prosegue a maglia rasata lavorando le prime 2 maglie e le ultime 2 maglie a legaccio. Segua le indicazioni per aumentare. Terminata l'apertura al centro sul davanti, lavora in tondo. Buon lavoro!

29.11.2018 - 16:00

country flag Francoise wrote:

Bonjour,pouvez-vous m'expliquer pour l'encolure du modèle : sauter 2 m/ rangs Dois-je comprendre : je saute 2 m à chaque fois ? Et que veux dire dans la m /le rang suivant ? Grand merci pour votre réponse

08.10.2017 - 20:34

DROPS Design answered:

Bonjour Françoise, pour crocheter la bordure, sautez, en fonction du sens de la partie tricotée, soit 2 mailles (sur les parties en largeur) soit 2 rangs (sur les parties en hauteur), et crochetez la ms suivantes dans la maille ou dans le rang suivant. Bon crochet!

09.10.2017 - 09:24

country flag Béatrice De Flores wrote:

Bonjour, Habituée à suivre sans problème les explications de vos modèles j'ai commandé le fil nécessaire à se modèle sans me poser de question. Cependant je n'arrive pas à comprendre comment on peut arriver à une fente en faisant des allers retours indistinctement. Faut-il répéter quelque chose en s'arrêtant à la moitié du travail? Les indications ne me semblent pas claires. A l'avance merci.

15.03.2017 - 18:09

DROPS Design answered:

Bonjour Mme De Flores, on tricote en allers et retours au tout début, puis on continue en rond jusqu'à la fin, la partie tricotée en rangs va former la fente d'encolure. Bon tricot!

16.03.2017 - 08:26

country flag Gabriele wrote:

Hallo liebes Drops-team, Mit wie viel Fäden wird die Mütze gehäkelt? Liebe Grüße, Gabriele

13.09.2016 - 13:19

DROPS Design answered:

Liebe Gabrielle, die Mütze ist mit 1 Faden Eskimo mit Häkelnadel Nr 8 (siehe Maschenprobe) gehäkelt.

13.09.2016 - 14:11

country flag Inge wrote:

Hvad betyder m/p under hækling af slids?

19.11.2015 - 20:29

DROPS Design answered:

Hej Inge. m/p = maske/pind

20.11.2015 - 10:34

country flag Cinzia wrote:

Come posso fare questo poncho senza ferri circolari? grazie

20.01.2015 - 17:53

DROPS Design answered:

Buonasera Cinzia, la prima parte del poncho è lavorata avanti e indietro sui ferri, poi viene chiuso e lavorato in tondo. Se preferisce può continuare con i ferri dritti, tenendo conto che per come è strutturato la cucitura risulterà sul davanti. buon lavoro!

20.01.2015 - 18:29

country flag Patouche wrote:

Bonjour, je suis en train de faire ce modèle et je me demande ce que vous entendez en disant pour le bonnet rang 2 "faire une bride dans la 1 ere bride" je l'entends faire 3 ml ? En vous remerciant Cordialement Patouche

03.11.2014 - 17:12

DROPS Design answered:

Bonjour Patouche, en début de tour, on remplace effectivement la 1ère B par 3 ml, les fois suivantes (R3 et 4), on crochète 1 B dans la m suivante. Bon crochet!

04.11.2014 - 09:11

country flag Anne Marie Hansen wrote:

Jeg er ved at strikke str. 4 kan det passe at jeg skal strikke 10 cm glat strik efter udtagninger for at få den rigtige længde ? Jeg har kontrolleret strikkefasthed og den passer.

12.10.2014 - 21:37

DROPS Design answered:

Hej Anne Marie, Du øger på hver 2.pind som der står tidligere i opskriften. God fornøjelse!

22.10.2014 - 10:39

country flag Angélique wrote:

Bonjour, Je voulais réaliser le poncho avec le bonnet par contre je n'ai même pas assez d'une pelote de Drops Eskimo pour finir le bonnet, pourtant niveau dimension c'est correct. Vous me confirmez qu'il faut uniquement 50g d'Eskimo pour le bonnet ET le poncho? Merci d'avance.

14.07.2014 - 10:20

DROPS Design answered:

Bonjour Angélique, il faut 50 g Eskimo pour le poncho (bordures et pompons) ET 50/100 g Eskimo pour le bonnet (cf fournitures bonnet par taille au-dessus des explications du bonnet). Bon tricot et crochet !

14.07.2014 - 11:38