DROPS Alpaca
DROPS Alpaca
100% Alpaca
from 3.40 £ /50g
DROPS Alaska
DROPS Alaska
100% Wool
from 1.90 £ /50g
Get the yarn to make this pattern from 35.90£.

The yarn cost is calculated from the pattern’s smallest size and the yarn’s cheapest product type. Looking for an even better price? You might find it on the DROPS Deals!

DROPS SS24
DROPS Baby 13-6
Size: 1/3 – 6/9 – 12/18 months (2 –3/4 years)
Size in cm: 50/56 – 62/68 – 74/80 (86/92 – 98/104)

Materials: Alpaca
Jacket:
150-150-200 (200-250) g colour no 3720, pink
DROPS wooden button, no 503, 3 pcs

Trousers:
150-150-150 (200-200) g colour no 3140, baby pink
Elastic: approx 50-60 cm

For both: 50 g colour no 0100, off-white for crochet border

Bonnet:
50 g for all sizes of colour 0100, off-white, and no 3720, pink
Silk ribbon: approx 80 cm in suited colour

Bag:
50 g Alaska, colour no 02, off-white
+ a remnant of Vienna colour no 21, off-white and no 36, pink + a remnant of Alpaca colour no 3140, baby pink.

DROPS circular needle size 3mm
DROPS crochet hook size 3
DROPS pointed needle size 5.5mm (for bag)
DROPS crochet hook size 6 (for bag application)

-------------------------------------------------------

Alternative Yarn – See how to change yarns here
Yarn Groups A to F – Use the same pattern and change the yarn here
Yarn usage using an alternative yarn – Use our yarn converter here

-------------------------------------------------------

DROPS Alpaca
DROPS Alpaca
100% Alpaca
from 3.40 £ /50g
DROPS Alaska
DROPS Alaska
100% Wool
from 1.90 £ /50g
Get the yarn to make this pattern from 35.90£.

The yarn cost is calculated from the pattern’s smallest size and the yarn’s cheapest product type. Looking for an even better price? You might find it on the DROPS Deals!

Pattern instructions

NOTE: This pattern is written in British English. All measurements in charts are in cm. For conversion from cm to inches - click here. There are different terms for crocheting in British and American English. If this pattern includes crochet, click for "crochet terms" here. For this pattern in American English, please click here.
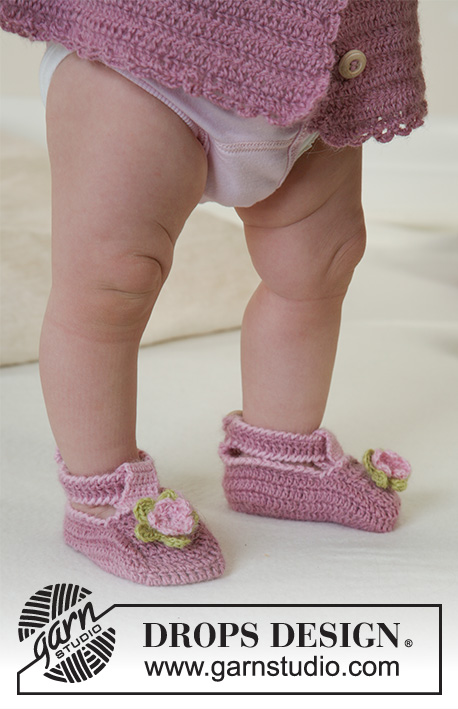
JACKET:
Knitting tension: 24 sts x 48 rows with Alpaca in garter sts on needle size 3mm = 10 x 10 cm.

Garter sts (back and forth on needle): Knit all sts

Moss sts: 1st row: *K1, P1*, repeat from *-*. 2nd row: K over P, P over K. Repeat 2nd row.

Buttonhole: Make buttonholes on right front edge from the right side: cast off 3rd and 4th st from the edge and cast on 2 new sts on next row. Make buttonholes as follows:
Size 1/3 months: 14 and 18 cm
Size 6/9 months: 16 and 20 cm
Size 12/18 months: 17 and 22 cm
Size 2 years: 18 and 23 cm
Size 3/4 years: 21 and 26 cm
NB! The third buttonhole will be on the neckline.

The jacket is knitted back and forth on circular needle.
Back piece: Cast on 58-64-71 (78-86) sts (incl 1 edge st each side) with pink no 3720 on needle size 3mm and knit garter sts. When piece measures 16-17-19 (20-22) cm, cast on new sts each side for sleeves on every other row (i.e. at the end of each row): 3 sts 3-3-3 (3-2) times, 4 sts 4-4-3 (5-8) times, 10 sts 2-2-3 (3-3) times and then 10-13-12 (15-14) 1 time = 168-180-197 (226-250) sts. When piece measures 25-27-30 (32-35) cm cast off the middle 18-20-23 (24-24) sts for neck. Dec 2 sts on next row to shape the neckline = 73-78-85 (99-111) sts left on each shoulder/sleeve. When piece measures 26-28-31 (33-36) cm – adjust after 1 row from the wrong side – put all sts on a thread.

Right front: Cast on 34-37-41 (44-48) sts (incl 1 edge st at side and 5 front edge sts towards mid front) with pink no 3720 on needle size 3mm. Knit the 14 sts towards mid front in moss sts, the rest in garter sts. Remember buttonholes, see above. When piece measures 16-17-19 (20-22) cm cast on new sts for sleeve as described for back piece = 89-95-104 (118-130) sts. When piece measures 22-24-27 (28-31) cm cast off 8-9-10 (11-11) sts for neck and dec to shape the neckline on every other row: 2 sts 2 times, 1 st 3 times = 74-79-87 (100-112) sts left on shoulder/sleeve. When piece measures 26-28-31 (33-36) cm – adjust after 1 row from the wrong side – put all sts on a thread.

Left front: Cast on and knit as right front, but mirrored. NB! Do not make buttonholes!

Assembly: Sew shoulder and upper arm seams (sts from threads). Sew side and under arm seams within 1 edge st. NB! The seam on the lower 4-6 cm on the sleeves should be inside out so that it doesn’t show when sleeve is turned up.
Neck: Pick up approx 60 to 80 sts round the neck with pink no 3720 and needle size 3mm. Knit 6 rows garter sts (1st row = wrong side). NB! After the 1st row, make buttonhole over the others on front edge. Cast off loosely from the wrong side.
Crochet border: Crochet a border round the whole opening (i.e. along both front pieces, round the neck and along bottom edge) and round the sleeves with off-white and crochet hook size 3 as follows: 1 dc in 1st st, *3 ch, 1 tr in the 1st ch just crochet, skip approx 2 sts, 1 dc in next st*, repeat from *-* and finish with 1 sl st in 1st dc from beginning of round.
Crochet flower: Crochet 3 ch with baby pink and crochet hook size 3 and form a ring with a sl st.
1st round: 5 dc in ring and finish with 1 sl st in dc from beginning of round
2nd round: *4 ch, 1 tr in the 1st ch just crochet, 1 dc in next st*, repeat from *-* = 5 leaves. Cut the thread.
Now crochet 3 ch with off-white and crochet hook size 3 and form a ring with a sl st.
1st round: 5 dc in ring and finish with 1 sl st in dc from beginning of round
2nd round: *4 ch, 3 tr in the 1st ch just crochet, 1 dc in next st*, repeat from *-* = 5 leaves. Cut the thread. Sew the pink flower on top of the off-white flower and sew on jacket.
NB! Make another flower, but in opposite colour combination and attach to the bag strap.


TROUSERS:

Knitting tension: 24 sts x 48 rows in garter sts with Alpaca on needle size 3mm = 10 x 10 cm.

Garter sts(back and forth on needle): Knit all sts
Moss sts: 1st row: *K1, P1*, repeat from *-*. 2nd row: K over P, P over K. Repeat 2nd row.

The trousers are knitted from bottom up.
Right leg: Cast on 58-60-62 (65-67) sts using baby pink and circular needle size 3mm and knit moss sts back and forth on needle. When piece measures 8-8-9 (9-10) cm continue in garter sts until finished measurements. Measure piece from here from now on. When piece measures 3-3-4 (5-5) cm inc 1 st each side on every 4-5-5.5 (7-8.5) cm a total of 4 times = 66-68-70 (73-75) sts. When piece measures 18-21-24 (29-34) cm, cast off 2 sts each side. Now dec 1 st on one side of piece (= towards mid front) on every 4th row a total of 4 times = 58-60-62 (65-67) sts. Continue in garter sts until piece measures 34-40-44 (50-56) cm and knit 5 rows garter sts (1st row from right side), then K 1 row from wrong side and 5 rows garter sts. Cast off loosely.

Left leg: As right leg, but mirrored.

Assembly: Fold right leg double and sew inner leg seam within 1 edge st – NB! On the lower 4 cm (turn-up) sew with seam on the right side so that it doesn’t show when you turn it. Sew left leg in the same way. Sew together the trousers front and back within 1 edge st and sew the opening between the legs. Fold the top edge double towards the wrong side and sew – leave a little opening for the elastic band. Crochet a border round the legs similar to the one crochet on the jacket.


BONNET:
Size: 1/3 – 6/9 – 12/18 months
To fit head circumference: approx 40/42 – 44/46 – 46/48 cm

The bonnet is knitted back and forth on circular needle. Loosely cast on 80-88-96 sts (incl 1 edge st each side) with pink no 3720 and needles size 3mm. Knit 5 rows garter sts and knit next row as follows: *K2 tog, yo*, repeat from *-* and finish with K2. Knit 5 rows stocking sts over all sts including yo’s. Piece now measures approx 3 cm – measure piece from here from now on. Change to off-white and knit garter sts. When piece measures 11-12-13 cm cast off the outermost 27-29-31 each side = 26-30-34 sts left (= middle back piece). Now dec 1 st each side on every 2 cm a total of 4 times = 18-22-26 sts left. Cast off when piece measures 22-24-26 cm. Sew on middle back piece to the side pieces within 1 edge st.

Assembly: Fold the edge at front of bonnet double towards the wrong side by the row of holes and attach with neat sts. Pick up approx 70 to 88 sts round the lower edge of bonnet with rose no 3720. Knit 5 rows stocking sts and then a row of holes as follows: *K2 tog, yo*, repeat from *-* until the end of row. Now knit 5 rows stocking sts over all sts (incl yo’s) and cast off loosely. Fold the edge double towards the wrong side and attach. Pull silk ribbon through the row of holes at lower edge.


BAG:

Knitting tension: 16 sts x 20 rows in stocking sts with Alaska on needle size 5.5mm = 10 x 10 cm.

Measurements:
Before felting: approx width 16 cm x height 24 cm
After felting: approx width 12 cm x height 15 cm
Felting: Felt the bag in the washing machine at 40 degrees C + spinning with 1 spoonful of powder without enzymes – read more about felting on our homepage www.garnstudio.com

Loosely cast on 27 sts (incl 1 edge st each side) on needle size 5.5mm with off-white Vienna. Knit 2 rows garter sts, change to Alaska and knit stocking sts until piece measures approx 47 cm – adjust so that next row is from the wrong side. Change back to off-white Vienna, knit 2 rows garter sts and cast off loosely.
Strap: Cast on 5 sts with Alaska on needle size 5.5mm and knit stocking sts until piece measures approx 25 cm. Cast off. Fold strap double wrong side against wrong side and sew together.

Assembly: Sew bag’s side seams within 1 edge st. Sew on strap and felt bag in washing machine.

Crochet heart: Crochet 2 ch with pink Vienna and crochet hook size 6 and crochet 1 dc in the first ch, turn the piece.
1 ch, 3 dc in dc from previous row, turn the piece,
1 ch, 2 dc in first dc, 1 dc in next dc and 2 dc in the last dc = 5 dc, turn the piece,
1 ch, 2 dc in first dc, 1 dc in next dc, 2 dc in next dc, 1 dc in next dc and 2 dc in last dc = 8 dc, turn the piece,
*1 ch, skip 1 dc, 1 dc in each of the next 3 dc, turn the piece. 1 ch, skip 1 dc, 1 dc in each of the next 2 dc, turn the piece. 1 ch, 1 dc in each of the next 2 dc, turn the piece. 1 ch and 1 sl st in ch from beginning of row. Cut the thread*. Repeat from *-* on the other side of the heart and sew heart to the bag.

Crochet flower: Crochet 3 ch with baby pink and crochet hook size 3 and form a ring with a sl st.
1st round: 5 dc in ring and finish with 1 sl st in dc from beginning of round
2nd round: *4 ch, 1 tr in the 1st ch just crochet, 1 dc in next st*, repeat from *-* = 5 leaves. Cut the thread. Sew the flower onto the heart.


BLANKET: see pattern 13-20


AFTER FELTING:
If the piece is not felted enough and is too big: Wash the piece one more time in the washing machine while it is still wet add a terry towel that measures approx. 50 x 70 cm - NOTE: Do not use a short program.
If the piece has been felted too much and is too small: While the piece is still wet stretch it to the correct measurements, if the piece is dry, make sure to soak it first.
Remember: All subsequent washes are as a normal wool garment.

Diagram

diagram measurements

Each of our patterns has specific tutorial videos to help you.

Do you have a question? See a list of frequently asked questions (FAQ)

Knitting tension is what determines the final measurements of your work, and is usually measured per 10 x 10 cm. It is provided like so: number of stitches in width x number of rows in height - eg: 19 stitches x 26 rows = 10 x 10 cm.

The knitting tension is very individual; some people knit/crochet loosely while others work tightly. You adjust the knitting tension with the needle size, which is why the suggested needle size is only meant as a guide! You need to adjust this (up or down) to ensure that YOUR knitting tension matches the knitting tension provided in the pattern. If you work with a different knitting tension than provided you will have a different yarn consumption, and your work will have different measurements than what the pattern suggests.

The knitting tension also determines which yarns can replace each other. As long as you achieve the same knitting tension you can replace one yarn with another.

See DROPS lesson: How to measure your tension/gauge

See DROPS video: How to make a gauge tension swatch

The required amount of yarn is provided in grams, eg: 450 g. To calculate how many balls you’ll need you first need to know how many grams are in 1 ball (25g, 50g or 100g). This information is available if you click on the individual yarn quality on our pages. Divide the amount required with the amount of each ball. For example, if each ball is 50g (the most common amount), the calculation will be as follows: 450 / 50 = 9 balls.

The important thing when changing from one yarn to another is that the knitting/crochet tension remains the same. This is so that the measurements of the finished piece will be the same as on the sketch provided. It is easier to achieve the same knitting tension using yarns from the same yarn group. It is also possible to work with multiple strands of a thinner yarn to achieve the knitting tension of a thicker one. Please try our yarn converter. We recommend you to always work a test swatch.

Please NOTE: when changing yarn the garment might have a different look and feel to the garment in the photo, due to individual properties and qualities of each yarn.

See DROPS lesson: Can I use a different yarn than the one mentioned in the pattern?

All our yarns are categorised into yarn groups (from A to F) according to thickness and knitting tension – group A contains the thinnest yarns and group F the thickest. This makes it easier for you to find alternative yarns to our patterns, should you wish to switch yarn. All yarns within the same group have a similar knitting tension and can easily replace each other. However, different yarn qualities have different structures and properties which will give the finished work a unique look and feel.

Click here for an overview of the yarns in each yarn group

At the top of all our patterns you’ll find a link to our yarn calculator, which is a helpful tool should you wish to use a different yarn than suggested. By filling in the yarn quality you wish to replace, the amount (in your size) and number of strands, the calculator will present good alternative yarns with the same knitting tension. Additionally it will tell you how much you’ll require in the new qualities and whether you’ll need to work with multiple strands. Most skeins are 50g (some are 25g or 100g).

If the pattern is worked with multiple colours, every colour will have to be calculated separately. Similarly, if the pattern is worked with several strands of different yarns (for example 1 strand Alpaca and 1 strand Kid-Silk) you will have to find alternatives for each, individually.

Click here to see our yarn calculator

Since different yarns have different qualities and textures we have chosen to keep the original yarn in our patterns. However, you can easily find options among our available qualities by using our yarn calculator, or simply pick a yarn from the same yarn group.

It is possible that some retailers still have discontinued yarns in stock, or that someone has a few skeins at home that they would like to find patterns for.

The yarn calculator will provide both alternative yarn as well as required amount in the new quality.

If you think it's hard to decide what size to make, it can be a good idea to measure a garment you own already and like the size of. Then you can pick the size by comparing those measures with the ones available in the pattern's size chart.

You'll find the size chart at the bottom of the pattern.

See DROPS lesson: How to read size chart

The needle size provided in the pattern serves only as a guide, the important thing is to follow the knitting tension. And since knitting tension is very individual, you will have to adjust the needle size to ensure that YOUR tension is the same as in the pattern – maybe you’ll have to adjust 1, or even 2 needle sizes, up or down to achieve the correct tension. For this, we recommend that you work test swatches.

Should you work with a different knitting tension than the one provided, the measurements of the finished garment might deviate from the measurement sketch.

See DROPS lesson: How to measure your tension/gauge

See DROPS video: How to make a tension/gauge swatch

Working a garment top-down provides more flexibility and room for personal adjustment. For example it is easier to try the garment on while working, as well as making adjustments to length of yoke and shoulder caps.

The instructions are carefully explaining every step, in the correct order. Diagrams are adjusted to the knitting direction and are worked as usual.

The diagram depicts all rows/rounds, and every stitch seen from the right side. It is read from bottom to top, from right to left. 1 square = 1 stitch.

When working back and forth, every other row is worked from the right side and every other row is worked from the wrong side. When working from the wrong side, the diagram will have to be worked reversed: from left to right, knit stitches are purled, purl stitches are knit etc.

When working in the round every round is worked from the right side and the diagram are worked from right to left on all rounds.

See DROPS lesson: How to read knitting diagrams

The diagram depicts all rows/rounds, and every stitch seen from the right side. It is worked from bottom to top, from right to left.

When working back and forth every other row is worked from the right side: from right to left and every other row is worked from the wrong side: from left to right.

When working in the round, every row in the diagram are worked from the right side, from right to left.

When working a circular diagram you start in the middle and work your way outwards, counter clockwise, row by row.

The rows usually start with a given number of chain stitches (equivalent to the height of the following stitch), this will either be depicted in the diagram or explained in the pattern.

See DROPS lesson: How to read crochet diagrams

Instructions for working several diagrams after each other on the same row/round, will often be written like so: “work A.1, A.2, A.3 a total of 0-0-2-3-4 times". This means you work A.1 once, then A.2 is worked once, and A.3 is repeated (in width) the number of times provided for your size – in this case like so: S = 0 times, M = 0 times, L=2 times, XL= 3 times and XXL = 4 times.

The diagrams are worked as usual: begin with the first row in A.1, then work the first row in A.2 etc.

See DROPS lesson: How to read knitting diagrams

See DROPS lesson: How to read crochet diagrams

The total width of the garment (from wrist-to-wrist) will be larger in the larger sizes, despite the actual sleeves being shorter. The larger sizes have longer sleeve caps and wider shoulders, so there will be a good fit in all sizes.

The measurement sketch/schematic drawing provides information regarding the full length of the garment. If it’s a jumper or a jacket the length is measured from the highest point on the shoulder closest to the neckline, and straight down to the bottom of the garment. It is NOT measured from the tip of shoulder. Similarly, the length of yoke is measured from the highest point on the shoulder and down to where yoke is split into body and sleeves.

On a jacket measures are never taken along bands, unless specifically stated. Always measure inside band stitches when measuring the length.

See DROPS lesson: How to read a schematic drawing

Diagrams are often repeated on the round or in height. 1 repeat is the diagram the way it appears in the pattern. If it says to work 5 repeats of A.1 in the round, then you work A.1 a total of 5 times after/next to each other in the round. If it says to work 2 repeats of A.1 vertically/in height you work the entire diagram once, then begin again at the start and work the entire diagram one more time.

Chain stitches are slightly narrower than other stitches and to avoid working the cast-on edge too tight, we simply chain more stitches to begin with. The stitch count will be adjusted on the following row to fit the pattern and measurement sketch.

The rib edge is more elastic and will contract slightly compared to, for example, stocking stitch. By increasing before the rib edge, you avoid a visible difference in width between the rib edge and the rest of the body.

It’s very easy to cast off too tightly, and by making yarn overs while casting off (and simultaneously casting these off) you avoid a too tight cast off edge.

See DROPS video: How to bind off with yarn overs (yo)

To achieve an even increase (or decrease) you can increase on, for example: every 3rd and 4th row alternately, like so: work 2 rows and increase on the 3rd row, work 3 rows and increase on the 4th. Repeat this until the increase is complete.

See DROPS lesson: Increase or decrease 1 st on every 3rd and 4th row alternately

Should you prefer to work in the round instead of back and forth, you may of course adjust the pattern. You’ll need to add steeks mid-front (usually 5 stitches), and follow the instructions. When you would normally turn and work from the wrong side, simply work across the steek and continue in the round. At the end you’ll cut the piece open, pick up stitches to work bands, and cover the cut edges.

See DROPS video: How to knit steeks and cut open

Should you prefer to work back and forth instead of in the round, you may of course adjust the pattern so you work the pieces separately and then assemble them at the end. Divide the stitches for the body in 2, add 1 edge stitch in each side (for sewing) and work the front and back pieces separately.

See DROPS lesson: Can I adapt a pattern for circular needles into straight needles?

Pattern repeats can vary slightly in the different sizes, in order to get the correct proportions. If you’re not working the exact same size as the garment in the photo, yours might deviate slightly. This has been carefully developed and adjusted so that the complete impression of the garment is the same in all sizes.

Make sure to follow instructions and diagrams for your size!

If you have found a pattern you like which is available in women’s size it’s not very difficult to convert it to men’s size. The biggest difference will be the length of sleeves and body. Start working on the women size that you think would fit across the chest. The additional length will be worked right before you cast off for the armhole/sleeve cap. If the pattern is worked top-down you can add the length right after the armhole or before the first decrease on sleeve.

Regarding additional yarn amount, this will depend on how much length you add, but it is better with a skein too many than too few.

All yarns will have excess fibres (from production) that might come off as lint or shedding. Brushed yarns (ie hairier yarns) have more of these loose, excess fibres, causing more shedding.

Shedding also depends on what is worn under or over the garment, and whether this pulls at the yarn fibres. It’s therefore not possible to guarantee that there will be no shedding

Below are some tips on how to get the best result when working with hairier yarns:

1. When the garment is finished (before you wash it) shake it vigorously so the looser hairs come off. NOTE: do NOT use a lint roller, brush or any method that pulls at the yarn.

2. Place the garment in a plastic bag and put it in your freezer - the temperature will cause the fibres to become less attached to each other, and excess fibres will come off easier.

3. Leave in the freezer for a few hours before taking it out and shaking it again.

4. Wash the garment according to the instructions on the yarn label.

Pilling is a natural process that happens to even the most exclusive of fibers. It's a natural sign of wear and tear that is hard to avoid, and that is most visible in high friction areas of your garment like a sweater's arms and cuffs.

You can make your garment look as new by removing the pilling, using a fabric comb or a pill/lint remover.

Still can't find the answer you need? Then scroll down and leave your question so one of our experts can try to help you. This will be done normally within 5 to 10 working days.
In the meantime, you can read the questions and answers that others have left to this pattern or join the DROPS Workshop on Facebook to get help from fellow knitters/crocheters!

You might also like...

Post a comment to pattern DROPS Baby 13-6

We would love to hear what you have to say about this pattern!

If you want to leave a question, please make sure you select the correct category in the form below, to speed up the answering process. Required fields are marked *.

Comments / Questions (15)

country flag Hazeline Montecines wrote:

Hello, for the bonnet cast on instruction: loosely cast on 80-88-96 sts (incl 1 edge st each side) ehat does include 1 edge st at each side mean.? Does it mean add 1 to each end of the cast on?, making it for example 82 instead on 80? Thank you?

04.01.2021 - 10:21

DROPS Design answered:

Dear Mrs Montecines, the edge stitches are included, this means you don't need to cast on extra stitches, only 80 sts and work the 80 sts as explained. Happy knitting!

05.01.2021 - 10:24

country flag Anette Nikolaisen wrote:

Jeg strikker bukserne i str. 2 år og kan ikke forstå mål i cm. Da der skal være 29 cm på bukselængden men jeg regner det ud sådan: først 5 cm bagefter 4 gange 7 cm ialt 28 cm plus 5 cm så bliver det i alt 33 cm. Men der står "når arb måler 29 cm" Hvordan skal det forstås?

02.10.2017 - 11:34

DROPS Design answered:

Hej Anette, du tager ud ialt 4 gange (når arb måler 5, 12, 19, 26 cm). God fornøjelse!

05.10.2017 - 09:40

country flag Jannice Jönsson wrote:

Vad menar ni med "sy axel-och överärmssömmarna i ett med OSYNLIGA MASKSTYGN"??

30.01.2015 - 19:10

DROPS Design answered:

Hej Jannice, Här ser du hur man gör:

DROPS Knitting Tutorial: How to knit kitchener stitches from Garnstudio Drops design on Vimeo.

02.02.2015 - 13:48

country flag Drops Design wrote:

Hej Gitte. Er du sikker på at du overholder strikkefastheden, der skal være nok garn hvis du ikke strikker for fast.

12.09.2011 - 09:15

country flag Gitte Nørgaard wrote:

Det er ikke nok med 50g Alaska til tasken.

10.09.2011 - 15:22

country flag Merethe wrote:

Jeg synes ikke håndarbeidsskolen viser et riktig bilde når det gjelder sammensying for denne jakken. På denne jakken så er det jo masker som skal syes sammen, ikke en ferdig avfelt kant som håndarbeidskolen viser. Det hadde vært kjempefint med en bedre forklaring. Takk for hjelpen!

08.09.2008 - 12:22

country flag DROPS Design wrote:

De første 14 i perlestrikk er stolpen. De 5 M. til stolpen inngår i de 14 m i perlestrikk og beskriver bare den delen som overlapper og ikke helle stolpen.

11.08.2008 - 08:54

country flag Merethe wrote:

Vedrørende forstykke på jakke. Skal kantmaskene også strikkes i perlestrikk? Er de 5 maskene en andel av de 14 eller kommer de 5 i tillegg til de 14?

11.08.2008 - 08:19

country flag DROPS / Lena wrote:

Man lägger delarna mot varann och syr från rätsidan med stygn som följer maskornas väg. Titta i vår Handarbetsskola. Där finns det bild.

02.11.2007 - 17:07

country flag Ingegerd wrote:

Har aldrig tidigare sytt ihop en tröja på beskrivet sätt. Har enl mönstret inte maskat av och ska sedan sy ihop med maskstygn. Hur göra?

02.11.2007 - 12:38