
Popular categories
Looking for a yarn?


|
|
Jumping Jacks |
|
 |
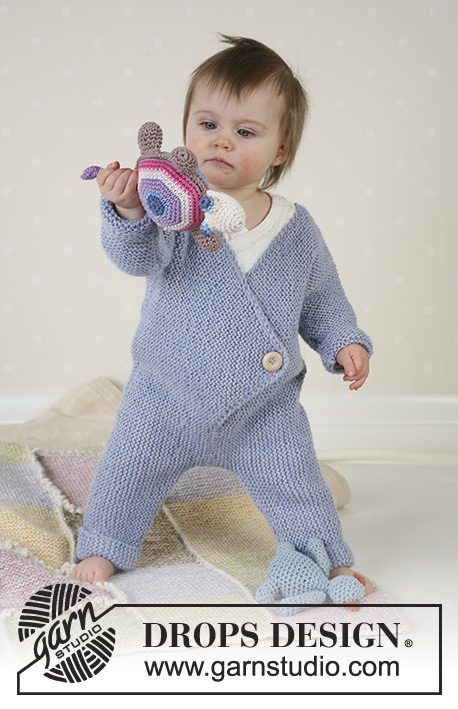 |
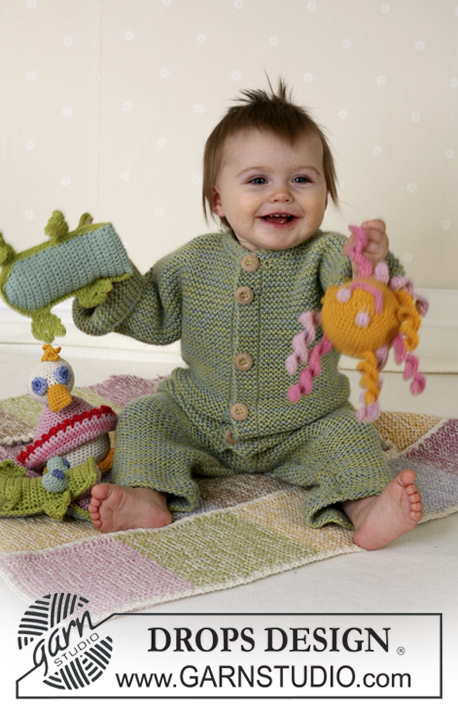
Jumpsuit, soft toys and blanket in Alpaca
DROPS Baby 13-1 |
|
|
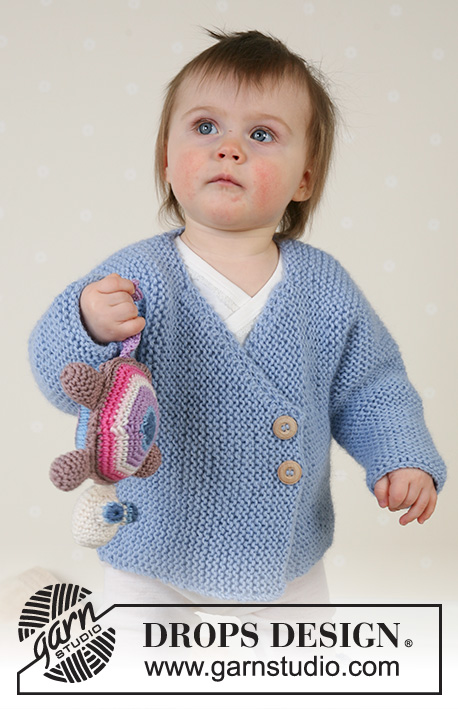
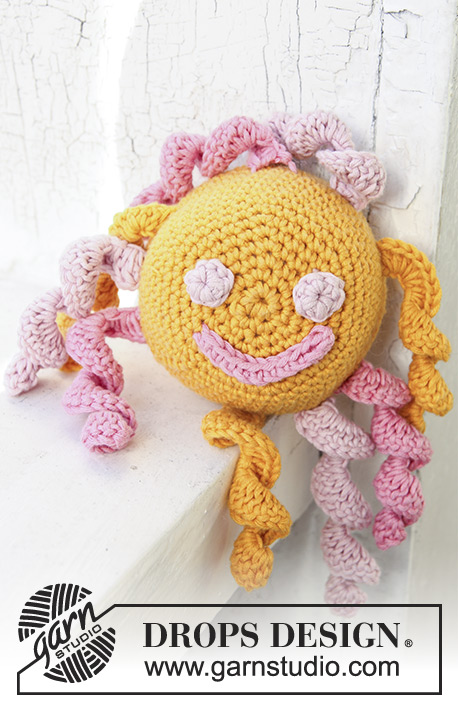
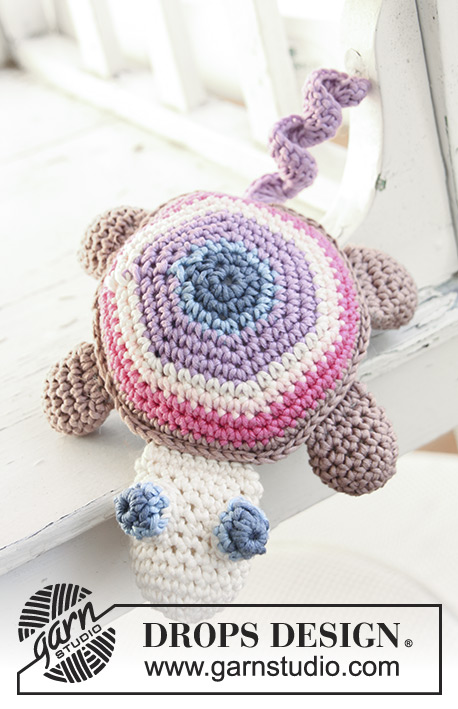
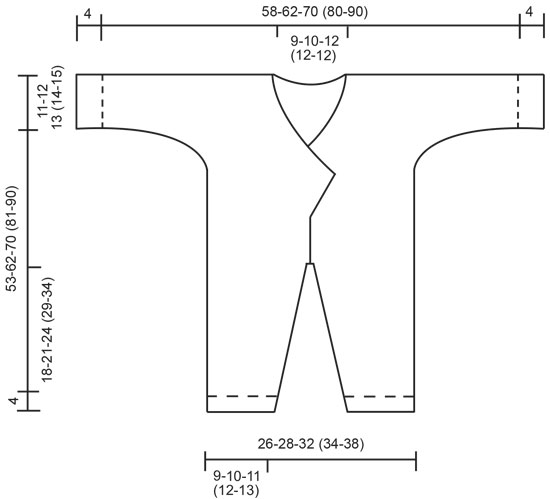
Garter sts: Knit all rows Increasing tips (applies to pointed front edge): Inc 1 st within 1 edge st by knitting 2 sts in 1. JUMPSUIT: Back piece + sleeves + legs: The jumpsuit is knitted from side to side, i.e. starting with the sleeve. Loosely cast on 13-14-15 (15-16) sts (= right sleeve edge) with 1 strand of each Alpaca color (= double strands held together) on needle size 5 mm / US 8. Knit in garter sts. When piece measures 8 cm / 3⅛" inc 1 st at left side of piece (seen from the right side), repeat on every 2 cm / ¾" a total of 6-7-7 (9-10) times = 19-21-22 (24-26) sts. When piece measures 20-21-23 (27-30) cm / 8"-8¼"-9" (10⅝"-11¾") (sleeve on back piece is now finished), loosely cast on 78-91-104 (121-134) sts at left side of piece (seen from the right side) = 97-112-126 (145-160) sts. Insert a marker – measure piece from here from now on. Continue in garter sts over the back piece. When piece measures 9-10-11 (12-13) cm / 3½"-4"-4⅜" (4¾"-5⅛") from marker, bind off the same side as you increased, on every other row as follows: Size 1/3 months: 16 sts 1 time, 7 sts 3 times Size 6/9 months: 16 sts 1 time, 9 sts 3 times Size 12/18 months: 16 sts 1 time, 8 sts 4 times Size 2 years: 16 sts 1 time, 10 sts 4 times Size 3/4 years: 17 sts 1 time, 8 sts 6 times After all dec are complete there are 69-69-78 (89-95) sts on row. When piece measures 13-14-16 (17-19) cm / 5⅛"-5½"-6¼" (6¾"-7½") insert a new marker (= mid back) – measure piece from here from now on. When piece measures 2 cm / ¾", cast on new sts the same side as you bound off before, on every other row as follows: Size 1/3 months: 7 sts 3 times, 16 sts 1 time Size 6/9 months: 9 sts 3 rimes, 16 sts 1 time Size 12/18 months: 8 sts 4 times, 16 sts 1 time Size 2 years: 10 sts 4 times, 16 sts 1 time Size 3/4 years: 8 sts 6 times, 17 sts 1 time There are now 97-112-126 (145-160) sts on row. When piece measures 13-14-15 (17-19) cm / 5⅛"-5½"-6" (6¾"-7½") from mid back, loosely bind off 78-91-104 (121-134) sts the same side as before = 19-21-22 (24-26) sts left for sleeve. Insert a new marker- measure piece from here from now on. When piece measures 2-1-3 (3-4) cm / ¾"-⅜"-1⅛" (1⅛"-1½") dec 1 st same side as before on every 2 cm / ¾" a total of 6-7-7 (9-10) times = 13-14-15 (15-16) sts. When piece measures 21-21-23 (27-30) cm / 8¼"-8¼"-9" (10⅝"-11¾") bind off loosely. The piece now measures approx 66-70-78 (88-98) cm / 26"-27½"-30¾" (34⅝"-38½") from sleeve edge to sleeve edge (including 4 cm / 1½" to fold up on each sleeve). Right front piece + sleeve + leg: The piece is knitted from side to side from front edge towards the sleeve. Read the whole section before knitting it! Cast on 3 sts with 1 strand of each Alpaca color (= double strands held together) on needle size 5 mm / US 8. Work in garter sts, at the same time inc 1 st each side (for pointed front edge) – see Increasing tips – on every other row: 12-14-15 (17-19) times = 27-31-33 (37-41) sts. AT THE SAME TIME after approx 3 cm / 1⅛" bind off the middle 3 sts for buttonhole and cast on 3 new sts on next row. After all inc are complete (piece measures approx 7-8-9 (10-11) cm / 2¾"-3⅛"-3½" (4"-4⅜")) cast on 17-19-21 (25-27) new sts at left side of piece (seen from the right side) and insert a marker = mid front. At the other side inc 1 st as before for neckline on every row 7-8-10 (11-13) times and then 9-11-14 (16-14) sts 1 times. AT THE SAME TIME when piece measures 2 cm / ¾" from marker, cast on new sts for leg at left side of piece on every other row as follows: Size 1/3 months: 7 sts 3 times, 16 sts 1 time Size 6/9 months: 9 sts 3 rimes, 16 sts 1 time Size 12/18 months: 8 sts 4 times, 16 sts 1 time Size 2 years: 10 sts 4 times, 16 sts 1 time Size 3/4 years: 8 sts 6 times, 17 sts 1 time After all inc are complete there are 97-112-126 (145-160) sts on row. When piece measures 13-14-16 (17-19) cm / 5⅛"-5½"-6" (6¾"-7½") from marker mid front loosely bind off 78-91-104 (121-134) sts at left side = 19-21-22 (24-26) sts left for sleeve. Insert a new marker and measure piece from here from now on. When piece measures 2-1-3 (3-4) cm / ¾"-⅜"-1⅛" (1⅛"-1½") dec 1 st at left side on every 2 cm / ¾" a total of 6-7-7 (9-10) times = 13-14-15 (15-16) sts. When piece measures 21-21-23 (27-30) cm / 8¼"-8¼"-9" (10⅝"-11¾") bind off loosely. Left front piece + sleeve + leg: Cast on and knit as right front piece, but mirrored. Assembly: Sew shoulder + upper sleeve seams in outermost loop of sts to create a neat seam – leave 4-5-6 (7-8) cm / 1½"-2"-2½" (2¾"-3") for neck opening. Sew inner leg seams, under-sleeve and side seams the same way and sew the opening between the legs. Sew on 1 button on the right side of left front piece and 1 button on the wrong side of right front piece – adjust to buttonholes. Fold approx 4 cm / 1½" on each sleeve. SOFT TOYS: see pattern Baby 13-08 BLANKET: see pattern Baby 13-19 |
|
|
|
|
Have you made this or any other of our designs? Tag your pictures in social media with #dropsdesign so we can see them! Do you need help with this pattern?You'll find tutorial videos, a Comments/Questions area and more by visiting the pattern on garnstudio.com. © 1982-2024 DROPS Design A/S. We reserve all rights. This document, including all its sub-sections, has copyrights. Read more about what you can do with our patterns at the bottom of each pattern on our site. |
|


With over 40 years in knitting and crochet design, DROPS Design offers one of the most extensive collections of free patterns on the internet - translated to 17 languages. As of today we count 304 catalogs and 11422 patterns - 11417 of which are translated into English (US/in).
We work hard to bring you the best knitting and crochet have to offer, inspiration and advice as well as great quality yarns at incredible prices! Would you like to use our patterns for other than personal use? You can read what you are allowed to do in the Copyright text at the bottom of all our patterns. Happy crafting!
Comments / Questions (19)
cadillac escalade danbury
23.12.2022 - 20:52Ссылочная пирамида
26.02.2022 - 08:29Kan jeg få kjøpt/ tilsendt oppskriften?
15.10.2020 - 19:29DROPS Design answered:
Hei Anne, Alle våre oppskrifter er tilgjengelig gratis på nett. God fornøyelse!
16.10.2020 - 08:23Det ser ikke ut som dere har fargen lys blågrå lenger (nr 8105). Har dere en annen farge som tilsvarer?
13.08.2020 - 10:15DROPS Design answered:
Hej Tonje. Nej den har dessvärre utgått ur sortimentet. Den färg som kommer närmast skulle jag tro är 9021 eller 7139. Mvh DROPS Design
13.08.2020 - 10:42L'échantillon étant 17 m pour 10 cm, comment peut on avoir 13 cm pour la taille 12/18 mois avec 15 m montées ?
05.11.2018 - 23:00DROPS Design answered:
Bonjour Chantal, les 13 cm correspondent à la largeur de la manche après les augmentations, soit 22 mailles. Bon tricot!
06.11.2018 - 08:29Mitä tarkoittaa ohjeessa,kun puhutaan lahkeen kavennuksista: 1x16s. Ja 3x7s. Miten tämä tulee tehdä?
03.09.2017 - 22:34DROPS Design answered:
Hei, tämä tarkoittaa, että päätät joka 2. kerros aluksi 16 silmukkaa kerran ja sitten vielä 7 silmukkaa yhteensä 3 kertaa. <
14.09.2017 - 14:06Dans les explications pour la réalisation du dos, à 8cm de hauteur, en taille 2 ans, après augmentations, nombre de mailles=23. Hors, 15+9=24mailles. Dans le schéma (toujours en taille 2 ans) : les manches ont une largeur de 14cm alors que les jambes ont une largeur de 12cm. Comment les jambes peuvent être moins larges que les manches ? En dehors de ces deux points de détails, les explications son faciles à suivre. Merci DROP Design.
20.02.2016 - 22:34DROPS Design answered:
Bonjour Isabelle et merci. Le nbe de mailles pour les 2 grandes tailles a été corrigé - les mesures indiquées sont correctes et correspondent au modèle. Bon tricot!
22.02.2016 - 11:38Ich würde die Jacke gerne für mich stricken. Gibt es die Anleitung auch für Erwachsene?
14.01.2016 - 11:00DROPS Design answered:
Genau dieses Modell haben wir nicht in Erwachsenengrößen. Stöbern Sie einfach mal bei den Jacken, dort finden Sie sicher auch Modelle, die Ihnen zusagen.
23.01.2016 - 18:11Du øker 16 masker 1 gang og deretter 7 masker 3 ganger.
08.03.2010 - 09:21Takk for svar. :-) Men hva menes med 16 m 1 gang og 7 m 3 ganger?
05.03.2010 - 13:09