
Popular categories
Looking for a yarn?


|
|
DROPS 95-14 |
|
|
|
|
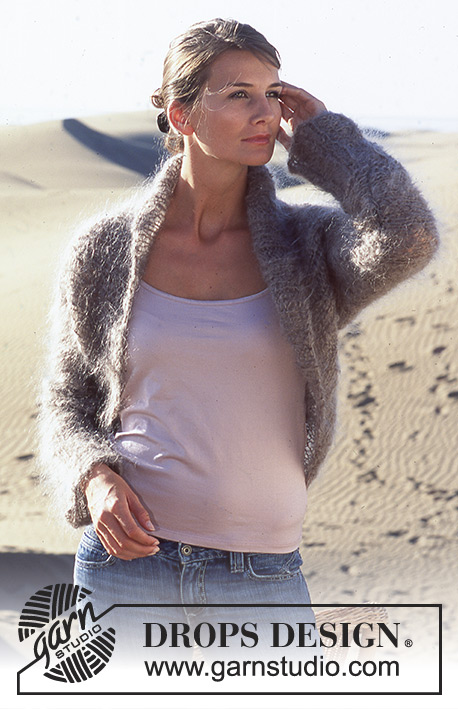
DROPS Smart jacket in rib and Paris
DROPS 95-14 |
|
|
Knitting gauge: 17 sts x 22 rows on needle size 5 mm = US 8 in stockinette stitch = 10 x 10 cm = 4" x 4" Garter stitch: Knit all rows Rib.1: *K2, P4*, repeat from *-* Rib.2: *K2, P5*, repeat from *-* Back piece: Cast on 64-70-82-94-100 sts (inclusive of 1edge st each side) using needle size 5 mm = US 8 with Paris color no 56. Purl 1 row from the wrong side. Now continue in Rib.1 with 1 edge st and 2 knitted sts each side (seen from the right side). When Rib measures 5 cm = 2" continue in stockinette sts, at the same time adjusting number of sts to 66-72-82-92-102 on first row of stockinette sts. When piece measures 8 cm = 3⅛", inc 1 st each side on every 6-6-9-10-10 cm = 2⅜"-2⅜"-3½"-4"-4" a total of 4-4-3-3-3 times = 74-80-88-98-108 sts. When piece measures 32-33-34-36-36 dec for armhole each side on every other row as follows: 3 sts 1-1-1-1-2 times, 2 sts 1-1-2-4-4 times and 1 st 2-3-4-4-5 times = 60-64-66-68-70 sts. When piece measures 49-51-53-56-58 cm = 19¼"-20"-21"-22"-22¾" bind off the middle 18-18-18-20-22 sts for neck, dec 1 st towards neck line on next row = 20-22-23-23-23 sts left on each shoulder. Bind off when piece measures 51-53-55-58-60 cm = 20"-21"-21⅝"-22¾"-23⅝". Right Front: The piece is knitted from mid front towards the side – read the whole pattern section before you begin! Cast on 22-26-26-28-32 sts on needle size 5 mm = US 8 and Paris color no 56. Knit Rib as follows (from the right side): Size S + XL: *P4, K2*, repeat from *-* and finish with P4 Size M + L + XXL: *K2, P4*, repeat from *-* and finish with K2 Continue the Rib like this, at the same time casting on new sts each side on every other row (i.e. at the end of each row) as follows: Cast on towards bottom edge: 3 sts 3-2-2-3-2 times, 2 sts 5-4-5-4-2 times and 1 st 4-6-6-6-10 times. Cast on towards shoulder: 4 sts a total of 7-7-8-8-8 times and then 13-16-14-15-18 sts 1 time NB! Incorporate new sts in Rib as you go along, after the last increase each side knit the outermost 3-2-4-3-2 sts in garter sts. After all inc have been made there are 86-90-94-98-102 sts on needle and the Rib finishes with K2 and 3-2-4-3-2 sts in garter sts each side (seen form the right side). Armhole: When piece measures 19-20-22-22-22 cm = 7½"-8"-8¾"-8¾"-8¾" bind off the 28 outermost sts on shoulder for armhole. Now dec 2 sts this side on every other row 2-3-4-5-6 times. Side: At the same time when piece measures 21-23-26-28-31 cm = 8¼"-9"-10¼"-11"-12¼" bind off the outermost sts on side towards cast-on row on every other row as follows: 18-20-20-20-22 sts 1 time, 18-18-20-20-20 sts 1 time and then the remaining 18-18-18-20-20 sts. After all decreases piece measures approx 23-25-28-31-33 cm = 9"-9¾"-11"-12¼"-13" from cast-on row (measured where widest). Left Front: as right front piece, but mirrored. Sleeve: Cast on 44-51-51-58-58 sts (inclusive of 1 seam st each side) on needle size 5 mm = US 8 with Paris color no 56. Purl 1 row from wrong side and continue in Rib.2 with 1 seam st each side. After 2 rows of Rib, dec all P5 to P4 = 38-44-44-50-50 sts left. When Rib measures 12-12-12-14-14 cm = 4¾"-4¾"-4¾"-5½"-5½" continue in stockinette sts. When piece measures 14-14-14-15-15 cm = 5½"-5½"-5½"-6"-6" inc 1 st each side on every 3-3.5-3-3-2 cm = 1⅛"-1¼"-1⅛"-1⅛"-¾" a total of 12-10-11-11-14 times = 62-64-66-72-78 sts. When piece measures 49-49-48-47-45 cm = 19¼"-19¼"-19"-18½"-17¾" bind off for sleeve cap each side on every other row as follows: 3 sts 1 time, 2 sts 3-3-3-4-4 times, 1 st 1-1-3-3-4 times, and then 2 sts each side until piece measures 56-56-57-57-57 cm = 22"-22"-22½"-22½"-22½", now dec 3 sts each side and bind off remaining sts on next row, piece measures approx 57-57-58-58-58 cm = 22½"-22½"-22¾"-22¾"-22¾". Assembly: Sew shoulder seams. Set in sleeves. Sew sleeve and side seams within 1 seam st. Crochet border: Crochet a border round the opening of the jacket, i.e. up along both front pieces, round neck and along lower edge using crochet size 5 mm = US H/8 and Paris color no 26 (beige) as follows: 1 sc between the first 2 sts, *3 ch, skip 2-2.5 cm = ¾"-1", 1 sc between the next 2 sts*, repeat from *-* and finish with 3 ch and 1 sl st in first sc from beginning of round. NB! Crochet between K2/P2 to achieve the best looking result. Close the jacket with a broche. |
|

|
|
|
Have you made this or any other of our designs? Tag your pictures in social media with #dropsdesign so we can see them! Do you need help with this pattern?You'll find tutorial videos, a Comments/Questions area and more by visiting the pattern on garnstudio.com. © 1982-2024 DROPS Design A/S. We reserve all rights. This document, including all its sub-sections, has copyrights. Read more about what you can do with our patterns at the bottom of each pattern on our site. |


With over 40 years in knitting and crochet design, DROPS Design offers one of the most extensive collections of free patterns on the internet - translated to 17 languages. As of today we count 304 catalogs and 11422 patterns - 11417 of which are translated into English (US/in).
We work hard to bring you the best knitting and crochet have to offer, inspiration and advice as well as great quality yarns at incredible prices! Would you like to use our patterns for other than personal use? You can read what you are allowed to do in the Copyright text at the bottom of all our patterns. Happy crafting!
Comments / Questions (13)
Amy Dodson wrote:
Thank you. I found that "NB" is Latin for "Note well", or an important note. I thought it was a knitting term. It is not commonly used in my part of the world. Sorry for the misunderstanding.
04.10.2017 - 13:54Amy Dodson wrote:
Please, would you explain the term "NB!" in the right front and assembly sections of the pattern? Thank you very much!
04.10.2017 - 05:43DROPS Design answered:
Dear Mrs Dodson, this note explains that the increased sts have to be worked in rib, when the last increased has been done, work 3-2-4-3-2 sts in garter st on each side. Happy knitting!
04.10.2017 - 11:35Wat een leuk vest , alleen jammer dat die kleur garen niet meer te koop is
17.02.2015 - 22:29Hallo ik kom er niet uit met patroon nr.95-14 met voorpand met het meerderen waar ik dat moet doen en hoe.graag hoor ik snel wat,ben al een week bezig met uithalen en opzetten
11.02.2013 - 15:27DROPS Design answered:
Je zet nieuwe st op aan het eind van elke nld: Aan de schouderzijde: 7-7-8-8-8 keer 4 st en vervolgens 1 keer 13-16-14-15-18 st. En langs de onderrand (middenvoor): 3-2-2-3-2 keer 3 st, 5-4-5-4-2 keer 2 st en 4-6-6-6-10 keer 1 st. Je hebt daarna 86-90-94-98-102 st op de nld (afhankelijk van uw maat) n de boordsteek eindigt met 2 r en 3-2-4-3-2 ribbels aan beide kanten
12.02.2013 - 12:22Hei, En ymmärrä seuraavaa osaa tästä ohjeesta: "Lisätyt s:t neulotaan jatkuvasti mukaan joustin-neulontaan (ts. koossa S + XL neulotaan 2 ensimmäistä s kummassakin sivussa o, seuraavat 4 neulotaan n (o puolelta katsottuna) jne. " Koska esim. alareunaa kohti lisätään koossa S 3 silmukkaa, eikö minun pitäisi neuloa uudet 3 silmukkaa 1 nurin, 2 oikein ja jatkaa sitten alkuperäistä joustinta 4 nurin 2 o? Kiitos avusta jo etukäteen! Ystävällisin terveisin, Karoliina Vuopala
18.02.2009 - 08:04wrote:
enda en "må-ha" jakke!
06.02.2006 - 13:48Torunn wrote:
Anvendelig og lettstrikket jakke !
10.01.2006 - 17:33wrote:
Denne modellen er lekker!!! Jeg ville valgt et ensfarget garn, men denne skal jeg strikke
05.01.2006 - 13:59wrote:
Fin!
29.12.2005 - 23:20Mailinglisten wrote:
flot flot både i snit og farve
14.12.2005 - 00:14