
Popular categories
Looking for a yarn?


|
||||||||||||||||
Desert Delight |
||||||||||||||||
 |
 |
|||||||||||||||
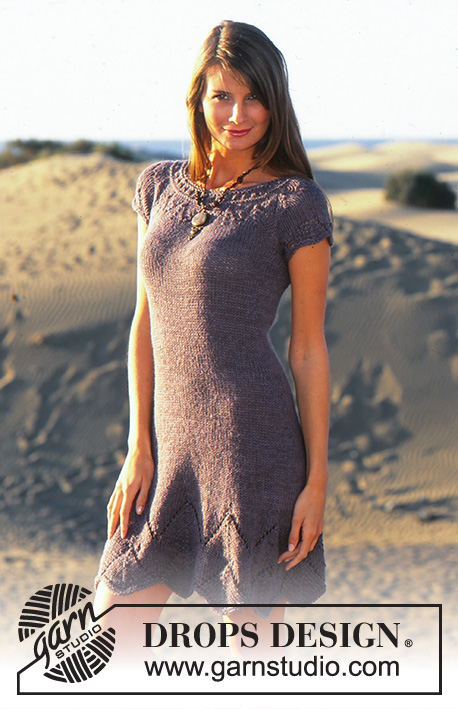
DROPS Dress in Safran and Alpaca
DROPS 95-10 |
||||||||||||||||
|
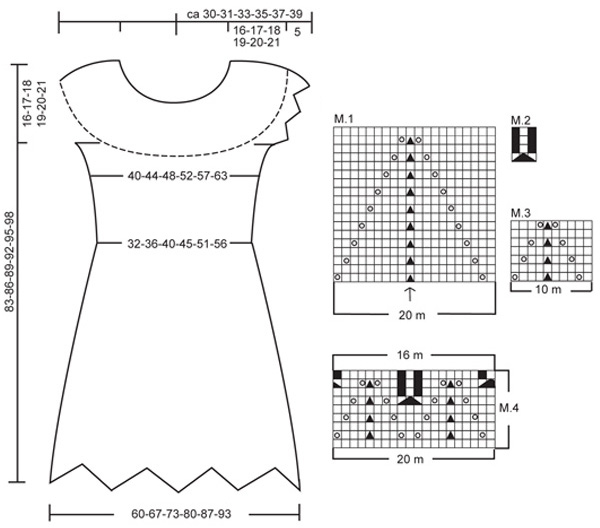
Knitting gauge: 15 sts x 19 rows on needle size 6 mm / US 10 with 1 thread of each quality in stockinette st = 4'' x 4'' (10 x 10 cm). Pattern: see diagrams M.1 to M.4. The diagrams show the pattern from the RS. Decreasing tips (applies to the cuts and sides): Dec as follows after 1st and 3rd marking thread + marking thread at side: K2 tog. Dec as follows before 2nd and 4th marking thread + marking thread at side: slip 1 st as if to knit, K1, psso Increasing tips: Inc 1 st by picking up a st in st from previous row and K it. Measuring tips: Make all measurements when piece is lying flat. BODY Worked in the round on circular needles. Read the entire pattern before you begin! Cast on 180-200-220-240-260-280 sts using both ends of the circular needle (to make sure the edge becomes elastic) with 1 thread of each quality (= double thread). Remove 1 needle and K1 round, P 1 round and K 1 round. Now work M.1 (start at the side). After 2 repeats of M.1 – piece measures approx 21 cm - insert a marking thread (MT) in the middle of each repeat (see arrow in M.1 = 9-10-11-12-13-14 MT). Continue in stockinette st, at the same time on 2nd and 4th round after M.1 work M.2 over each MT = 144-160-176-192-208-224 sts left. Remove all MT after the last dec. When piece measures 25-25-25-26-26-26 cm insert 6 new MT as follows: K 22-26-28-31-34-37 sts, insert MT before next st (= MT-1), K 28-28-32-34-36-38 sts, insert MT before next st (= MT-2), K 22-26-28-31-34-37 sts, insert MT before next st (= side), K 22-26-28-31-34-37 sts, insert MT (= MT-3), K 28-28-32-34-36-38 sts, insert MT before next st (= MT-4), K remaining 22-26-28-31-34-37 sts and insert a MT (= side). Now dec 1 st on both sides of the MT at sides (do not dec by the other MT on front and back) – see decreasing tips – on every 5-5-5-6-6-7 round a total of 8-9-9-9-9-9 times. At the same time when piece measures 31-32-33-35-36-37 cm dec 1 st for cut after MT-1 and MT-3 and before MT-2 and MT-4 – see Decreasing tips – on every 6-6-8-8-8-8 round a total of 4-4-5-5-5-5 times. After all dec are complete there are 96-108-120-136-152-168 sts left. When piece measures 50-51-52-54-56-58 cm inc 1 st after MT-1 and MT-3 and before MT-2 and MT-4 - see Increasing tips above - on every 2-2-2-3-3-3 round row a total of 6-6-6-5-5-5 times = 120-132-144-156-172-188 sts. After last inc remove markers on front and back. When piece measure 67-69-71-73-75-77 cm / 26 3/8''-27 1/8''-28''-28¾''-29½''-30 3/8'' bind off 8-8-8-10-10-10 sts each side for armhole (i.e. 4-4-4-5-5-5 sts on both sides of MT) = 52-58-64-68-76-84 sts left for front and back piece. Put the piece aside and knit the sleeves. Sleeve: Cast on 40-42-44-48-50-54 sts using 2 double pointed needles size 6 mm / US 10 with 1 thread of each yarn quality (= double thread). Remove 1 needle and K 1 round on double pointed needles, P 1 round and K 1 round. Work next round as follows: 0-1-2-4-0-2 stockinette sts, M.3 on the next 40-40-40-40-50-50 sts and 0-1-2-4-0-2 stockinette sts. Work 1 repeat of M.3 (piece measures approx 5 cm / 2''). K 1 round, at the same time bind off 8-8-8-10-10-10 sts mid under arm for armhole = 32-34-36-38-40-44 sts left. Put sts on a thread and knit the other sleeve. Yoke: Put the sleeves in on the same circular needle as body where bind off for armholes = 168-184-200-212-232-256 sts. Now dec as follows: Size XS: Work 5 cm / 2'' stockinette sts, at the same time dec 14 sts evenly on the 3rd and 7th round = 140 sts. Size S: Work 6 cm / 2 3/8'' stockinette sts, at the same time dec 12 sts evenly on the 3rd and 8th round = 160 sts Size M: Work 7 cm / 2¾'' stockinette sts, at the same time dec 10 sts evenly on the 4th and 9th round = 180 sts. Size L: Work 8 cm / 3 1/8'' stockinette sts, at the same time dec 8 sts evenly on the 3rd, 6th, , 9th and 12th round = 180 sts. Size XL: Work 9 cm / 3½'' stockinette sts, at the same time dec 8 sts evenly on the 3rd , 7th , 10th , and 14th round = 200 sts. Size XXL: Work 10 cm / 4'' stockinette sts, at the same time dec 9 sts evenly on the 4th , 8th , 12th ,and 16rh round = 220 sts. All sizes: When yoke measures 5-6-7-8-9-10 cm work M.4. After 1 repeat of M.4 there are 112-128-144-144-160-176 sts on needle. Work 2 rounds stockinette sts, at the same time adjust no of sts to 111-123-144-144-159-171 on the last round. P 1 round, K 2 rounds and work next row as follows: *1 YO, K3 tog*, repeat from *-* = 74-82-96-96-106-114 sts left. K 2 rounds, at the same time adjust no of sts to 74-82-86-90-94-98 on the last row. P 1 round, Knit 1 round and bind off in P sts on next round – dress measures approx 83-86-89-92-95-98 cm when lying flat. Assembly: Sew the openings under the arms. |
||||||||||||||||
Diagram explanations |
||||||||||||||||
|
||||||||||||||||
|
||||||||||||||||
|
Have you made this or any other of our designs? Tag your pictures in social media with #dropsdesign so we can see them! Do you need help with this pattern?You'll find tutorial videos, a Comments/Questions area and more by visiting the pattern on garnstudio.com. © 1982-2024 DROPS Design A/S. We reserve all rights. This document, including all its sub-sections, has copyrights. Read more about what you can do with our patterns at the bottom of each pattern on our site. |
||||||||||||||||


With over 40 years in knitting and crochet design, DROPS Design offers one of the most extensive collections of free patterns on the internet - translated to 17 languages. As of today we count 304 catalogs and 11422 patterns - 11417 of which are translated into English (US/in).
We work hard to bring you the best knitting and crochet have to offer, inspiration and advice as well as great quality yarns at incredible prices! Would you like to use our patterns for other than personal use? You can read what you are allowed to do in the Copyright text at the bottom of all our patterns. Happy crafting!
Comments / Questions (62)
Beste,\r\nIk wil dt jurkje maken en bij het doorlezen van het patroon begreep ik iets niet.\r\nWaarom zijn in de teltekening, twee verschillende tekens, met dezelfde beschrijving?\r\nDe zwarte driehoek in 1 vakje en de zwarte driehoek die 3 vakjes omvat.\r\n1 steek afhalen, 2 recht samenbreien, de afgehaalde steek overhalen.\r\nMisschien heb ik iets over het hoofd gezien.
20.03.2019 - 15:49DROPS Design answered:
Dag Annemiek,
Het is inderdaad exact dezelfde steek en je hebt gelijk dat dit wat onduidelijk is. (In de nieuwe patronen is dit al aangepast.) Het betreffende symbool in M.1 wordt eigenlijk over 3 steken gebreid. In de eerste naald brei je 1 recht, 1 omslag, 8 recht, dan 1 afh, 2 sambreien, afgehaalde steek overhalen, 8 recht, 1 omslag. Het aantal steken recht wordt bij elke oneven naald 1 minder. Hopelijk is zo duidelijk wat de bedoeling is. In M.4 is dit al op de juiste wijze aangegeven met de driehoek over 3 steken.
21.03.2019 - 16:45Ich möchte das Kleid mit Drops Belle stricken. Meine Maschenprobe ergibt zwar 15 M, aber nur 10 R auf 10 cm (mit doppeltem Faden). Wie verfahre ich am besten?
09.07.2018 - 05:34DROPS Design answered:
Liebe Birgit, dieses Kleid wird mit 2 Fäden Garngruppe A (= 1 Garngruppe C) gestrickt, Belle gehört aber zur Garngruppe B und ist doch keine Alternative zu diesem Modell. Hier lesen Sie mehr über Garnalternativen. Viel Spaß beim stricken!
09.07.2018 - 08:56Tak for svar. Det står desværre ikke i opskriften, at man efter udtagningerne fortsætter lige op til arb måler 71 cm. Jeg strikker videre :-) mvh Joan
12.06.2018 - 17:45HEJ, HAR SPØRGSMÅL TIL LÆNGDEN.HVIS MAN STARTER UDTAGNING V 52 CM OG TAGER UD PÅ HVER 2. PIND 6 GANGE GIVER DET 12 PINDE I ALT, HVORDAN KAN DET GIVE 19 CM NÅR I SKRIVER DER SKAL VÆRE 71 CM (OP) TIL ÆRMEGAB ? HÅBER I KAN HJÆLPE, IGEN :-)VH JOAN
11.06.2018 - 23:08DROPS Design answered:
Hej, du tager ikke flere masker ud, men fortsætter til arbejdet måler 71 cm og nu lukker du af til ærmegab i hver side. God fornøjelse!
12.06.2018 - 11:24Wie soll man den Satz verstehen: Gleichzeitig auf der 2. Und 4. R nach M.1 wird M.2 über jeden markierungsfaden gestrickt
31.10.2017 - 16:12" Samtidigt på 2:a och 4:e v efter M.1 stickas M.2 över varje märktråd = 144-160-176-192-208-224 m kvar på st..." Jag har stickat klart M1. Jag har placerat ut märktrådarna. Hur ska jag kunna sticka M2 på 2:a och 4:e varvet, när M2 består av fyra varv? Då är jag ju halvvägs upp på första M2 när det är dags för nästa??
08.07.2017 - 22:12DROPS Design answered:
Hej! Det har smugit sig in ett fel i beskrivningen, A.2 ska stickas på varv 2 och 6 efter M.1.
10.07.2017 - 17:16Jag har 13 nystan Drops Love You nr 6 här hemma. Naturligtvis kommer jag sticka en provlapp, men kan jag räkna med att Safran & Alpaca går att byta ut mot det garn jag har? Och fungerar en sån här klänning i bomullsgarn?
30.04.2017 - 20:00DROPS Design answered:
Hej, Ja du kan använda DLY #6, fast du måste ha en tråd till från garngrupp A för att få en stickfasthet med 15 m på 10 cm. Lycka till!
03.05.2017 - 14:25Bonsoir, J'en suis presque à la fin mais... "Toutes les tailles : A 5-6-7-8-9-10 cm de hauteur, suivre M4. Après 1 répétition de M4,..." comment répéter M4 ? le rang 1 de M4 est sur 20 mailles le dernier rang est sur 16mailles,?
07.03.2017 - 23:54DROPS Design answered:
Bonjour Véronique31, vous tricotez 1 fois M.4 en hauteur, puis, après M.4, vos tricotez 2 rangs endroit en ajustant le nombre de mailles à celui indiqué pour votre taille. Bon tricot!
08.03.2017 - 09:33Buongiorno, io non capisco come avviare le maglie su entrambe le estremità dei ferri circolari. devo avviarne metà per parte o cosa?
18.01.2016 - 06:43DROPS Design answered:
Buongiorno Antonella. Deve sovrapporre le due punte dei ferri circolari; è come se avviasse le m su un ferro di qualche misura più grande di quello con cui lavorerà in seguito. Il seguente video può aiutarla. Buon lavoro!
18.01.2016 - 08:52Vanda wrote:
Hallo, Can 1 thread of Cotton Merino or Belle be used instead of the 2 yarns? Has anyone tried it out with nice results? Thanks.
15.05.2015 - 08:57DROPS Design answered:
Dear Vanda, Cotton Merino and Belle belong to group B of our yarn, this dress is worked with 2 strands group A (= 1 strand group C) - see also here alternatives. Happy knitting!
15.05.2015 - 09:23