
Popular categories
Looking for a yarn?


|
||||||||||||||||||||||
DROPS 94-14 |
||||||||||||||||||||||
|
|
||||||||||||||||||||||
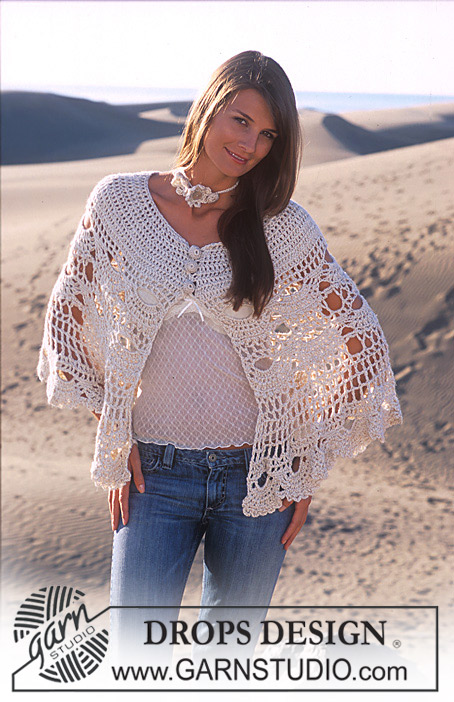
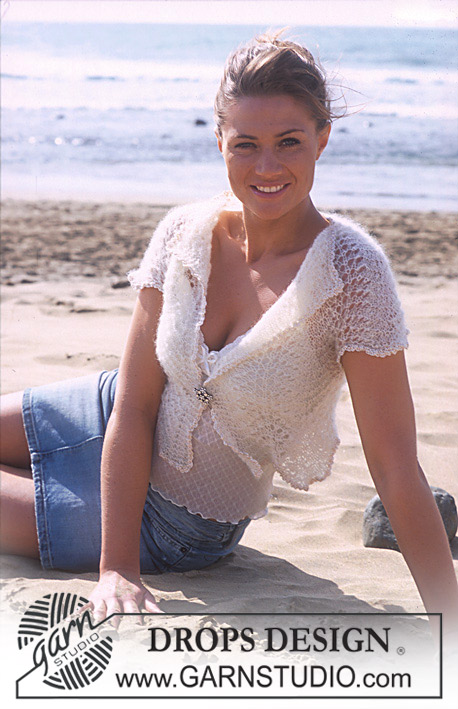
DROPS Cardigan in Alpaca and scarf in Vivaldi.
DROPS 94-14 |
||||||||||||||||||||||
|
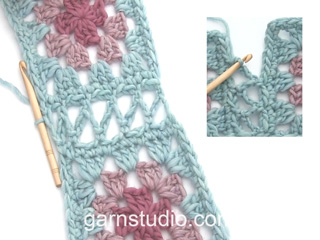
Knitting Gauge: 23 sts x 30 rows on needles size 3 mm with Alpaca in stocking sts. = 10 x 10 cm. Pattern: See diagrams M.1 to M.6. The diagrams are seen from the right side. Net pattern: The pattern is knitted over all sts inc. the edge sts. 1st and 3rd row (= wrong side): P over all sts. 2nd row (= right side): *K2 tog. make a yo*, repeat from *-* and finish off with K1. 4th row (= right side): K1, *make a yo, slip a st as if to knit, K1, psso*, repeat from *-*. Repeat row 1 to 4 a total of 4 times. Bind off tips (for the neck shaping): Bind off after 1 edge st: Slip a st as if to knit, K1 psso. Bind off before 1 edge st: K2 tog. Body: Please read all of the pattern before you knit! The cardigan is knitted forward and backward on circular needles starting from the centre mid front. Cast on 176-194-212-239-257 sts (inclusive of 1 edge st each side mid front) on circular needles size 3.5 with Alpaca. Purl 1st row from the wrong side. Knit the next row from the right side as follows: 1 edge st (knitted in garter sts on all rows), M.1A over the next 171-189-207-234-252 sts, M.1B (= 3 sts) and 1 edge st (knitted in garter sts on all rows). When the piece measures 5 cm – adjust the length to a finished pattern repeat - knit 5 rows of garter sts beginning from the right side. Continue in M.2 with an edge st each side mid front. Insert a marking thread 45-49-54-60-65 sts in from each side (= 86-96-104-119-127 sts between the marking threads for the back). At the same time when the piece measures 8-8-8-10-10 cm inc. 1 st both sides of the marking thread on every 3.5-3.5-3.5-4-4.5 cm a total of 5-5-5-4-4 times = 196-214-232-255-273 sts – knit new sts in stocking sts, when finished increasing remove the marking threads. When the piece measures 22-23-24-25-26 – make sure the next row is from the wrong side and uyou have knitted at least 2 rows of stocking sts after a row of lace holes – knit M.3 – at the same time on the last row of M.3, adjust the number of sts to 195-219-235-259-275. After M.3 knit the next row from the right side as follows: 1 edge st, M.4 over the next 192-216-232-256-272 sts, 1 stocking st and 1 edge st. Continue the pattern like this – at the same time on the last row of M.4 bind off 16 sts evenly distributed on row = 179-203-219-243-259 sts. Continue in net pattern – see explanation above. Repeat the net pattern 3 times and change to M.3 at the same time inc. 17 sts evenly distributed on row on the first row of M.3 = 196-214-232-255-273 sts. At the same time on the last row of M.3 knit from the wrong side as follows: Knit 45-49-54-58-63 sts (= left front), bind off 10-10-10-12-12 sts for the armhole, knit 86-96-104-115-123 (= back piece), bind off 10-10-10-12-12 sts for the armhole and knit the last 45-49-54-58-63 sts (= right front). The piece now measures approx 32-33-34-35-36 cm. Now put the work aside and knit the sleeves. Sleeve: Cast on 54-54-54-63-63 sts on double pointed needles 3.5 with Alpaca. K 1 round and continue with M.1A. When the piece measures 11 cm - adjust the length to a finished pattern repeat – knit M.5A. Now knit M.2 – make sure the holes are nicely located over the “bubbles”. At the same time when the piece measures 15 cm inc. 2 sts mid under arm a total of 12-14-17-15-17 times on every: Size S: 8th round, Size M: 7th round, Size L: Alternate between every 5th and 6th round, Size XL: 6th round, Size XXL: 5th round. Incorporate the new sts in pattern as you go along. At the same time when the piece measures approx 38-37-37-36-36 cm – make sure the numbers of rounds in stocking sts (in M.2) are the same as for the body before M.3 – knit M.3. After M.3 knit M.4 – adjust the pattern so a lace pattern is at the centre top of the sleeve – see the arrow in diagram. At the same time on the last round of M.4 bind off 3-3-3-4-4- sts evenly distributed. Continue in net pattern as for the body but knit the first and third round (i.e. no pattern). Continue in M.3 at the same time on the 1st round inc 3-3-3-4-4 sts evenly distributed. After all dec and inc there are 78-82-88-93-97 sts on round. At the same time on the last round in M.3 ( the piece now measures 48-47-47-46-46 cm) bind off 10-10-10-12-12 sts at the centre underneath the sleeve = 68-72-78-81-85 sts. Put the remaining sts on a thread and knit another sleeve. Yoke: Put the sleeves in on the same circular needle as the body where you bound off for armholes = 312-338-368-393-419 sts. Knit 1 row from the right side at the same time adjusting the number of sts to 306-338-368-386-418. Continue to knit and bind off according to M.6 (remember the edge st at each side as before). At the same time bind off 1 st for the V neck at the centre front on every other row – see bind off tips: a total of 30-31-33-34-36 times. After all bind off’s there are 69-77-78-86-92 sts left on row. When finish with M.6 and the V neck shaping continue in stocking sts until the piece measures 52-54-56-58-60 cm. K 1 row from the right side at the same time adjusting the number of sts evenly distributed on row to approx 35-45 sts. Bind off loosely on the next row. Assembly: Sew the openings under the arms. Front and neck edge: Pick up 278 – 323 sts (divisible by 5 + 3) on circular needle size 3 with Alpaca – Pick up from the right side up along the right front piece, to the back and down along the left front piece. Knit 2 rows of garter sts. Continue as follows: 1st row (=the wrong side): *K3, P2*, repeat from *-* and finish with K3. 2nd row: K over all sts. Repeat row 1 and 2 – NB: In the bend where the neck shape starts on both front pieces, inc. 1 st on every other row a total of 3 times so the edge doesn’t get too tight. It looks nicest to inc. in the 3rd P st or 2nd K st (seen from the right side). Knit the new sts the same as the st you inc. in. At the same time when the front edge measures approx. 1 cm bind off for 6 – 7 button holes evenly distributed on the right front edge. 1 button hole = bind off 2 sts and cast on 2 new sts over the bound off sts on the next row. The first button hole should be 1-2 cm from the bottom edge and the top should be at the bend where the v neck starts. When the front edge measures approx 2.5 to 3 cm bind off loosely from the wrong side in with K over K and P over P. Scarf Length: approx 10 x 180 cm Materials: Vivaldi 50 g colour no. 06, Off white 1st square: crochet 4 ch, on hook size 3.5 with Vivaldi and make a loop with a sl st. 1st round: 3 ch,, 11 tr around the ring, finish with a sl st in the 3rd ch from beginning of round. 2nd. round: *4 ch, 1 tr in the 1st of the 4 ch, skip 1 tr, 1 sl st in the next tr*, repeat from *-* a total of 6 times and finish with a sl st in the sl st from the end of the previous round = 6 leaves. 3rd round: 3 ch, 1 dc in the top of the 1st leave, *7 ch, 1 dc in the top of the next leave* repeat from *-* a total of 6 times and finish with a sl st in the dc at the top of the 1st leave = 6 loops. 4th round: *4 ch, 1 tr in the 1st of the 4 ch, 1 dc around the loop, 4 ch, 1 tr in the 1st of the 4 ch, 1 dc in the dc between the loops*, repeat from *-* a total of 6 times and finish with a sl st in the sl st from the end of the previous round = 12 leaves. 5th round: 3 ch, *1 dc in the top of the 1st leave, 4 ch, 1 dc in the top of the next leave, 4 ch, 1 dc in the next leave, 4 ch, 1 dtr in the dc between the next 2 leaves, 4 ch*, repeat from *-* a total of 4 times and finish with a sl st in the 1st dc from beginning of round = 4 double corner tr and 16 ch loops. 6th round: *2 ch, 1 dc around the loop, 2 ch, 1 dc in the top of the leave, 2 ch, 1 dc around the loop, 2 ch, 1 dc in the top of the leave, 2 ch, 1 dc around the loop, 2 ch, 1 dc in the corner tr, 2 ch, 1 dc in the corner tr, 2 ch, 1 dc in the loop, 2 ch, 1 dc at the top of the leave*, repeat from *-* a total of 4 times, but finish with a sl st in the sl st from the end of the previous round = 36 ch loops. 7th round: * 6 ch, skip 1 dc, 1 dc in the next dc (over the leave), 6 ch, skip 1 dc, 1 dc in the next dc, 6 ch, skip 1 dc, 1 dc in the next dc (= 1st dc in the corner), 4 ch, 1 dc in the next dc (= 2nd dc from the corner), 6 ch, skip 1 dc, 1 dc in the next dc* repeat from *-* a total of 4 times, finish with a sl st in the sl st from the end of the previous round. Cut the thread. Crochet another 13 squares. Assembly: Crochet the squares tog. to a long chain as follows: Crochet 1 dc in the corner of the 1st square, 2 ch, 1 dc in the corner of the 2nd square, 2 ch, 1 dc around the 1st loop on the 1st square, 2 ch, 1 dc around the 1st loop of the 2nd square, 2 ch, 1 dc around the next loop of the 1st square and so on… At last crochet a triangle at each end as follows: 1st row: 1 dc in the corner of one of the end squares, *8 ch, skip approx. 2 cm (adjust the space so there is room for 5 loops in between), 1 dc in the next st*, repeat from *-* a total of 5 times, turn the piece. 2nd. row: 4 ch, 1 dc in the top of the 1st loop, *8 ch, 1 dc in the top of the next ch loop*, repeat from *-* a total of 4 times, turn the piece. 3rd. row: 4 ch, 1 dc in the top of the 1st loop, *8 ch, 1 dc in the top of the next loop*, repeat from *-* a total of 3 times, turn the piece. Continue as above another 2 rows, i.e one less loop for each row. Repeat the other end of the scarf. |
||||||||||||||||||||||
Diagram explanations |
||||||||||||||||||||||
|
||||||||||||||||||||||

|
||||||||||||||||||||||
|
Have you made this or any other of our designs? Tag your pictures in social media with #dropsdesign so we can see them! Do you need help with this pattern?You'll find tutorial videos, a Comments/Questions area and more by visiting the pattern on garnstudio.com. © 1982-2024 DROPS Design A/S. We reserve all rights. This document, including all its sub-sections, has copyrights. Read more about what you can do with our patterns at the bottom of each pattern on our site. |
||||||||||||||||||||||


With over 40 years in knitting and crochet design, DROPS Design offers one of the most extensive collections of free patterns on the internet - translated to 17 languages. As of today we count 304 catalogues and 11422 patterns - 11422 of which are translated into English (UK/cm).
We work hard to bring you the best knitting and crochet have to offer, inspiration and advice as well as great quality yarns at incredible prices! Would you like to use our patterns for other than personal use? You can read what you are allowed to do in the Copyright text at the bottom of all our patterns. Happy crafting!
Comments / Questions (26)
In het patroon staat bij het bovenstuk dat je na alle minderingen 46 steken over houd, ik heb er 78. Ik heb gekeken in het Noorse patroon, daar staat volgens mij ook 78.???
01.09.2023 - 11:02This looks beautiful and challenging.
20.06.2023 - 06:21Begrijp ik het goed, dat de mouwen helemaal rond gebreid worden?
25.05.2021 - 11:02DROPS Design answered:
Dag Marina,
Ja, dat klopt, de mouwen worden in de rondte gebreid op sokkenbreinaalden (maar je kunt in de plaats daarvan ook een rondbreinaald gebruiken).
25.05.2021 - 19:24Sorry begrijp er niets van, het gaat om patroon 94-14 bij het meerderen in het telpatroon M2 aan beide zijden van de markeerdraden voor de zijnaden. U spreekt van A3 maar volgens mij ben je dan bezig met telpatroon M2. Groetjes Alice
20.12.2018 - 11:30DROPS Design answered:
Dag Alice,
Je hebt gelijk, ik had een fout gemaakt, ik bedoel inderdaad M.2 in plaats van A.3
20.12.2018 - 18:04Hallo bedankt voor uw snelle antwoord. Maar komt dan de teltekening M2 dan nog goed, als je de gemeerderde steken na de markering in tricot moet breien? Groetjes en bedankt. Alice
19.12.2018 - 18:44DROPS Design answered:
Dag Alice,
Ja, omdat je de gemeerderde steken in tricotsteek breit, en en niet in A.3 heb je hier geen last van.
20.12.2018 - 10:32Hallo ik ben Alice een beginnende breister, ik ben op een hoogte van 10 cm voor meerdering langst de markeerdraden, moet ik de gemeerderde steken ook in het patroon M2 breien of enkel de nieuwe steken in tricot? Vriendelijke groeten en dank bij voorbaat. Alice
16.12.2018 - 14:31DROPS Design answered:
Dag Alice,
De gemeerderde steken in de zijnaden brei je in tricotsteek.
18.12.2018 - 10:591. Does M2 pattern beginon a wrongside row so that the eyelets are being made on the right side? 2. What does ‘ adjust length to a finished pattern repeat’ mean? Patterns from Drops are very poorly written and uoset me dvery time. They’re not clear nor written by a knitter. Ive knitted for years but have to rewrite then so they’re understandable. why put patterns in this format if you truly wsnt us to knit them? :(
14.11.2018 - 06:21DROPS Design answered:
Dear Mrs Douglas, that's right, M.2 is worked starting from WS (= you first work 5 rows with M.1 starting from RS = last row will be worked from RS so that M.2 starts on next row from WS). "Adjust the length to a finished pattern repeat" means to work more or less than the cm given, the most important will be here that you have worked a whole repeat of the diagram in height. Happy knitting!
14.11.2018 - 09:04Volgens mij zit er een fout in het patroon bij de meerderingen: van 234 steken met 4 keer 2 steken meerderen is volgens mij geen 255 maar 242 st. Daarna moet er geminderd worden van 255 naar 259 steken. Ik ben hier even de weg kwijt! Met vriendelijke groet, Ellen van der Poel
23.06.2017 - 16:56DROPS Design answered:
Hoi Ellen, In beide zijkanten heb je een markeerdraad en je meerdert telkens aan beide kanten van de markeerdraad, dus per keer meerder je 4 steken en dan komen er dus in totaal 16 steken meer op de naald.
29.06.2017 - 21:11Der Kettrand der Kante zieht sich trotz sehr lockerer Technik (+eine ganze Nadelnr. größer) sehr stark zusammen, wodurch die ganze Optik etwas leidet. Hier würde ich empfehlen anstatt den Rand zum Schluss anzustricken, ihn als Blende gleich mit ins Muster einzuarbeiten. Außerdem sind Silberknöpfe nicht empfehlenswert. Sie sind für die zarte Jacke viel zu schwer.
17.10.2015 - 10:58Ich habe eine Frage zum Ärmel. Wenn ich aus dem Muster M1A komme, ist die letzte Runde links. M5A beginnt dann auf der rechten Seite. Die Noppe würde dann auf der linken Seite gestrickt werden. Das kann ja eigentlich nicht richtig sein, oder?
29.09.2015 - 23:02DROPS Design answered:
Sie stricken die Ärmel in Runden, nicht in Hin- und Rück-R, dann ergibt sich das Problem mit der Noppe nicht. Das ist in der Anleitung leider etwas missverständlich, die Anleitung wird diesbezüglich gleich verdeutlicht.
03.10.2015 - 11:44