
Popular categories
Looking for a yarn?


|
|
DROPS 94-4 |
|
|
|
|
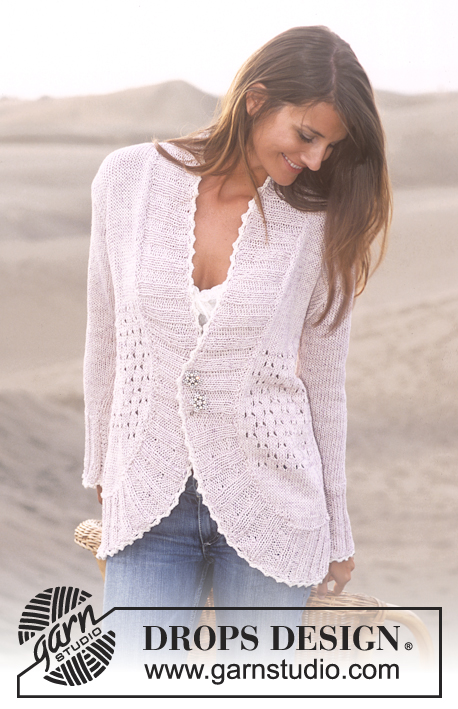
DROPS Cardigan knitted with 2 strands of Alpaca.
DROPS 94-4 |
|
|
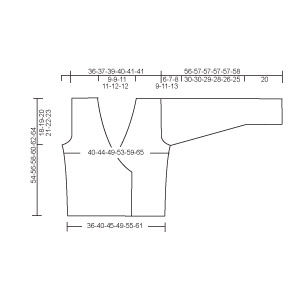
Knitting Gauge: 15 sts x 19 rows on needles size 6 mm / US 10 in stockinette sts. = 10 x 10 cm / 4" x 4". Rib 1: *K1, P2*, repeat from *-*. Bind off tips (for the front edge and neck shaping): Bind off inside the 7 edge sts, (knitted as explained in the pattern). All bind off’s are done from the right side. Bind off after the 7 sts: Slip a st as if to knit, K1, psso. Bind off before the 7 sts: K2 tog. -------------------------------------------------------- Back Piece: Cast on loosely 56-62-70-76-84-94 sts (inclusive of 1 seam st each side) on needle size 6 mm/US 10 with 1 thread of each color (= 2 threads). Knit 2 rows of garter sts and continue in stockinette sts. When the piece measures 9 cm / 3½" inc. 1 st each side on every 9-9-9.5-10-10-11 cm / 3½"-3½"-3¾"-4"-4"-4⅜" a total of 3 times = 62-68-76-82-90-100 sts. When the piece measures 36-37-38-39-40-41 cm / 14¼"-14½"-15"-14¼"-15¾"-16⅛" bind off for armhole each side on every other row as follows: 3 sts 1 time, 2 sts 0-1-2-2-3-4 times and 1 st 1-1-2-4-5-8 times = 54-56-58-60-62-62 sts. When the piece measures 50-52-54-56-58-60 cm / 19¾"-20½"-21¼"-22"-22¾"-23⅝" continue in rib on the mid 26-26-28-28-30-30 sts from the right side as follows (all other sts are worked as before): Size XS + S: *P2, K1* repeat from *-* over the first 24 sts of the 26 sts, P2. Size M + L: *P2, K1*, repeat from *-* over the first 12 sts of the 28 sts, K1, P2, K1, P2, *K1, P2*, repeat from *-* over the last 12 sts of the 28 sts. Size XL + XXL: *P2, K1*, repeat from *-* over the first 15 sts of the 30 sts, hereafter *K1, P2*, repeat from *-* over the last 15 sts of the 30 sts. When the piece measures 52-54-56-58-60-62 cm / 20½"-21¼"-22"-22¾"-23⅝"-24⅜" bind off the mid 12-12-14-14-16-16 sts for the neck. Continue to bind off 1 st on next row at the neck side – see binding off tips = 20-21-21-22-22-22 sts left on each shoulder. Continue in rib on both sides of the neck, but knit the outermost sts on each neck side in garter sts on all rows until finished measurements. Bind off remaining sts when the piece measures 54-56-58-60-62-64 cm / 21¼"-22"-22¾"-23⅝"-24⅜"-25¼". Left front: Cast on loosely 37-40-44-47-51-56 sts (inclusive of 7 edge sts at the front edge and 1 seam st at the side) on needle size 6 mm/US 10 with 1 thread of each color. Knit 2 rows of garter sts and continue in stockinette sts, but the 7 outermost sts at the front edge are worked as follows (seen from the right side): 1 edge st knitted in garter sts on every row, K1, P2, K1, P2. Read all of the following section before continuing: Inc. at the sides: When the piece measures 9 cm / 3½" inc at the side as done for the back piece. Binding off at the front edge: At the same time when the piece measures 17-18-19-20-21-22 cm / 6¾"-7"-7½"-8"-8¼"-8¾" bind off 1 st at the front edge – see binding off tips: On every 4th row: 15-15-15-15-16-16 times and on every 6th row: 1 st 1-1-2-2-2-2 times. Armhole: At the same time when the piece measures 36-37-38-39-40-41 cm / 14¼"-14½"-15"-14¼"-15¾"-16⅛" bind off for the armhole as done for the back piece. When all decreases and increases are complete there are 20-21-21-22-22-22 sts left on row. Bind off when the piece measures 54-56-58-60-62-64 cm / 21¼"-22"-22¾"-23⅝"-24⅜"-25¼". Right front: Cast on and knit as left front but reverse. Sleeve: Cast on 39-42-42-45-45-48 sts (including a seam st each side) on needle size 6 mm/US 10 with 1 thread of each color. Knit 2 rows of garter sts and continue in stockinette sts. When the piece measures 20 cm / 8" inc. 1 st each side, repeat on every 7-5.5-3.5-3.5-2.5-2.5 cm / 2¾"-2¼"-1¼"-1¼"-⅞"-⅞" a total of 5-6-8-8-10-10 times = 49-54-58-61-65-68 sts. When the sleeve measures 50-50-49-48-46-45 cm / 19¾"-19¾"-19¼"-19"-18"-17¾" bind of for sleeve cap each side on every other row as follows: 3 sts 1 time, 2 sts 2 times and 1 st 0-0-1-2-3-4 times. Continue to bind off 2 sts each side until the piece measures 55-56-56-56-56-57 cm / 21½"-22"-22"-22"-22"-22½" and then bind off each side 3 sts 1 time. Bind off remaining sts when the piece measures approx. 56-57-57-57-57-58 cm / 22"-22½"-22½"-22½"-22½"-23". Assembly: Sew the shoulder seams. Sew in the sleeves. Sew the sleeves and the sides tog. inside the seam sts. Crochet 1 row of sc over the neck sts on back piece on hook size 5 mm/H/8 with 1 thread of each color to make sure the neck doesn’t expand too much. Crochet edge: Crochet on hook size 5/H/8 with 2 threads of lime along all edges including the sleeve edges. Begin at the mid back as follows: 1 sc into the 1st st, *3 ch, 1 dc into the 1st ch crochet, skip ch 2, 1 sc into the next st*, repeat from *-*. Hold the cardigan together with either a brooch or a kilt pin. |
|
|
|
|
Have you made this or any other of our designs? Tag your pictures in social media with #dropsdesign so we can see them! Do you need help with this pattern?You'll find tutorial videos, a Comments/Questions area and more by visiting the pattern on garnstudio.com. © 1982-2024 DROPS Design A/S. We reserve all rights. This document, including all its sub-sections, has copyrights. Read more about what you can do with our patterns at the bottom of each pattern on our site. |


With over 40 years in knitting and crochet design, DROPS Design offers one of the most extensive collections of free patterns on the internet - translated to 17 languages. As of today we count 304 catalogs and 11422 patterns - 11417 of which are translated into English (US/in).
We work hard to bring you the best knitting and crochet have to offer, inspiration and advice as well as great quality yarns at incredible prices! Would you like to use our patterns for other than personal use? You can read what you are allowed to do in the Copyright text at the bottom of all our patterns. Happy crafting!
Comments / Questions (7)
Met dit vestje heb ik een jonge vrouw met maatje 32/34 een groot plezier kunnen doen. Omdat ik naalden 5,5 heb gebruikt, past het precies. Wat zou het fijn zijn als veel meer patronen ook maat XS zouden krijgen! Hartelijk dank voor alle moois!
12.02.2021 - 14:09De beschrijving voor de mouwkop is mij niet helemaal duidelijk. . ....kant verder 2 st. aan weersz. tot een totale hoogte van 50 cm.... Ontbreekt hier iets? Hoeveel steken blijven er uiteindelijk over die in 1 keer worden afgekant? Hartelijk bedankt alvast!
13.01.2021 - 21:01DROPS Design answered:
Dag Jetje,
Je kant op dat moment steeds 2 steken af aan elke kant (dus elke keer aan het begin van iedere naald) tot de aangegeven hoogte. Het aantal steken dat over is wanneer je afkant maakt niet uit, het gaat erom dat je op de aangegeven hoogte bent.
17.01.2021 - 10:28How do two greens make blue? Do you have the correct colours listed here?it looks like one of the yarns might be blue, not green.
21.04.2019 - 21:25DROPS Design answered:
Dear Sharon, yes, the colours are correct - lime and mint (or grey-green). But of course, you can choose colour on your own and put more blue coloured shade instead - please check our shadecard. Happy knitting!
21.04.2019 - 22:27Modell 94-4: Ich verwende ein dünneres Garn mit Nadelstärke 3.5 um dieses Modell zu stricken. Für den Rücken habe ich 120 M angeschlagen. Wie viele M muss ich für ein Vorderteil anschlagen? Ich danke Ihnen herzlich für die vielen tollen Anleitungen und erwarte gerne Ihre Information. Freundliche Grüsse Gabrielle Steffen Wynigen/Schweiz
14.11.2018 - 19:36DROPS Design answered:
Liebe Frau Steffen, dieses Modell wird für eine Maschenprobe von 15 m x 19 Reihen glatt rechts gestrickt = 10 x 10 cm geschrieben - leider können wir jede Anleitung nach jeder individuellen Anfrage anpassen - Sie können sich von einer ähnlichen Anleitung mit der selben Maschenprobe inspirieren lassen, oder mal Kontakt mit dem Laden aufnehmen, wo Sie die Wolle gekauft haben. Viel spaß beim stricken!
15.11.2018 - 08:52Hallo Lieblingsdesigner, Hinterteil bedeutet Popo :-) Rückenteil ist die richtige Bezeichnung. Ganz lieben Dank für die tollen Anleitungen und die schönen Garne. Herzliche Grüße Gitte
05.03.2015 - 10:44DROPS Design answered:
Liebe Gitte, danke für den Hinweis, wir haben es korrigiert :). Dies ist eine alte Anleitung, mit noch einigen sprachlichen Holprigkeiten - wir werden die älteren Anleitungen bei Gelegenheit überarbeiten.
06.03.2015 - 07:07The armhole is 18-23 cm, the number 9 cm you refer to is the measure for the height of the sleeve cap. See measure chart at the bottom of the pattern page.
06.05.2009 - 23:25I am wondering if the measurements for the arm holes are correct. 9 cm does not seem to be long enough. Thank you and I love everything about your patterns and web site
06.05.2009 - 23:07