DROPS Alpaca
DROPS Alpaca
100% Alpaca
from 3.40 £ /50g
Get the yarn to make this pattern from 17.00£.

The yarn cost is calculated from the pattern’s smallest size and the yarn’s cheapest product type. Looking for an even better price? You might find it on the DROPS Deals!

DROPS SS24

Strawberry Top

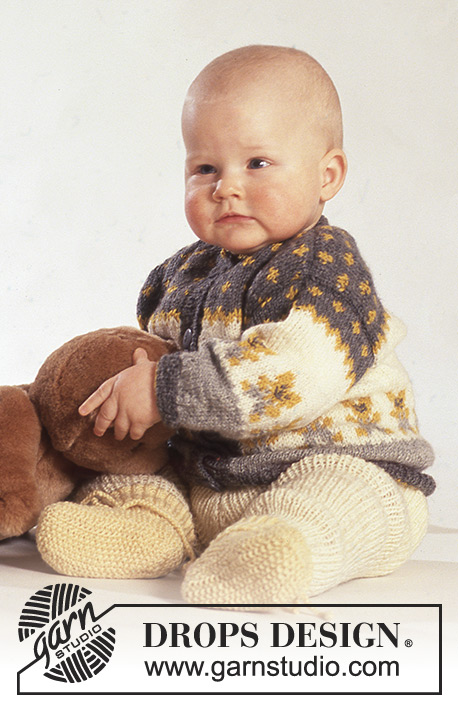
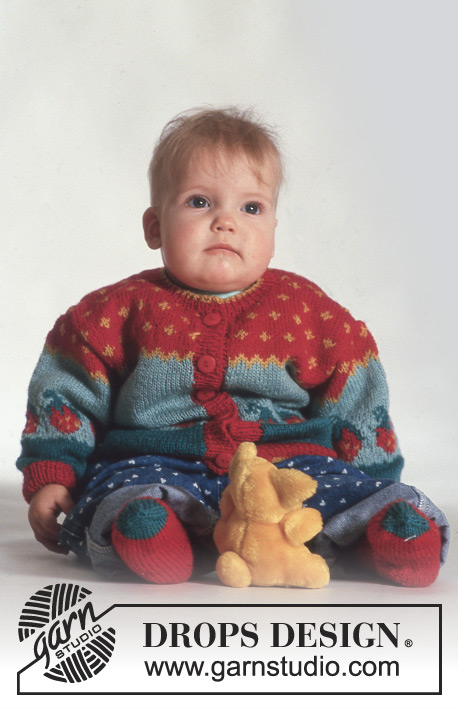
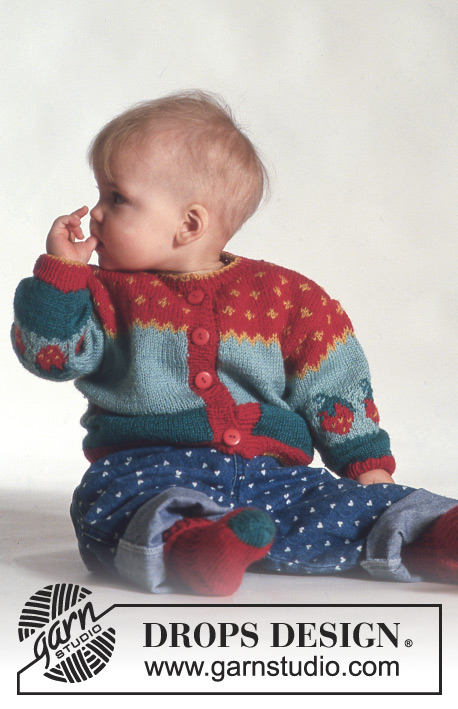
Knitted jacket and socks in DROPS Alpaca with strawberry for baby and kids, size 3 month to 3 years.

DROPS Baby 3-13
DROPS design: Pattern no Ø-029a-by
--------------------------------------------------------

Set consists of: Jacket and socks

Size: 3 - 6/9 - 12/18 months (2-3) years
In cm: 56 - 62/68 - 74/80 (86/92 - 98/104)

Materials: DROPS Alpaca from Garnstudio

Jacket:
50-50-100 (100-100) g colour no 3620-red
50-50-100 (100-100) g colour no 6309-medium petrol
50-50-50 (50-50) g colour no 7139-dark grey green
50-50-50 (50-50) g colour no 2923-goldenrod
Socks:
50-50-50 (50-50) g colour no 21-red, + some left-over medium petrol.

Materials: DROPS buttons: 5-5-5 (6-6) pieces
DROPS circular needle (60 cm) and double pointed needles size 2.5 and 3 mm.

-------------------------------------------------------

Alternative Yarn – See how to change yarns here
Yarn Groups A to F – Use the same pattern and change the yarn here
Yarn usage using an alternative yarn – Use our yarn converter here

-------------------------------------------------------

DROPS Alpaca
DROPS Alpaca
100% Alpaca
from 3.40 £ /50g
Get the yarn to make this pattern from 17.00£.

The yarn cost is calculated from the pattern’s smallest size and the yarn’s cheapest product type. Looking for an even better price? You might find it on the DROPS Deals!

Pattern instructions

NOTE: This pattern is written in British English. All measurements in charts are in cm. For conversion from cm to inches - click here. There are different terms for crocheting in British and American English. If this pattern includes crochet, click for "crochet terms" here. For this pattern in American English, please click here.
Pattern: See diagrams. M.1 - M.3. The diagrams show the pattern from the RS
JACKET:

KNITTING TENSION: 10 x 10 cm = 24 stitches x 32 rows on needle size 3 mm and in stocking stitch. Remember that needle size is ONLY a suggestion.

RIB: * Knit 1, purl 1 *.

Body:
Worked back and forth on circular needle from mid front. Cast on 120-132-144 (158-162) stitches on circular needle size 2.5 mm with goldenrod and work 3-3-3 (4-4) cm rib but after 1 round switch to red. Then switch to circular needle size 3 mm and work in stocking stitch with 6309-medium petrol while at the same time increasing 3-3-3 (13-21) stitches evenly on 1st row = 123-135-147 (171-183) stitches. Remember the knitting tension! After 3-4-5 (5-5) cm with 6309-medium petrol work M.1 with 1 edge stitch in the right side and 2 edge stitches in the left side towards mid front. Then continue with dark grey green at the same time when piece measures 16-18-21 (22-21) cm, divide for armholes as follows: 31-34-37 (43-46) stitches front piece and 61-67-73 (85-91) stitches back piece, finish each part separately.

Back piece: = 61-67-73 (85-91) stitches. When piece measures 19-22-24 (26-29) cm, work M.2 and the finish with M.3. When piece measures 26-29-33 (35-38) cm, cast off 21-23-27 (29-37) stitches mid back for neck. Then cast off 2 stitches in each side on next row. Cast off the remaining 18-20-21 (26-25) stitches for shoulder when piece measures 28-31-35 (37-40) cm.

Left front piece: = 31-34-37 (43-46) stitches. Work pattern as on back piece. When piece measures 24-28-32 (34-37) cm, cast off for neck on every other row: 7-8-10 (11-15) stitches x 1, 2 stitches x 2 and 1 stitches x 2. Cast off the remaining 18-20-21 (26-25) stitches for shoulder when piece measures approx. 28-31-35 (37-40) cm.

Right front piece: = 31-34-37 (43-46) stitches. Work as left front piece.

Sleeve: Cast on 38-40-40 (42-42) stitches on double pointed needles size 2.5 mm with goldenrod and work 2-2-3 (3-4) cm rib but after 1 round switch to red. Switch to double pointed needles size 3 mm, 6309-medium petrol and stocking stitch while at the same time increasing 2-4-6 (10-16) stitches evenly on 1st round = 40-44-48 (52-58) stitches. Work 3-4-4 (4-5) cm while at the same time increasing mid under sleeve 2 stitches x 9-9-10 (10-16) on 3 month: every 4th round 6/9+12/18 months + 2 years: alternately every * 5th and 6th round * 3 years: alternately every * 3rd and 4th round * = 58-62-68 (72-90) stitches. When piece measures 5-6-7 (7-9) cm, work M.1 (make sure to get a repetition mid on top of sleeve), then continue with dark grey green until 3-3-5 (5-7) cm remain. Work M.2 and then finish with M.3. Cast off when piece measures 21-25-27 (28-31) cm.

Assembly: Sew the shoulder seam.

Left band: Pick up 70-90 stitches on needle size 2.5 mm with red along left front piece and work 3 cm rib, cast off.

Right band and neck: Work as left but after 1 cm cast off for 5-5-5 (6-6) buttonholes evenly - 1 buttonhole = cast off 3 stitches, increase 3 new stitches on next row. Pick up approx. 85-95 stitches on needle size 2.5 mm around the neck with red and work 1.5 cm rib, switch to goldenrod, work 1 row and cast off. Sew sleeves to body in edge stitches to avoid a chunky seam. Sew on buttons.


SOCKS:

Size: Foot length: 10-11-12 (14-15) cm.
Materials: DROPS Double pointed needles size 3 mm.

KNITTING TENSION: 10 x 10 cm = 24 stitches x 32 rows on needle size 3 mm and in stocking stitch. Remember that needle size is ONLY a suggestion.

Rib: * Knit 1, purl 1 *.

Sock: Cast on 38-40-42 (42-44) stitches on double pointed needles size 3 mm with red and work 3 cm rib. Continue in stocking stitch. When piece measures 5-6-7 (8-9) cm, work as follows:

Heel: Work 3 cm in stocking stitch back and forth over 18 stitches mid back. Heel decrease (1st row from right side): Row 1: Knit 10, knit 2 twisted together, knit 1, turn piece, Row 2: Slip 1 stitch, purl 4, purl 2 together, purl 1, turn piece, Row 3: Slip 1 stitch, knit 5, knit 2 twisted together, knit 1, turn piece, Row 4: Slip 1 stitch, purl 6, purl 2 together, purl 1, turn piece, Row 5: Slip 1 stitch, knit 7, knit 2 twisted together, knit 1, turn piece, Row 6: Slip 1 stitch, purl 8, purl 2 together, purl 1, turn piece, Row 7: Knit 2 together, knit 8, knit 2 twisted together = 10 stitches on needle. Pick up 7 stitches on each side of heel and slip all stitches on to same needle = 44-46-48 (48-50) stitches. Then decrease on each side of the top 16-18-18 (20-22) stitches 1 stitch x 6-6-7 (6-6) on every row = 32-34-34 (36-38) stitches. When foot measures 7-8-9 (11-12) cm (from start of heel decrease), insert a marker thread on each side. Switch to medium petrol and decrease for toes on each side of thread (4 decreases in total) 1 stitch x 8-8-8 (9-9) on every row. Pull yarn through the last stitches and fasten.

Diagram

symbols = dark grey green
symbols = medium petrol
symbols = red
symbols = goldenrod
diagram
diagram

Each of our patterns has specific tutorial videos to help you.

Do you have a question? See a list of frequently asked questions (FAQ)

Knitting tension is what determines the final measurements of your work, and is usually measured per 10 x 10 cm. It is provided like so: number of stitches in width x number of rows in height - eg: 19 stitches x 26 rows = 10 x 10 cm.

The knitting tension is very individual; some people knit/crochet loosely while others work tightly. You adjust the knitting tension with the needle size, which is why the suggested needle size is only meant as a guide! You need to adjust this (up or down) to ensure that YOUR knitting tension matches the knitting tension provided in the pattern. If you work with a different knitting tension than provided you will have a different yarn consumption, and your work will have different measurements than what the pattern suggests.

The knitting tension also determines which yarns can replace each other. As long as you achieve the same knitting tension you can replace one yarn with another.

See DROPS lesson: How to measure your tension/gauge

See DROPS video: How to make a gauge tension swatch

The required amount of yarn is provided in grams, eg: 450 g. To calculate how many balls you’ll need you first need to know how many grams are in 1 ball (25g, 50g or 100g). This information is available if you click on the individual yarn quality on our pages. Divide the amount required with the amount of each ball. For example, if each ball is 50g (the most common amount), the calculation will be as follows: 450 / 50 = 9 balls.

The important thing when changing from one yarn to another is that the knitting/crochet tension remains the same. This is so that the measurements of the finished piece will be the same as on the sketch provided. It is easier to achieve the same knitting tension using yarns from the same yarn group. It is also possible to work with multiple strands of a thinner yarn to achieve the knitting tension of a thicker one. Please try our yarn converter. We recommend you to always work a test swatch.

Please NOTE: when changing yarn the garment might have a different look and feel to the garment in the photo, due to individual properties and qualities of each yarn.

See DROPS lesson: Can I use a different yarn than the one mentioned in the pattern?

All our yarns are categorised into yarn groups (from A to F) according to thickness and knitting tension – group A contains the thinnest yarns and group F the thickest. This makes it easier for you to find alternative yarns to our patterns, should you wish to switch yarn. All yarns within the same group have a similar knitting tension and can easily replace each other. However, different yarn qualities have different structures and properties which will give the finished work a unique look and feel.

Click here for an overview of the yarns in each yarn group

At the top of all our patterns you’ll find a link to our yarn calculator, which is a helpful tool should you wish to use a different yarn than suggested. By filling in the yarn quality you wish to replace, the amount (in your size) and number of strands, the calculator will present good alternative yarns with the same knitting tension. Additionally it will tell you how much you’ll require in the new qualities and whether you’ll need to work with multiple strands. Most skeins are 50g (some are 25g or 100g).

If the pattern is worked with multiple colours, every colour will have to be calculated separately. Similarly, if the pattern is worked with several strands of different yarns (for example 1 strand Alpaca and 1 strand Kid-Silk) you will have to find alternatives for each, individually.

Click here to see our yarn calculator

Since different yarns have different qualities and textures we have chosen to keep the original yarn in our patterns. However, you can easily find options among our available qualities by using our yarn calculator, or simply pick a yarn from the same yarn group.

It is possible that some retailers still have discontinued yarns in stock, or that someone has a few skeins at home that they would like to find patterns for.

The yarn calculator will provide both alternative yarn as well as required amount in the new quality.

If you think it's hard to decide what size to make, it can be a good idea to measure a garment you own already and like the size of. Then you can pick the size by comparing those measures with the ones available in the pattern's size chart.

You'll find the size chart at the bottom of the pattern.

See DROPS lesson: How to read size chart

The needle size provided in the pattern serves only as a guide, the important thing is to follow the knitting tension. And since knitting tension is very individual, you will have to adjust the needle size to ensure that YOUR tension is the same as in the pattern – maybe you’ll have to adjust 1, or even 2 needle sizes, up or down to achieve the correct tension. For this, we recommend that you work test swatches.

Should you work with a different knitting tension than the one provided, the measurements of the finished garment might deviate from the measurement sketch.

See DROPS lesson: How to measure your tension/gauge

See DROPS video: How to make a tension/gauge swatch

Working a garment top-down provides more flexibility and room for personal adjustment. For example it is easier to try the garment on while working, as well as making adjustments to length of yoke and shoulder caps.

The instructions are carefully explaining every step, in the correct order. Diagrams are adjusted to the knitting direction and are worked as usual.

The diagram depicts all rows/rounds, and every stitch seen from the right side. It is read from bottom to top, from right to left. 1 square = 1 stitch.

When working back and forth, every other row is worked from the right side and every other row is worked from the wrong side. When working from the wrong side, the diagram will have to be worked reversed: from left to right, knit stitches are purled, purl stitches are knit etc.

When working in the round every round is worked from the right side and the diagram are worked from right to left on all rounds.

See DROPS lesson: How to read knitting diagrams

The diagram depicts all rows/rounds, and every stitch seen from the right side. It is worked from bottom to top, from right to left.

When working back and forth every other row is worked from the right side: from right to left and every other row is worked from the wrong side: from left to right.

When working in the round, every row in the diagram are worked from the right side, from right to left.

When working a circular diagram you start in the middle and work your way outwards, counter clockwise, row by row.

The rows usually start with a given number of chain stitches (equivalent to the height of the following stitch), this will either be depicted in the diagram or explained in the pattern.

See DROPS lesson: How to read crochet diagrams

Instructions for working several diagrams after each other on the same row/round, will often be written like so: “work A.1, A.2, A.3 a total of 0-0-2-3-4 times". This means you work A.1 once, then A.2 is worked once, and A.3 is repeated (in width) the number of times provided for your size – in this case like so: S = 0 times, M = 0 times, L=2 times, XL= 3 times and XXL = 4 times.

The diagrams are worked as usual: begin with the first row in A.1, then work the first row in A.2 etc.

See DROPS lesson: How to read knitting diagrams

See DROPS lesson: How to read crochet diagrams

The total width of the garment (from wrist-to-wrist) will be larger in the larger sizes, despite the actual sleeves being shorter. The larger sizes have longer sleeve caps and wider shoulders, so there will be a good fit in all sizes.

The measurement sketch/schematic drawing provides information regarding the full length of the garment. If it’s a jumper or a jacket the length is measured from the highest point on the shoulder closest to the neckline, and straight down to the bottom of the garment. It is NOT measured from the tip of shoulder. Similarly, the length of yoke is measured from the highest point on the shoulder and down to where yoke is split into body and sleeves.

On a jacket measures are never taken along bands, unless specifically stated. Always measure inside band stitches when measuring the length.

See DROPS lesson: How to read a schematic drawing

Diagrams are often repeated on the round or in height. 1 repeat is the diagram the way it appears in the pattern. If it says to work 5 repeats of A.1 in the round, then you work A.1 a total of 5 times after/next to each other in the round. If it says to work 2 repeats of A.1 vertically/in height you work the entire diagram once, then begin again at the start and work the entire diagram one more time.

Chain stitches are slightly narrower than other stitches and to avoid working the cast-on edge too tight, we simply chain more stitches to begin with. The stitch count will be adjusted on the following row to fit the pattern and measurement sketch.

The rib edge is more elastic and will contract slightly compared to, for example, stocking stitch. By increasing before the rib edge, you avoid a visible difference in width between the rib edge and the rest of the body.

It’s very easy to cast off too tightly, and by making yarn overs while casting off (and simultaneously casting these off) you avoid a too tight cast off edge.

See DROPS video: How to bind off with yarn overs (yo)

To achieve an even increase (or decrease) you can increase on, for example: every 3rd and 4th row alternately, like so: work 2 rows and increase on the 3rd row, work 3 rows and increase on the 4th. Repeat this until the increase is complete.

See DROPS lesson: Increase or decrease 1 st on every 3rd and 4th row alternately

Should you prefer to work in the round instead of back and forth, you may of course adjust the pattern. You’ll need to add steeks mid-front (usually 5 stitches), and follow the instructions. When you would normally turn and work from the wrong side, simply work across the steek and continue in the round. At the end you’ll cut the piece open, pick up stitches to work bands, and cover the cut edges.

See DROPS video: How to knit steeks and cut open

Should you prefer to work back and forth instead of in the round, you may of course adjust the pattern so you work the pieces separately and then assemble them at the end. Divide the stitches for the body in 2, add 1 edge stitch in each side (for sewing) and work the front and back pieces separately.

See DROPS lesson: Can I adapt a pattern for circular needles into straight needles?

Pattern repeats can vary slightly in the different sizes, in order to get the correct proportions. If you’re not working the exact same size as the garment in the photo, yours might deviate slightly. This has been carefully developed and adjusted so that the complete impression of the garment is the same in all sizes.

Make sure to follow instructions and diagrams for your size!

If you have found a pattern you like which is available in women’s size it’s not very difficult to convert it to men’s size. The biggest difference will be the length of sleeves and body. Start working on the women size that you think would fit across the chest. The additional length will be worked right before you cast off for the armhole/sleeve cap. If the pattern is worked top-down you can add the length right after the armhole or before the first decrease on sleeve.

Regarding additional yarn amount, this will depend on how much length you add, but it is better with a skein too many than too few.

All yarns will have excess fibres (from production) that might come off as lint or shedding. Brushed yarns (ie hairier yarns) have more of these loose, excess fibres, causing more shedding.

Shedding also depends on what is worn under or over the garment, and whether this pulls at the yarn fibres. It’s therefore not possible to guarantee that there will be no shedding

Below are some tips on how to get the best result when working with hairier yarns:

1. When the garment is finished (before you wash it) shake it vigorously so the looser hairs come off. NOTE: do NOT use a lint roller, brush or any method that pulls at the yarn.

2. Place the garment in a plastic bag and put it in your freezer - the temperature will cause the fibres to become less attached to each other, and excess fibres will come off easier.

3. Leave in the freezer for a few hours before taking it out and shaking it again.

4. Wash the garment according to the instructions on the yarn label.

Pilling is a natural process that happens to even the most exclusive of fibers. It's a natural sign of wear and tear that is hard to avoid, and that is most visible in high friction areas of your garment like a sweater's arms and cuffs.

You can make your garment look as new by removing the pilling, using a fabric comb or a pill/lint remover.

Still can't find the answer you need? Then scroll down and leave your question so one of our experts can try to help you. This will be done normally within 5 to 10 working days.
In the meantime, you can read the questions and answers that others have left to this pattern or join the DROPS Workshop on Facebook to get help from fellow knitters/crocheters!

You might also like...

Post a comment to pattern DROPS Baby 3-13

We would love to hear what you have to say about this pattern!

If you want to leave a question, please make sure you select the correct category in the form below, to speed up the answering process. Required fields are marked *.

Comments / Questions (1)

country flag Gro wrote:

Jeg ser i oppskriften at man kan velge jordbær eller bamse. Jeg finner ikke diagrammet på bamsen eller bildet. Jeg strikket denne til min sønn som er født i 91. Artig å finne igjen oppskriften. Jakken var mye finere i virkeligheten. Har dere bilde av jakken med bamse og diagrammet?

02.11.2017 - 13:38

DROPS Design answered:

Hei Gro. Så morsomt å høre :) Akurrat denne oppskriften holder vi på å "pusse" opp med nye diagrammer og andre/flere bilder, så oppskrift er snart klar til publisering. Du vil da finne den under BabyDROPS nr. 3, oppskrift 19. God Fornøyelse!

02.11.2017 - 14:09