
Popular categories
Looking for a yarn?


|
||||||||||||||||
Pick of the Crop |
||||||||||||||||
 |
 |
|||||||||||||||
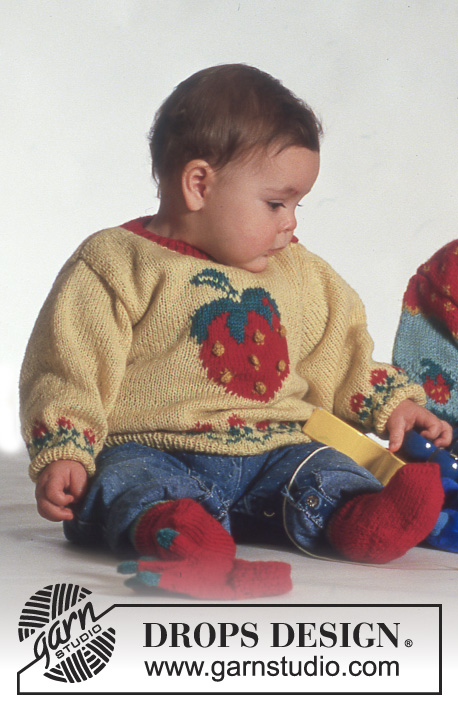
DROPS jumper with strawberry, socks, hat and gloves in “BabyMerino” and “Alpaca”.
DROPS Baby 3-3 |
||||||||||||||||
|
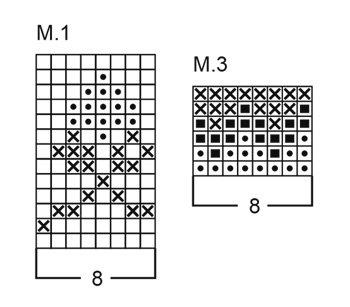
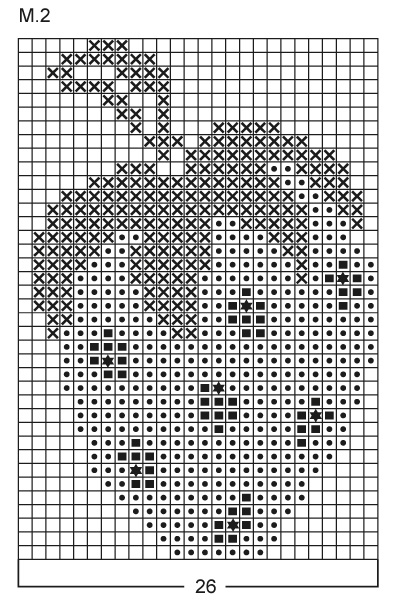
JUMPER: Knitting tension: 24 sts x 32 rows on needles size 3 mm in pattern = 10 x 10 cm. Rib: *K1, P1*, repeat from *-*. Pattern: See diagram. The diagram shows the pattern from the RS side. Front and back piece: Knitted in the round on circular needle. Cast on 120-132-144 (156-160) sts on circular needle size 2.5 mm with yellow and knit 3-3-3 (4-4) cm Rib, but after 1 round change to light yellow. After the Rib, change to needle size 3 mm and continue in M.1, at the same time inc 0-4-8 (4-16) sts evenly on first round = 120-136-152 (160-176) sts. Continue in light yellow. Remember the knitting tension. 2-3-5 (5-7) cm after M.1 divide piece in two and complete front and back pieces separately. Inc 1 st each side for seam. Front piece: = 62-70-78 (82-90) sts. Now knit M.2 on the middle 26 sts with light yellow either side. At the same time when piece measures 15-16-19 (20-20) cm dec to shape the armhole on every other row as follows: 2 sts 2 times, 1 st 2-2-4 (3-1) times = 50-58-62 (68-80) sts. When piece measures 23-25-29 (31-35) cm cast off the middle 10-12-16 (18-20) sts for neck. Right side: dec on every other row to shape the neckline: 3 sts 1 time, 2 sts 1 time and 1 st 3 times. Cast off remaining sts on shoulder when piece measures 27-29-33 (35-39) cm. Left shoulder: dec to shape the neckline on every other row: 3 sts 1 time, 2 sts 1 time and 1 st 1 time. When piece measures 26-28-32 (34-38) cm change to needle size 2.5 mm and knit 2 cm Rib, but after 2 rows make 2 buttonholes evenly distributed. 1 buttonhole = cast off 3 sts and cast on 3 new sts on return row. Cast off when piece measures 28-30-34 (36-40) cm. Back piece: = 62-70-78 (82-90) sts. Continue in light yellow. Dec for armhole as described for front piece = 50-58-62 (68-80) sts. When piece measures 25-27-30 (33-36) cm cast off the middle 22-24-28 (30-32) sts for neck. Right side: dec 2 sts on neckline on next row and cast off remaining sts when piece measures 27-29-33 (35-39) cm. Left shoulder: when piece measures 25-27-30 (33-36) cm change to needle size 2.5 mm and knit 2 cm Rib. Cast of when piece measures 28-30-33 (36-40) cm. Sleeve: Cast on 40-44-48 (52-58) sts on double pointed needles size 2.5 mm with yellow and knit 3-3-3 (3-4) cm Rib, but after 1 round change to light yellow. Change to needle size 3 mm and continue in M.1 – make sure to place a pattern repeat mid upper sleeve – and after M.1 continue in light yellow. When piece measures 8-8-8 (8-9) cm inc 2 sts mid under arm a total of 9-9-10 (10-16) times as follows: Size 3 months: on every 3rd and 4th round alternately Size 6/9 months + 12/18 months: on every 5th round Size 2 years: on every 6th round Size 3/4 years: on every 3rd and 4th round alternately = 58-62-68 (72-90) sts. When piece measures 20-24-26 (28-31) cm cast off 6 sts mid under arm and complete sleeve back and forth on needle. Dec to shape the sleeve cap each side on every other row: 5 sts 3 times. Cast off when piece measures 23-27-29 (31-34) cm. Assembly: Sew shoulder seams. Pick up approx 80-90 sts on needle size 2.5 mm with light yellow and knit 2 cm Rib, but after 1 round change to red, at the same time make a buttonhole after 2 rounds over the others on body piece. Set in sleeves and sew on buttons. SOCKS: Size: 3 – 6/9 – 12/18 months (2 -3 years) Foot length: 10-11-12 (14-15) cm DROPS double pointed needles size 3 mm Knitting tension: 24 sts x 32 rows on needles size 3 mm in stocking st = 10 x 10 cm. Rib: *K1, P1*, repeat from *-*. Cast on 38-40-42 (42-44) sts on double pointed needle size 3 mm with red and knit 6-7-7 (8-8) cm Rib. Now knit heel as follows: 3 cm stocking st back and forth on needle on 18 sts mid back. Decreases for heel: Row 1: K10, K2 tog into back of st, K1, turn the piece Row 2: slip 1 st as if to P, P4, P2 tog, P1, turn the piece Row 3: slip 1 st as if to K, K5, K2 tog into back of st, K1, turn the piece Row 4: slip 1 st as if to P, P6, P2 tog, P1, turn the piece Row 5: slip 1 st as if to K, K7, K2 tog into back of st, K1, turn the piece Row 6: slip 1 st as if to P, P8, P2 tog, P1, turn the piece Row 7: K2 tog, K8, K2 tog into back of st = 10 sts on needle. Now pick up 7 sts on both sides of heel and put all sts on needles = 44-46-48 (48-50) sts. Continue in Rib on the middle 20-22-24 (24-26) sts and knit remaining sts in stocking st. At the same time, dec 1 st 3 times on both sides of the Rib section = 38-40-42 (42-44) sts. Continue until foot measures 7-8-9 (11-12) cm, change to green/turquoise and insert a MT either side of the Rib. Dec on both sides of MT (= 4 dec per round) on every round: 1 st 7-8-8 (8-9) times = 10-8-10 (10-8) sts. Cut the thread, pull through remaining sts and fasten. HAT: Size: 3 – 6/9 – 12/18 months (2 -3 years) To fit head circumference: 42-44-45 (47-50) cm. DROPS double pointed needles size 2.5 mm and 3 mm Knitting tension: 24 sts x 32 rows on needles size 3 mm in stocking st = 10 x 10 cm. Garter st in the round: K 1 round, P 1 round. Bobble: knit 4 sts in the same st, knit 3 rows stocking st on these 4 sts, on next row K tog sts to 1 st. Cast on 100-104-108 (112-120) sts on double pointed needles size 2.5 mm with red and knit 4 rows garter st. Change to needle size 3 mm and continue in stocking st. After 4 rounds knit next round as follows: *9-7-8 (7-7) stocking sts in red, 1 bobble in yellow*, repeat from *-*. Continue in red. When piece measures 8-10-11 (12-13) cm knit M.3 and then complete piece in green/turquoise. When piece measures 12-14-16 (18-19) cm continue as follows: 1 round knitting tog st 2 by 2, 1 round in stocking st. Repeat this dec 4 times = 6-6-7 (7-8) sts. Knit last round as follows: *K1, 1 bobble*, repeat from *-*. Cut the thread, pull through remaining sts and fasten. Earflap: Cast on 3 sts on needle size 3.5 mm with green/turquoise and knit garter st. Inc 1 st each side on every other row a total of 8-8-8 (9-9) times = 19-19-19 (21-21) sts. Continue until piece measures 7-7.5-8 (8-9) cm and cast off. Knit another one. Crochet a chain measuring approx 25 cm and attach to bottom of each earflap. Assembly: Fold edge double towards RS. Fasten earflaps in the last row in garter st with 9-10-10 (11-11) cm between them at the back. GLOVES: Size: 2/3 years DROPS double pointed needles size 2.5 mm and 3 mm Knitting tension: 24 sts x 32 rows on needles size 3 mm in stocking st = 10 x 10 cm. Rib: *K1, P1*, repeat from *-*. Cast on 36 sts on double pointed needles size 2.5 mm with red and knit 4 cm Rib. Measure piece from here. Change to needle size 3 mm and continue in stocking st. When piece measures 3.5 cm, put 6 sts on cable needle for thumb. On next round cast on 4 sts over sts on cable needle= 34 sts. When piece measures 4 cm inc 4 sts evenly on round = 38 sts. Insert a MT in line with the one but last st on thumb (= middle st for index finger) and a MT after half the sts (= middle st for little finger Little finger: = 8 sts. Knit 3 cm, but after 1.5 cm change to green/turquoise. Now dec on round by K tog all sts 2 by 2, cut the thread and pull through remaining sts. Ring finger = 5 sts on either side of little finger + cast on 1 st each side = 12 sts. Knit 4.5 cm, but after 3 cm change to green/turquoise. Continue as described for little finger. Middle finger: = 5 sts on either side of ring finger + cast on 1 st each side = 12 sts. Knit 5 cm, but after 3.5 cm change to green/turquoise. Continue as described for the other fingers. Index finger: = the last 10 sts + cast on 2 sts towards middle finger = 12 sts. Continue as described for ring finger. Thumb: Pick up 6 sts in the inc sts by thumb and put sts from cable needle back on needle = 12 sts. Knit 4 cm, but after 2.5 cm change to green/turquoise. Continue as described for the other fingers. Knit another glove, but mirrored. |
||||||||||||||||
Diagram explanations |
||||||||||||||||
|
||||||||||||||||
|
||||||||||||||||
|
||||||||||||||||

|
||||||||||||||||
|
Have you made this or any other of our designs? Tag your pictures in social media with #dropsdesign so we can see them! Do you need help with this pattern?You'll find tutorial videos, a Comments/Questions area and more by visiting the pattern on garnstudio.com. © 1982-2024 DROPS Design A/S. We reserve all rights. This document, including all its sub-sections, has copyrights. Read more about what you can do with our patterns at the bottom of each pattern on our site. |
||||||||||||||||


With over 40 years in knitting and crochet design, DROPS Design offers one of the most extensive collections of free patterns on the internet - translated to 17 languages. As of today we count 304 catalogues and 11422 patterns - 11422 of which are translated into English (UK/cm).
We work hard to bring you the best knitting and crochet have to offer, inspiration and advice as well as great quality yarns at incredible prices! Would you like to use our patterns for other than personal use? You can read what you are allowed to do in the Copyright text at the bottom of all our patterns. Happy crafting!
Comments / Questions (10)
Er det noe feil i oppskriften Pick of the crop vanter? Det står ikke hvor mange masker det skal økes og være til sammen på lillefingeren og det skal ikke være tommeløkning?
28.04.2023 - 19:08DROPS Design answered:
Hej Wenche, du øker ikke på lillefingeren, den strikker du i 3 cm. Jo til tommelfingeren plukker du 6 masker op i hullet så du får 12 masker :)
03.05.2023 - 07:27Hallo Es sind auf dem Foto auch Handschuhe zu sehen. Wo finde ich die Anleitung dafür? Danke
19.09.2022 - 14:02DROPS Design answered:
Liebe Moreen, jetzt sind die Hanschuhen online. Viel Spaß beim stricken!
22.09.2022 - 09:15Jag har stickat en arm. Nar man kommer till axeln star det : Vidare avm i var sida pa varannat varv: 5m x 3. Maska av nar arb mater 23-27-29 (31-34) cm. Det resulterar i en axel med oversta biten helt rak ( jag behover sticka ett par cm till for att fa ratt langd ). Det ser inte alls ratt ut. ---- I I
28.11.2020 - 14:31DROPS Design answered:
Hej Gunnel, om du måste sticka ett par cm till, så kan du evt avm 4 x 4 istället för at få ärmkullen rundare...
02.12.2020 - 11:01Jag har stickat en arm. Nar man kommer till axeln star det : Vidare avm i var sida pa varannat varv: 5m x 3. Maska av nar arb mater 23-27-29 (31-34) cm. Det resulterar i en axel med oversta biten helt rak ( jag behover sticka ett par cm till for att fa ratt langd ). Det ser inte alls ratt ut. ---- I I
24.11.2020 - 13:38DROPS Design answered:
Hej Gunnel, hvis du ikke holder samme strikkefasthed som i opskriften, så kan du fortsætte med at avm i hver side til arm når det rigtige mål. God fornøjelse!
08.01.2021 - 14:11Skriver igen. Rakade skicka under kommentar. Under beskrivning pa balen star det: Efter 2-3-5 (5-7) cm delas arbetet. 2-3-5 (5-7) cm efter vad? Styckets borjan eller borjan av M1? Antar borjan av M1, men jag har undrat....
24.10.2020 - 21:07DROPS Design answered:
Hei Gunnel. Når du er ferdig med M.1, da skal det fortsettes med lys gul i 2-3-5 (5-7) cm. Man deler forstykket og bakstykke ettersom man nå skal strikke M.2 på forstykket. mvh DROPS design
26.10.2020 - 14:05Jag har borjat pa balen (ursakta amerikanskt keyboard) Dar star det (pa fjarde raden): Efter 2-3-5 (5-7) cm delas arbetet.... 2-3-5 (5-7) cm efter vad? Styckets borjan - eller monstrets borjan? Antar att det ar monstret, men jag har undrat...
24.10.2020 - 21:03Where can I see a photo of the hat?
11.01.2019 - 16:29DROPS Design answered:
Dear Johanne, we have added a picture of the hat. Happy knitting!
14.01.2019 - 09:11Wird dieser Pullover in einem Stück gearbeitet oder Vorder- und Rückenteil extra?
28.01.2015 - 18:16DROPS Design answered:
Der Pullover wird zuerst in einem Stück gearbeitet, in Runden. Dann werden Vorder- und Rückenteil jeweils einzeln in Hin- und Rück-R weitergestrickt, ab dem Beginn des Musters, weil das in Runden nicht funktioniert.
28.01.2015 - 23:06Knut wrote:
Rätstickning: 1 v. räta, 1 v aviga maskor.
19.11.2013 - 19:17Hej Hur stickar man rätstickning på strumpstickor? Det står 4 varv rätstickning sedan slätstickning men stixkar man runt så blir det ju automatiskt slätstickning. Skall man sticka avigt de första varven?
19.11.2013 - 01:18