
Popular categories
Looking for a yarn?


|
|||||||||||||||||||||||||||||||
Saturday Adventures |
|||||||||||||||||||||||||||||||
|
|
|||||||||||||||||||||||||||||||
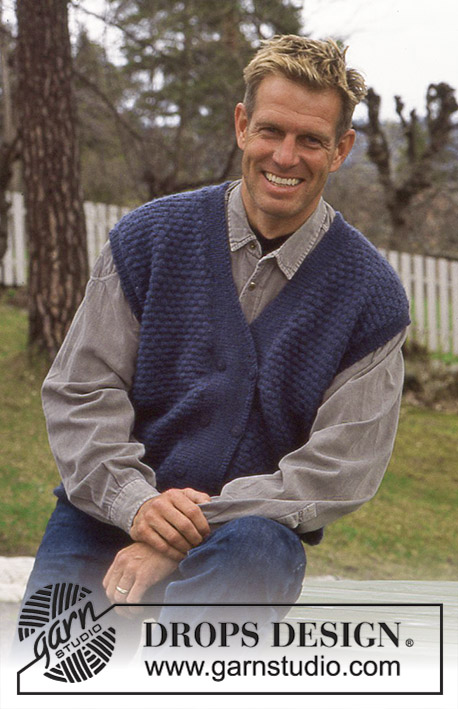
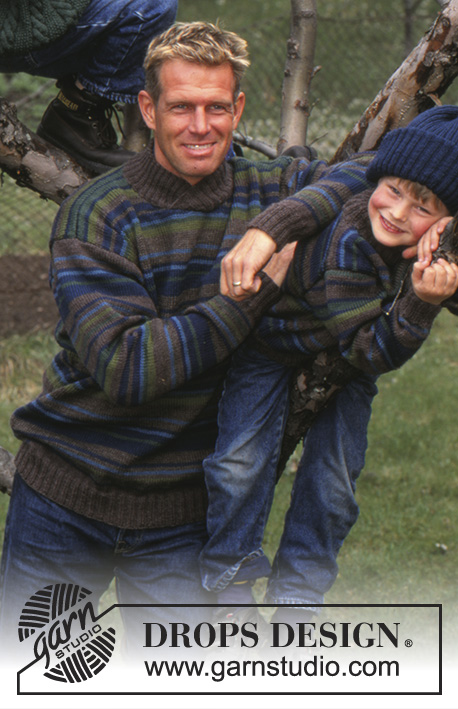
DROPS Sweater for men in Alpaca with either V-neck or turtleneck.
DROPS 59-17 |
|||||||||||||||||||||||||||||||
|
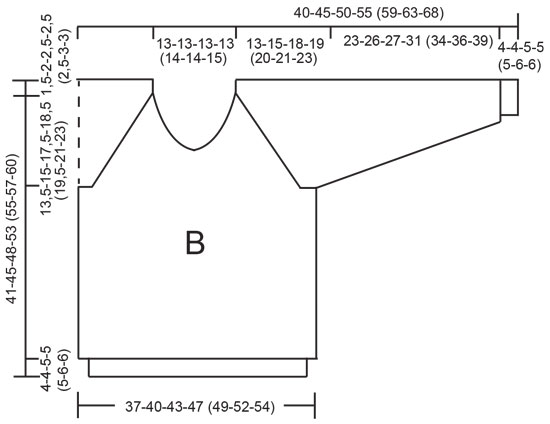
ADULT'S SWEATER: Gauge: 24 sts x 40 rows on larger needles in pattern = 10 x 10 cm . NOTE: Row gauge is very important during raglan shaping. Pattern: See chart (1 chart = 1 repeat). The pattern is seen from the right side. Rib: * K 2, P 2 *. Repeat from * - *. Body: Numbers in ( ) = men’s sizes. Cast on 244-260 (248-260-268-280) sts on smaller circular needles with medium petrol; join and place a marker at the join. Knit rib for 5-5 (6-6-6-6) cm , increasing 40-44 (40-44-48-52) sts evenly distributed on the last row = 284-304 (288-304-316-332) sts. Change to larger circular needles and knit Pattern. When the work measures 32-35 (39-40-40-42) cm , knit the next row as follows: bind off 4 sts for armhole, 134-144 (136-144-150-158) sts for the front, bind off 8 sts for armhole, 134-144 (136-144-150-158) sts for the back, bind off 4 sts for armhole. Put the work aside. Sleeves: Cast on 52-56 (56-60-60-64) sts on smaller double pointed needles with medium petrol; join and place a marker at the join. Knit rib for 5-5 (6-6-6-6) cm , increasing 8-8 (8-4-8-4) sts evenly distributed on the last row = 60-64 (64-6468-68) sts. Change to larger double pointed needles and knit Pattern. After the rib, inc 1 st each side of marker 28-28 (28-30-28-31) times: Sizes S/M + M/L + (XXL): every 5th row Sizes (S/M + M/L + XL): alternately every 5th and 6th row = 116-120 (120-124-124-130) sts - knit the increased sts into the pattern as you go along. When the work measures 45-45 (49-50-49-49) cm (adjust for complete pattern -- it is important that you end on the same row as on the body) bind off 4 sts each side of marker and put the work aside = 108-112 (112-116-116-122) sts. Body: Put the sleeves in on the same circular needles as the body where 8 sts are bound off = 484-512 (496-520-532-560) sts on the needles. Attach a marker in each transition between the sleeves and the body (4 markers). Continue the Pattern, but knit the first st on each side of each marker in stockinette st (2 stockinette sts in each transition from the body to the sleeve). Raglan shaping: Read the entire next section before knitting! Dec 1 st on each side of the 2 transition stockinette sts every 4th row 3-2 (3-3-6-5) times, then every other row 46-50 (47-50-48-52) times (8 decreased sts per row). Make decreases as follows: Before the 2 transition sts: Right side: K 2 tog. Wrong side: Lift the next 2 sts off the needles, put them back on the left needle twisted (one by one), P 2 tog into the back of the sts. After the 2 transition sts: Right side: Slip 1, K 1, psso. Wrong side: P 2 tog. Turtleneck: When 6-6 (5-6-8-8) raglan decreases remain to be worked, bind off the center front 20-24 (22-22-20-22) sts for the neck and knit the rest back and forth on the needles. Bind off at each neck edge every other row: 2 sts 2-2 (2-2-3-3) times, 1 st 4-4 (3-4-5-5) times. Bind off after the last raglan decrease. V-neck: At the same time as the raglan shaping, bind off for the front neck. When the work measures 42-45 (49-50-52-54) cm , divide the work at the center front and knit the rest back and forth on the needles. Bind off for the neck every other row: 2 sts 1 time, 1 st 6-7 (5-6-8-8) times, then every 4th row: 1 st 8-9 (8-8-9-10) times, and then every 6th row: 1 st 2-2 (3-3-3-3) times. Bind off all sts after the last raglan decrease row. The work measures approx. 58-62 (65.5-68-70-73) cm and 56-56 (60-58-58-60) sts remain on the needles. The sweater’s measurement up to the shoulder = 60-64 (68-70-72-75) cm . Assembly: Sew the 8 sts together at each underarm. Turtleneck: Pick up approx. 96-100 (100-100-104-108) sts around the neck on smaller double pointed needles with medium petrol. Knit rib, increasing to approx. 120-140 sts (divisible by 4 sts) evenly distributed across the first row. When the rib measures 16-16 (16-16-18-18) cm , bind off loosely in rib. V-neck: Pick up approx. 148-160 sts (divisible by 4 sts) around the neck on smaller needles with medium petrol and knit 3 cm rib back and forth on the needles from the center front as follows: K 1 (edge st knit in garter st throughout), * K 2, P 2 *, repeat from * - * until 3 sts remain on the needles, K 2, K 1 (edge st knit in garter st throughout). Bind off in rib. Lay the right (left for men) part of the neck edge over the left (right for men) and sew. ________________________________________ CHILD'S SWEATER Sizes: 2 - 3/4 - 5/6 - 7/8 (9/10 - 11/12 - 13/14) years Finished measurements: 74-80-86-94 (98-104-108) cm Materials: DROPS ALPACA from Garnstudio 100-150-150-150 (150-200-200) g. Col. 6309, medium petrol 50-100-100-100 (100-100-100) g. Col.7895, dark green 50-100-100-100 (100-100-100) g. Col. 601, dark brown 50-100-100-100 (100-100-100) g. Col. 6790, dark blue DROPS 2.5 mm and 3.5 mm circular and double pointed needles, or sizes needed to obtain correct gauge. Gauge: 24 sts x 40 rows on larger needles in pattern = 10 x 10 cm . NOTE: Row gauge is very important during raglan shaping. Pattern: See chart (1 chart = 1 repeat). The pattern is seen from the right side. Rib: * K 2, P 2 *. Repeat from * - *. Body: Cast on 156-168-184-196 (208-216-228) sts on smaller circular needles with medium petrol; join and place a marker at the join. Knit rib for 4-4-5-5 (5-6-6) cm , increasing 20-24-24-28 (28-32-32) sts evenly distributed on the last row = 176-192-208-224 (236-248-260) sts. Change to larger circular needles and knit Pattern. When the work measures 26-28-28-32 (33-33-34) cm , knit the next row as follows: bind off 2-3-3-3 (4-4-4) sts for armhole, 84-90-98-106 (110-116-122) sts for the front, bind off 4-6-6-6 (8-8-8) sts for armhole, 84-90-98-106 (110-116-122) sts for the back, bind off 2-3-3-3 (4-4-4) sts for armhole. Put the work aside. Sleeves: Cast on 40-40-44-44 (48-52-52) sts on smaller double pointed needles medium petrol; join and place a marker at the join. Knit 4-4-5-5 (5-6-6) cm rib, increasing 8-8-8-8 (8-8-8) sts evenly distributed on the row = 48-48-52-52 (56-60-60) sts. Change to larger double pointed needles and knit Pattern. After the rib, inc 1 st each side of marker 7-13-16-20 (20-22-24) times every 12th-7th-6th-6th (6th-6th-6th) row = 62-74-84-92 (96-104-108) sts - knit the increased sts into the pattern as you go along. When the work measures 27-30-32-36 (39-42-45) cm (adjust for pattern - it is important that you end on the same pattern row as on the body), bind off 2-3-3-3 (4-4-4) sts each side of marker and put the work aside = 58-68-78-86 (88-96-100) sts. Body: Put the sleeves in on the same circular needles as the body where 4-6-6-6 (8-8-8) sts are bound off = 284-316-352-384 (396-424-444) sts on the needles. Attach a marker in each transition between the sleeves and the body (4 markers). Continue the pattern, but knit the first st on each side of each marker in stockinette st (2 stockinette sts in each transition from body to sleeve). Raglan binding off: Read the entire next section before knitting! Dec 1 st on each side of the 2 transition stockinette sts every 4th row 1-1-2-0 (1-1-3) times, then every other row 25-28-31-37 (37-40-40) times (8 decreased sts per row). Make decreases as follows: Before the 2 transition sts: Right side: K 2 tog. Wrong side: Lift the next 2 sts off the needles, put them back on the left needle twisted (one by one), P 2 tog into the back of the sts. After the 2 transition sts: Right side: Slip 1, K 1, psso. Wrong side: P 2 tog. V-neck: At the same time as the raglan shaping, when the work measures 31-34-36-40 (41-42-44) cm , divide at the center front and knit the rest back and forth on the needles. Bind off at each neck edge every other row: 2 sts 2 times, 1 st 10-10-9-8 (8-8-8) times, then every 4th row: 1 st 2-2-3-4 (5-5-6) times. Bind off all sts after the last raglan decrease. Pick up approx. 84-96-100-104 (112-116-120) sts (divisible by 4 sts) around the neck on smaller double pointed needles with gray-blue and knit 2-2-2-3 (3-3-3) cm rib back and forth on the needles from the center front as follows: K 1 (edge st knit in garter st throughout), * K 2, P 2 *, repeat from * - * until 3 sts remain, K 2, K 1 (edge st knit in garter st throughout). Bind off in rib. Lay the right part of the neck over the left and sew. Turtleneck: When 5-4-3-3 (5-4-4) raglan decreases remain to be worked, bind off the center front 18-20-24-24 (20-22-24) sts for the neck and knit the rest back and forth on the needles. Bind off at each neck edge every other row: 2 sts 2-2-1-1 (2-2-2) times, 1 st 3-2-2-2 (3-2-2) times. Bind off all sts after the last raglan decrease - 44-52-56-56 (58-62-64) sts remain. The sweater’s measurement up to the shoulder = 41-45-48-53 (55-57-60) cm . Pick up approx. 80-88-92-92 (96-100-104) sts around the neck on smaller double pointed needles with medium petrol. Knit rib, increasing evenly distributed to approx. 92-100-108-108 (112-116-120) sts (divisible by 4 sts) on the first row. Bind off loosely in rib when the rib measures 10-10-12-12 (14-14-16) cm . Assembly: Sew the 4-6-6-6 (8-8-8) sts together at underarms. |
|||||||||||||||||||||||||||||||
Diagram explanations |
|||||||||||||||||||||||||||||||
|
|||||||||||||||||||||||||||||||

|
|||||||||||||||||||||||||||||||
|
|||||||||||||||||||||||||||||||
|
Have you made this or any other of our designs? Tag your pictures in social media with #dropsdesign so we can see them! Do you need help with this pattern?You'll find tutorial videos, a Comments/Questions area and more by visiting the pattern on garnstudio.com. © 1982-2024 DROPS Design A/S. We reserve all rights. This document, including all its sub-sections, has copyrights. Read more about what you can do with our patterns at the bottom of each pattern on our site. |
|||||||||||||||||||||||||||||||


With over 40 years in knitting and crochet design, DROPS Design offers one of the most extensive collections of free patterns on the internet - translated to 17 languages. As of today we count 304 catalogues and 11422 patterns - 11422 of which are translated into English (UK/cm).
We work hard to bring you the best knitting and crochet have to offer, inspiration and advice as well as great quality yarns at incredible prices! Would you like to use our patterns for other than personal use? You can read what you are allowed to do in the Copyright text at the bottom of all our patterns. Happy crafting!
Comments / Questions (16)
Was ist beim Ärmel die untere Mitte? Bedeutet das an den Rändern, also rechts und links des Ärmels zu-, bzw abnehmen? Vielen lieben Dank für Ihre Mühe.
19.04.2024 - 16:19I would like to make the child's v-neck pattern in one color using "I Love This Yarn" from Hobby Lobby. It is a 4-Medium weight 4 ply yarn. The 4×4 gauge with a US8 needle is 18 st x23 R. Can you help me with selecting the correct needle sizes to use and any alterations to the pattern, please? Thank you!
10.07.2023 - 20:46DROPS Design answered:
Dear Melissa, this pattern is for a group A yarn (for sport, fingering, lace yarns), while you are using a group C yarn, too thick for this pattern. We recommend you work a jumper for kids made with a group C yarn and apply the charts/ pattern here to the group C jumper, for example this one: https://www.garnstudio.com/pattern.php?id=6342&cid=19. In the pattern we indicated you would need to work the high neck as in this pattern. Happy knitting!
17.07.2023 - 14:19Mallineule- kuvio ei näy, mistä johtuu? Miten saan näkymään?
15.01.2021 - 14:34DROPS Design answered:
Nyt piirros avautuu.
23.03.2021 - 16:49Hei. Går vel greit å bruke Baby merino på ensfarget genser? Har strikket denne før, ensfarget lys blå, men husker ikke garnmerke. Flott genser å vokse i! Strikket str 2 år men genseren vokser med barnet pga mønsterteknikken. Begynte å bruke den som 1 åring og brukes forts. Er nå 4 år.
24.10.2020 - 14:54DROPS Design answered:
Hei Kari-Mette. Du kan fint bruke DROPS Baby Merino. Dette garnet tilhører samme garngruppe som DROPS Alpaca og DROPS Camelia (utgått), men husk å sjekke at du får strikkefastheten din til å passe med det som står i oppskriften. mvh DROPS design
25.10.2020 - 20:49Mallineule-kuvio , en näe sitä. Olen lapsen kokoa tekemässä?
07.09.2020 - 15:52In knitting The decreases for the raglán, It say, “ wrong side: lift the next 2 sets off the needle..... I am knitting with circular needles, so Ihave no wrong side, how is it then?
05.06.2020 - 23:59DROPS Design answered:
Dear Tereasa, you are working in the round until you will decrease for neck - either turtleneck or V-neck, so that you will continue back and forth on needle. Happy knitting!
08.06.2020 - 07:58Aloitan neulomaan miesten villapaitaa nro 59-17 mitenkä on kudottu kun näyttää oikea puoli kun olis nurjaa kudosta vai kudotaanko vain oikeaa.
09.02.2020 - 10:37DROPS Design answered:
Puserossa neulotaan sekä oikeaa että nurjaa. Piirroksen merkkien selityksistä näet mitkä silmukat neulotaan oikein ja mitkä neulotaan nurin. Piirros näyttää mallineuletta oikealta puolelta katsottuna.
10.02.2020 - 17:41Rectificatif...est ce qu'on tricote en" tour ou en rang."..pas en tour ou en rond naturellement
20.12.2015 - 13:06DROPS Design answered:
voir réponse ci-dessous.
21.12.2015 - 11:11Bonjour Au montage des mailles vous dites " joindre et placer un marqueur" ce qui suppose de tricoter en rond, mais plus loin il est question de "rang" et non de "tour"...alors est ce en tour ou en rond? Merci de votre réponse Cordialement A.B.
20.12.2015 - 11:47DROPS Design answered:
Bonjour Mme Bourgeois, tout à fait, les "rangs" ont été modifiés en "tours" quand nécessaire. Bon tricot!
21.12.2015 - 11:04Iris wrote:
Ik denk dus dat er in de Nederlandse beschrijving zou moeten staan "Minder 1-1-2-0 (1-1-3) x 1 st aan weerskanten van elke 2 tussenst in elke 4e nld, en hierna in elke 2e nld: 25-28-31-37 (37-40-40) x 1 st (8 geminderde st per nld)." Dus voor de kleinste maat totaal (1 + 25) x 8 = 208 minderingen voor de raglan in plaats van (7 + 25) x 8 = 254 minderingen zoals er nu staat. Klopt dat?
14.10.2015 - 16:01DROPS Design answered:
Hoi Iris. Je hebt gelijk. Er was iets verkeerd hier met de Nederlandse vertaling. Ik heb het online aangepast volgens het originele Noorse patroon.
15.10.2015 - 14:45