DROPS Karisma
DROPS Karisma
100% Wool
from 2.50 € /50g
Get the yarn to make this pattern from 42.50€.

The yarn cost is calculated from the pattern’s smallest size and the yarn’s cheapest product type. Looking for an even better price? You might find it on the DROPS Deals!

DROPS SS24

Starry Sky

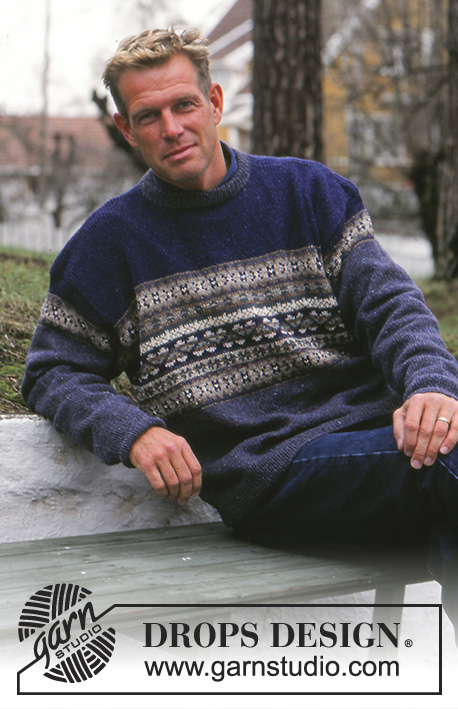
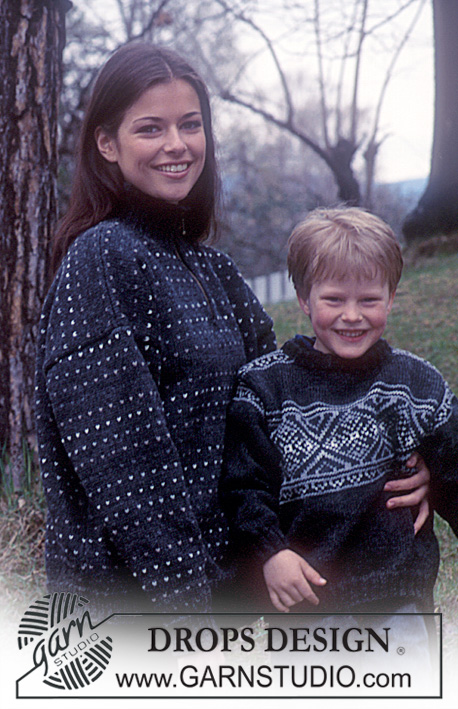
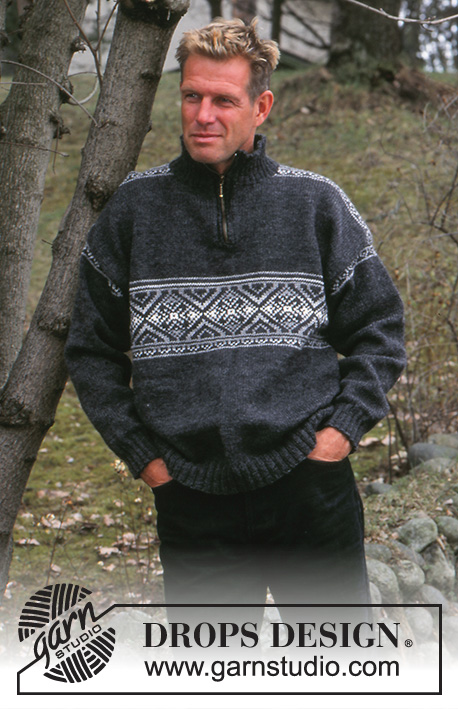
Knitted sweater for women, men and children in DROPS Karisma. Piece is worked with Nordic star pattern and can be worked with round or zippered neck. Women’s size S – L. Men’s size S – XL. Children’s size 2 – 14 years.

DROPS 59-9
DROPS Design: Pattern u-412
Yarn group B
-------------------------------------------------------

SIZE WOMEN AND MEN:
Numbers in ( ) = Men’s size
S – M – L (S/M - M/L - XL)

MATERIALS WOMEN AND MEN:
DROPS Karisma from Garnstudio (belongs to yarn group B)
700-750-850 (850-900-1000) g colour 53, coal gray
50-50-100 (100-100-100) g colour 21, medium gray
50-50-50 (50-50-50) g colour 44, light gray
50-50-50 (50-50-50) g colour 01, natural white

KNITTING TENSION WOMEN AND MEN:
22 stitches in width and 30 rows in height with stocking stitch = 10 x 10 cm.

NEEDLES WOMEN AND MEN:
DROPS DOUBLE POINTED NEEDLES SIZE 3.5 MM.
DROPS CIRCULAR NEEDLE SIZE 3.5 MM: length 80 cm for stocking stitch.
DROPS DOUBLE POINTED NEEDLES SIZE 2.5 MM.
DROPS CIRCULAR NEEDLE SIZE 2.5 MM: length 80 cm for rib.
Needle size is only a guide. If you get too many stitches on 10 cm, change to a larger
needle size. If you get too few stitches on 10 cm, change to a smaller needle size.

ZIPPER: 20 cm, colour black (only sweater with zippered neck)

-------------------------------------------------------

SIZE CHILDREN:
2 - 3/4 - 5/6 - 7/8 - (9/10 - 11/12 - 13/14) years
Size equals approx. kid’s height in cm:
86/92 - 98/104 - 110/116 - 122/128 (134/140 - 146/152 - 158)

MATERIALS CHILDREN:
DROPS KARISMA from Garnstudio (Belongs to yarngroup B)
250-250-300-350 (350-400-450) g colour 53, coal gray
50-50-50-50 (50-100-100) g colour 21, medium gray
50-50-50-50 (50-50-50) g colour 44, light gray
50-50-50-50 (50-50-50) g colour 01, natural white

KNITTING TENSION CHILDREN:
22 stitches in width and 30 rows in height with stocking stitch = 10 x 10 cm.

NEEDLES CHILDREN:
DROPS DOUBLE POINTED NEEDLES SIZE 3.5 MM.
DROPS CIRCULAR NEEDLE SIZE 3.5 MM: length 60 or 80 cm for stocking stitch.
DROPS DOUBLE POINTED NEEDLES SIZE 2.5 MM.
DROPS CIRCULAR NEEDLE SIZE 2.5 MM: length 60 or 80 cm for rib.
Needle size is only a guide. If you get too many stitches on 10 cm, change to a larger
needle size. If you get too few stitches on 10 cm, change to a smaller needle size.

-------------------------------------------------------

Alternative Yarn – See how to change yarns here
Yarn Groups A to F – Use the same pattern and change the yarn here
Yarn usage using an alternative yarn – Use our yarn converter here

-------------------------------------------------------

DROPS Karisma
DROPS Karisma
100% Wool
from 2.50 € /50g
Get the yarn to make this pattern from 42.50€.

The yarn cost is calculated from the pattern’s smallest size and the yarn’s cheapest product type. Looking for an even better price? You might find it on the DROPS Deals!

Pattern instructions

NOTE: This pattern is written in British English. All measurements in charts are in cm. For conversion from cm to inches - click here. There are different terms for crocheting in British and American English. If this pattern includes crochet, click for "crochet terms" here. For this pattern in American English, please click here.
-------------------------------------------------------

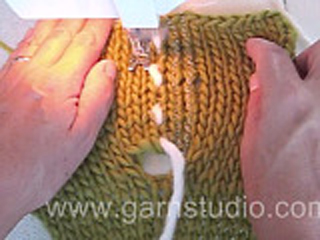
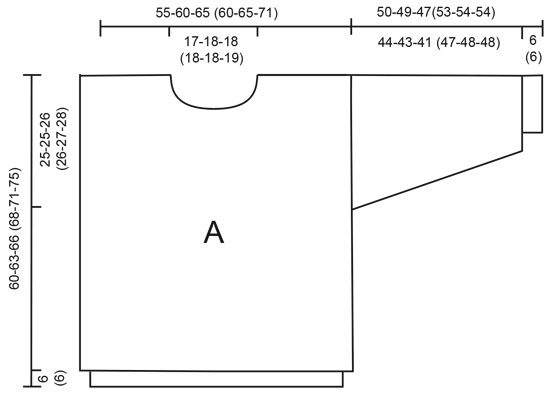
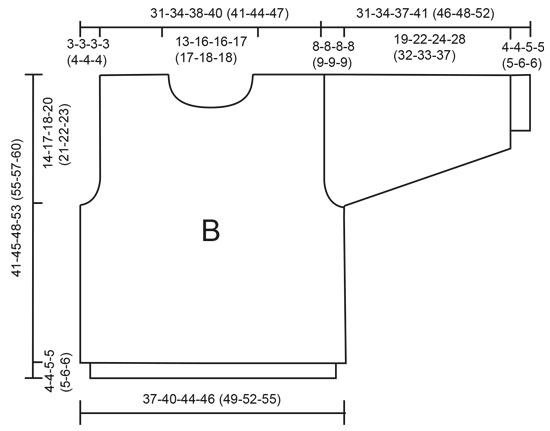
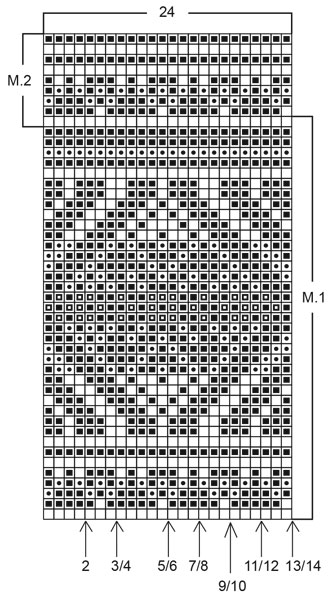
START THE PIECE WOMEN AND MEN:

-------------------------------------------------------

EXPLANATION FOR THE PATTERN WOMEN AND MEN:

PATTERN:
See diagrams M.1 to M.2. The whole pattern is worked in stocking stitch.

RIB:
* knit 2 / purl 2 *. Repeat from *-*.

GARTER STITCH (back and forth):
Knit all rows. 1 ridge = 2 rows knit.

-------------------------------------------------------

Body: Numbers in ( ) = men's sizes. Cast on 240-264-288 (264-288-312) sts on smaller circular needles with coal gray; join and place a marker at the join. Knit 6 cm rib. Change to larger circular needles and knit stockinette st. When the work measures 25-28-30 (31-33-36) cm , knit Pattern 1, centering the pattern across the front and back. Place a second marker at the other side. At the same time, when the work measures 35-38-40 (42-44-47) cm , inc 5 sts at each side (these sts are for the steeks and are not knit into the pattern). After Pattern 1, knit stockinette st with coal gray again.

Sweater with zippered neck: When the work measures 41-44-47 (49-52-56) cm (approx. 19 cm of the work remains), knit the next row as follows: 5 steek sts, 60-66-72 (66-72-78) sts for the front, bind off 1 st for neck, 59-65-71 (65-71-77) sts for the front, 5 steek sts, 120-132-144 (132-144-156) sts for the back. Continue knitting back and forth.
When the work measures 55-58-61 (63-66-70) cm , bind off at each center front neck edge every other row: 9-10-10 (10-10-11) sts 1 time, 3 sts 1 time, 2 sts 2 times, 1 st 3 times - (the shoulders will have different numbers of sts -- left shoulder = 41-46-52 (46-52-57) sts, right shoulder = 40-45-51 (45-51-56) sts). When the work measures 57-60-63 (65-68-72) cm , knit Pattern 2 to finished dimensions (place Pattern 2 directly over Pattern 1). At the same time, when the work measures 58-61-64 (66-69-73) cm .

Sweater with round neck: When the work measures approx. 55-58-61 (63-66-70) cm , bind off the center front 24-24-26 (28-28-30) sts for the neck and knit the rest back and forth on the needles. Bind off at each neck edge every other row: 3 sts 1 time, 2 sts 2 times, 1 st 3 times. At the same time, when the work measures 57-60-63 (65-68-72) cm , knit Pattern 2 to finished dimensions. At the same time, when the work measures 58-60-62 (65-68-72) cm , bind off the center back 40-40-42 (44-44-46) sts for the neck. Bind off 2 sts at each neck edge on the next row. Bind off after Pattern 2 - the work measures approx. 60-63-66 (68-71-75) cm .

Sleeves: Cast on 56-60-60 (60-64-64) sts on smaller double pointed needles with coal gray; join and place a marker at the join. Knit 6 cm rib. Change to larger double pointed needles and knit stockinette st. After the rib, inc 1 st each side of marker 27-25-27 (27-27-30) times:
Sizes Women's S+M + Men's XL: alternately every 4th and 5th row
Size Women's L: every 4th row
Sizes Men's S/M + M/L: every 5th row
= 110-110-114 (114-118-124) sts. When the work measures 47-46-44 (50-51-51) cm , knit Pattern 2 to finished dimensions = 50-49-47 (53-54-54) cm . Now knit 2 cm reverse stockinette st for a seam allowance over the cut edge on the body, bind off.

Assembly:
Sweater with zippered neck: Sew a marker thread down into the center of the steek sts on each side. Sew two machine seams around the marker threads, first seam = 1/2 sts from the thread, 2nd seam = 1/2 sts from the first seam. Cut up for armhole. Sew shoulder seams. Pick up approx. 134-146 sts (divisible by 4 sts + 2 sts) around the neck on smaller double pointed needles with coal gray and knit back and forth on the needles (from the right side): P 1 row, K 1 row, then 8 cm rib as follows: K 2 (edge sts kept in garter st throughout), * K 2, P 2 *, repeat from * - * until 4 sts remain, K 2, K 2 (edge sts kept in garter st throughout). Bind off loosely in rib.

Make zipper pockets: pick up approx. 40-46 sts on smaller double pointed needles with coal gray along the left side of the neck split and neck ribbing inside the outer 2 sts and knit 3 rows stockinette st, bind off. Repeat along the right side of the split. Sew the zipper in. Sew the bottom of the split together.
Sew the sleeves to the body from the right side as follows: Sew alternately a st in the last row of knitting on the sleeve before the seam allowance and a st on the body after the machine seam. Turn the sweater inside out and sew the seam allowance from the sleeve over the cut edge on the body by hand.

-------------------------------------------------------

START THE PIECE CHILDREN:

-------------------------------------------------------

EXPLANATION FOR THE PATTERN CHILDREN:

PATTERN:
See diagrams M.1 to M.2. The whole pattern is worked in stocking stitch.

RIB:
* knit 2 / purl 2 *. Repeat from *-*.

-------------------------------------------------------

Body: Cast on 162-174-192-204 (216-228-240) sts on smaller circular needles with coal gray; join and place a marker at the join. Knit 4-4-5-5 (5-6-6) cm rib. Change to larger circular needles and knit stockinette st with coal gray. Place a second marker for the other side - front and back each have 81-87-96-102 (108-114-120) sts. When the work measures 17-20-22-25 (25-25-26) cm , knit Pattern 1 - start at the appropriate arrow on the chart and knit pattern across the front, start at the arrow again and knit across the back. At the same time, when the work measures 27-28-30-33 (34-35-37) cm , bind off 4 sts on each side (2 sts each side of each marker). On the next row, inc 5 sts on each side over the bound-off sts (these sts are for the steeks and are not knit into the pattern). Dec for armholes inside the 5 steek sts on every row: 1 st 2-2-2-2 (4-4-3) times, then every other row: 1 st 2-2-2-3 (3-3-3) times - front and back each have 69-75-84-88 (90-96-104) sts + 5 steek sts at each side. After Pattern 1 is complete, knit stockinette st with coal gray again.
When the work measures 37-41-44-48 (50-52-55) cm , bind off the center front 15-21-22-24 (24-26-26) sts for the neck and knit the rest back and forth on the needles. Bind off at each neck edge every other row: 3 sts 1 time, 2 sts 2 times, 1 st 2 times. At the same time, when the work measures 38-42-45-50 (52-54-57) cm , knit Pattern 2 to finished dimensions. When the work measures 39-43-46-51 (53-55-58) cm , bind off the center back 29-35-36-38 (38-40-40) sts for the neck. Bind off 2 sts at each back neck edge on the next row. Bind off after Pattern 2 - the work measures approx. 41-45-48-53 (55-57-60) cm .

Sleeves: Cast on 44-44-48-48 (52-52-56) sts on smaller double pointed needles with coal gray; join and place a marker at the join. Knit 4-4-5-5 (5-6-6) cm rib. Change to larger double pointed needles and knit stockinette st. After the rib, inc 1 st each side of marker 9-15-16-20 (20-22-23) times:
Size 2 years: every 6th row
Sizes 3/4 + 5/6 + 7/8 + 11/12 years: every 4th row
Sizes 9/10 + 13/14 years: alternately every 4th and 5th row
= 62-74-80-88 (92-96-102) sts. When the work measures 23-26-29-33 (37-39-43) cm , put 2 sts each side of marker on a stitch holder. Then put sts on a stitch holder for sleeve caps each side every other row: 3-3-3-4 (3-4-4) sts 7-7-7-7 (8-8-8) times. Put all the sts on the stitch holder back on the needles and knit Pattern 2 over all sts to finished dimensions = 31-34-37-41 (46-48-52) cm reverse stockinette st for a seam allowance over the cut edge on the body, bind off.

Assembly: Sew a marker thread down into the center of the steek sts on each side. Sew two machine seams around the marker threads, first seam = 1/2 stitch from the thread, 2nd seam = 1/2 stitch from the first seam. Cut up for armhole. Sew shoulder seams. Pick up approx. 92-96-100-104 (108-112-116) sts (divisible by 4 sts) around the neck on smaller double pointed needles with coal gray; join and knit as follows (from the right side): P 1 row, K 1 row, then 8 cm rib. Bind off loosely in rib. Fold the edge over against the wrong side and sew.
Sew the sleeves to the body from the right side as follows: Sew alternately a st in the last row of knitting on the sleeve before the seam allowance and a st on the body after the machine seam. Turn the sweater inside out and sew the seam allowance from the sleeve over the cut edge on the body by hand.

This pattern has been corrected.

Updated online: 28.08.2019
Correction: Sweater with zippered neck: When the work measures 41-44-47 (49-52-56) cm (approx. 19 cm of the work remains), knit the next row as follows: 5 steek sts, 60-66-72 (66-72-78) sts for the front, bind off 1 st for neck, 59-65-71 (65-71-77) sts for the front, 5 steek sts, 120-132-144 (132-144-156) sts for the back. Continue knitting back and forth.

Diagram

symbols = coal gray
symbols = medium gray
symbols = light grey
symbols = natural white
symbols = adult
symbols = child
diagram
diagram
diagram

Each of our patterns has specific tutorial videos to help you.

Do you have a question? See a list of frequently asked questions (FAQ)

Knitting tension is what determines the final measurements of your work, and is usually measured per 10 x 10 cm. It is provided like so: number of stitches in width x number of rows in height - eg: 19 stitches x 26 rows = 10 x 10 cm.

The knitting tension is very individual; some people knit/crochet loosely while others work tightly. You adjust the knitting tension with the needle size, which is why the suggested needle size is only meant as a guide! You need to adjust this (up or down) to ensure that YOUR knitting tension matches the knitting tension provided in the pattern. If you work with a different knitting tension than provided you will have a different yarn consumption, and your work will have different measurements than what the pattern suggests.

The knitting tension also determines which yarns can replace each other. As long as you achieve the same knitting tension you can replace one yarn with another.

See DROPS lesson: How to measure your tension/gauge

See DROPS video: How to make a gauge tension swatch

The required amount of yarn is provided in grams, eg: 450 g. To calculate how many balls you’ll need you first need to know how many grams are in 1 ball (25g, 50g or 100g). This information is available if you click on the individual yarn quality on our pages. Divide the amount required with the amount of each ball. For example, if each ball is 50g (the most common amount), the calculation will be as follows: 450 / 50 = 9 balls.

The important thing when changing from one yarn to another is that the knitting/crochet tension remains the same. This is so that the measurements of the finished piece will be the same as on the sketch provided. It is easier to achieve the same knitting tension using yarns from the same yarn group. It is also possible to work with multiple strands of a thinner yarn to achieve the knitting tension of a thicker one. Please try our yarn converter. We recommend you to always work a test swatch.

Please NOTE: when changing yarn the garment might have a different look and feel to the garment in the photo, due to individual properties and qualities of each yarn.

See DROPS lesson: Can I use a different yarn than the one mentioned in the pattern?

All our yarns are categorised into yarn groups (from A to F) according to thickness and knitting tension – group A contains the thinnest yarns and group F the thickest. This makes it easier for you to find alternative yarns to our patterns, should you wish to switch yarn. All yarns within the same group have a similar knitting tension and can easily replace each other. However, different yarn qualities have different structures and properties which will give the finished work a unique look and feel.

Click here for an overview of the yarns in each yarn group

At the top of all our patterns you’ll find a link to our yarn calculator, which is a helpful tool should you wish to use a different yarn than suggested. By filling in the yarn quality you wish to replace, the amount (in your size) and number of strands, the calculator will present good alternative yarns with the same knitting tension. Additionally it will tell you how much you’ll require in the new qualities and whether you’ll need to work with multiple strands. Most skeins are 50g (some are 25g or 100g).

If the pattern is worked with multiple colours, every colour will have to be calculated separately. Similarly, if the pattern is worked with several strands of different yarns (for example 1 strand Alpaca and 1 strand Kid-Silk) you will have to find alternatives for each, individually.

Click here to see our yarn calculator

Since different yarns have different qualities and textures we have chosen to keep the original yarn in our patterns. However, you can easily find options among our available qualities by using our yarn calculator, or simply pick a yarn from the same yarn group.

It is possible that some retailers still have discontinued yarns in stock, or that someone has a few skeins at home that they would like to find patterns for.

The yarn calculator will provide both alternative yarn as well as required amount in the new quality.

If you think it's hard to decide what size to make, it can be a good idea to measure a garment you own already and like the size of. Then you can pick the size by comparing those measures with the ones available in the pattern's size chart.

You'll find the size chart at the bottom of the pattern.

See DROPS lesson: How to read size chart

The needle size provided in the pattern serves only as a guide, the important thing is to follow the knitting tension. And since knitting tension is very individual, you will have to adjust the needle size to ensure that YOUR tension is the same as in the pattern – maybe you’ll have to adjust 1, or even 2 needle sizes, up or down to achieve the correct tension. For this, we recommend that you work test swatches.

Should you work with a different knitting tension than the one provided, the measurements of the finished garment might deviate from the measurement sketch.

See DROPS lesson: How to measure your tension/gauge

See DROPS video: How to make a tension/gauge swatch

Working a garment top-down provides more flexibility and room for personal adjustment. For example it is easier to try the garment on while working, as well as making adjustments to length of yoke and shoulder caps.

The instructions are carefully explaining every step, in the correct order. Diagrams are adjusted to the knitting direction and are worked as usual.

The diagram depicts all rows/rounds, and every stitch seen from the right side. It is read from bottom to top, from right to left. 1 square = 1 stitch.

When working back and forth, every other row is worked from the right side and every other row is worked from the wrong side. When working from the wrong side, the diagram will have to be worked reversed: from left to right, knit stitches are purled, purl stitches are knit etc.

When working in the round every round is worked from the right side and the diagram are worked from right to left on all rounds.

See DROPS lesson: How to read knitting diagrams

The diagram depicts all rows/rounds, and every stitch seen from the right side. It is worked from bottom to top, from right to left.

When working back and forth every other row is worked from the right side: from right to left and every other row is worked from the wrong side: from left to right.

When working in the round, every row in the diagram are worked from the right side, from right to left.

When working a circular diagram you start in the middle and work your way outwards, counter clockwise, row by row.

The rows usually start with a given number of chain stitches (equivalent to the height of the following stitch), this will either be depicted in the diagram or explained in the pattern.

See DROPS lesson: How to read crochet diagrams

Instructions for working several diagrams after each other on the same row/round, will often be written like so: “work A.1, A.2, A.3 a total of 0-0-2-3-4 times". This means you work A.1 once, then A.2 is worked once, and A.3 is repeated (in width) the number of times provided for your size – in this case like so: S = 0 times, M = 0 times, L=2 times, XL= 3 times and XXL = 4 times.

The diagrams are worked as usual: begin with the first row in A.1, then work the first row in A.2 etc.

See DROPS lesson: How to read knitting diagrams

See DROPS lesson: How to read crochet diagrams

The total width of the garment (from wrist-to-wrist) will be larger in the larger sizes, despite the actual sleeves being shorter. The larger sizes have longer sleeve caps and wider shoulders, so there will be a good fit in all sizes.

The measurement sketch/schematic drawing provides information regarding the full length of the garment. If it’s a jumper or a jacket the length is measured from the highest point on the shoulder closest to the neckline, and straight down to the bottom of the garment. It is NOT measured from the tip of shoulder. Similarly, the length of yoke is measured from the highest point on the shoulder and down to where yoke is split into body and sleeves.

On a jacket measures are never taken along bands, unless specifically stated. Always measure inside band stitches when measuring the length.

See DROPS lesson: How to read a schematic drawing

Diagrams are often repeated on the round or in height. 1 repeat is the diagram the way it appears in the pattern. If it says to work 5 repeats of A.1 in the round, then you work A.1 a total of 5 times after/next to each other in the round. If it says to work 2 repeats of A.1 vertically/in height you work the entire diagram once, then begin again at the start and work the entire diagram one more time.

Chain stitches are slightly narrower than other stitches and to avoid working the cast-on edge too tight, we simply chain more stitches to begin with. The stitch count will be adjusted on the following row to fit the pattern and measurement sketch.

The rib edge is more elastic and will contract slightly compared to, for example, stocking stitch. By increasing before the rib edge, you avoid a visible difference in width between the rib edge and the rest of the body.

It’s very easy to cast off too tightly, and by making yarn overs while casting off (and simultaneously casting these off) you avoid a too tight cast off edge.

See DROPS video: How to bind off with yarn overs (yo)

To achieve an even increase (or decrease) you can increase on, for example: every 3rd and 4th row alternately, like so: work 2 rows and increase on the 3rd row, work 3 rows and increase on the 4th. Repeat this until the increase is complete.

See DROPS lesson: Increase or decrease 1 st on every 3rd and 4th row alternately

Should you prefer to work in the round instead of back and forth, you may of course adjust the pattern. You’ll need to add steeks mid-front (usually 5 stitches), and follow the instructions. When you would normally turn and work from the wrong side, simply work across the steek and continue in the round. At the end you’ll cut the piece open, pick up stitches to work bands, and cover the cut edges.

See DROPS video: How to knit steeks and cut open

Should you prefer to work back and forth instead of in the round, you may of course adjust the pattern so you work the pieces separately and then assemble them at the end. Divide the stitches for the body in 2, add 1 edge stitch in each side (for sewing) and work the front and back pieces separately.

See DROPS lesson: Can I adapt a pattern for circular needles into straight needles?

Pattern repeats can vary slightly in the different sizes, in order to get the correct proportions. If you’re not working the exact same size as the garment in the photo, yours might deviate slightly. This has been carefully developed and adjusted so that the complete impression of the garment is the same in all sizes.

Make sure to follow instructions and diagrams for your size!

If you have found a pattern you like which is available in women’s size it’s not very difficult to convert it to men’s size. The biggest difference will be the length of sleeves and body. Start working on the women size that you think would fit across the chest. The additional length will be worked right before you cast off for the armhole/sleeve cap. If the pattern is worked top-down you can add the length right after the armhole or before the first decrease on sleeve.

Regarding additional yarn amount, this will depend on how much length you add, but it is better with a skein too many than too few.

All yarns will have excess fibres (from production) that might come off as lint or shedding. Brushed yarns (ie hairier yarns) have more of these loose, excess fibres, causing more shedding.

Shedding also depends on what is worn under or over the garment, and whether this pulls at the yarn fibres. It’s therefore not possible to guarantee that there will be no shedding

Below are some tips on how to get the best result when working with hairier yarns:

1. When the garment is finished (before you wash it) shake it vigorously so the looser hairs come off. NOTE: do NOT use a lint roller, brush or any method that pulls at the yarn.

2. Place the garment in a plastic bag and put it in your freezer - the temperature will cause the fibres to become less attached to each other, and excess fibres will come off easier.

3. Leave in the freezer for a few hours before taking it out and shaking it again.

4. Wash the garment according to the instructions on the yarn label.

Pilling is a natural process that happens to even the most exclusive of fibers. It's a natural sign of wear and tear that is hard to avoid, and that is most visible in high friction areas of your garment like a sweater's arms and cuffs.

You can make your garment look as new by removing the pilling, using a fabric comb or a pill/lint remover.

Still can't find the answer you need? Then scroll down and leave your question so one of our experts can try to help you. This will be done normally within 5 to 10 working days.
In the meantime, you can read the questions and answers that others have left to this pattern or join the DROPS Workshop on Facebook to get help from fellow knitters/crocheters!

You might also like...

Post a comment to pattern DROPS 59-9

We would love to hear what you have to say about this pattern!

If you want to leave a question, please make sure you select the correct category in the form below, to speed up the answering process. Required fields are marked *.

Comments / Questions (27)

country flag Teresa Waller wrote:

Guten Tag, ich möchte den Pullover gerne ab dem Ärmelausschnitt in Hin- und Rückreihen stricken und nicht am Ärmel aufschneiden. Wie gehe ich genau vor? Wann muss ich wie für den Ärmel abketten?

11.02.2024 - 16:31

DROPS Design answered:

Liebe Frau Waller, dann teilen Sie die Arbeit in 2 Teilen dann stricken Sie Vorder- und Rückenteil separat in Hin- und Rückreihen, bei der 1. Reihe nehmen Sie für die Naht 1 Masche beidseitig zu. Viel Spaß beim stricken!

12.02.2024 - 09:00

country flag Marianne wrote:

Bonjour, Pour le pull avec coll zippé en taille XL, pour les manches à la fin on a 124 mailles. Mais comment faire pour tricoter M2 alors que ce n'est pas un multiple de 6 ? Merci

20.12.2023 - 19:20

DROPS Design answered:

Bonjour Marianne, vous pouvez centrer un motif de M.2 au milieu du dessus de la manche (cf cette leçon ainsi les deux manches seront identiques, même si le motif ne tombe pas juste au milieu sous la manche. Bon tricot!

21.12.2023 - 08:12

country flag Kirsti Storstrand wrote:

Hvordan tas det opp masker på innsiden av splitten?

07.11.2023 - 17:02

DROPS Design answered:

Hei Kirsti. Bruke en strikkepinne (evnt. en en heklenål) og strikk opp masker på innsiden av splitten. Se evnt hjelpevideo nederst på siden. Vises ikke fra innsiden, men samme teknikk kan brukes. mvh DROPS Design

13.11.2023 - 09:59

country flag Renate wrote:

Die erste Frage ist damit beantwortet, vielen Dank dafür. Aber meine anderen Fragen sind leider noch offen: - wird das Bündchen beidseitig dann nach innen geklappt? - wie wird der Reißverschluss drangenäht? Mit Steppstichen? Oder unsichtbar von hinten an die Bündchen? Ich kann es leider nicht in der Anleitung finden und auf dem einzigen Foto auch nicht erkennen und bin für jede Hilfe dankbar.

13.10.2023 - 15:55

DROPS Design answered:

Liebe Renate, die Reißverschluss-Blende (= 3 Reihen glatt rechts) wird direkt an den Schlitz des Pullovers angestrickt und wird nicht umgeklappt. Den Reißverschluss nähen Sie an der Rückseite der 3 glatt rechten Reihen an, am besten im Steppstich mit der Strickwolle. Gutes Gelingen!

16.10.2023 - 09:30

country flag Renate wrote:

Nochmal die konkreten Fragen: Wozu ist das Bündchen rechts und links vom Reißverschluss? Wird das nach innen geklappt und somit „unsichtbar“? Wie wird der Reißverschluss an das Bündchen bzw. Schlitz mit den Bündchen angenäht? Für Hilfe wäre ich sehr dankbar.

13.10.2023 - 13:02

DROPS Design answered:

Liebe Renate, man strickt 3 Reihen glatt rechts an jeder Seite von Reissverschluss damit der Schlitz schöner aussieht. Viel Spaßb eim stricken!

13.10.2023 - 15:30

country flag Renate wrote:

Ich habe den Rumpf dieses tollen Pullis in Herrengröße S/M fertig gestrickt, in Hin-und Rückreihen mit Schlitz für den Reißverschluss. Nun will ich den Halsausschnitt fertigstellen, die Anleitung für den Kragen verstehe ich, aber dann ist noch die linke und rechte Seite des Reißverschlusses mit einem Bündchen zu stricken. Ich verstehe nun nicht, wie der Reißverschluss an das Bündchen (3 R glatt rechts) angenäht wird. Das wird nicht explizit erwähnt, oder? Danke für Ihre Hilfe!

03.10.2023 - 16:38

country flag Renate wrote:

1. Was passiert mit den anderen Farbfäden bei Unterbrechung des Musters an den Steek-Maschen? Müssen die hinter den 5 Maschen mitgeführt werden? Das sieht man ihm Anleitungsvideo leider nicht. 2. Wenn die Mustermitte auch die vordere Mitte sein soll, dann muss ich das Muster am Reihenanfang an einer anderen Stelle beginnen. Das ist im M1-Diagramm aber nur für die Kindergrößen eingezeichnet. Ich muss mir das für die Herrengröße M/L selbst ausrechnen. Hab ich das richtig verstanden?

29.08.2023 - 17:09

DROPS Design answered:

Liebe Renate, alle Farben können mit den Steek-Maschen gestrickt werden, entweder in Streifen (wie in diesem Video oder abwechslungsweise. M.1 muss in der Mitte zentriert werden, diese Lektion kann Ihnen damit helfen. Viel Spaß beim stricken!

30.08.2023 - 07:58

country flag Laurel Von Gerichten wrote:

This pattern is so appealing that after having made the sweater for my 10-year-old grandson I am now making it for his father. I would like to make the round-neck version. However, I notice that there are no finishing instructions for the adult round neck version for the ribbing that finishes the neck as there are in the instructions for the child sweater. Please advise. Perhaps someone else has asked this question but I couldn't read the other language comments. Thanks!

29.07.2023 - 19:03

DROPS Design answered:

Dear Laurel Von Gerichten, for round neck pick stitches divisible by 4 and knit 2K/2P rib in round as described. Happy knitting!

29.07.2023 - 21:28

country flag Andreea Bocirnea wrote:

Hva med de 5 oppklippsmasker? I oppskriften det står sånn : når arbeidet måler 47 cm økes det 5 m i hvert side ( disse m er til å klippe opp i etterpå og strikkes ikke inn i monsteret) Skal de 5 oppklippsmasker strikkes hele veien til genseren er ferdig eller skal det strikkes etter bredde på armen. I min tilfelle armen har 22 cm .. så skal jeg felle over det 5 masker når jeg har strikket "armhulen " eller skal dem følge arbeidet videre ?

29.11.2022 - 06:18

DROPS Design answered:

Hej Andreea, hvis du følger opskriften, så skal du fortsætte med de 5 opklipsmasker i hver side, da det er dem du skal klippe i bagefter :)

30.11.2022 - 15:29

country flag Joan wrote:

Hvorfor kan man ikke bare dele arbejdet,over brystet efter mønsteret,så man ikke skal klippe op

25.11.2022 - 20:46

DROPS Design answered:

Hej Joan, Det må du gerne gøre :)

30.11.2022 - 14:09