-------------------------------------------------------
Alternative Yarn – See how to change yarns here
Yarn Groups A to F – Use the same pattern and change the yarn here
Yarn usage using an alternative yarn – Use our yarn converter here
-------------------------------------------------------
All measurements in charts are in cm.
Each of our patterns has specific tutorial videos to help you.
These step-by-step tutorials might also help you:
Why is the knitting/crochet tension so important?
Knitting tension is what determines the final measurements of your work, and is usually measured per 10 x 10 cm. It is provided like so: number of stitches in width x number of rows in height - eg: 19 stitches x 26 rows = 10 x 10 cm.
The knitting tension is very individual; some people knit/crochet loosely while others work tightly. You adjust the knitting tension with the needle size, which is why the suggested needle size only serve as a guide! You need to adjust this (up or down) to ensure that YOUR knitting tension matches the knitting tension provided in the pattern. If you work with a different knitting tension than provided you will have a different yarn consumption, and your work will have different measurements than what the pattern suggests.
The knitting tension also determines which yarns can replace each other. As long as you achieve the same knitting tension you can replace one yarn with another.
See DROPS lesson: How to measure your tension/gauge
See DROPS video: How to make a gauge tension swatch
How do I know how many balls of yarn I need?
The required amount of yarn is provided in grams, eg: 450 g. To calculate how many balls you’ll need you first need to know how many grams are in 1 ball (25g, 50g or 100g). This information is available if you click on the individual yarn quality on our pages. Divide the amount required with the amount of each ball. For example, if each ball is 50g (the most common amount), the calculation will be as follows: 450 / 50 = 9 balls.
Can I use a different yarn than what the pattern suggests?
The important thing when changing from one yarn to another is that the knitting/crochet tension remains the same. This is so that the measurements of the finished piece will be the same as on the sketch provided. It is easier to achieve the same knitting tension using yarns from the same yarn group. It is also possible to work with multiple strands of a thinner yarn to achieve the knitting tension of a thicker one. Please try our yarn converter. We recommend you to always work a test swatch.
Please NOTE: when changing yarn the garment might have a different look and feel to the garment in the photo, due to individual properties and qualities of each yarn.
See DROPS lesson: Can I use a different yarn than the one mentioned in the pattern?
What are the yarn groups?
All our yarns are categorised into yarn groups (from A to F) according to thickness and knitting tension – group A contains the thinnest yarns and group F the thickest. This makes it easier for you to find alternative yarns to our patterns, should you wish to switch yarn. All yarns within the same group have a similar knitting tension and can easily replace each other. However, different yarn qualities have different structures and properties which will give the finished work a unique look and feel.
How do I use the yarn converter?
At the top of all our patterns you’ll find a link to our yarn converter, which is a helpful tool should you wish to use a different yarn than suggested. By filling in the yarn quality you wish to replace, the amount (in your size) and number of strands, the converter will present good alternative yarns with the same knitting tension. Additionally it will tell you how much you’ll require in the new qualities and whether you’ll need to work with multiple strands. Most skeins are 50g (some are 25g or 100g).
If the pattern is worked with multiple colours, every colour will have to be converted separately. Similarly, if the pattern is worked with several strands of different yarns (for example 1 strand Alpaca and 1 strand Kid-Silk) you will have to find alternatives for each, individually.
Why do you show discontinued yarns in the patterns?
Since different yarns have different qualities and textures we have chosen to keep the original yarn in our patterns. However, you can easily find options among our available qualities by using our yarn converter, or simply pick a yarn from the same yarn group.
It is possible that some retailers still have discontinued yarns in stock, or that someone has a few skeins at home that they would like to find patterns for.
The yarn converter will provide both alternative yarn as well as required amount in the new quality.
What size should I knit?
If you think it's hard to decide what size to make, it can be a good idea to measure a garment you own already and like the size of. Then you can pick the size by comparing those measures with the ones available in the pattern's size chart.
You'll find the size chart at the bottom of the pattern.
See DROPS lesson: How to read size chart
Why do I get the wrong knitting tension with the suggested needle size?
The needle size provided in the pattern serves only as a guide, the important thing is to follow the knitting tension. And since knitting tension is very individual, you will have to adjust the needle size to ensure that YOUR tension is the same as in the pattern – maybe you’ll have to adjust 1, or even 2 needle sizes, up or down to achieve the correct tension. For this, we recommend that you work test swatches.
Should you work with a different knitting tension than the one provided, the measurements of the finished garment might deviate from the measurement sketch.
See DROPS lesson: How to measure your tension/gauge
See DROPS video: How to make a gauge tension swatch
Why is the pattern worked top-down?
Working a garment top-down provides more flexibility and room for personal adjustment. For example it is easier to try the garment on while working, as well as making adjustments to length of yoke and shoulder caps.
The instructions are carefully explaining every step, in the correct order. Diagrams are adjusted to the knitting direction and are worked as usual.
How do I work according to a knitting diagram?
The diagram depicts all rows/rounds, and every stitch seen from the right side. It is read from bottom to top, from right to left. 1 square = 1 stitch.
When working back and forth, every other row is worked from the right side and every other row is worked from the wrong side. When working from the wrong side, the diagram will have to be worked reversed: from left to right, knit stitches are purled, purl stitches are knit etc.
When working in the round every round is worked from the right side and the diagram are worked from right to left on all rounds.
See DROPS lesson: How to read knitting diagrams
How do I work according to a crochet diagram?
The diagram depicts all rows/rounds, and every stitch seen from the right side. It is worked from bottom to top, from right to left.
When working back and forth every other row is worked from the right side: from right to left and every other row is worked from the wrong side: from left to right.
When working in the round, every row in the diagram are worked from the right side, from right to left.
When working a circular diagram you start in the middle and work your way outwards, counter clockwise, row by row.
The rows usually start with a given number of chain stitches (equivalent to the height of the following stitch), this will either be depicted in the diagram or explained in the pattern.
See DROPS lesson: How to read crochet diagrams
How do I work several diagrams simultaneously on the same row/round?
Instructions for working several diagrams after each other on the same row/round, will often be written like so: “work A.1, A.2, A.3 a total of 0-0-2-3-4 times". This means you work A.1 once, then A.2 is worked once, and A.3 is repeated (in width) the number of times provided for your size – in this case like so: S = 0 times, M = 0 times, L=2 times, XL= 3 times and XXL = 4 times.
The diagrams are worked as usual: begin with the first row in A.1, then work the first row in A.2 etc.
See DROPS lesson: How to read knitting diagrams
See DROPS lesson: How to read crochet diagrams
Why are the sleeves shorter in larger sizes?
The total width of the garment (from wrist-to-wrist) will be larger in the larger sizes, despite the actual sleeves being shorter. The larger sizes have longer sleeve caps and wider shoulders, so there will be a good fit in all sizes.
Where on the garment is the length measured?
The measurement sketch/schematic drawing provides information regarding the full length of the garment. If it’s a jumper or a jacket the length is measured from the highest point on the shoulder (usually closest to the neckline), and straight down to the bottom of the garment. It is NOT measured from the tip of shoulder. Similarly, the length of yoke is measured from the highest point on the shoulder and down to where yoke is split into body and sleeves.
See DROPS lesson: How to read a schematic drawing
What is a repeat?
Diagrams are often repeated on the round or in height. 1 repeat is the diagram the way it appears in the pattern. If it says to work 5 repeats of A.1 in the round, then you work A.1 a total of 5 times after/next to each other in the round. If it says to work 2 repeats of A.1 vertically/in height you work the entire diagram once, then begin again at the start and work the entire diagram one more time.
Why does the piece start with more chain stitches than it’s worked with?
Chain stitches are slightly narrower than other stitches and to avoid working the cast-on edge too tight, we simply chain more stitches to begin with. The stitch count will be adjusted on the following row to fit the pattern and measurement sketch.
Why increase before the rib edge when the piece is worked top-down?
The rib edge is more elastic and will contract slightly compared to, for example, stocking stitch. By increasing before the rib edge, you avoid a visible difference in width between the rib edge and the rest of the body.
Why increase in the cast-off edge?
It’s very easy to cast off too tightly, and by making yarn overs while casting off (and simultaneously casting these off) you avoid a too tight cast off edge.
See DROPS video: How to bind off with yarn overs (yo)
How do I increase/decrease on every 3rd and 4th row/round alternately?
To achieve an even increase (or decrease) you can increase on, for example: every 3rd and 4th row alternately, like so: work 2 rows and increase on the 3rd row, work 3 rows and increase on the 4th. Repeat this until the increase is complete.
See DROPS lesson: Increase or decrease 1 st on every 3rd and 4th row alternately
How can I work a jacket in the round instead of back and forth?
Should you prefer to work in the round instead of back and forth, you may of course adjust the pattern. You’ll need to add steeks mid-front (usually 5 stitches), and follow the instructions. When you would normally turn and work from the wrong side, simply work across the steek and continue in the round. At the end you’ll cut the piece open, pick up stitches to work bands, and cover the cut edges.
See DROPS video: How to knit steeks and cut open
Can I work a jumper back and forth instead of in the round?
Should you prefer to work back and forth instead of in the round, you may of course adjust the pattern so you work the pieces separately and then assemble them at the end. Divide the stitches for the body in 2, add 1 edge stitch in each side (for sewing) and work the front and back pieces separately.
See DROPS lesson: Can I adapt a pattern for circular needles into straight needles?
Why is the pattern slightly different than what I see in the photo?
Pattern repeats can vary slightly in the different sizes, in order to get the correct proportions. If you’re not working the exact same size as the garment in the photo, yours might deviate slightly. This has been carefully developed and adjusted so that the complete impression of the garment is the same in all sizes.
Make sure to follow instructions and diagrams for your size!
How do I make a women’s size garment into a men’s size one?
If you have found a pattern you like which is available in women’s size it’s not very difficult to convert it to men’s size. The biggest difference will be the length of sleeves and body. Start working on the women size that you think would fit across the chest. The additional length will be worked right before you cast off for the armhole/sleeve cap. If the pattern is worked top-down you can add the length right after the armhole or before the first decrease on sleeve.
Regarding additional yarn amount, this will depend on how much length you add, but it is better with a skein too many than too few.
How do I prevent a hairy garment from shedding?
All yarns will have excess fibres (from production) that might come off as lint or shedding. Brushed yarns (ie hairier yarns) have more of these loose, excess fibres, causing more shedding.
Shedding also depends on what is worn under or over the garment, and whether this pulls at the yarn fibres. It’s therefore not possible to guarantee that there will be no shedding
Below are some tips on how to get the best result when working with hairier yarns:
1. When the garment is finished (before you wash it) shake it vigorously so the looser hairs come off. NOTE: do NOT use a lint roller, brush or any method that pulls at the yarn.
2. Place the garment in a plastic bag and put it in your freezer - the temperature will cause the fibres to become less attached to each other, and excess fibres will come off easier.
3. Leave in the freezer for a few hours before taking it out and shaking it again.
4. Wash the garment according to the instructions on the yarn label.
Why does my garment pill?
Pilling is a natural process that happens to even the most exclusive of fibers. It's a natural sign of wear and tear that is hard to avoid, and that is most visible in high friction areas of your garment like a sweater's arms and cuffs.
You can make your garment look as new by removing the pilling, using a fabric comb or a pill/lint remover.
Elinor's Mistery |
|
|
|
DROPS Cardigan in Vivaldi with Hood
DROPS 80-18 |
|
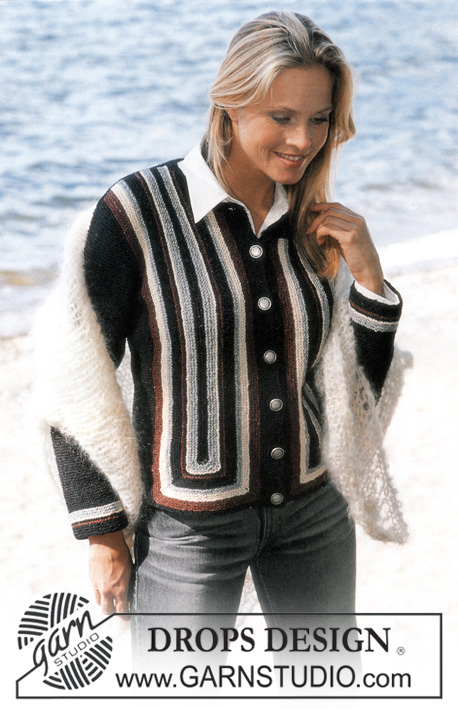
Gauge: 14 sts x 28 rows in garter st with 2 strands = 10 x 10 cm. Pattern: Row 1 (right side): knit Row 2 (wrong side): purl Row 3: purl Row 4: purl Row 5: knit Back: Cast on loosely 56-62-68-76-86 sts with 2 strands brown + 1 strand light blue. Take away 1 strand brown and knit garter st to finished measurements. When the piece measures 8 and 14 cm dec 1 st at each side = 52-58-64-72-82 sts. When the piece measures 20-21-22-23-24 cm inc 1 st at each side every 3 cm a total of 5 times = 62-68-74-82-92 sts. When the piece measures 37-38-39-40-41 cm bind off for armhole at each side every other row: 3 sts 1 time, 2 sts 0-1-2-3-4 times and 1 st 3-3-3-4-5 times = 50-52-54-56-60 sts. When the piece measures 54-56-58-60-62 cm bind off the center 14-16-16-18-18 sts for the neck. On the next row dec 1 st at each neck edge = 17-17-18-18-20 sts remain on each shoulder. Bind off when the piece measures 56-58-60-62-64 cm. Left front: Cast on 33-36-39-43-48 sts with 2 strands brown + 1 strand light blue. Take away 1 strand brown and knit garter st to finished measurements – but purl the 6th st from center front edge on all rows to mark the buttonband. When the piece measures 8 and 14 cm dec 1 st at the side = 31-34-37-41-46 sts. When the piece measures 20-21-22-23-24 cm inc 1 st at the side every 3 cm a total of 5 times = 36-39-42-46-51 sts. When the piece measures 37-38-39-40-41 cm bind off for armhole at the side as on back = 30-31-32-33-35 sts. When the piece measures 49-51-53-55-57 cm put the 8-9-9-10-10 sts at the center front edge on a st holder for the neck. Then bind off for neck every other row: 2 sts 1 time and 1 st 3 times = 17-17-18-18-20 sts remain on shoulder. Bind off when the piece measures 56-58-60-62-64 cm. Right front: Cast on and knit the same as the left, reversing all shaping. Make buttonholes along button bands (1 buttonhole = K tog the 3rd and 4th sts from center front edge and then yo. On the next row, twist the yo when knitting so the buttonhole will not stretch too large.) Make buttonholes when the piece measures: Size S: 8, 16, 24, 32, 40 and 48 cm. Size M: 8, 16, 25, 33, 42 and 50 cm. Size L: 8, 17, 26, 34, 43 and 52 cm. Size XL: 9, 18, 27, 36, 45 and 54 cm. Size XXL: 9, 18, 28, 37, 47 and 56 cm. Sleeve: Cast on 33-34-35-36-37 sts with 2 strands brown + 1 strand light blue. Take away 1 strand brown and knit garter st for 10 cm. Then knit Pattern - see instructions above - 1 time. Continue in garter st to finished measurements. At the same time when the piece measures 13 cm inc 1 st at each side every 5-4-3.5-3-2.5 cm a total of 8-9-10-11-12 times = 49-52-55-58-61 sts. When sleeve measures 50-49-48-46-44 cm bind off for sleeve cap at each side every other row: 3 sts 1 time and 2 sts 1 time, continue dec 1 st at each side until the piece measures 56 cm, then bind off 2 sts at each side until the piece measures 58 cm. Bind off the remaining sts. Assembly: Sew shoulder seams. Hood: Cast on 5 sts with 1 strand of each color, then put sts from st holder on left front on needle, pick up approx. 30-40 sts around neck, put sts from st holder on right front on needles and cast on 5 new sts at the other side = approx. 56-70 sts. Knit garter st over all sts – at the same time after 4 rows garter st inc evenly distributed (do not inc over the 5 outermost sts at each side) to 82-84-86-88-90 sts. Knit garter st until hood measures approx. 31-32-33-34-35 cm, divide sts onto 2 needles and Kitchener st the top together. Fold the 5 outermost sts along edge double to the right side and stitch in place. Sew in sleeves. Sew sleeve and side seams in one using edge sts as seam allowance. Sew on buttons. |
|
Have you made this or any other of our designs? Tag your pictures in social media with #dropsdesign so we can see them! Do you need help with this pattern?You'll find tutorial videos, a Comments/Questions area and more by visiting the pattern on garnstudio.com. © 1982-2024 DROPS Design A/S. We reserve all rights. This document, including all its sub-sections, has copyrights. Read more about what you can do with our patterns at the bottom of each pattern on our site. |
With over 40 years in knitting and crochet design, DROPS Design offers one of the most extensive collections of free patterns on the internet - translated to 17 languages. As of today we count 304 catalogs and 11422 patterns - 11417 of which are translated into English (US/in).
We work hard to bring you the best knitting and crochet have to offer, inspiration and advice as well as great quality yarns at incredible prices! Would you like to use our patterns for other than personal use? You can read what you are allowed to do in the Copyright text at the bottom of all our patterns. Happy crafting!
Comments / Questions (75)
Gabriele wrote:
.. liebes Drops Team,.. ich bin total verunsichert was die Farben angeht. Eurem Rat zufolge habe ich mich nun für Kid Silk entschieden und hier für die Garnfarben: dunkelbraun unicolor 15 und hell graublau unicolor 07 Sind die Farben richtig für die Jacke 80-18?, oder schlagt ihr mir eine andere Nummer bei Kid Silk vor? Die Jacke soll farblich genau so werden wie abgebildet. (zumindest sehr ähnlich)
23.10.2017 - 17:33DROPS Design answered:
Liebe Gabriele, am besten fragen Sie Ihr DROPS Laden, die haben Farben vor Augen und so können Sie Ihnen besser beraten. Viel Spaß beim stricken!
24.10.2017 - 08:32Gabriele Paulus wrote:
Ich würde gerne die Jacke in der gleichen Farbe stricken wie abgebildet. Welches Altzernativgarn soll ich nehmen, (Vivaldi ist ja nicht mehr verfügbar) wieviel brauche ich für Größe XL und kann ich das bei euch bestellen?
22.10.2017 - 20:14DROPS Design answered:
Liebe Frau Paulus, am besten können Sie 2 Fäden Kid-Silk (= 1 Faden Vivaldi) siehe hier oder 1 Faden Brushed Alpaca Silk (= 1 Faden Vivaldi) ersetzen. Viel Spaß beim stricken!
23.10.2017 - 11:56Julia wrote:
Hallo, welchen Durchmesser haben die hier verwendeten Knöpfe? Vielen Dank, Julia
11.09.2017 - 23:14DROPS Design answered:
Liebe Julia, Knöpfe von 20 mm Durchmesser sollen passen. Viel Spaß beim stricken!
12.09.2017 - 08:37Eva wrote:
Um eine feinere Optik zu erhalten, würde ich die Jacke gerne glatt rechts stricken. Ist das möglich bzw was ist zu beachten? Muss dennoch mit doppeltem Faden gestrickt werden? Vielen Dank
27.10.2016 - 11:16DROPS Design answered:
Liebe Eva, die Maschenprobe Kraus oder glatt re. gestrickt sind verschieden, das müssen sie beachten. Für weitere persönnliche Anfragen wird Ihnen Ihren DROPS Laden gerne helfen.
27.10.2016 - 11:22Djaouida Takouk wrote:
J'adore le modèle, mais j'ai un problème. Je voudrais faire le modèle 80-18 avec une laine à aiguille #5. Mon échantillon avec les mêmes données a fait 9,5cm de coté. J'ai calculé pour 43 cm de largeur au début, cela me prend 108 mailles. Êtes vous en mesure de m'aider pour le reste du calcul, afin d'adapter ma laine à vos mesures. Merci beaucoup.
11.04.2016 - 18:22DROPS Design answered:
Bonjour Mme Takouk, nous ne sommes malheureusement pas en mesure de pouvoir ajuster chaque modèle à chaque demande individuelle. Vous pouvez vous inspirer d'un modèle de même tension ou demander conseil au magasin où vous avez acheté votre fil. Bon tricot!
12.04.2016 - 08:58Fran Buckler wrote:
The pattern says, "Cast on loosely 56-62-68-76-86 sts with 2 strands brown + 1 strand light blue. Take away 1 strand brown and knit garter st to finished measurements. I can't tell by the schematics what the finished measurements of the back are suppose to be. I know that at 8 cm and 14 cm I can decrease. Can someone explain this for me? Thank you Fran
30.01.2016 - 18:03DROPS Design answered:
Dear Mrs Buckler, please read more about measurement chart here. Happy knitting!
01.02.2016 - 09:33Katja wrote:
Es geht mir darum, wie viel wolle ich dann bestellen muss
21.09.2015 - 19:17DROPS Design answered:
Ich würde Ihnen als Alternative Brushed Alpaca Silk empfehlen, denn die Jacke ist kraus rechts gestrickt und von daher ist ein leichtes Ersatzgarn empfehlenswert, damit sich die Jacke im Vergleich zum ebenfalls leichten Originalgarn nicht zu stark aushängt. Brushed Alpaca Silk hat auf 50 g die gleiche Lauflänge wie Vivaldi, daher können Sie die gleiche Garnmenge verwenden, aber beachten Sie, dass es sich bei Brushed Alpaca Silk um 25g-Knäuel handelt, nicht um 50g-Knäuel.
27.09.2015 - 21:56Katja wrote:
Hallo wenn ich ein anderes Garn der Gruppe C nehme muss ich dann auch mit zwei Fäden stricken?
21.09.2015 - 14:20DROPS Design answered:
Ja, auch dann müssen Sie den Faden doppelt verwenden. Beachten Sie, dass Sie bei einem Alternativgarn die Garnmenge anhand der Lauflänge neu berechnen müssen. Außerdem muss die Maschenprobe stimmt.
27.09.2015 - 21:52Lisa Hansson wrote:
Hej igen… tänkte fel sist. Om jag byter till garnet ,drops ❤ nr 5 som har 17*22 som fasthet på st 5 borde väl det funka? Om jag testar vilken st på st jac behöver för att få 14*28.
09.09.2015 - 11:54DROPS Design answered:
Hej Lisa, ja det går... men det blir ganska löst stickad då... Lycka till!
17.09.2015 - 11:46Lisa Hansson wrote:
Om man byter från vivaldi till tex big fabel räcker det med en tråd då ist för 2trådar? Tacksam för snabbt svar. /lisa
07.09.2015 - 10:49DROPS Design answered:
Hej. Vivaldi tillhör garngrupp C och det gör även de andra garn som står som "garnalternativ" så du måste ha 2 trådar även av de garn som står där (t.ex big fabel). Se bara till att göra en provlapp så att du får samma stickfasthet som uppges i mönstret. Kom också ihåg att beräkna garnmängd om du byter garn. Lycka till!
07.09.2015 - 14:26