DROPS Snow
DROPS Snow
100% Wool
from 2.00 £ /50g
Get the yarn to make this pattern from 4.00£.

The yarn cost is calculated from the pattern’s smallest size and the yarn’s cheapest product type. Looking for an even better price? You might find it on the DROPS Deals!

DROPS SS24

Blue Shadow

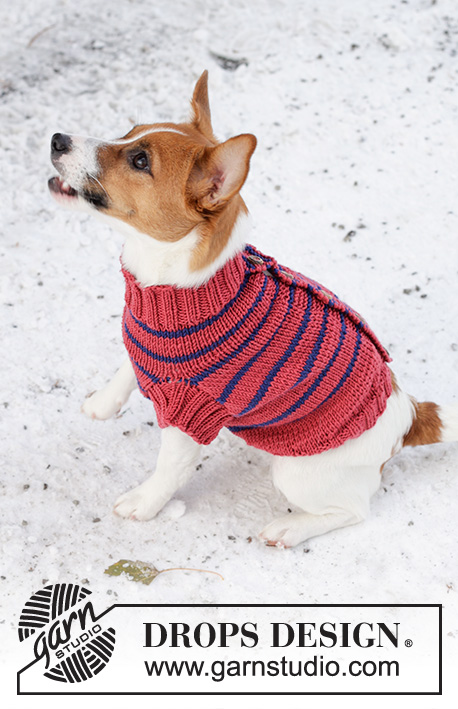
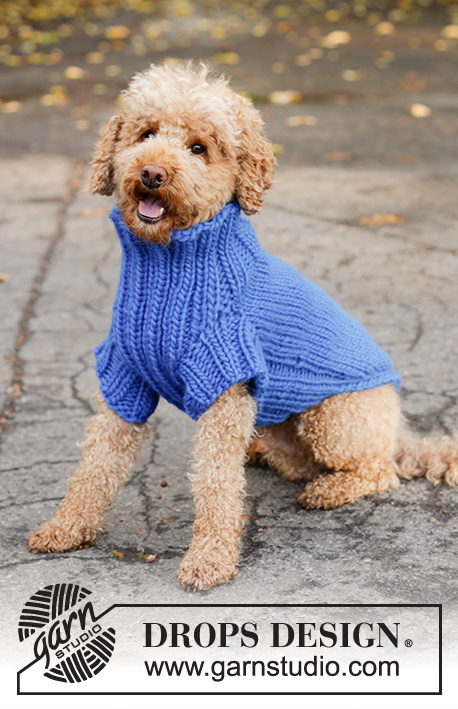
Knitted dog jumper in DROPS Snow. The piece is worked from the tail to the neck with stocking stitch and rib. Sizes XS - L.

DROPS Extra 0-81
DROPS Pattern: ee-765
Yarn group E or C + C
--------------------------------------------------------
SIZE:
XS - S - M - L
MEASUREMENTS:
Back-length: 34-38-44-50 cm
Chest: 34/38 - 42/46 - 52/56 - 58/62 cm
Examples of breeds:
XS = Chihuahua, S = Bichon Frisé, M = Cocker Spaniel, L = Small Boxer

YARN:
DROPS SNOW from Garnstudio (belongs to yarn group E)
150-200-200-200 g colour 104, cobalt blue

NEEDLES:
DROPS SINGLE POINTED NEEDLES SIZE 7 MM
DROPS DOUBLE POINTED NEEDLES SIZE 6 MM

KNITTING TENSION:
12 stitches in width and 16 rows in height with stocking stitch = 10 x 10 cm.
NOTE: Needle size is only a guide. If you get too many stitches on 10 cm, change to a larger needle size. If you get too few stitches on 10 cm, change to a smaller needle size.

-------------------------------------------------------

Alternative Yarn – See how to change yarns here
Yarn Groups A to F – Use the same pattern and change the yarn here
Yarn usage using an alternative yarn – Use our yarn converter here

-------------------------------------------------------

More like this:
Home Pets Dog Sweaters
DROPS Snow
DROPS Snow
100% Wool
from 2.00 £ /50g
Get the yarn to make this pattern from 4.00£.

The yarn cost is calculated from the pattern’s smallest size and the yarn’s cheapest product type. Looking for an even better price? You might find it on the DROPS Deals!

Pattern instructions

NOTE: This pattern is written in British English. All measurements in charts are in cm. For conversion from cm to inches - click here. There are different terms for crocheting in British and American English. If this pattern includes crochet, click for "crochet terms" here. For this pattern in American English, please click here.
-------------------------------------------------------

EXPLANATIONS FOR THE PATTERN:
-------------------------------------------------------

INCREASE TIP:
Increase by making 1 yarn over, which is worked twisted on the next row to avoid a hole. The new stitches are worked in stocking stitch on the back and rib on the tummy.

GARTER STITCH (worked back and forth):
Knit all rows.

-------------------------------------------------------

START THE PIECE HERE:

-------------------------------------------------------

DOG JUMPER - SHORT OVERVIEW OF THE PIECE:
The piece is worked from the tail to the neck. The back and tummy are worked separately back and forth, then joined and the neck worked in the round. The back and tummy are sewn together to finish.

BACK:
Cast on 14-18-18-22 stitches with needles size 7 mm and DROPS Snow.
Work rib as follows (first row = wrong side): work (purl 2, knit 2) until there are 2 stitches left, purl 2. Knit over knit and purl over purl for a total of 3 rows.
Work as follows from the right side: Knit 2, purl 2, work 6-10-10-14 stocking stitches and increase 5 stitches evenly over these stitches - read INCREASE TIP, finish with purl 2, knit 2 = 19-23-23-27 stitches.
Continue with stocking stitch over the middle stitches and 4 ribbed stitches on each side. At the same time, increase 1 stitch after/before the ribbed stitches on each side every 2nd row a total of 7-7-8-8 times = 33-37-39-43 stitches.
When the piece measures 12-12-14-14 cm, cast on 1 stitch on each side, these stitches are worked in GARTER STITCH – read description above = 35-39-41-45 stitches. The edge stitches are used when sewing the back and tummy together.
When the piece measures 27-31-35-41 cm, work stocking stitch over all stitches, casting off stitches every 2nd row for the front legs as follows: 5 stitches 1 time, 1 stitch 2-2-3-3 times. Work 2 rows and cast on 2 stitches on each side (the end of the openings for the front legs) = 25-29-29-33 stitches. The piece measures approx. 33-37-42-48 cm. Place the stitches on a stitch holder.

TUMMY:
Cast on 8-8-16-16 stitches with double pointed needles size 6 mm and DROPS Snow.
Work as follows from the wrong side: 1 edge stitch in garter stitch, (purl 2, knit 2) until there are 3 stitches left, purl 2 and 1 edge stitch in garter stitch.
Continue this rib back and forth for 15-17-20-26 cm. Insert 1 marker in each side, which show where the openings for the front legs start and are used when assembling. Continue the rib until the piece measures 20-24-28-35 cm.
Now increase 1 stitch after/before the edge stitch on each side every 2nd row, 2 times = 12-12-20-20 stitches – remember INCREASE TIP – the new stitches are worked in rib. The tummy measures approx. 23-27-31-38 cm.

NECK:
Place the stitches from the tummy and the back on double pointed needles size 6 mm, dividing them as follows: Tummy’s 12-12-20-20 stitches on the first needle, the 25-29-29-33 back-stitches divided between the 3 other needles = 37-41-49-53 stitches. Start on the tummy: Work 1 stocking stitch, rib as before over the next 10-10-18-18 stitches, 1 stocking stitch (first needle), work stocking stitch and decrease 1-1-5-5 stitches over the back-stitches = 36-40-44-48 stitches.
Work a small elevation as follows: * Work the 12-12-20-20 stitches on the first needle as before, turn. Work back as before, turn. Work 1 round of rib (purl 2, knit 2) over all stitches *, work from *-* a total of 2-2-3-4 times. Insert 1 marker to measure from. Work rib in the round over all stitches for 5-7-8-10 cm. Loosely cast off.

ASSEMBLY:
Sew the back and tummy together on each side. Start where the 1 garter stitch was cast on and sew inside this stitch along the side of the tummy as far as the markers on each side. The remaining cms on the back and tummy are for the front legs.

FRONT LEGS:
Knit up 24-28-28-32 stitches (divisible by 4) around the opening for the front leg, with double pointed needles size 6 mm. Work rib in the round (purl 2, knit 2) for 5-6-7-8 cm. Loosely cast off.
Repeat around the other opening.

This pattern has been corrected.

Updated online: 13.10.2023
The pattern has been reviewed and rephrased.
Updated online: 23.02.2024
The pattern is updated. Correction on neck in size M and L.

Each of our patterns has specific tutorial videos to help you.

Do you have a question? See a list of frequently asked questions (FAQ)

Knitting tension is what determines the final measurements of your work, and is usually measured per 10 x 10 cm. It is provided like so: number of stitches in width x number of rows in height - eg: 19 stitches x 26 rows = 10 x 10 cm.

The knitting tension is very individual; some people knit/crochet loosely while others work tightly. You adjust the knitting tension with the needle size, which is why the suggested needle size is only meant as a guide! You need to adjust this (up or down) to ensure that YOUR knitting tension matches the knitting tension provided in the pattern. If you work with a different knitting tension than provided you will have a different yarn consumption, and your work will have different measurements than what the pattern suggests.

The knitting tension also determines which yarns can replace each other. As long as you achieve the same knitting tension you can replace one yarn with another.

See DROPS lesson: How to measure your tension/gauge

See DROPS video: How to make a gauge tension swatch

The required amount of yarn is provided in grams, eg: 450 g. To calculate how many balls you’ll need you first need to know how many grams are in 1 ball (25g, 50g or 100g). This information is available if you click on the individual yarn quality on our pages. Divide the amount required with the amount of each ball. For example, if each ball is 50g (the most common amount), the calculation will be as follows: 450 / 50 = 9 balls.

The important thing when changing from one yarn to another is that the knitting/crochet tension remains the same. This is so that the measurements of the finished piece will be the same as on the sketch provided. It is easier to achieve the same knitting tension using yarns from the same yarn group. It is also possible to work with multiple strands of a thinner yarn to achieve the knitting tension of a thicker one. Please try our yarn converter. We recommend you to always work a test swatch.

Please NOTE: when changing yarn the garment might have a different look and feel to the garment in the photo, due to individual properties and qualities of each yarn.

See DROPS lesson: Can I use a different yarn than the one mentioned in the pattern?

All our yarns are categorised into yarn groups (from A to F) according to thickness and knitting tension – group A contains the thinnest yarns and group F the thickest. This makes it easier for you to find alternative yarns to our patterns, should you wish to switch yarn. All yarns within the same group have a similar knitting tension and can easily replace each other. However, different yarn qualities have different structures and properties which will give the finished work a unique look and feel.

Click here for an overview of the yarns in each yarn group

At the top of all our patterns you’ll find a link to our yarn calculator, which is a helpful tool should you wish to use a different yarn than suggested. By filling in the yarn quality you wish to replace, the amount (in your size) and number of strands, the calculator will present good alternative yarns with the same knitting tension. Additionally it will tell you how much you’ll require in the new qualities and whether you’ll need to work with multiple strands. Most skeins are 50g (some are 25g or 100g).

If the pattern is worked with multiple colours, every colour will have to be calculated separately. Similarly, if the pattern is worked with several strands of different yarns (for example 1 strand Alpaca and 1 strand Kid-Silk) you will have to find alternatives for each, individually.

Click here to see our yarn calculator

Since different yarns have different qualities and textures we have chosen to keep the original yarn in our patterns. However, you can easily find options among our available qualities by using our yarn calculator, or simply pick a yarn from the same yarn group.

It is possible that some retailers still have discontinued yarns in stock, or that someone has a few skeins at home that they would like to find patterns for.

The yarn calculator will provide both alternative yarn as well as required amount in the new quality.

If you think it's hard to decide what size to make, it can be a good idea to measure a garment you own already and like the size of. Then you can pick the size by comparing those measures with the ones available in the pattern's size chart.

You'll find the size chart at the bottom of the pattern.

See DROPS lesson: How to read size chart

The needle size provided in the pattern serves only as a guide, the important thing is to follow the knitting tension. And since knitting tension is very individual, you will have to adjust the needle size to ensure that YOUR tension is the same as in the pattern – maybe you’ll have to adjust 1, or even 2 needle sizes, up or down to achieve the correct tension. For this, we recommend that you work test swatches.

Should you work with a different knitting tension than the one provided, the measurements of the finished garment might deviate from the measurement sketch.

See DROPS lesson: How to measure your tension/gauge

See DROPS video: How to make a tension/gauge swatch

Working a garment top-down provides more flexibility and room for personal adjustment. For example it is easier to try the garment on while working, as well as making adjustments to length of yoke and shoulder caps.

The instructions are carefully explaining every step, in the correct order. Diagrams are adjusted to the knitting direction and are worked as usual.

The diagram depicts all rows/rounds, and every stitch seen from the right side. It is read from bottom to top, from right to left. 1 square = 1 stitch.

When working back and forth, every other row is worked from the right side and every other row is worked from the wrong side. When working from the wrong side, the diagram will have to be worked reversed: from left to right, knit stitches are purled, purl stitches are knit etc.

When working in the round every round is worked from the right side and the diagram are worked from right to left on all rounds.

See DROPS lesson: How to read knitting diagrams

The diagram depicts all rows/rounds, and every stitch seen from the right side. It is worked from bottom to top, from right to left.

When working back and forth every other row is worked from the right side: from right to left and every other row is worked from the wrong side: from left to right.

When working in the round, every row in the diagram are worked from the right side, from right to left.

When working a circular diagram you start in the middle and work your way outwards, counter clockwise, row by row.

The rows usually start with a given number of chain stitches (equivalent to the height of the following stitch), this will either be depicted in the diagram or explained in the pattern.

See DROPS lesson: How to read crochet diagrams

Instructions for working several diagrams after each other on the same row/round, will often be written like so: “work A.1, A.2, A.3 a total of 0-0-2-3-4 times". This means you work A.1 once, then A.2 is worked once, and A.3 is repeated (in width) the number of times provided for your size – in this case like so: S = 0 times, M = 0 times, L=2 times, XL= 3 times and XXL = 4 times.

The diagrams are worked as usual: begin with the first row in A.1, then work the first row in A.2 etc.

See DROPS lesson: How to read knitting diagrams

See DROPS lesson: How to read crochet diagrams

The total width of the garment (from wrist-to-wrist) will be larger in the larger sizes, despite the actual sleeves being shorter. The larger sizes have longer sleeve caps and wider shoulders, so there will be a good fit in all sizes.

The measurement sketch/schematic drawing provides information regarding the full length of the garment. If it’s a jumper or a jacket the length is measured from the highest point on the shoulder closest to the neckline, and straight down to the bottom of the garment. It is NOT measured from the tip of shoulder. Similarly, the length of yoke is measured from the highest point on the shoulder and down to where yoke is split into body and sleeves.

On a jacket measures are never taken along bands, unless specifically stated. Always measure inside band stitches when measuring the length.

See DROPS lesson: How to read a schematic drawing

Diagrams are often repeated on the round or in height. 1 repeat is the diagram the way it appears in the pattern. If it says to work 5 repeats of A.1 in the round, then you work A.1 a total of 5 times after/next to each other in the round. If it says to work 2 repeats of A.1 vertically/in height you work the entire diagram once, then begin again at the start and work the entire diagram one more time.

Chain stitches are slightly narrower than other stitches and to avoid working the cast-on edge too tight, we simply chain more stitches to begin with. The stitch count will be adjusted on the following row to fit the pattern and measurement sketch.

The rib edge is more elastic and will contract slightly compared to, for example, stocking stitch. By increasing before the rib edge, you avoid a visible difference in width between the rib edge and the rest of the body.

It’s very easy to cast off too tightly, and by making yarn overs while casting off (and simultaneously casting these off) you avoid a too tight cast off edge.

See DROPS video: How to bind off with yarn overs (yo)

To achieve an even increase (or decrease) you can increase on, for example: every 3rd and 4th row alternately, like so: work 2 rows and increase on the 3rd row, work 3 rows and increase on the 4th. Repeat this until the increase is complete.

See DROPS lesson: Increase or decrease 1 st on every 3rd and 4th row alternately

Should you prefer to work in the round instead of back and forth, you may of course adjust the pattern. You’ll need to add steeks mid-front (usually 5 stitches), and follow the instructions. When you would normally turn and work from the wrong side, simply work across the steek and continue in the round. At the end you’ll cut the piece open, pick up stitches to work bands, and cover the cut edges.

See DROPS video: How to knit steeks and cut open

Should you prefer to work back and forth instead of in the round, you may of course adjust the pattern so you work the pieces separately and then assemble them at the end. Divide the stitches for the body in 2, add 1 edge stitch in each side (for sewing) and work the front and back pieces separately.

See DROPS lesson: Can I adapt a pattern for circular needles into straight needles?

Pattern repeats can vary slightly in the different sizes, in order to get the correct proportions. If you’re not working the exact same size as the garment in the photo, yours might deviate slightly. This has been carefully developed and adjusted so that the complete impression of the garment is the same in all sizes.

Make sure to follow instructions and diagrams for your size!

If you have found a pattern you like which is available in women’s size it’s not very difficult to convert it to men’s size. The biggest difference will be the length of sleeves and body. Start working on the women size that you think would fit across the chest. The additional length will be worked right before you cast off for the armhole/sleeve cap. If the pattern is worked top-down you can add the length right after the armhole or before the first decrease on sleeve.

Regarding additional yarn amount, this will depend on how much length you add, but it is better with a skein too many than too few.

All yarns will have excess fibres (from production) that might come off as lint or shedding. Brushed yarns (ie hairier yarns) have more of these loose, excess fibres, causing more shedding.

Shedding also depends on what is worn under or over the garment, and whether this pulls at the yarn fibres. It’s therefore not possible to guarantee that there will be no shedding

Below are some tips on how to get the best result when working with hairier yarns:

1. When the garment is finished (before you wash it) shake it vigorously so the looser hairs come off. NOTE: do NOT use a lint roller, brush or any method that pulls at the yarn.

2. Place the garment in a plastic bag and put it in your freezer - the temperature will cause the fibres to become less attached to each other, and excess fibres will come off easier.

3. Leave in the freezer for a few hours before taking it out and shaking it again.

4. Wash the garment according to the instructions on the yarn label.

Pilling is a natural process that happens to even the most exclusive of fibers. It's a natural sign of wear and tear that is hard to avoid, and that is most visible in high friction areas of your garment like a sweater's arms and cuffs.

You can make your garment look as new by removing the pilling, using a fabric comb or a pill/lint remover.

Still can't find the answer you need? Then scroll down and leave your question so one of our experts can try to help you. This will be done normally within 5 to 10 working days.
In the meantime, you can read the questions and answers that others have left to this pattern or join the DROPS Workshop on Facebook to get help from fellow knitters/crocheters!

You might also like...

Post a comment to pattern DROPS Extra 0-81

We would love to hear what you have to say about this pattern!

If you want to leave a question, please make sure you select the correct category in the form below, to speed up the answering process. Required fields are marked *.

Comments / Questions (33)

country flag Vivian wrote:

In this section “work all sts in stockinette sts at the same time bind off for leg openings at beg of every row, each side: 5 sts 1 time, 1 st 2 times, then inc 1 st each side on every other row 2 times,” does that mean to start the row by binding off 5 stitches in one stitch and then… knit 2 stitches, and then add 1 stitch at the end of the row? Does that mean to

02.10.2022 - 01:27

DROPS Design answered:

Dear Vivian, cast off 5 sts (not in one stitch, each individually) at the beginning of the row on the right side and at the beginning of the row on the wrong side. Next, cast off 1 stitch at the beginning of the next row from the right side and the next row from the wrong side. Repeat this 1-stitch cast off once more. Finally, on the next row, increase 1 stitch on the right side and don't increase on the wrong side; repeat this once more. Happy knitting!

03.10.2022 - 00:42

country flag Christl wrote:

Hallo drops team, ich bin jetzt beim hals angekommen. Das mit den verkürzten reihen verstehe ich. Aber dann kommt der teil mit dem abketten und noch 10cm weiter stricken. Das verstehe ich nicht. Bräuchte bitte hilfe. Lg

11.12.2021 - 09:50

DROPS Design answered:

Liebe Christl, die verkürzten Reihen stricken Sie nur 4 Mal (grössere Größe) und so: *die 22 Maschen auf der 1. Nadel (Untertail) im Bündchen wie zuvor stricken, wenden und die Rückreihe stricken, wenden und eine Runde wie zuvor stricken*, stricken Sie 3 Runde über alle Maschen wie zuvor, dann von *-* wiederholen. Dann 10 cm wie zuvor (ohne verkürzten Reihen) stricken. Viel Spaß beim stricken!

13.12.2021 - 09:03

country flag Lillian Greek wrote:

Jag stickar näst största storleken på tröja till hund 0-31 och det rekommenderade garnet tog slut innan jag började på hals och ben, trots att nästa storlek även den skulle ha 3 nystan.

19.11.2021 - 16:03

country flag Britta W wrote:

Hallo, was ist mit „Strumpfnadel“ gemeint? Ich kenne als Strumpfnadeln nur das Nadelspiel, aber in der Materialliste steht sowohl Nadelspiel als auch Strumpfnadel. Vielen Dank im Voraus für die Antwort

04.09.2021 - 18:13

DROPS Design answered:

Liebe Britta, ja genau mit "Strumpfnadel" ist "Nadelspiel" gemeint. Viel Spaß beim stricken!

06.09.2021 - 08:35

country flag Stanislava Obermajerova wrote:

Good afternoon. I need a help please. When it says : At the same time when piece measures 12 (12) 14 (14) cm inc 1 st each side for side seam. Does it mean on that row only or following all next rows? Thank you very much.

20.01.2021 - 19:02

DROPS Design answered:

Dear Mrs Obermajerova, you will increase only 1 time 1 stitch on each side = 2 stitches will be increased, these stitches are for seam allowance. Happy knitting!

21.01.2021 - 07:46

country flag Pomegranite wrote:

Hi there! Just want to confirm. On the back piece, when switching to stockinette (except for edges), the first 3 increases ("at the same time inc 1 st at each side inside 4 edge sts: first on every row 3 times") are done on both wrong and right side rows, so literally the next 3 rows? It seems pretty clear but not used to wrong side increases so thought I'd ask. Thanks so much for your time!

27.11.2020 - 00:04

DROPS Design answered:

Dear Pomegranite, correct the first 3 increases are worked on every row = from RS and from WS, then you increase on every other row = on every row from RS. Happy knitting!

27.11.2020 - 07:35

country flag Marilyn Raffaele wrote:

Thank you for your prompt reply to my earlier question but the pattern says that the extra two stitches are included in the 8 cast ons. I am still confused about this. Why doesn't the pattern just say cast on 10 if that is what is needed? Thank you and sorry to bother you again.

27.07.2019 - 21:38

DROPS Design answered:

Dear Marilyn, thank you for this info - well, there is little difference in Brittish and US wording, which I did not mention for the first time: so number of cast on sts is correct, but the 1 end st on each side is NOT worked into the rib (you knit this end sts in garter st). Hope now it will be ok :-) Happy knitting!

28.07.2019 - 09:45

country flag Marilyn Raffaele wrote:

For the bottom section of the dog sweater, it says cast on 8 with the one extra at each end. Then is says to to k2, p2 rib ending with a k2. That would need 10 stitches not 8. I am confused.

27.07.2019 - 20:15

DROPS Design answered:

Dear Marilyn, you need cast on 8 sts + 1 extra at each end, i.e. 8+2 = 10 sts. In that case you will be able to make k2/p2 rib with k2 at the end. Happy knitting!

27.07.2019 - 20:37

country flag Nancy Berube wrote:

Mon chien mesure 65 cm de long , et le patron le plus long 50 cm, alors je tricote plus long de combien?

02.03.2019 - 00:19

DROPS Design answered:

Bonjour Mme Berube, nous ne sommes malheureusement pas en mesure de pouvoir adapter chacun de nos modèles à chaque demande. Merci de bien vouloir contacter le magasin où vous avez acheté votre laine pour toute assistance individuelle. Bon tricot!

04.03.2019 - 07:45

country flag Gisela Hohn wrote:

Hallo, ich möchte wissen, wie hoch das Unterteil insgesamt gestrickt wird...? Danke im Voraus

19.01.2019 - 02:17

DROPS Design answered:

Liebe Frau Hohn, das Unterteil wird etwas länger als 20-24-28-35 cm messen (= nach dieser Länge stricken Sie noch 4 Reihen (Zunahmen)). Viel Spaß beim stricken!

21.01.2019 - 09:48