
Popular categories
Looking for a yarn?


|
|
Sarafina |
|
 |
 |
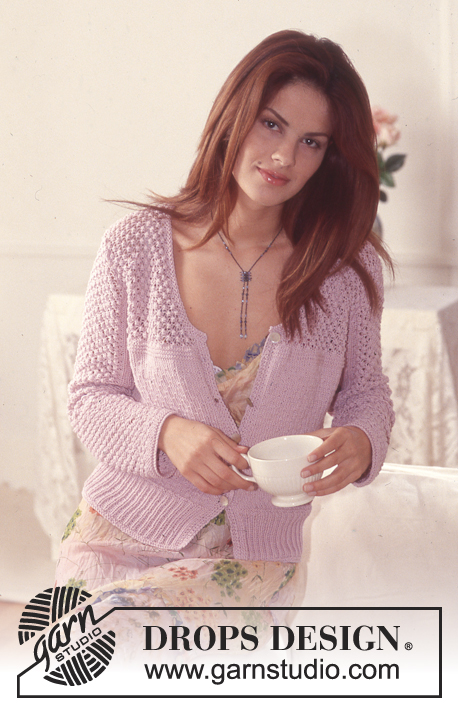
DROPS Cardigan in Angora-Tweed and Bomull-Lin.
DROPS 74-26 |
|
|
Gauge: 18 sts x 24 rows = 10 x 10 cm on larger needles in stockinette st. Garter st, when knitting flat: Knit all sts, all rows. Garter st, when knitting in the round: *Rnd 1, knit. Rnd 2, purl.* Repeat from * - *. Decreasing tips-1 (for raglan shaping): All decs are made on right side rows. 2 or 3 sts are decreased each time. Dec inside 2 edge sts as follows: After raglan sts: Put 2/3 sts on cable needle in back of work, knit 1st st on left needle and 1st st on cable needle tog. Repeat until all sts on cable needle have been bound off. Before raglan sts: Put 2/3 sts on cable needle in front of work. Slip 1st st on cable needle as if to knit, knit 1st st from left needle, psso, repeat until all sts on cable needle have been bound off. Decreasing tips-2 (for V-neck): All decs are made on right side rows. Dec 1 st inside 1 edge st as follows: After 1 edge st: Slip 1 st as if to knit, K 1, psso. Before 1 edge st: K 2 tog Buttonhole: Make buttonholes along right button band. 1 buttonhole = bind off 3rd st from edge and cast on 1 new sts on the next row. Make the last buttonhole when 2 rows garter st remain on button bands. Make buttonholes when the piece measures: Size S: 2, 9, 15, 22, 29 and 35 cm. Size M: 2, 9, 16, 23, 30 and 37 cm. Size L: 2, 9, 17, 24, 31 and 38 cm. Size XL: 2, 10, 17, 25, 32 and 40 cm. Size XXL: 2, 10, 17, 25, 33 and 41 cm. Body: Cast on 159-173-188-201-216 sts on smaller circular needles with Angora-Tweed and knit 2 rows garter st. Change to larger circular needles and stockinette st, but keep 4 edge sts at each side in garter st throughout for buttonbands. When the piece measures 10 cm dec 10 sts evenly distributed on the row = 149-163-178-191-206 sts. Change to smaller circular needles and Bomull-Lin and knit 2 rows garter st (start with right side row), change to Angora-Tweed and knit 2 rows garter st. Put a marker 39-42-46-49-53 sts in from each edge (for side) = 71-79-86-93-100 sts between markers (for back). Change to larger circular needles and Angora-Tweed and knit stockinette st to finished measurements (keep buttonbands in garter st). At the same time when the piece measures 14 cm inc 1 st at each side of markers at each side every 8-8-9-9-10 rows a total of 5 times = 169-183-198-211-226 sts. When the piece measures 31-32-33-34-35 cm knit the next row as follows (right side row): 38-41-45-48-52 sts (right front), bind off 12 sts for armhole, 69-77-84-91-98 sts (back), bind off 12 sts for armhole, 38-41-45-48-52 sts (left front). Lay piece aside and knit the sleeve. Sleeve: Cast on 41-43-45-47-49 sts on smaller double-pointed needles with Bomull-Lin; join and place a marker at the join. Knit 2 rows garter st. Change to larger double-pointed needles and knit stockinette st until the piece measures 11 cm. Now dec 4 sts evenly distributed on the row = 37-39-41-43-45 sts. Change to smaller double-pointed needles and knit 2 rows garter st, change to Angora Tweed and knit 2 rows garter st. Change back to larger double-pointed needles and Angora-Tweed and knit stockinette st to finished measurements. At the same time when the piece measures 14 cm inc 1 st each side of marker a total of 14-15-16-17-18 times: Sizes S + M: every 6 rows. Sizes L + XL: every 5 rows. Size XXL: alternately every 4th and 5th row = 65-69-73-77-81 sts. When the piece measures 51-51-50-50-49 cm bind off 6 sts each side of marker = 53-57-61-65-69 sts. Lay piece aside and knit another sleeve. Yoke: Put the sleeves in on the same circular needles as Body where the sts were bound off for armhole = 251-273-296-317-340 sts. Put markers in each transition between Body and Sleeve = 4 markers. Continue with stockinette st back and forth on needles and dec for raglan. Raglan shaping: Read entire next section before knitting: There are 8 places to dec per row and 2 sts between decs (1 st each side of marker). These 2 sts are the raglan sts and are knit in stockinette st. Dec every 4 rows – see decreasing tips-1 above: Fronts and Back: 3 sts 2-6-6-10-10 times and then 2 sts 9-5-6-2-3 times. Sleeve: 3 sts 1-1-1-3-3 times and then 2 sts 10-10-11-9-10 times. Neckband: At the same time when the piece measures 35-37-38-40-41 cm bind off 3 button band sts at each side. Then dec 1 st at each neck edge – see decreasing tips-2 – every other row 6-6-7-7-9 times and then every 4 rows 4 times. Note: the raglan shaping will overlap the neck shaping on the fronts, so all sts on fronts will be gone before the shaping is complete on the back. After all raglan and neck shaping is complete, approx. 39-48 sts remain on needles and the piece measures approx. 52-54-56-58-60 cm to shoulder. Neckband: Put sts around the neck on smaller circular needles, pick up approx. 32-38 sts along front neckbands with Bomull-Lin = 103-124 sts. Knit 2 rows garter st, change to Angora-Tweed and knit 2 rows garter st, bind off. Assembly: Sew opening under the sleeve and sew on buttons. |
|

|
|
|
Have you made this or any other of our designs? Tag your pictures in social media with #dropsdesign so we can see them! Do you need help with this pattern?You'll find tutorial videos, a Comments/Questions area and more by visiting the pattern on garnstudio.com. © 1982-2024 DROPS Design A/S. We reserve all rights. This document, including all its sub-sections, has copyrights. Read more about what you can do with our patterns at the bottom of each pattern on our site. |
|


With over 40 years in knitting and crochet design, DROPS Design offers one of the most extensive collections of free patterns on the internet - translated to 17 languages. As of today we count 304 catalogs and 11422 patterns - 11417 of which are translated into English (US/in).
We work hard to bring you the best knitting and crochet have to offer, inspiration and advice as well as great quality yarns at incredible prices! Would you like to use our patterns for other than personal use? You can read what you are allowed to do in the Copyright text at the bottom of all our patterns. Happy crafting!