
Popular categories
Looking for a yarn?


|
||||||||||||||||
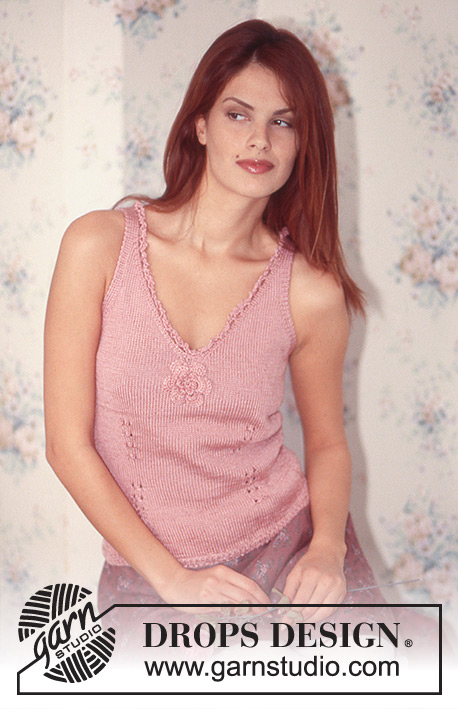
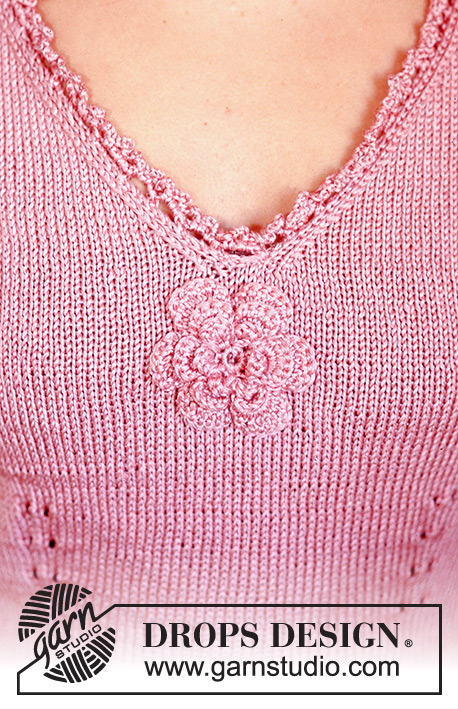
Ruffle Rose |
||||||||||||||||
 |
 |
|||||||||||||||
Knitted DROPS top in "Cotton Viscose" with crochet flower on front.
DROPS 74-11 |
||||||||||||||||
|
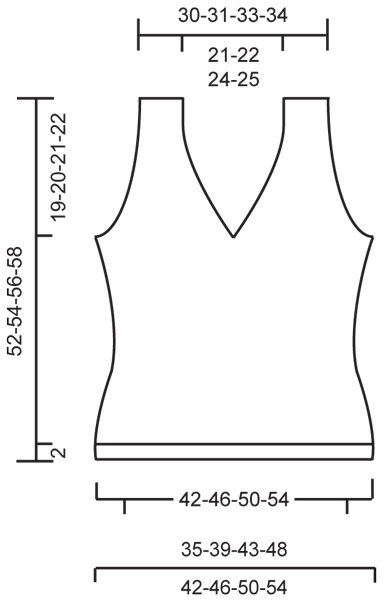
Knitting tension: 24 stitches x 32 rows = 10 x 10 cm with needle size 3 mm and stocking stitch. Remember needle size is only a guide! Ridge/Garter stitch (back and forth on needle): 1 ridge = Knit 2 rows. Rib: * K1, P1 *, repeat from *-*. Body shaping: Decrease and increase to shape front and back pieces according to diagrams - M.1 and M.2. The pattern in the diagram is seen from the right side. Decrease tip (for armholes and neck): All decreases are worked from the right side. Decrease on inside of: Armhole: 7 edge stitches which are worked as follows from the edge (seen from the right side): 1 stitch in garter stitch, then * K1, P1 * a total of 3 times. Neck: 3 edge stitches which are worked as follows from the edge (seen from the right side): 1 stitch in garter stitch, K1, P1. Decrease as follows after the edge stitches: Slip 1 as if to knit, K1, pass slipped stitch over. Decrease as follows before the edge stitches: K2 together. ---------------------------------------------------------- Body: Cast on 200-220-240-260 stitches with circular needle size 3 mm and Cotton Viscose, change to circular needle size 2.5 mm and work rib for 2 cm. Change back to circular needle size 3 mm, insert 1 marker thread at beginning of round and work the next round as follows: 10 stitches rib (start with K1), 79-89-99-109 stitches stocking stitch, 21 stitches rib (start with P1), 79-89-99-109 stitches stocking stitch, 11 stitches rib (start with P1). Continue with stocking stitch upwards and rib in the sides. Remember the knitting tension! When piece measures 6-7-8-9 cm insert marker threads for the shaping on front and back pieces as follows: 10 stitches rib, 17-21-25-29 stitches stocking stitch, insert 1 marker thread, 45-47-49-51 stitches stocking stitch, insert 1 marker thread, 17-21-25-29 stitches stocking stitch, 21 stitches rib, 17-21-25-29 stitches stocking stitch, insert 1 marker thread, 45-47-49-51 stitches stocking stitch, insert 1 marker thread, 17-21-25-29 stitches stocking stitch, 11 stitches rib. Then work M.1 over the marker threads in front and back (= shaping) - see arrow in diagram for marker thread. Repeat M.1 a total of 4 times = 168-188-208-228 stitches. After M.1 continue with stocking stitch and rib in the sides until piece measures 16-17-18-19 cm. Now work M.2 in the same way over the marker threads in front and back. Repeat M.2 a total of 4 times = 200-220-240-260 stitches. Read the whole of the next section before continuing! When piece measures 33-34-35-36 cm decrease to armholes and V-neck as follows: Cast off 3 stitches for armhole, 7 stitches rib, 36-41-46-51 stitches stocking stitch, P1, K1, 1 stitch garter stitch, slip next stitch, K1, pass slipped stitch over, K1, P1, 36-41-46-51 stitches stocking stitch, 7 stitches rib, cast off 7 stitches for armhole, 7 stitches rib, 79-89-99-109 stitches stocking stitch, 7 stitches rib, cast off 4 stitches for armhole. Each part is finished separately. Front piece: Place stitches on left side (when garment is worn) on a thread. Right side: = 46-51-56-61 stitches. Read the whole of the next section before continuing! Continue to decrease for armholes and V-neck - see Decrease tip! V-neck: 1 stitch every 2nd row a total of 25-26-28-29 times. Armhole: 1 stitch every 2nd row a total of 10-14-17-21 times = 11 stitches rib left for shoulder strap. Work until piece measures 54-56-58-60 cm, then cast off with knit over knit and purl over purl. Left side: Place stitches on thread back on needle = 46-51-56-61 stitches and work as for right side - First row is worked from mid front, i.e. from the wrong side - start by picking up 1 stitch in the middle stitch that was cast off and work it together with the first stitch on the needle (this is done so that there will not be a “jump” in the transition at bottom of V-neck). Back piece: = 93-103-113-123 stitches. Continue to decrease for armhole in the side as for front piece = 73-75-79-81 stitches. When piece measures 48-50-52-54 cm work rib over all stitches. When piece measures 50-52-54-56 cm cast off all stitches. Assembly: Sew the straps on each side of the back piece so that the stitches match. Crochet edge in neck: Work on inside of the 1 edge stitch around the neck with hook size 3 mm and Cotton Viscose. Row 1: 1 double crochet, * 5 chain stitches, skip 1 row/stitch (in the neck, skip 3 stitches), 1 double crochet in next row/stitch *, repeat from *-*, finish with 1 slip stitch in the first double crochet. Row 2: Work slip stitches to middle of first chain-space, * 5 chain stitches, 1 double crochet in next chain-space, 5 chain stitches, 1 double crochet in same chain-space *, repeat from *-*, finish with 5 chain stitches and 1 double crochet in first chain-space. Crochet flower: Work 4 chain stitches and form them to a ring with 1 slip stitch. Round 1: 6 double crochets in ring, finish with 1 slip stitch in first double crochet. Round 2: * 1 double crochet in double crochet, 3 chain stitches *, repeat from *-*, finish with 1 slip stitch in first double crochet. Round 3: 1 chain stitch, then work as follows in chain-space: * 1 double crochet, 1 chain stitch, 3 treble crochets, 1 chain stitch, 1 double crochet *, repeat from *-* in all spaces, finish with 1 slip stitch in first double crochet. Round 4: Turn piece, * work 1 double crochet in double crochet from round 2 (work around stitch from previous round, tighten strand), 5 chain stitches *, repeat from *-* a total of 6 times, finish with 1 slip stitch in first double crochet. Round 5: 1 chain stitch, then work as follows in chain-space: * 1 double crochet, 1 chain stitch, 5 treble crochets, 1 chain stitch, 1 double crochet *, repeat from *-* in all spaces. Finish with 1 slip stitch in first double crochet. Round 6: Turn piece, * work 1 double crochet in double crochet from round 2 (work around the stitch from the previous round, tighten strand), 7 chain stitches *, repeat from *-* a total of 6 times, finish with 1 slip stitch in first double crochet. Round 7: 1 chain stitch, then work as follows in chain-space: * 1 double crochet, 1 chain stitch, 1 treble crochet, 5 double treble crochets, 1 treble crochet, 1 chain stitch, 1 double crochet *, repeat from *-* in all spaces. Finish with 1 slip stitch in first double crochet. Cut strand and sew flower to mid front of top. |
||||||||||||||||
Diagram explanations |
||||||||||||||||
|
||||||||||||||||

|
||||||||||||||||
|
||||||||||||||||
|
Have you made this or any other of our designs? Tag your pictures in social media with #dropsdesign so we can see them! Do you need help with this pattern?You'll find tutorial videos, a Comments/Questions area and more by visiting the pattern on garnstudio.com. © 1982-2024 DROPS Design A/S. We reserve all rights. This document, including all its sub-sections, has copyrights. Read more about what you can do with our patterns at the bottom of each pattern on our site. |
||||||||||||||||


With over 40 years in knitting and crochet design, DROPS Design offers one of the most extensive collections of free patterns on the internet - translated to 17 languages. As of today we count 304 catalogues and 11422 patterns - 11422 of which are translated into English (UK/cm).
We work hard to bring you the best knitting and crochet have to offer, inspiration and advice as well as great quality yarns at incredible prices! Would you like to use our patterns for other than personal use? You can read what you are allowed to do in the Copyright text at the bottom of all our patterns. Happy crafting!
Comments / Questions (12)
Se puede hacer con dos agujas con las mismas indicaciones que tienen para aguja circular?
07.12.2021 - 06:36DROPS Design answered:
Hola Sonia, si, se puede. Tienes que dividir los puntos para el cuerpo en 2, agregar 1 punto de orillo a cada lado (para coser) y tejer la pieza del frente y la pieza de la espalda separadamente. Saludos!
07.12.2021 - 08:48Ik snap de tip bij het afkanten niet, brei 7 kantsteken, 1 ribbelsteek 1 recht 1 averechts. Normaal is toch bij afkanten dat je twee steken breit en de eerste steek over de tweede haalt of twee steken samenbreit😰.
13.07.2020 - 13:52DROPS Design answered:
Dag Carin,
Dit is een vertaalfout; in plaats van 'Tip afkanten' hoort er 'Tip minderen' te staan. Ik zal het zo aanpassen...
15.07.2020 - 18:26Bonjour, je vous remercie pour votre réponse et votre réactivité. Cordialement.
25.03.2020 - 10:03Bonjour, est-ce que ce modèle de débardeur 🎽 se tricote en rond avec l'aiguille circulaire ??? Pourquoi doit on monter les mailles avec l'aiguille circulaire numéro 3 et tout de suite tricoté les premiers rangs avec l'aiguille circulaire numéro 2, et enfin reprendre l'aiguille numéro 3 quelques rangs plus haut 🔝 ??? Je vous remercie par avance pour votre réponse. Cordialement.
24.03.2020 - 20:17DROPS Design answered:
Bonjour Mme Ribault, la styliste a probablement fait ce choix pour que le rang de montage ne soit pas trop serré. Vous montez les mailles avec l'aiguille 3 puis tricotez en rond, en côtes, avec l'aiguille 2,5. Bon tricot!
25.03.2020 - 09:48Merci pour votre réponse, et j\' avais bien compris qu'il me fallait diviser le nombre de maille par 2, par contre, à quel moment je vais faire les diagrammes 1 et 2(pinces)
13.02.2019 - 15:11DROPS Design answered:
Bonjour Mme Cluzeaud, nous ne sommes pas en mesure de pouvoir adapter chaque modèle à chaque demande, il vous faudra alors lire les explications pour adapter à votre façon de faire. Dans ce cas, on commence par 10 m en côtes et on termine par 11 m de côtes, au milieu du rang, on a 21 m en côtes = côtés, le début du tour commence par un côté (10 m), on a 21 m en côtes de l'autre côté et on termine par 11 m (= soit 21 m en côtes de chaque côté). Ajustez ainsi en fonction de votre taille le nombre de mailles. Votre magasin pourra vous aider si besoin, même par mail ou téléphone. Bon tricot!
14.02.2019 - 09:40Bonjour\r\nVos modèles sont jolis mais, je ne sais pas tricoter en rond, comment adapter le modèle avec des aiguilles normales.\r\nCordialement\r\nM. Cluzeaud
13.02.2019 - 14:46DROPS Design answered:
Bonjour Mme Cluzeaud, vous trouverez ici, comment adapter un modèle sur aiguilles droites. Bon tricot!
13.02.2019 - 14:56Bonjour, Je ne comprends pas les explications concernant les pinces. Les mailles en côtes sont elles situées aux côtés du top ? la jonction des mailles est elle le milieu du dos ? Merci pour votre réponse Cordialement VB
03.03.2018 - 10:25DROPS Design answered:
Bonjour Mme Blottiere, les tours commencent sur le côté = on commence par 10 m en côtes et on termine par 11 m de côtes et au milieu du tour, on aura 21 m en côtes (= 2ème côté). Bon tricot!
05.03.2018 - 08:26Hallo, ich verstehe das Muster nicht. Soll denn vier Mal je weils abgenommen werden (M.1) und danach später vier Mal (Muster2)durch Umschläge zugenommen werden???? Oder habe ich das falsch verstanden? Freundliche Grüße an alle Strickerinnen Nora
06.02.2015 - 18:08DROPS Design answered:
Sie haben das richtig verstanden. Sie müssen ja die Formgebung wie in der Schnittzeichnung erreichen, das erfolgt bei diesem Modell durch M.1 und M.2. Durch die Abnahmen in M.1 ergibt sich die Taillierung, dann mit den Zunahmen in M.2 erreichen Sie die Brustweite.
08.02.2015 - 16:06Hoi. Je moet 4 markeerringen plaatsen zoals beschreven. Brei M.1. Door de omslagen minder je 2 st per markeerdraad = 8 st per herhaling van M.1. Herhaal M.1 vier keer = 32 st minder. 260-32 st = 228 st. Ik hoop dat je nu verder kan. Succes ;o). Gr. Tine
14.03.2010 - 19:49Hallo, ik ben een leek in het breien en probeer patroon drops 74-11. Volgens de teltekening (denk ik) moet men boven elke merkdraad bij voor en achterpand 4 steken minderen, en dit 4 x herhalen, maar dan kom ik niet aan 228 steken of zie ik dit verkeerd. Of moet ik alleen minderen aan het voorpand?
06.03.2010 - 14:00