
Popular categories
Looking for a yarn?


|
|
DROPS 87-6 |
|
 |
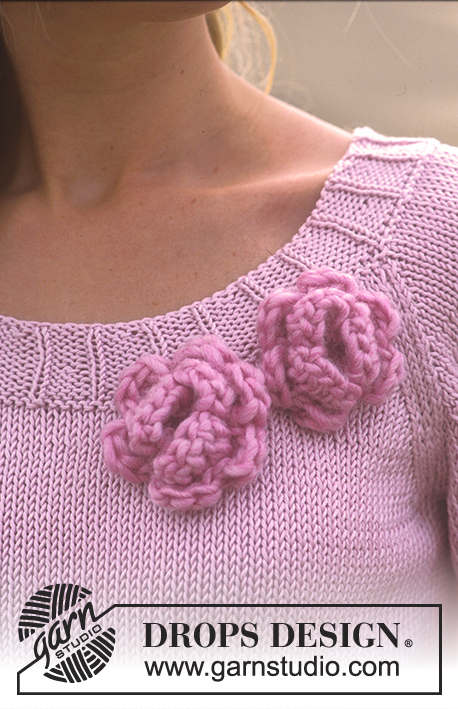 |
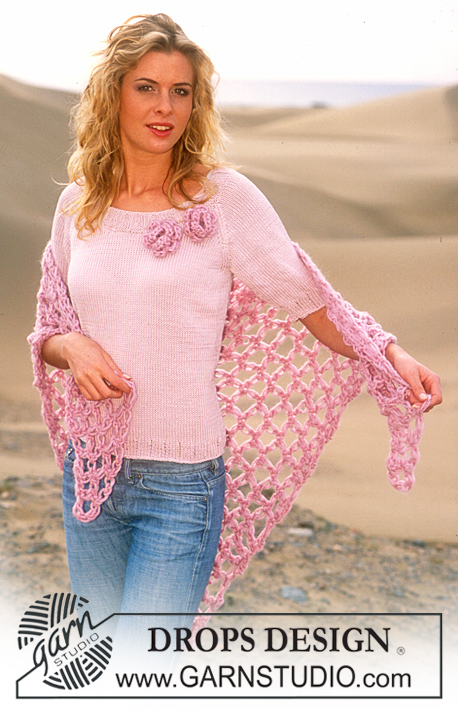
Small DROPS top with short sleeves and raglan in "Muskat", shawl and flower brooches in "Snow"
DROPS 87-6 |
|
|
Rib-1: * K 4, P 1 *, repeat from *-*. Rib-2: * P 4, K 1 *, repeat from *-*. Decrease tip (for raglan dec): Dec as follows in each transition between sleeve and body (start 3 sts before marker thread): K 2 tog, K 2 (marker thread is midway between these 2 sts), slip 1 st K-wise, K 1, lift the sl st over. Body: Cast on 160-175-190-215-240 sts with circular needle size 3.5 mm and Muskat. Work 1 round stocking st, then work Rib-1 for 4 cm. Change to circular needle size 4 mm and continue with stocking st while at the same time adjusting no. of sts to 160-176-192-216-240 sts on 1st round after rib. Insert 1 marker thread in each side. Remember knitting tension! When piece measures 8 cm inc 1 st on each side of both marker threads every 6 cm in total 4 times = 176-192-208-232-256 sts. When piece measures 32-33-34-35-35 cm cast off 10-10-10-12-12 sts in each side for armhole (i.e. 5-5-5-6-6 sts on each side of marker threads) = 78-86-94-104-116 sts remain for front and back pieces. Lay piece to one side and work sleeves. Sleeve: Cast on 55-60-60-65-70 sts with pointed needles size 3.5 mm and Muskat. Work 1 round stocking st, then work Rib-1 for 4 cm. Change to pointed needles size 4 mm and continue stocking st while at the same time adjusting no. of sts to 56-60-60-66-70 sts on 1st row after rib. At the same time, after rib inc 2 sts mid under arm every 2-2-1.5-1.5-1 cm in total 9-9-11-11-12 times = 74-78-82-88-94 sts. When sleeve measures 22-22-22-21-20 cm cast off 10-10-10-12-12 sts mid under arm = 64-68-72-76-82 sts. Lay piece to one side and work another sleeve. Carrying piece: Place sleeves on same circular needle as body, where there is cast off for armholes = 284-308-332-360-396 sts. Insert 1 marker thread in all transitions between body and sleeves = 4 marker threads. Work 3-2-1-0-0 rounds before dec starts. Raglan decrease: Dec 1 st on each side of all marker threads = 8 dec per round. Dec every 2nd round 17-19-21-23-26 times – see Decrease tip. Neckline: At the same time when piece measures 39-41-43-44-46 cm place middle 16-20-20-24-30 sts on a thread for neck. Continue to dec in each side towards neck every 2nd row: 2 sts 3-3-4-4-4 times and 1 st 5-5-5-6-6 times. After all dec for raglan and neck there are 110-114-118-124-130 sts on needle. Neck: Knit up approx 36 - 60 sts (incl sts from thread) in neck at front with Muskat and place all sts on pointed needles size 3.5 mm = approx. 146 - 190 sts. Work 1 round P, then work 1 round K while at the same time dec evenly to 145-155-160-165-170 sts. Then work Rib-2. When Rib-2 measures 2 cm dec every other P section from 4 P to 3 P = 131-140-144-149-153 sts. When rib measures 4 cm dec remaining 4 P to 3 P = 116-124-128-132-136 sts. Then loosely cast off with K over K and P over P. Assembly: Sew opening under sleeves. ________________________________________ Shawl: Shawl: Worked from bottom upwards - see fig.1 1st row: Crochet 1 ch with hook size 10 mm and Snow. * Pull st on hook long – approx. 3 cm, 1 YO, pull YO through st, put hook through loop made behind the long st (might need to help by using thumb and index finger round loop) - see fig.2, 1 YO, pull yarn through loop (= 2 sts on hook), 1 YO, pull YO through the 2 sts on hook * (from *-* = 1 love knot). Repeat from *-* 3 times more (= 4 love knots) and form to a ring with 1 dc in 1st ch worked. 2nd row: Turn piece, work 3 love knots, 1 dc in 3rd love knot from 1st row (work in knot itself, not chain), work 3 love knots and 1 dc in 2nd love knot from 1st row (= 2 squares on row). 3rd row: Turn piece, work 1 love knot and fasten with 1 dc in 2nd knot from previous row (i.e.in last square worked) – the piece has now been turned so that you are ready to continue working row: Work 3 love knots, 1 dc in top of last square from previous row, 2 love knots, 1 dc in top of next square, 3 love knots, 1 dc in 1st knot in 1st square from previous row (= 3 squares on hook). 4th row: Turn piece, work 1 love knot and fasten with 1 dc in 2nd knot in last square – the piece has now been turned so you are ready to continue working row: Work 3 love knots, 1 dc in top of last square from previous row, 2 love knots, 1 dc in top of next square, 2 love knots, 1 dc in top of next square, 3 love knots, 1 dc in 1st knot in 1st square from previous row (= 4 squares on row). Continue in same way upwards, turn each row as explained in 3rd row and continue so that there is one more square on each row. Work 3 love knots in each side and 2 love knots on rest of row (every square has 4 love knots). When 26 rows have been worked (or to desired length) cut strand. ________________________________________ Flower brooch: Flower: Crochet 4 ch with hook size 6 mm and Snow and form to a ring with 1 sl st. 1st round: 1 dc around ring, * 3 ch, 1 dc around ring *, repeat from *-* in total 2 times and finish with 3 ch and 1 sl st in 1st dc at beg of round = 3 ch-spaces. 2nd round: 1 ch, continue as follows in each ch-space: 1 sl st, 5 tr and 1 sl st. Turn piece, next round worked from back of flower. 3rd round: 1 ch, work 1 dc around dc from 1st round, * 3 ch, work 1 dc in bottom of 3rd tr from 2nd round (i.e. in middle of leaf’s bottom edge), 3 ch, 1 dc around next dc from 1st round, * repeat from *-* until 5 ch-spaces are worked, finish with 3 ch and 1 sl st in 1st ch at beg of round = 6 ch-spaces. Turn piece, next round worked from front of flower. 4th round: 1 ch, continue as follows in each ch-space: 1 sl st, 3 tr and 1 sl st, finish with 1 sl st in 1st ch at beg of round. Work 1 more flower. Cut and fasten strands and sew a safety pin to back of each flower. |
|

|
|
|
Have you made this or any other of our designs? Tag your pictures in social media with #dropsdesign so we can see them! Do you need help with this pattern?You'll find tutorial videos, a Comments/Questions area and more by visiting the pattern on garnstudio.com. © 1982-2024 DROPS Design A/S. We reserve all rights. This document, including all its sub-sections, has copyrights. Read more about what you can do with our patterns at the bottom of each pattern on our site. |
|


With over 40 years in knitting and crochet design, DROPS Design offers one of the most extensive collections of free patterns on the internet - translated to 17 languages. As of today we count 304 catalogues and 11422 patterns - 11422 of which are translated into English (UK/cm).
We work hard to bring you the best knitting and crochet have to offer, inspiration and advice as well as great quality yarns at incredible prices! Would you like to use our patterns for other than personal use? You can read what you are allowed to do in the Copyright text at the bottom of all our patterns. Happy crafting!
Comments / Questions (4)
Drops 87-6 - Jeg er kommet til det sted, hvor jeg skal sætte de midterste masker på tråd til hals, strikke videre med raglanindtagninger og senere lave hals. Jeg forstår ikke, hvordan jeg kan strikke videre rundt på rundpinden efter at have sat masker på pind, så bliver der jo med de 16 masker et så lille bitte hul, at det da ikke kan blive til noget et hoved kan komme igennem? Og jeg skal da ikke til at strikke frem og tilbage, vel ?
24.05.2021 - 14:40DROPS Design answered:
Hei Jette. Jo, når du har satt masker på en tråd skal det strikkes frem og tilbake. mvh DROPS design
26.05.2021 - 09:57Hola me prodriais decir como se hace el chal? Muchas Gracias
25.09.2015 - 17:58DROPS Design answered:
Hola Yolanda. Para hacer el chal mira Drops 87-5.
27.09.2015 - 18:06Dans la traduction française, il manque les augmentations des manches! merci christine
26.05.2015 - 10:19DROPS Design answered:
Bonjour Christine et merci, les augmentations ont été ajoutées. Bon tricot!
26.05.2015 - 11:03Smakfull!
03.03.2006 - 12:02