
Popular categories
Looking for a yarn?


|
|
DROPS 92-23 |
|
|
|
|
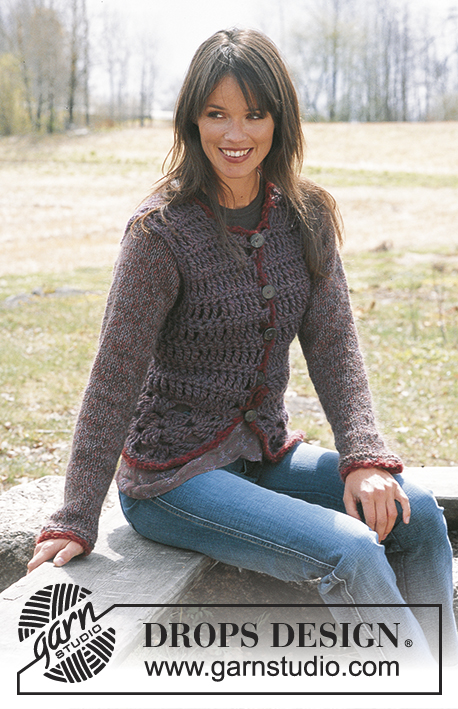
DROPS Long cardigan and Scarf with crochet hat.
DROPS 92-23 |
|
|
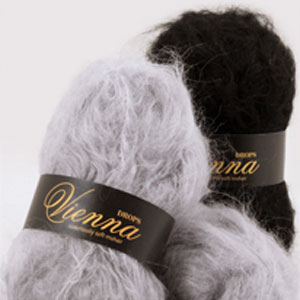
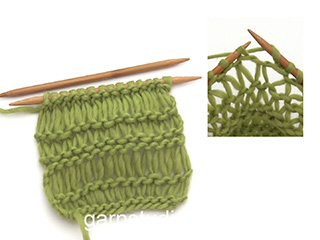
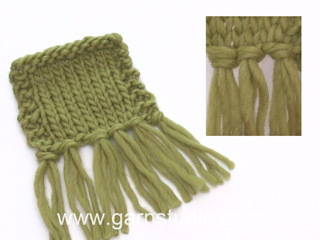
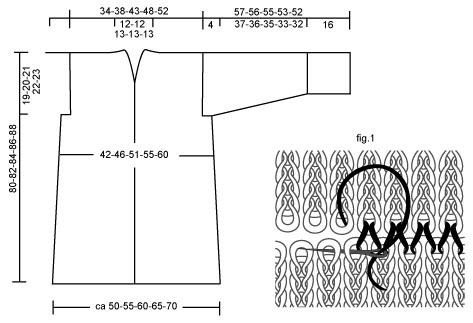
Gauge: 13 sts in Hyacinth pattern = approx. 10 cm in width, 2 repeats in height = approx. 14 cm. Hyacinth pattern: Row 1 (= wrong side): * P 5 tog, in the next st knit K 1, P 1, K 1, P 1 and K 1 (= 5 sts) *, repeat * - *. Rows 2 and 4 (= right side): Purl all sts. Row 3 (= wrong side): * in the next st knit K 1, P 1, K 1, P 1 and K 1 (= 5 sts), P 5 tog *, repeat * - *. Row 5 (= wrong side): * insert needle in the next st as if to K, wrap yarn 3 times around needle before pulling through st *, repeat * - *. Row 6 (= right side): K first loop of every st, letting the 2 others drop. Buttonband: The buttonbands are knit in garter st but on every 5th row of the pattern, knit buttonband sts as follows (from the center front edge): * 3 yo on needle, K 1 *, repeat * - * over all buttonband sts. On 6th row of the pattern knit garter st as before but let the yos from previous row drop. Increasing tips (for sleeves): Inc 1 st at each side by knitting 2 sts in edge st. Knit the increased sts in garter st and 5th and 6th rows of pattern as on buttonbands. Measuring tips: Make all length measurements when the piece is held up, otherwise the garment will be too long when worn. BACK Read entire back instructions before knitting: Cast on 60-66-72-78-84 sts around 2 needles (so that the cast-on edge will be elastic). Pull out one needle and knit garter st. When the piece measures 6 cm knit the next row as follows (wrong side row): K 3 (edge sts knit in garter st), Hyacinth pattern – see instructions above – over the next 54-60-66-72-78 sts and K 3 (edge sts knit in garter st). Continue the pattern as established but on 5th row of the pattern knit the 3 outermost sts at each side in the same manner as for buttonband above. On 6th row knit as for buttonbands. When the piece measures 12 and 36 cm dec 1 edge st at each side = 56-62-68-74-80 sts – do not dec on 5th or 6th row of the pattern. After first dec, you will have 2 edge sts in garter st; after 2nd dec, you will have only 1 edge st in garter st. When the piece measures 61-62-63-64-65 cm – read Measuring tips – bind off 6 sts at each side for armholes = 44-50-56-62-68 sts remain on needles. Continue Hyacinth pattern with 1 edge st in garter st at each side. When the piece measures approx. 76-78-80-82-84 cm – adjust to end after 6th row of the pattern – knit garter st to finished measurements. When the piece measures 78-80-82-84-86 cm bind off the center 12-12-14-14-14 sts for the neck. On the next row dec 1 st at each neck edge = 15-18-20-23-26 sts remain on each shoulder. Knit 1 row more and then bind off loosely. Right front: Cast on 35-39-41-45-47 sts around 2 needles. Pull out one needle and knit garter st. When the piece measures 6 cm – adjust to match back – knit the next row as follows (wrong side row): K 3 (edge sts in garter st), Hyacinth pattern over the next 24-30-30-36-36 sts and K 8-6-8-6-8 (buttonband sts knit in garter st). Continue the pattern as on back but on the 5th and 6th rows knit buttonband following instructions above. When the piece measures 24 and 48 cm dec 1 st at the side as on back = 33-37-39-43-45 sts. When the piece measures 61-62-63-64-65 cm bind off for armhole at the side as on back = 27-31-33-37-39 sts remain on needles. Continue the pattern with 1 edge st in garter st at the side and buttonband as before. When the piece measures approx. 76-78-80-82-84 cm – adjust to match back – knit garter st to finished measurements. When the piece measures 80-82-84-86-88 cm bind off the outermost 15-18-20-23-26 sts for shoulder. Continue with garter st over the remaining 12-13-13-14-13 sts for the neck edge. When neckband measures approx. 5-6 cm from shoulder put sts on a st holder. Left front: Knit the same as the right, reversing shaping. Sleeve: Cast on 28-30-32-34-36 sts around 2 needles. Pull out one needle and knit garter st for 16 cm (adjust so that the next row is a wrong side row), increasing to 32-32-38-38-38 sts evenly spaced on the 1st row. Now knit Hyacinth pattern, keeping 1 edge st at each side in garter st. On 5th row of the pattern make 3 yo on needle inside the 1 edge st in garter st at each side and on 6th row let yos drop, as on Body. When the piece measures 18 cm inc 1 st at each side every 4.5-4-4-3.5-3 cm a total of 8-9-8-9-10 times – see Increasing tips above = 48-50-54-56-58 sts. When the piece measures 53-52-51-49-48 cm put a marker at each side (to show where sleeves shall be sewn to Body) – and knit garter st to finished measurements (adjust to end after a whole repeat of Pattern). Bind off loosely when the piece measures 57-56-55-53-52 cm. Note: The sleeves are shorter in the larger sizes because of the shoulder drop. Assembly: Sew shoulder seams. Neckband: Join neckband at center back with Kitchener st – see Fig.1 on page 60 of Drops No. 92. Sew to neck with seam to wrong side. Collar: Start approx. 15 cm down from shoulder on right front. Pick up approx. 50 - 60 sts (incl. yos as described below) up along right front, around the neck and approx. 15 cm down along left front. When you pick up sts in the elongated sts make as follows: * Pick up 1 st, yo *, repeat * - * 3-4 times in each long st. Knit garter st for 14 cm – bind off loosely. Assembly: Sew side seams. Match up the elongated sts and sew so that the seam will not be too tight. Sew sleeve seams in the same manner up to the marker and sew sleeves into Body. The marker on sleeves should match up with the side seams. Belt: Cast on 6 sts around 2 needles. Pull out one needle and knit garter st. When belt measures approx. 120 cm, or to desired length, bind off all sts. SCARF: Measurements: approx. 20 x 260 cm [7-⅞" x (incl. fringe) Materials: DROPS VIENNA from Garnstudio 100 gr nr 43, light brown and use: DROPS SNOW from Garnstudio 50 gr nr 09, dusty pink DROPS 8 mm [US 11] needles, or size needed to obtain correct gauge. Gauge: 8 sts with Vienna and elongated sts = approx. 10 cm in width. Pattern: Row 1 (= right side): knit all sts. Row 2 (= wrong side): knit all sts. Row 3 (= right side): K 1 (edge st knit in garter st), * 3 yo on needle, K 1 *, repeat * - * and finish with 3 yo on needle and K 1 (edge st knit in garter st). Row 4 (= wrong side): knit all sts and let yos from previous row drop (= elongated st). SCARF Cast on 16 sts around 2 needles with Vienna (so that the cast-on edge will be elastic). Pull out one needle and K 2 rows garter st. Then knit Pattern – see instructions above. When the piece measures approx. 200 cm (measure when piece is held up) K 2 rows garter st and then bind off all sts loosely – so that bound-off edge will not be too tight, make and bind off a yo every 4 sts. Fringe: Fasten 5 fringe tufts at each end. 1 fringe tuft = cut 2 strands Vienna + 4 strands Snow (= 6 strands) approx. 60 cm long, fold in half and pull loops through edge of scarf, then pull ends through loops. If yarn curls, wet strands and shake hard, then let dry. HAT: Sizes: one-size Materials: DROPS SNOW from Garnstudio 100 gr nr 23, beige and use: DROPS VIENNA from Garnstudio small amount Vienna nr 44, dark brown (for pompoms) DROPS 6 mm [US J] crochet hook, or size needed to obtain correct gauge. Crochet gauge: 7 dc with Snow = approx. 10 cm in width. Crochet tips: Replace the 1st dc of each row with ch 3 and end each row with 1 sl st in ch 3 at start of row. HAT Ch 4 with Snow and join into a ring with 1 sl st in 1st ch. Round 1: 8 dc in ring. Round 2: 2 st in each dc = 16 dc Round 3: * 1 dc in first dc, 2 dc in the next dc *, repeat * - * around row = 24 dc. Round 4: * 1 dc in each of the 2 first dc, 2 dc in the next dc *, repeat * - * = 32 dc. Round 5: * 1 dc in each of the 3 first dc, 2 dc in the next dc *, repeat * - * = 40 dc. Rounds 6 - 8: 1 dc in each dc. Round 9: Crochet dc, decreasing 2 dc by skipping over 2 dc evenly distributed on the row = 38 dc. Round 10: 1 dc in each dc. Round 11: 1 sc in each dc. Rounds 12-13: 1 sc in back loop of sc from previous row. Round 14: 1 sc in 1st sc from previous row, * ch 3, 1 dc in the 1st of these ch 3, skip over approx. 3 cm, 1 sc in st *, repeat * - * and finish with ch 3, 1 dc in 1st ch, skip over approx. 3 cm, 1 sl st in 1st sc at start of row. Pompom: Make 3 pompoms in Vienna with a diameter approx. 5 cm. Cut 3 strands Snow approx. 15 - 25 cm long (the 3 strands can be different lengths). Fasten pompoms to strands of Snow and then fasten to top of hat. |
|
|
|
|
Have you made this or any other of our designs? Tag your pictures in social media with #dropsdesign so we can see them! Do you need help with this pattern?You'll find tutorial videos, a Comments/Questions area and more by visiting the pattern on garnstudio.com. © 1982-2024 DROPS Design A/S. We reserve all rights. This document, including all its sub-sections, has copyrights. Read more about what you can do with our patterns at the bottom of each pattern on our site. |


With over 40 years in knitting and crochet design, DROPS Design offers one of the most extensive collections of free patterns on the internet - translated to 17 languages. As of today we count 304 catalogs and 11422 patterns - 11417 of which are translated into English (US/in).
We work hard to bring you the best knitting and crochet have to offer, inspiration and advice as well as great quality yarns at incredible prices! Would you like to use our patterns for other than personal use? You can read what you are allowed to do in the Copyright text at the bottom of all our patterns. Happy crafting!
Comments / Questions (7)
J'ai remarqué une erreur pour le devant droit: "A 24 et 48 cm de hauteur totale, diminuer 1 m sur le côté comme pour le dos = 33-37-39-43-45 m. A 61-62-63-64-65 cm de hauteur totale, former l’emmanchure sur le côté comme pour le dos = 33-37-39-43-45 m. " Comme les instructions du dos indiquent "rabat 6 m de chaque côté pour les emmanchures" nous devrions nous retrouver avec 31 mailles et non 37 comme c'est indiqué dans l'explication.
03.05.2016 - 15:40DROPS Design answered:
Bonjour Eucharis, effectivement, après l'emmanchure, il reste 27-31-33-37-39 m pour le devant. Le nbe de mailles a été corrigé, merci. Bon tricot!
03.05.2016 - 15:58Barbara Sepúlveda wrote:
Siguiendo las instrucciones de éste patrón el gorro es muy pequeño, no es una talla para mujer
30.06.2015 - 01:05Hallo. Im Vorderteil habe ich nach dem Ärmelloch weitergestrickt und soll nun gegen die Schulter noch einmal 15M abnehmen und dann noch einmal 5-6cm weiterstricken? Dann gibt es aber doch einen großen Absatz, wie soll da der Ärmel herinpassen? Kann es sein dass hier ein Fehler vorliegt und die 15M gegen den Hals abgekettet werden müssten? Vielen Dank!
08.11.2013 - 00:08DROPS Design answered:
Liebe Alisa, nein es liegt kein Fehler vor: es sind die Schultermaschen, die abgekettet werden. Das Stück hat an der Schulter die fertige Höhe erreicht. Über die restlichen Maschen wird für die Halsblende weitergestrickt.
08.11.2013 - 08:44Essayez avec un crochet, peut être y arriverez vous plus facilement ?
29.02.2008 - 09:27Avez vous une astuce pour tricoter 5 m ens, j'arrive à atteindre 4 m mais 5 !!! Merci d'avance
26.02.2008 - 14:34Hallo Daan, Als het niet lukt 5 st av samen te br kunt u ook 2 st av afh 3 st samenbr en de afgeh st overhalen. De 5e en de 6e nld gewoon breien volgens het patroon dan gaan de randen niet intrekken.
15.04.2007 - 19:39Goedemiddag, Op zich is het patroon duidelijk, alleen lukt t mij niet om bij het hyacintmotief, 5 av samen te breien, heeft u een uitleg voor mij hoe ik dit moet doen? Daarnaast is het voor mij niet helemaal duidelijk in het patroon hoe ik de 5e en 6e nld moet breien aan het begin en einde, zodat de kanten niet gaan samentrekken?! Kunt hier ook een duidelijkere uitleg over geven? Alvast hartelijk dank! Daan
10.04.2007 - 13:26