
Popular categories
Looking for a yarn?


|
|
DROPS 88-21 |
|
|
|
|
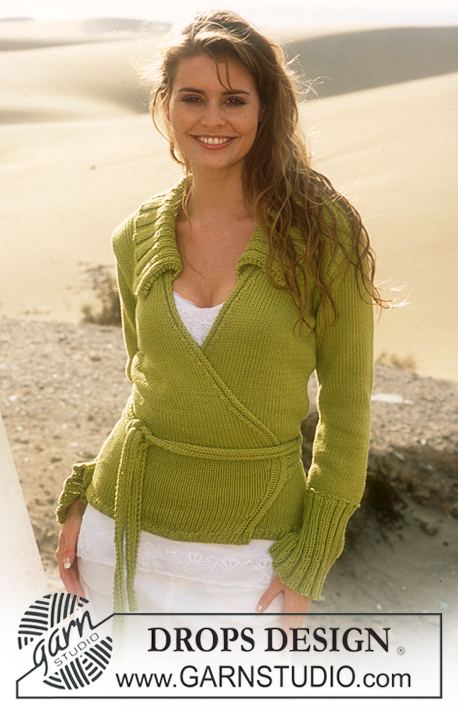
Knitted wrap-over top in "Paris"
DROPS 88-21 |
|
|
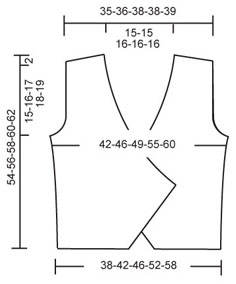
Knitting tension: Remember needle size is only a guide. 17 stitches x 22 rows with needle size 5 mm and stocking stitch = 10 x 10 cm. Ridge/Garter stitch (back and forth on needle): 1 ridge = Knit 2 rows. Increase tip (for front pieces): Increase inside 1 stitch in garter stitch by making 1 yarn over. On next row, purl yarn over twisted to avoid holes. All increases are worked from right side! Decrease tip (for armholes and neck): Decrease inside 1 stitch in garter stitch. All decreases are made from right side! Decrease as follows after 1 stitch in garter stitch: Slip 1 stitch as if to knit, K1, pass slipped stitch over. Decrease as follows before 1 stitch in garter stitch: K2 together. ---------------------------------------------------------- Back piece: Cast on 66-74-80-90-100 stitches (incl. 1 edge stitch in each side) with needle size 5 mm and pistachio and work 1 ridge. Then continue with stocking stitch. Remember the knitting tension! When piece measures 10 cm increase 1 stitch in each side every 6-9-9-9-15 cm a total of 4-3-3-3-2 times = 74-80-86-96-104 stitches. When piece measures 36-37-38-39-40 cm decrease for armholes in each side every 2nd row - see Decrease tip: 3 stitches 1 time, 2 stitches 1-2-2-3-4 times and 1 stitch 2-2-4-7-8 times = 60-62-64-64-66 stitches. Read the rest of back piece before continuing. Neck decreases: When piece measures 51-53-55-57-59 cm work 1 ridge over the middle 26-26-28-28-28 stitches. Then cast off the middle 24-24-26-26-26 stitches for neck. Then decrease 1 stitch on next row towards neck - see Decrease tip. Decreases for shoulders: At the same time, when piece measures 52-54-56-58-60 cm decrease outermost on each shoulder every 2nd row: 5-6-6-6-6 stitches 1 time and 6 stitches 1 time, then cast off the remaining 6-6-6-6-7 stitches when piece measures 54-56-58-60-62 cm. Right front piece: Cast on 25-29-32-37-42 stitches (incl. 1 edge stitch in side) with needle size 5 mm and pistachio and work 1 ridge. Continue with stocking stitch but the outermost stitch towards mid front is worked in garter stitch to finished length. Read the whole of front piece before continuing. Increases towards mid front: At the same time, on the first knitted row after the ridge increase towards mid front every 4th row - see Increase tip: 1 stitch 0-2-3-5-6 times and then every 2nd row: 1 stitch 22-20-19-17-16 times. Side increases: At the same time, when piece measures 10 cm increase in the side as for back piece. Neck: At the same time, after you have finished increases towards mid front, work 2 rows stocking stitch, (piece now measures approx. 22-23-24-25-26 cm), then decrease every 2nd row - see Decrease tip: 1 stitch 21-22-23-24-24 times, then every 4th row: 1 stitch 6-6-6-6-7 times. Armhole: At the same time, when piece measures 36-37-38-39-40 cm decrease for armhole in the side as for back piece. Decreases for shoulder: At the same time, when piece measures 52-54-56-58-60 cm cast off the outermost 5-6-6-6-6 stitches towards the side on the wrong side. On the next purl row cast off 6 more stitches. Cast off the remaining 6-6-6-6-7 stitches when piece measures 54-56-58-60-62 cm. Left front piece: Cast on 25-29-32-37-42 stitches (incl. 1 edge stitch in side) with needle size 5 mm and light mint green and work as for right, but reversed. Assembly: Sew shoulder seams. Closing: There are 2 alternatives: Closing-1 (as shown in picture): Twist 1 strand pistachio and 1 strand light mint green so that when folded double, they continue to twist, tie 1 knot in the end. Make 2 such cords of approx. 35 cm each and fasten one to the right front piece, towards mid front on the widest part. The other cord is fastened to the left front piece, approx. 16 cm in from mid front on the widest part. Crochet button loop: Work on the widest part of the left front piece towards mid front. Work with hook size 4 mm and 1 strand Paris as follows: 1 double crochet in stitch, 5 chain stitches, fasten with 1 double crochet approx. 1 cm further down, turn and work back 6 double crochets around the chain-space, finish with 1 slip stitch in the first double crochet from the previous row. Sew on button approx. 16 cm in from mid front on the back of the widest part of the right front piece, so that the left front piece is held in place. Closing-2: Twist 2 strands and fasten one cord to the right front piece (approx. 35 cm long) as described under Closing-1. Fasten the other cord (approx.115-155 cm long) in the same way, but on the left front piece. The left cord must be longer than the right because it will go around your waist on the inside of the top and out through 1 opening in the side seam – see description below. Tie the cords at the side. Sew side seams – if you would like Closing-2 leave an opening of approx. 1 cm 20-21-22-23-24 cm from the cast-on edge in the left side. |
|
|
|
|
Have you made this or any other of our designs? Tag your pictures in social media with #dropsdesign so we can see them! Do you need help with this pattern?You'll find tutorial videos, a Comments/Questions area and more by visiting the pattern on garnstudio.com. © 1982-2024 DROPS Design A/S. We reserve all rights. This document, including all its sub-sections, has copyrights. Read more about what you can do with our patterns at the bottom of each pattern on our site. |


With over 40 years in knitting and crochet design, DROPS Design offers one of the most extensive collections of free patterns on the internet - translated to 17 languages. As of today we count 304 catalogues and 11422 patterns - 11422 of which are translated into English (UK/cm).
We work hard to bring you the best knitting and crochet have to offer, inspiration and advice as well as great quality yarns at incredible prices! Would you like to use our patterns for other than personal use? You can read what you are allowed to do in the Copyright text at the bottom of all our patterns. Happy crafting!
Comments / Questions (6)
Hi there. I am really struggling to understand decrease to armholes. Any chance you could make a video?
11.06.2022 - 22:24DROPS Design answered:
Dear Mrs Megyeri, you will first cast off for the armhole at the beginning of every row both from the right side and from the wrong side then decrease 1 stitch as explained under Decrease tip (for armholes and neck):. Happy knitting!
13.06.2022 - 09:12Hallo! Ich habe bei der Anleitung zu Modell 88-21 Fehler festgestellt: es wurde zweimal das linke Vorderteil beschrieben.\r\nBeim Rückenteil ist nicht klar abnehmen oder zunehmen ............74-80-86-96-104 M. \r\nIch bin von den Modellen sehr begeistert und finde die Anleitungen normalerweise sehr klar und deutlich.\r\nLiebe Grüsse aus dem heissen Italien\r\nGisela
12.08.2020 - 07:22DROPS Design answered:
Guten Tag, die Anleitung wurde soeben komplett umformuliert. Vielleicht ist es nun klarer. Bei den Vorderteil müssen Sie darauf achten, dass Sie das eine Vorderteil gegengleich (spiegelverkehrt) zum anderen Vorderteil arbeiten. Gutes Gelingen!
12.08.2020 - 11:01Hola! En la foto parece que todo el contorno se ha rematado con aguja de ganchillo.. es asi? Muchas gracias por todos estos patrones tan preciosos.
17.04.2020 - 00:30DROPS Design answered:
Hola! Es verdad, el contorno se ha rematado con aguja de ganchillo. Buen trabajo!
04.11.2020 - 17:57Bonjour, comment faire pour augmenter 1 m coté milieu pour le devant? merci
20.02.2015 - 18:54DROPS Design answered:
Bonjour Mme Deverre, on augmente à 1 m du bord côté milieu devant en faisant 1 jeté - tricotez le jeté torse à l'env au rang suivant pour éviter les trous. Bon tricot!
21.02.2015 - 09:25Thank you Tomme. Last line added.
01.01.2010 - 11:34The last line of the pattern is incomplete. It ends with the instruction to leave an opening "20-21-22-23-24 cm up from " -- up from what, the bottom of the vest?
01.01.2010 - 01:25