
Popular categories
Looking for a yarn?


|
|
DROPS 91-27 |
|
|
|
|
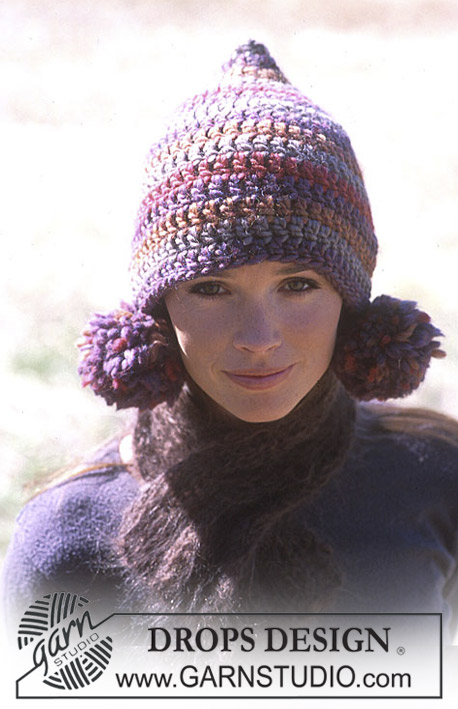
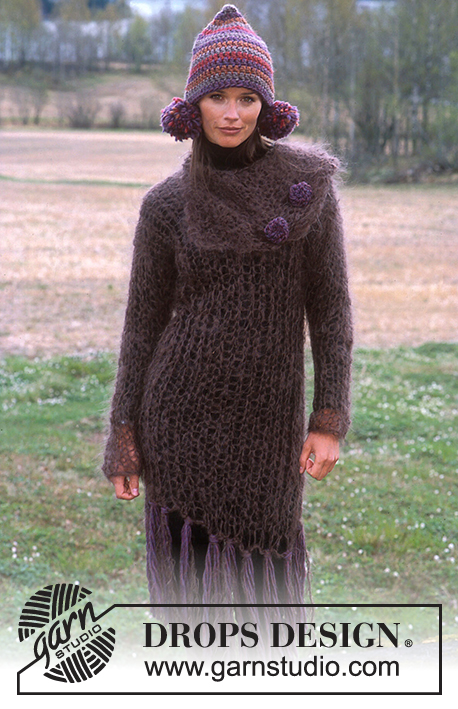
DROPS Crochet dress in Karisma Superwash
DROPS 91-27 |
|
|
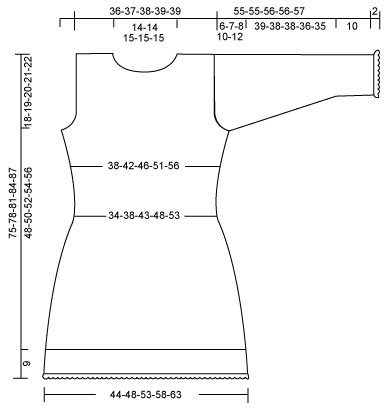
Crochet Gauge: 16 dc/dtr in the width and 5 texture rows in the length (1 row of DC + 1 row of dtr x 5) on hook size 4.5 = 10 x 10 cm. Note: Because of different crochet techniques used by the individual, the gauge may vary, so you might have to drop/go up a hook size to obtain the correct gauge. Crochet info: Replace the 1st dc on each “dc row” with a ch, and the 1st dtr on each “dtr row” with 4 ch. Finish every “dc row” with a dc in the 4th ch from beginning of the previous row, and every “dtr row” with a dtr in the 1st ch from beginning of the previous row. Texture pattern: *1 row of dtr, 1 row of dc* repeat from *-* until finish – Note: Crochet into each dtr/dc and not in between. Bind off tips: Bind off at the beginning of row: Replace 1 dc/dtr with a sl st. Bind off at the end of row: Turn the piece when the number of dc/dtr’s to be bound off are left on row and crochet back again. Increasing tips: Inc. 1 dc/dtr at each side as follows: Crochet an extra dc/dtr in the second and second but last dc/dtr on each side. FRONT PIECE Crochet loosely 105-114-124-136-148 ch (inclusive of 1 ch to turn with) on hook size 4.5 in Karisma. Crochet the 1st row as follows: 1 dc in the 2nd ch from the hook, 1dc in the next ch *skip 1 ch, 1 dc in the next 2 ch* repeat from *-* Note: For sizes L + XL + XXL finish with a dc in the last 3 ch (instead of in the last 2 ch) = 71-77-84-92-100 dc, turn the piece. Continue to crochet in texture pattern – see above description and remember to check your crochet gauge. When the piece measures 5 cm bind off 1 dc/dtr at each side on approx. every 3-3-3.5-3.5-4 cm a total of 8 times – see bind off tips above = 55-61-68-76-84 dc/dtr. When the piece measures 30-32-34-36-38 cm inc. 1 dc/dtr at each side on approx every 6-6-5-5-5 cm a total of 3 times – see increasing tips above = 61-67-74-82-90 dc/dtr. When the piece measures 48-50-52-54-56 cm bind off for armhole at each side -see bind off tips above: 3dc/dtr 0-0-0-1-2 times, 2 dc/dtr 1-1-1-2-2 times and 1 dc/dtr 0-2-2-3-4 times = 57-59-60-62-62 dc/dtr. When the piece measures 59-62-65-67-70 cm insert a marking thread in the centre dc/dtr st (for sizes L + XL + XXL insert the marking thread in between the centre 2 dc/dtr). Bind off for neckline as follows: Crochet from the shoulder in towards the neck until 8-8-9-9-9 dc/dtr left before the marking thread, turn the piece. Continue to bind off on every row at the neck side – see bind off tips: 2 dc/dtr 1 time and 1 dc/dtr 1 time = 17-18-18-19-19 dc/dtr left for shoulder. When the piece measures 66-69-72-75-77 cm cut the thread. Repeat for the other side. Back piece: Crochet as done for the front piece until the piece measures 64-67-70-73-76 cm. Continue to crochet over the outer 17-18-18-19-19 dc/dtr on the right side. When the piece measures 66-69-72-75-78 cm cut the thread. Repeat for the left side, but when the piece measures 66-69-72-75-78 cm crochet 3 rows of dc (1 dc in each dc/dtr from previous row)), for button edge, cut the thread (NB: Do not crochet over the centre 23-23-24-24-24 dc/dtr = neckline). Sleeve: Crochet loosely 51-52-55-58-61 ch (inclusive of 1 ch to turn with) on hook size 4.5 in Karisma. Crochet the 1st row as follows: 1 dc in the 2nd ch from the hook, 1dc in the next ch *skip 1 ch, 1 dc in the next 2 ch* repeat from *-* Note: For sizes M + L + XL + XXL finish with a dc in the last 3 ch (instead of in the last 2 ch) = 35-36-38-40-42 dc, turn the piece. Continue to crochet in texture pattern as for the front and back piece. At the same time when the piece measures 10 cm inc. 1 dc/dtr at each side on every 5-4.5-4-3.5-3 cm a total of 8-9-10-10-11 times = 51-54-58-60-64 dc/dtr – see increasing tips. When the piece measures 49-48-48-46-45 cm bind off for the sleeve cap at each side on every row – see decreasing tips: 4 dc/dtr 1 time, 3 dc/dtr 1 time and hereafter bind off 2 dc/dtr at each side until the piece measures 55-55-56-56-57 cm, cut the thread. Assembly: Sew tog. the right shoulder seam – edge to edge – with small stitches. Neck: Crochet approx. 56-64 dc around the neck (including the button edge) on hook size 4.5 with Karisma. Crochet texture pattern back and forth. When the neck measures approx 8-8-8-9-9 cm cut the thread. Button hole: Crochet 1 row of dc along the left shoulder on the front piece and continue up along the neck edge. Turn the piece and crochet a row of dc – at the same time crochet 5 button holes evenly distributed NB: make 2 button holes on the neck edge itself (the top one should be approx 1.5 to 2 cm from the top), the others should be evenly distributed. 1 button hole = crochet in dc to the place where you want the button to be, crochet 4 ch, and 1 dc in the same dc. Sew in the sleeves with small stitches. If it is difficult to make it look neat, crochet the sleeves to the armhole instead as follows: Crochet 1 dc alternately between the sleeve and the armhole with a ch in between. NB: On the left side, place the button hole edge on the backpiece under the shoulder on the frontpiece, and sew/crochet through both pieces. Sew the sleeve and side seams with small neat stitches and sew in the buttons on the left shoulder back piece. Crochet border at the bottom of the dress: Start at the side and crochet from the bottom edge and down on hook size 4.5 in Karisma. 1st round: 1 dc in the 1st st, 6 ch (= 1 dtr + 2 ch), *skip 2 dc, 1 dtr in the next dc, 2 ch* repeat from *-* and finish the round with a sl st in the 4th ch from beginning of round. 2nd round: 7 ch (= 1 dtr + 3 ch), *1 dtr in the next st, 3 ch*, repeat from *-* and finish with a sl st in the 4th ch from beginning of round. 3rd and 4th round: As 2nd round. 5th round (= ruffle): 5 ch (=1dtr + 1 ch), 1dtr around the 1st ch loop, 1 ch, 1 dtr around the same ch loop, 1 ch, 1 dtr around the same ch loop, **2 ch, around the next ch loop crochet as follows: *1 dtr, 1 ch*, repeat from *-* a total of 5 times. 2 ch, around the next ch loop crochet as follows: *1 dtr, 1 ch*, repeat from *-* a total of 4 times **, repeat from **-** to finish round and finish off with 2 dc and 2 sl st in the 4th dc from beginning of round. Crochet ruffle at the bottom of sleeve: Crochet 1 dc in the 1st st, 5 ch (1dtr + 1 ch), continue to crochet and alternate between 1 and 2 dtr in each st, with a ch between until end of round. Finish off with a sl st in the 4 ch from beginning of round. |
|
|
|
|
Have you made this or any other of our designs? Tag your pictures in social media with #dropsdesign so we can see them! Do you need help with this pattern?You'll find tutorial videos, a Comments/Questions area and more by visiting the pattern on garnstudio.com. © 1982-2024 DROPS Design A/S. We reserve all rights. This document, including all its sub-sections, has copyrights. Read more about what you can do with our patterns at the bottom of each pattern on our site. |


With over 40 years in knitting and crochet design, DROPS Design offers one of the most extensive collections of free patterns on the internet - translated to 17 languages. As of today we count 304 catalogues and 11422 patterns - 11422 of which are translated into English (UK/cm).
We work hard to bring you the best knitting and crochet have to offer, inspiration and advice as well as great quality yarns at incredible prices! Would you like to use our patterns for other than personal use? You can read what you are allowed to do in the Copyright text at the bottom of all our patterns. Happy crafting!
Comments / Questions (34)
I'm confused about the back. I have finished the front, and it says to make the back the same way... at least past the armholes. After that, it says to continue until it measures 73 cm (I'm making an XL). BUT, do you make the neck the same way as you do the front? For the front, the neck was started at 67 cms, not 73. So do you not make a neck decrease in the back?? Or do you go to 73 cm, then only make a row or two of 19? Thanks you for any help you can give me to clear this up!!
04.12.2014 - 03:49DROPS Design answered:
Dear Carolyn, neckline on front piece is deeper than on back piece - on back piece you continue until piece measures 73 cm, then work for shoulder on the 19 sts on the right side of piece for 2 more cm (piece measures 75 cm) - on the left side, you will crochet longer to make the buttonband. Happy crocheting!
04.12.2014 - 11:13Can this be done in a different kind of yarn? like redheart super saver or something else?
17.12.2013 - 23:57DROPS Design answered:
Dear Robbalina, you'll find more informations about our yarn under shademap for each of them and on the list of groups from A to F to find an alternative. Happy crocheting!
18.12.2013 - 09:43So after decreasing, you crochet evenly until it reaches 30 cm and then increase?
26.07.2013 - 18:50DROPS Design answered:
Yes Meili, after dec continue until your piece measures a total of 30 cm from the beg and then start inc. Happy crocheting!
27.07.2013 - 09:49For the front of the dress, after you decrease it says: "When the piece measures 30-32-34-36-38 cm inc 1 sc/tr at each side..." I don't understand what this means. It seems to imply that you crochet the structure pattern evenly until it reaches the required size, in my case, 30 cm, and then start increasing, or it could be that it's supposed to reach 30 cm by the time you're done decreasing, but I am confused...help please?
26.07.2013 - 06:33DROPS Design answered:
Dear Meili, you crochet structure pattern, start dec when piece peasures 5 cm and when it measures 30 cm, start inc. Happy crocheting!
26.07.2013 - 09:49How much wool is needed for the dress?
30.03.2013 - 18:37DROPS Design answered:
Dear Lili, you'll find all materials and finished measurements to choose your size on the right side of the picture : you'll need 650 to 950 g Karisma Superwash. Happy crocheting!
02.04.2013 - 09:50I don't understand what the directions are saying to do when I reach the armholes. I'm making a size small - what do I do?
05.12.2012 - 05:32DROPS Design answered:
Dear Mrs Harris, when the piece measures 48 cm, you will dec sts each side to shape armholes. You will then dec (see decreasing tips at the very top) 2 sc or tr (depending on how far you are in your work) each side : at the beg of row and at the end of row. Continue as stated before. Happy crocheting!
05.12.2012 - 09:06When making the front, after it measures 5cm, the pattern says to dec 1 stitch on every side approx. every 3 cm for a total of 8 times = 55. I don't understand what every 3 cm means and what the 55 implies at this part.
30.11.2012 - 23:46DROPS Design answered:
Dear Katie, when piece measures 5 cm, you decrease 1 st on every side, then repeat this dec every 3 cm = work 3 cm and dec 1 more st each side a total of 8 times. You will have decreased a total of 16 sts and there are 55 sts left. Happy crocheting!
01.12.2012 - 11:25Confused, working the front, 2ND row, when you work 2 sc then skip a ch, are you supposed to chain 1. Or is the while thing supposed to be to end up spiralling?
16.09.2012 - 23:54DROPS Design answered:
Dear Jade, on 2nd row, you skip 1 ch to keep the foundation row quite loose and not too tight. Happy Crocheting !
12.11.2012 - 14:18Confused about the neckband. Does this go round both the front and back of the left shoulder as well as the neck or just one of the shoulders plus the neck? If the latter should it be the front or the back?
09.04.2012 - 12:05DROPS Design answered:
It doesn't go along the shoulder. It goes along the neck and also along the short side of the button band made at the end of left shoulder on back.
10.04.2012 - 01:33Nei, bare over de 3 rader med fm til knappestolpen som du hekler i slutten av bakstk.
19.01.2012 - 09:27