
Popular categories
Looking for a yarn?


|
|
DROPS 91-27 |
|
|
|
|
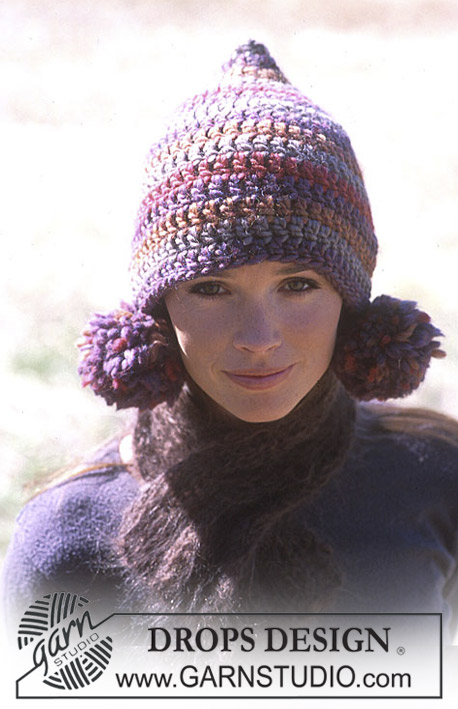
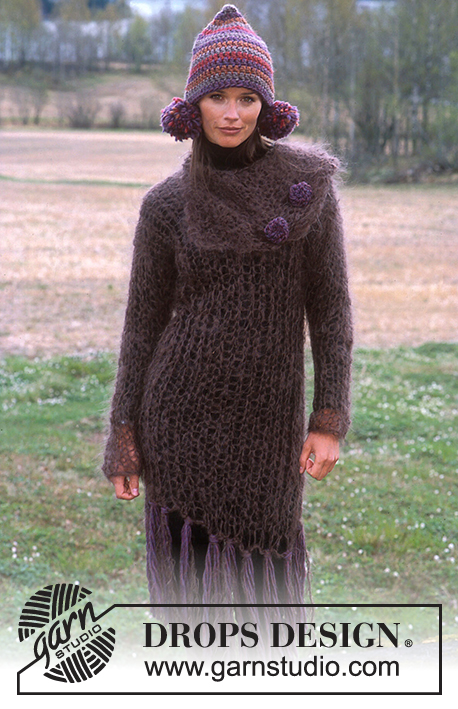
DROPS Crochet dress in Karisma Superwash
DROPS 91-27 |
|
|
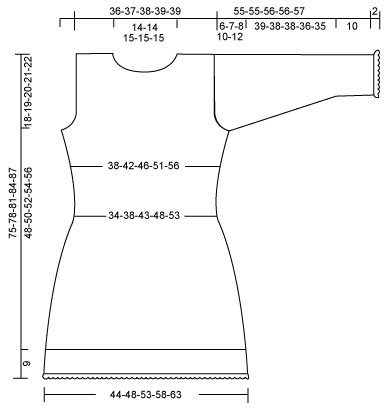
Crochet Gauge: 16 dc/dtr in the width and 5 texture rows in the length (1 row of DC + 1 row of dtr x 5) on hook size 4.5 = 10 x 10 cm. Note: Because of different crochet techniques used by the individual, the gauge may vary, so you might have to drop/go up a hook size to obtain the correct gauge. Crochet info: Replace the 1st dc on each “dc row” with a ch, and the 1st dtr on each “dtr row” with 4 ch. Finish every “dc row” with a dc in the 4th ch from beginning of the previous row, and every “dtr row” with a dtr in the 1st ch from beginning of the previous row. Texture pattern: *1 row of dtr, 1 row of dc* repeat from *-* until finish – Note: Crochet into each dtr/dc and not in between. Bind off tips: Bind off at the beginning of row: Replace 1 dc/dtr with a sl st. Bind off at the end of row: Turn the piece when the number of dc/dtr’s to be bound off are left on row and crochet back again. Increasing tips: Inc. 1 dc/dtr at each side as follows: Crochet an extra dc/dtr in the second and second but last dc/dtr on each side. FRONT PIECE Crochet loosely 105-114-124-136-148 ch (inclusive of 1 ch to turn with) on hook size 4.5 in Karisma. Crochet the 1st row as follows: 1 dc in the 2nd ch from the hook, 1dc in the next ch *skip 1 ch, 1 dc in the next 2 ch* repeat from *-* Note: For sizes L + XL + XXL finish with a dc in the last 3 ch (instead of in the last 2 ch) = 71-77-84-92-100 dc, turn the piece. Continue to crochet in texture pattern – see above description and remember to check your crochet gauge. When the piece measures 5 cm bind off 1 dc/dtr at each side on approx. every 3-3-3.5-3.5-4 cm a total of 8 times – see bind off tips above = 55-61-68-76-84 dc/dtr. When the piece measures 30-32-34-36-38 cm inc. 1 dc/dtr at each side on approx every 6-6-5-5-5 cm a total of 3 times – see increasing tips above = 61-67-74-82-90 dc/dtr. When the piece measures 48-50-52-54-56 cm bind off for armhole at each side -see bind off tips above: 3dc/dtr 0-0-0-1-2 times, 2 dc/dtr 1-1-1-2-2 times and 1 dc/dtr 0-2-2-3-4 times = 57-59-60-62-62 dc/dtr. When the piece measures 59-62-65-67-70 cm insert a marking thread in the centre dc/dtr st (for sizes L + XL + XXL insert the marking thread in between the centre 2 dc/dtr). Bind off for neckline as follows: Crochet from the shoulder in towards the neck until 8-8-9-9-9 dc/dtr left before the marking thread, turn the piece. Continue to bind off on every row at the neck side – see bind off tips: 2 dc/dtr 1 time and 1 dc/dtr 1 time = 17-18-18-19-19 dc/dtr left for shoulder. When the piece measures 66-69-72-75-77 cm cut the thread. Repeat for the other side. Back piece: Crochet as done for the front piece until the piece measures 64-67-70-73-76 cm. Continue to crochet over the outer 17-18-18-19-19 dc/dtr on the right side. When the piece measures 66-69-72-75-78 cm cut the thread. Repeat for the left side, but when the piece measures 66-69-72-75-78 cm crochet 3 rows of dc (1 dc in each dc/dtr from previous row)), for button edge, cut the thread (NB: Do not crochet over the centre 23-23-24-24-24 dc/dtr = neckline). Sleeve: Crochet loosely 51-52-55-58-61 ch (inclusive of 1 ch to turn with) on hook size 4.5 in Karisma. Crochet the 1st row as follows: 1 dc in the 2nd ch from the hook, 1dc in the next ch *skip 1 ch, 1 dc in the next 2 ch* repeat from *-* Note: For sizes M + L + XL + XXL finish with a dc in the last 3 ch (instead of in the last 2 ch) = 35-36-38-40-42 dc, turn the piece. Continue to crochet in texture pattern as for the front and back piece. At the same time when the piece measures 10 cm inc. 1 dc/dtr at each side on every 5-4.5-4-3.5-3 cm a total of 8-9-10-10-11 times = 51-54-58-60-64 dc/dtr – see increasing tips. When the piece measures 49-48-48-46-45 cm bind off for the sleeve cap at each side on every row – see decreasing tips: 4 dc/dtr 1 time, 3 dc/dtr 1 time and hereafter bind off 2 dc/dtr at each side until the piece measures 55-55-56-56-57 cm, cut the thread. Assembly: Sew tog. the right shoulder seam – edge to edge – with small stitches. Neck: Crochet approx. 56-64 dc around the neck (including the button edge) on hook size 4.5 with Karisma. Crochet texture pattern back and forth. When the neck measures approx 8-8-8-9-9 cm cut the thread. Button hole: Crochet 1 row of dc along the left shoulder on the front piece and continue up along the neck edge. Turn the piece and crochet a row of dc – at the same time crochet 5 button holes evenly distributed NB: make 2 button holes on the neck edge itself (the top one should be approx 1.5 to 2 cm from the top), the others should be evenly distributed. 1 button hole = crochet in dc to the place where you want the button to be, crochet 4 ch, and 1 dc in the same dc. Sew in the sleeves with small stitches. If it is difficult to make it look neat, crochet the sleeves to the armhole instead as follows: Crochet 1 dc alternately between the sleeve and the armhole with a ch in between. NB: On the left side, place the button hole edge on the backpiece under the shoulder on the frontpiece, and sew/crochet through both pieces. Sew the sleeve and side seams with small neat stitches and sew in the buttons on the left shoulder back piece. Crochet border at the bottom of the dress: Start at the side and crochet from the bottom edge and down on hook size 4.5 in Karisma. 1st round: 1 dc in the 1st st, 6 ch (= 1 dtr + 2 ch), *skip 2 dc, 1 dtr in the next dc, 2 ch* repeat from *-* and finish the round with a sl st in the 4th ch from beginning of round. 2nd round: 7 ch (= 1 dtr + 3 ch), *1 dtr in the next st, 3 ch*, repeat from *-* and finish with a sl st in the 4th ch from beginning of round. 3rd and 4th round: As 2nd round. 5th round (= ruffle): 5 ch (=1dtr + 1 ch), 1dtr around the 1st ch loop, 1 ch, 1 dtr around the same ch loop, 1 ch, 1 dtr around the same ch loop, **2 ch, around the next ch loop crochet as follows: *1 dtr, 1 ch*, repeat from *-* a total of 5 times. 2 ch, around the next ch loop crochet as follows: *1 dtr, 1 ch*, repeat from *-* a total of 4 times **, repeat from **-** to finish round and finish off with 2 dc and 2 sl st in the 4th dc from beginning of round. Crochet ruffle at the bottom of sleeve: Crochet 1 dc in the 1st st, 5 ch (1dtr + 1 ch), continue to crochet and alternate between 1 and 2 dtr in each st, with a ch between until end of round. Finish off with a sl st in the 4 ch from beginning of round. |
|
|
|
|
Have you made this or any other of our designs? Tag your pictures in social media with #dropsdesign so we can see them! Do you need help with this pattern?You'll find tutorial videos, a Comments/Questions area and more by visiting the pattern on garnstudio.com. © 1982-2024 DROPS Design A/S. We reserve all rights. This document, including all its sub-sections, has copyrights. Read more about what you can do with our patterns at the bottom of each pattern on our site. |


With over 40 years in knitting and crochet design, DROPS Design offers one of the most extensive collections of free patterns on the internet - translated to 17 languages. As of today we count 304 catalogues and 11422 patterns - 11422 of which are translated into English (UK/cm).
We work hard to bring you the best knitting and crochet have to offer, inspiration and advice as well as great quality yarns at incredible prices! Would you like to use our patterns for other than personal use? You can read what you are allowed to do in the Copyright text at the bottom of all our patterns. Happy crafting!
Comments / Questions (34)
Laves den første indtagning ved de 5cm, eller svarer den 5. cm til at det er centimeter 0, så man skal hækle yderligere 3cm op, før man laver indtagning, så første indtagning er ved 8 cm? (Str M) Samme spørgsmål til udtagning og de 6 cm - er første udtagning når arbejdet måler 32cm eller 6 cm længere oppe?
07.03.2022 - 16:32DROPS Design answered:
Hej Kristin, du starter ved de 5 cm :)
09.03.2022 - 11:02The buttonhole are very small if I am performing them correctly. So my question is are they functional or just for show?
03.11.2019 - 21:39DROPS Design answered:
Hi Gerri, The buttonholes are functional. Make sure you are working your chain stitches in on the hook so they are the right length. 1 chain stitch should be as long as a double crochet is wide. Hope this helps and happy crocheting!
04.11.2019 - 07:11Goedemiddag, Vandaag de mouwen gemaakt, maar ik begrijp niet goed hoe ze aan het pand vastgemaakt moeten worden. De bovenkant van de mouw kan ik mooi vastmaken aan het voor of achterpand, maar de mouw is niet lang genoeg om rondom vastgemaakt te worden. moet ik nog twee mouwen erbij haken? Ik hoop dat u mijn vraag begrijpt en dat u me verder kunt helpen.
21.02.2019 - 17:40DROPS Design answered:
Dag Chralotte,
Je vraag is me niet helemaal duidelijk. De mouwkop moet tegen de schouder komen de onderkant van de mouw in de zijnaad. Als de mouw te krap is om hem erin te zetten kan het zijn dat de stekenverhouding niet helemaal klopt en dat je misschien extra toeren in de mouw kop moet verwerken. (Met extra mouw bedoel je denk ik extra toer?),
22.02.2019 - 14:09So I'm trying to figure out how much you want and I need and I see a that the yarn described here is in 50 grams skins and for a small it would be approximately 650 grams.I need to know how many yards of yarn I will need of a medium-grade yarn. And I realize proximate measurement but can you help me at all. I have looked at a number of conversion charts and I still can't figure it out.
05.02.2019 - 04:44DROPS Design answered:
Hi Kathy, The Karisma yarn has approx. 109 yds per 50 g ball, so for 650 grams you will get 13 x 109 yds = 1417 yds. Happy crocheting!
05.02.2019 - 08:08I’ve now almost finished making this dress in olive green and I’m very happy with the result. I made the skirt part longer. I would like to make a second one in a different colour, but using the star stitch, would I need more than 650g for a small size? How much wool would I need?
30.07.2018 - 17:08DROPS Design answered:
Dear Tina, we are unfortunately not able to adjust every pattern to every individual request. You are welcome to contact your DROPS store for any further personnal assistance. Happy crocheting!
31.07.2018 - 09:43Ik zie nr 62 (bruin) van DROPS Karisma Superwash niet meer op de kleurenkaart staan; is deze kleur uit het assortiment gehaald?
18.06.2017 - 10:41DROPS Design answered:
Hoi Linda, Ja, dat klopt, deze kleur is niet meer in het assortiment. Donkerbruin of chocoladebruin is een goed alternatief.
01.11.2017 - 19:02Hoeveel bollen garen heb ik nodig voor deze jurk?
04.02.2017 - 17:04DROPS Design answered:
Hoi Hilde. Het staat bovenaan het patroon: Maat: S - M - L - XL - XXL, Materialen: DROPS Karisma Superwash van Garnstudio, 650-700-800-850-950 gr nr. 62, bruin. 1 bol Karisma is 50 gr. En je kan je maat kiezen door de afmetingen onderaan op de maattekening te vergelijken met je eigen afmetingen.
06.02.2017 - 13:14Hello and happy new year! I'm having to re-start the dress as something went wrong. I'm wondering if it's because i ignored this instruction in the crochet info as i didnt understand. Pls could you clarify what it means? "Finish every “dc row” with a dc in the 4th ch from beginning of the previous row, and every “dtr row” with a dtr in the 1st ch from". Thank you!
31.12.2016 - 13:21DROPS Design answered:
Dear Mrs Townend, at the beg of each row you will replace the first st with some chains: start each dc row with 1 ch (= 1st dc) and start each dtr row with 4 ch (= 1st dtr) - at the end of each dc row work the last dc in the 4th ch from beg of previous row and at the end of each dtr row work the last dtr in the 1st ch from beg of previous row. Happy crocheting!
02.01.2017 - 08:43Hi. I'm working the armholes on the front. I know what binding off is but I don't know how these instructions relate to it: 3dc/dtr 0-0-0-1-2 times, 2 dc/dtr 1-1-1-2-2 times and 1 dc/dtr 0-2-2-3-4 times = 57-59-60-62-62 dc/dtr. I'm not sure what the 0-0-0-1-2 refers to. Please can you help? Thanks!
29.10.2016 - 13:45DROPS Design answered:
Dear Mrs Townend, in the first 3 sizes you will not dec 3 sts, but directely start dec 2 sts 1 time and 1 st 0-2-2 times (= only in the 2nd and 3rd size). Happy crocheting!
31.10.2016 - 09:48Hi, I am confused about the border at the bottom. Why does 1dc 6Ch equals (1 dtr + 2ch skip 2dc 1dtr in next dc, 2ch)?? which one am I supposed to follow? Same for the following rows.. thanks
17.03.2015 - 15:11DROPS Design answered:
Dear Lena, a bracket is missing and will be added, you start with 1 dc, then work 6 ch (= replace 1 dtr + 2 ch), then work from *-* and join round with 1 sl st in 4th ch from beg of round. Happy crocheting!
17.03.2015 - 16:16