
Popular categories
Looking for a yarn?


|
|
DROPS 91-26 |
|
|
|
|
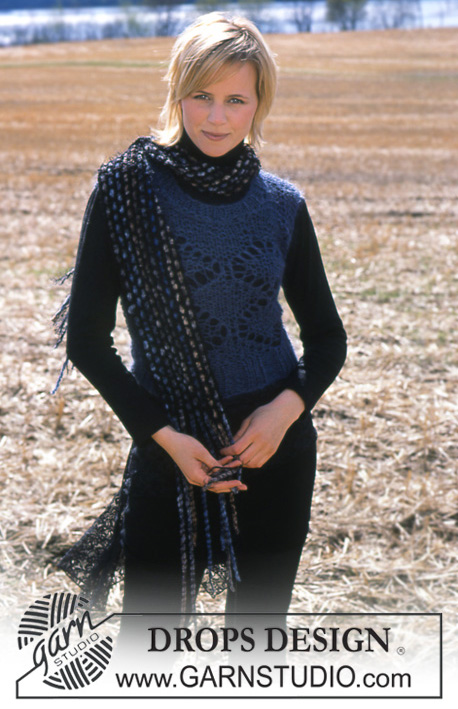
DROPS Crochet jumper and scarf in Ull-Flame’ with borders in Snow
DROPS 91-26 |
|
|
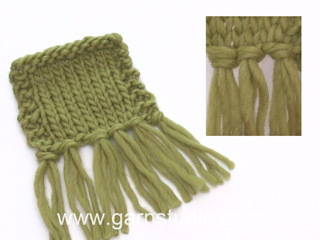
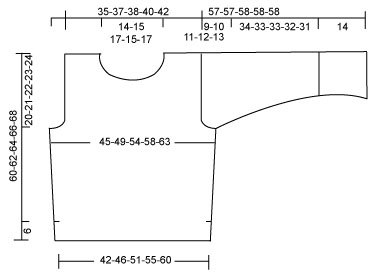
Crochet Gauge: 6,5 dtr in the width and 3 rows in the length on hook size 10 = 10 x 10 cm. NB: Because of different crochet techniques used by the individual, the gauge may vary, so you might have to drop/go up a hook size to obtain the correct gauge. Crochet info: At the beginning of each row replace the 1st dtr with 4 ch. Finish each row as follows: Crochet 1 dtr in the 4th ch from beginning of the previous row. Bind Off tips: Bind off at the beginning of row: Replace 1 dtr with a sl. st. Bind off at the end of row: Turn the piece when the number of dtr’s to be bound off are left on row and crochet back again. Rib-1: *K4, P5*, repeat from *-*. Rib-2: *K4, P4*, repeat from *-*. Front piece: Crochet loosely 38-42-46-50-54 ch (inclusive of the 4 ch to turn with) on hook size 10 in Ull-Flame. Crochet the 1st row as follows: 1 dtr in the 5th ch from the hook, 1 dtr in the next ch *skip 1 ch, 1 dtr in the next 3 ch* repeat from *-* = 27-30-33-36-39 dtr, turn the piece. Read Crochet info above! Continue to crochet 1 dtr in each dtr from previous row (crochet into the dtr and not in between). Remember to check your crochet gauge! When the piece measures approx 14 cm inc. a dtr at each side as follows: Crochet an extra dtr in the second and the second but last dtr on row = 29-32-35-38-41dtr. When the piece measures approx. 40-41-42-43-44 cm bind off for armhole at each side on each row –see Bind off tips, as follows: 3dtr 0-1-1-1-1 time, 2 dtr 1-0-0-1-1 time and 1 dtr 1-1-2-1-2 times = 23-24-25-26-27 dtr left. When the piece measures 53-55-57-59-61 cm (only 2 rows left before finished measurements) bind off for neck as follows: Crochet 8-8-8-9-9 dtr, turn piece. Replace the 1st dtr with a sl st and crochet 7-7-7-8-8 dtr. Cut the thread. The piece now measures 60-62-64-66-68 cm. Repeat on the other side. Back piece: Crochet as front piece but in order to avoid the seam edges becoming uneven, inc. 1 dtr at 28 cm instead of at 14 cm. Bind off for armholes as on the front and continue until the piece measures 57-59-61-63-65 cm (only 1 row left before finished measurements) bind off for neck as follows: Crochet 1 row of dtr on the outer most 7-7-7-8-8 dtr’s at each side ( =9-10-11-10-11 dtr’s left in the centre for neckline). Cut the thread, the piece now measures approx 60-62-64-66-68 cm. Sleeve: First knit a cuff in Snow yarn as follows: Cast on 38-38-38-47-47 sts loosely on needles size 8 with Snow. Purl 1 row from the wrong side and continue in Rib-1 with a seam st at each side (all seam sts are knitted in garter sts). After 2 rows dec. all P5 to P4 = 34-34-34-42-42 sts and continue in Rib-2. When the piece measures 14 cm knit 2 rows of garter sts starting from the right side and bind off loosely from the right side. Change to Ull-flame’ and hook size 10 and crochet 1st row as follows: 1 dc in the 1st st (crochet in the bind off row), 4 ch, *skip 1 st, 1 dtr in the next st* repeat from *-* = 17-17-19-20-21 dtr, turn the piece. Continue to crochet as done on the front and back piece with 1 dtr in each dtr from previous row. At the same time after 1 row of dtr inc. 1 dtr at each side on every 13-9-9-9-8 cm (approx. on every 4-3-3-3-2 rows) a total of 3-4-4-4-4 times = 23-25-27-28-29 dtr. When the piece measures 48-47-47-46-45 cm bind off for the sleeve cap at each side on every 3rd row: 3 dtr 1-1-2-2-2 times, and 2 dtr at each side until the piece measures 57-57-58-58-58 cm, cut the thread. Assembly: Crochet the right shoulder seam tog. as follows: Crochet 1 sl st in the first dtr on the back, 1 ch, 1 dc in the first dtr on the front, 1 ch, 1 dc in the next dtr on the back and so on. Neck: Pick up approx. 40-52 sts around the neckline on needles size 8 with Snow. Knit 2 rows garter sts starting from the wrong side. At the same time adjust the number of sts to 48-56-56-64-64. Continue in Rib-2 – adjust so there will be either K4 or P4 at the front of the jumper. When the neck measures 12-12-14-14-14 cm bind off loosely in rib. Crochet the left shoulder seam tog. the same way as on the right shoulder seam. Sew the neck in the outer part of the most outer st. so there will be no seam. Crochet the sleeves to the front and back piece the same way as done for the shoulder seams. Sew the cuff tog. inside the seam and crochet the sleeve and the sides tog. as done for the shoulders, except the last 6 cm at the bottom of the front and back piece (=slit). Scarf: Measures: approx 14 x 150 cm Materials: Ull-flame 150 g colour no. 01, Off-white. Snow 50 g colour no. 01, Off-white Drops crochet Hook size 10 Crochet Gauge: 6,5 dtr in the width and 3 rows in the length on hook size 10 = 10 x 10 cm Crochet info: On the beginning of each row replace the first dtr with 4 ch. Finish each row as follows: Crochet 1 dtr in the 4th ch from beginning of the previous row. Scarf: Crochet 14 ch loosely (inclusive of the 4 ch to turn with) on hook size 10 in Ull-Flame. Crochet 1st row as follows: 1 dtr in the 5th ch from the hook, 1 dtr in the next ch *skip 1 ch, 1 dtr in the next 3 ch* repeat from *-* = 9 dtr. Read crochet info. Continue to crochet 1 dtr in each dtr from previous row. When the scarf measures 150 cm cut the thread. Tassels: Attach 5 tassels evenly distributed at each end of the scarf. 1 tassel = 4 threads of Snow each 60 cm long. Fold the threads in half and pull the folded end through the space between 2 dtr’s making a loop. Pull the ends through the loop. Hint: If the yarn in the tassels “curl up”, wet the threads and shake them so they stretch out. |
|
|
|
|
Have you made this or any other of our designs? Tag your pictures in social media with #dropsdesign so we can see them! Do you need help with this pattern?You'll find tutorial videos, a Comments/Questions area and more by visiting the pattern on garnstudio.com. © 1982-2024 DROPS Design A/S. We reserve all rights. This document, including all its sub-sections, has copyrights. Read more about what you can do with our patterns at the bottom of each pattern on our site. |


With over 40 years in knitting and crochet design, DROPS Design offers one of the most extensive collections of free patterns on the internet - translated to 17 languages. As of today we count 304 catalogues and 11422 patterns - 11422 of which are translated into English (UK/cm).
We work hard to bring you the best knitting and crochet have to offer, inspiration and advice as well as great quality yarns at incredible prices! Would you like to use our patterns for other than personal use? You can read what you are allowed to do in the Copyright text at the bottom of all our patterns. Happy crafting!