
Popular categories
Looking for a yarn?


|
|||||||||||||
Baby Joy |
|||||||||||||
 |
 |
||||||||||||
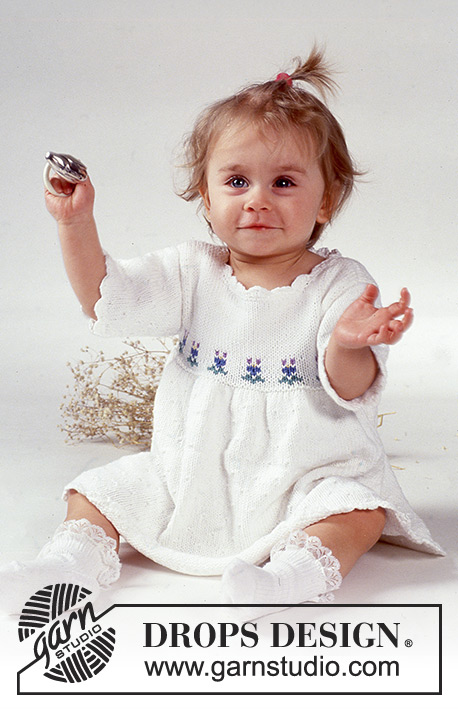
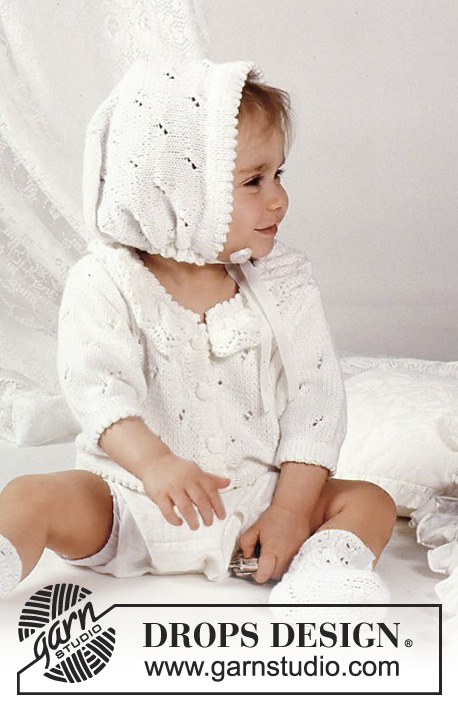
DROPS Suit and socks in lace pattern in Safran.
DROPS Baby 1-9 |
|||||||||||||
|
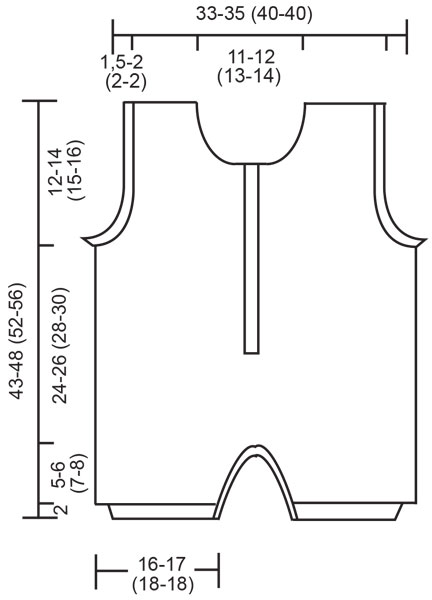
Knitting Tension: 24sts x 32 rows on needles size 3mm in stocking st = 10x10cm. Moss st: 1st row: K1, P1. 2nd row: Work P over K and K over P. Repeat rows 1 and 2. Hem: Work 2cm in stocking st. Next row: *K2tog, yo* (=folding edge – all measurements are taken from here), work 2 cm in stocking st. Pattern: See diagram (1 diagram = 1 repeat). Pattern is seen from RS. Hb=Right leg Vb=Left leg Left leg: Cast on 80-88 (90-90) sts on needles size 2.5mm with white. Work hem. Change to needles size 3mm. Work M.1. and at the same time dec 8-10 (6-6) sts evenly on 1st row = 72-78 (84-84) sts. Inc each side inside 1 edge st 1 st 3-3 (6-6) times for 3 months: every 6th row, for 6/9 months: every 7th row, for 12/18 + 24 months: every 4th row = 78-84 (96-96) sts. Remember to check knitting tension. Continue until piece measures 7-8 (9-10) cm. Put work aside. Right leg: Work as left leg. Body: Put left right and left leg on a circ needle and work in the round = 156-168 (192-192) sts. Continue in pattern until piece measures 16-17 (18-19) cm. Cast off 6 sts centre front for slit and finish piece working back and forth on needle. Cast on 4 sts on right side for button band. These 4 sts are worked in moss st. Continue until piece measures 31-34 (37-40) cm. Work next row as follows: work 36-39 (45-45) sts in M.1, cast off 2-3 (3-3) sts for arm hole, work 74-78 (90-90) sts in M.1, cast off 2-3 (3-3) sts for arm hole, work 36-39 (45-45) sts in M.1. Finish each side separately. Right front: = 40-43 (49-49) sts. Dec for arm hole on every other row as follows: 1 st 2-3 (3-3) times = 38-40 (46-46) sts. The 4 front sts is still worked in moss st. Continue until piece measures 36-41 (45-49) cm. Dec for neck on every other row as follows: 9-11 (13-14) sts once, 2 sts once, 1 st 5 times. Continue until piece measures 43-48 (52-56) cm. Cast off remaining sts. Left front: = 36-39 (45-45) sts. Dec for arm hole on every other row as follows: 1 st 2-3 (3-3) times = 34-36 (42-42) sts. Continue until piece measures 36-41 (45-49) cm. Dec for neck on every other row as follows: 5-7 (9-10) sts once, 2 sts once, 1 st 5 times. Continue until piece measures 43-48 (52-56) cm. Cast off remaining sts. Back: = 74-78 (90-90) sts. Dec for arm hole as on front = 70-72 (84-84) sts. Continue until piece measures 41-46 (50-54) cm. Cast off centre 22-24 (28-30) sts for neck. Dec each side of neck on every other row: 1 st twice. Continue until piece measures 43-48 (52-56) cm. Cast off remaining sts. Sleeve: Pick up approx 70 to 80 sts around arm hole on circ needle size 2.5mm and work hem. Assembly: Sew shoulder seams. Button band: Pick up approx 66 to 78 sts along left front on circ needle size 2.5mm and work hem, but after 0.5cm make 6 button holes evenly spaced – 1 button hole= cast off 2 sts, cast on 2 sts on next round. Also make button holes after the fold (row of holes). Fold all hems to WS along fold and sew. Pick up approx 90 sts around neck on circ needle size 2.5mm and work hem. Inside leg: (on back): Pick up approx 50 sts on needle size 2.5mm and work 5 rows in moss st. Cast off. Inside leg: (on front): Pick up sts as on back and work hem but after 0.5cm make 6 button holes evenly spaced (I button hole is worked as on button band). Also make button hole after the fold. Cast off and fold to WS and sew. Socks: Size: 3 – 6/9 (12/18 -24) months. Length of foot: 10-11 (12-14) cm. Materials: Drops Safran from Garnstudio 100% Egyptian cotton 50 g= 160m 50-50 (50-50) g col 017, white Drops double pointed needles: 3mm. Ribbon. Knitting Tension: 24sts x 32 rows on needles size 3mm in stocking st = 10x10cm. 1 Ridge: *1 round reverse stocking st, 1 round stocking st*. Sock: Cast on 30-35 (40-40) sts on double pointed needles size 3mm with white. Work 2 Ridges. Work M.2 until piece measures 7-8 (8-9) cm. Work 1 round in stocking st. Next round: *K2tog, yo*, 2 rounds in stocking st. Finish in stocking st. Heel: Work 3-4 (4-4) cm in stocking st back and forth on needle over centre back 18 sts. Decrease for heel: (1st row RS): 1st row: K10, K2tog back of loop, K1, turn. 2nd row: S1, P4, P2tog, P1, turn. 3rd row: S1, K5, K2tog back of loop, K1, turn. 4th row: S1, P6, P2tog, P1, turn. 5th row: S1, K7, K2tog back of loop, K1, turn. 6th row: S1, P8, P2tog, P1, turn. 7th row: K2tog, K8, K2tog back of loop = 10 sts left on needle. Pick up 7-8 (9-9) sts each side of heel and put all sts on one needle = 36-43 (50-50) sts. Continue in stocking st and at the same time dec each side of the 12-17 (22-22) sts on top of foot on every row as follows: 1 st 3-4 (4-4) times = 30-35 (42-42) sts. Continue until foot measures 7-8 (9-11) cm (measured from start of heel dec). Put a marker or thread each side and dec for toes at beginning of every other row (4 dec in all) 1 st 6-7 (8-8) times = 6-7 (10-10) sts. Pull double thread through remaining sts and fasten. Insert ribbon through holes. |
|||||||||||||
Diagram explanations |
|||||||||||||
|
|||||||||||||

|
|||||||||||||
|
|||||||||||||
|
Have you made this or any other of our designs? Tag your pictures in social media with #dropsdesign so we can see them! Do you need help with this pattern?You'll find tutorial videos, a Comments/Questions area and more by visiting the pattern on garnstudio.com. © 1982-2024 DROPS Design A/S. We reserve all rights. This document, including all its sub-sections, has copyrights. Read more about what you can do with our patterns at the bottom of each pattern on our site. |
|||||||||||||


With over 40 years in knitting and crochet design, DROPS Design offers one of the most extensive collections of free patterns on the internet - translated to 17 languages. As of today we count 304 catalogues and 11422 patterns - 11422 of which are translated into English (UK/cm).
We work hard to bring you the best knitting and crochet have to offer, inspiration and advice as well as great quality yarns at incredible prices! Would you like to use our patterns for other than personal use? You can read what you are allowed to do in the Copyright text at the bottom of all our patterns. Happy crafting!
Comments / Questions (24)
I am half way through knitting this really charming overall. unfortunately, it seems i will have to improvise quite a bit - there is no clear picture of neckline and the hem with buttonholes - perhaps you have some advice about how it should go? first neck then the hem with buttonholes? and do you have any advice / video for button holes on a double layered hem? the advice videos that are tagged are fairly basic, while this is not a basic garment...
14.04.2017 - 09:10Liga wrote:
I have a question regarding pattern chart - do arrows point the start of the pattern? For 6/9 month size I should knit 8 stiches, then knit2tog and yarn orver, then 11 knit stiches, knit2tog and yarn over, etc...it that correct?
06.07.2015 - 22:19DROPS Design answered:
Dear Liga, arrows shows where to start diagram, ie in size 6/9 months, start both legs with 2nd st in diagram. Happy knitting!
07.07.2015 - 10:25Jeg er i tvivl om, hvordan diagrammet M1 skal læses. Hvad betyder alle pilene og henvisninger til størrelser og højre ben/venstre ben? Rykkes mønsteret i takt med udtagningerne? Og hvilken type udtagning anbefaler I til denne dragt? Jeg strikker størrelse 6/9 mdr
27.06.2015 - 17:27DROPS Design answered:
Det er egentlig ikke så vigtig hvor du starter i diagrammet, bare du sørger for at du har 10 m glat immelem hver "2r sm, kast" hele vejen rundt. Når du tager ud kan du strikke 2 m i én maske. God fornøjelse!
31.07.2015 - 12:33Bonjour, Je ne comprends pas ou alors il y a une erreur. Quelle est la bonne mesure ? On ce retrouve avec deux longueurs différentes de chaque côté. Merci Devant droit : Continuer jusqu'à 36-41 (45-49) cm de hauteur totale....... Devant gauche : Continuer jusqu'à 35-39 (43-56) cm de hauteur totale......
10.06.2015 - 15:37DROPS Design answered:
Bonjour Nadine, votre question a été transférée à nos stylistes, merci d'avance pour votre patience.
10.06.2015 - 18:32Question : La reprise des mailles autour de l'encolure inclut-elle les mailles de la bordure de devant ? Si oui, il faut sans doute prévoir une boutonnière. (La photo et les explications ne sont pas très précises) Merci pour votre aide Sylvette
01.05.2014 - 10:25DROPS Design answered:
Bonjour Mme Andrieu, les boutonnières se font le long du devant gauche, pas le long de la bordure tricotée pour le col. Bon tricot!
02.05.2014 - 10:06What does M.1 mean in baby drops 1-9?
16.07.2013 - 05:26DROPS Design answered:
Dear Linda, M.1 is the pattern you will find on the right side of measurement chart. 1 square = 1 st x 1 row. Happy knitting!
16.07.2013 - 10:20Hva menes med dette? Hvorfor skal ikke begge sider av forstykket være like lange - eller rettere sagt, hva er rette mål? Det står Høyre forstk:...........Når arb måler 36-41(45-49)cm felles det til hals........ og Venstre forstk:............Når arb måler 36-41 (45-49) cm felles det til hals... Hvlike mål er de rette her?? Det hadde vært fint å få svar. Dere har ennå ikke svart på forrige spørsmål så da må man finne ut av det selv.
15.11.2012 - 09:24DROPS Design answered:
Det er korrekt. Det har med stolpen af göre. Under Bolen staar "Videre økes det 4 m i høyre side til stolpe (til å sy knapper på)". Der faar du flere m paa höjre side. Og under Montering skal du saa plukke op for stolpen og felle til knaphul
16.11.2012 - 17:32Strikker størrelse 3 mnd. Jeg får ikke mønsteret til å stemme når jeg setter sammen de to bena. Har startet mønsteret der det står 3-HB og 3-VB men det ser ut som om det skulle blitt korrekt hvis jeg hadde startet begge på samme sted. Er det noen som kan svare meg på hva som er rett....
27.10.2012 - 10:58Hi Sarah, as translated in pattern text, (in the section describing the pattern): Hb=Right leg Vb=Left leg
03.10.2011 - 17:27What does vb and hb mean in this pattern on the schematic
02.10.2011 - 10:45