
Popular categories
Looking for a yarn?


|
|||||||||||||
Baby Joy |
|||||||||||||
 |
 |
||||||||||||
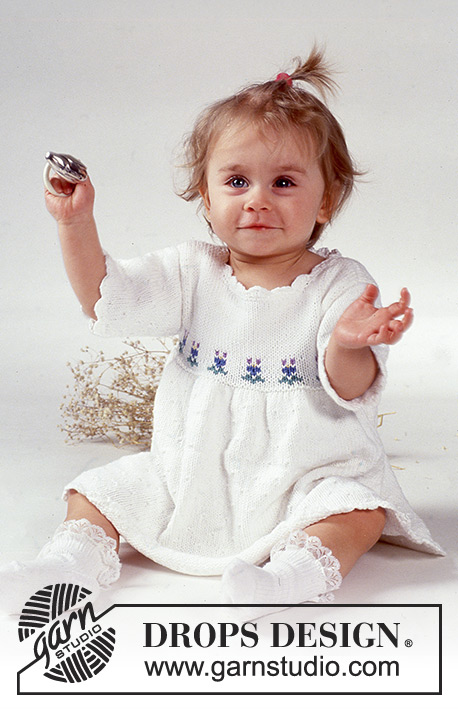
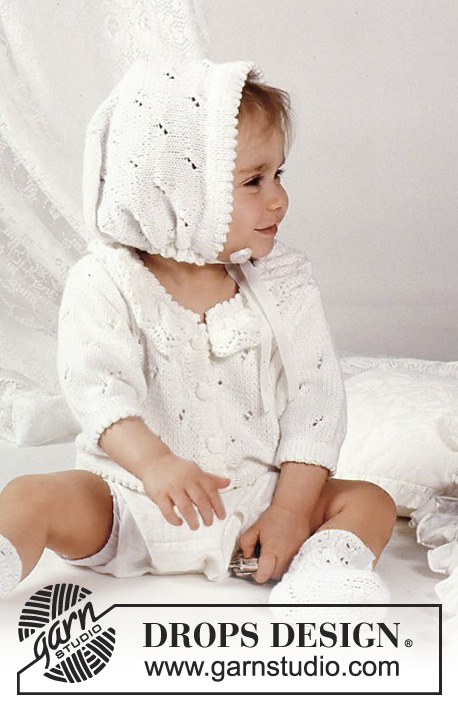
DROPS Suit and socks in lace pattern in Safran.
DROPS Baby 1-9 |
|||||||||||||
|
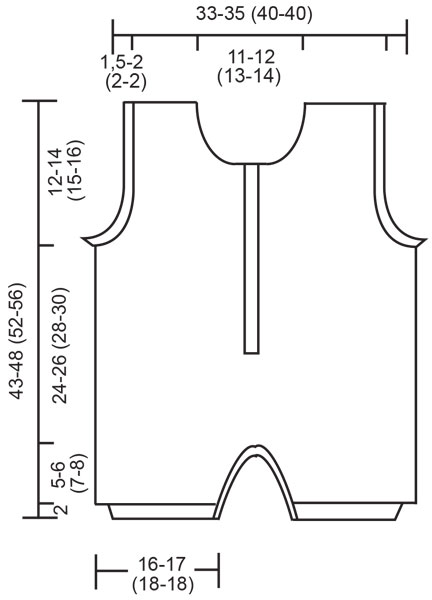
Knitting gauge: 24sts x 32 rows on needles size 3 mm / US 2.5 in stockinette st = 4" x 4" (10x10cm) Seed st: 1st row: K1, P1. 2nd row: Work P over K and K over P. Repeat rows 1 and 2. Hem: Work 2 cm/ 3/4'' in stockinette st. Next row: *K2tog, yo* (=folding edge – all measurements are taken from here), work 2 cm / 3/4'' in stockinette st. Pattern: See diagram (1 diagram = 1 repeat). Pattern is seen from RS. Hb=Right leg Vb=Left leg Left leg: Cast on 80-88 (90-90) sts on needles size 2.5 mm / US 1.5 with white. Work hem. Change to needles size 3 mm / US 2.5. Work M.1. and at the same time dec 8-10 (6-6) sts evenly on 1st row = 72-78 (84-84) sts. Inc each side inside 1 edge st 1 st 3-3 (6-6) times for 3 months: every 6th row, for 6/9 months: every 7th row, for 12/18 + 24 months: every 4th row = 78-84 (96-96) sts. Remember to check knitting gauge. Continue until piece measures 7-8 (9-10) cm . Put work aside. Right leg: Work as left leg. Body: Put left right and left leg on a circ needle and work in the round = 156-168 (192-192) sts. Continue in pattern until piece measures 16-17 (18-19) cm . Bind off 6 sts mid front for slit and finish piece working back and forth on needle. Cast on 4 sts on right side for button band. These 4 sts are worked in seed st. Continue until piece measures 31-34 (37-40) cm . Work next row as follows: work 36-39 (45-45) sts in M.1, bind off 2-3 (3-3) sts for arm hole, work 74-78 (90-90) sts in M.1, bind off 2-3 (3-3) sts for arm hole, work 36-39 (45-45) sts in M.1. Finish each side separately. Right front: = 40-43 (49-49) sts. Dec for arm hole on every other row as follows: 1 st 2-3 (3-3) times = 38-40 (46-46) sts. The 4 front sts is still worked in seed st. Continue until piece measures 36-41 (45-49) cm . Dec for neck on every other row as follows: 9-11 (13-14) sts once, 2 sts once, 1 st 5 times. Continue until piece measures 43-48 (52-56) cm . Bind off remaining sts. Left front: = 36-39 (45-45) sts. Dec for arm hole on every other row as follows: 1 st 2-3 (3-3) times = 34-36 (42-42) sts. Continue until piece measures 36-41 (45-49) cm . Dec for neck on every other row as follows: 5-7 (9-10) sts once, 2 sts once, 1 st 5 times. Continue until piece measures 43-48 (52-56) cm . Bind off remaining sts. Back: = 74-78 (90-90) sts. Dec for arm hole as on front = 70-72 (84-84) sts. Continue until piece measures 41-46 (50-54) cm . Bind off centre 22-24 (28-30) sts for neck. Dec each side of neck on every other row: 1 st twice. Continue until piece measures 43-48 (52-56) cm . Bind off remaining sts. Sleeve: Pick up approx 70 to 80 sts around arm hole on circ needle size 2.5 mm / US 1.5 and work hem. Assembly: Sew shoulder seams. Button band: Pick up approx 66 to 78 sts along left front on circ needle size 2.5 mm / US 1.5 and work hem, but after 0.5cm make 6 button holes evenly spaced – 1 button hole= bind off 2 sts, cast on 2 sts on next round. Also make button holes after the fold (row of holes). Fold all hems to WS along fold and sew. Pick up approx 90 sts around neck on circ needle size 2.5 mm / US 1.5 and work hem. Inside leg: (on back): Pick up approx 50 sts on needle size 2.5 mm / US 1.5 and work 5 rows in seed st. Bind off. Inside leg: (on front): Pick up sts as on back and work hem but after 0.5cm make 6 button holes evenly spaced (I button hole is worked as on button band). Also make button hole after the fold. Bind off and fold to WS and sew. Socks: Size: 3 – 6/9 (12/18 -24) months. Length of foot: 10-11 (12-14) cm . Materials: DROPS Safran from Garnstudio 50-50 (50-50) g col 017, white DROPS double pointed needles: 3mm. Ribbon. Knitting gauge: 24sts x 32 rows on needles size 3 mm / US 2.5 in stockinette st = 4" x 4" (10x10cm) 1 Ridge: *P1 round, K1 round *, repeat *-*. Sock: Cast on 30-35 (40-40) sts on double pointed needles size 3 mm / US 2.5 with white. Work 2 Ridges. Work M.2 until piece measures 7-8 (8-9) cm . K 1 round in stockinette st. Next round: *K2tog, yo*, 2 rounds in stockinette st. Finish in stockinette st. Heel: Work 3-4 (4-4) cm in stockinette st back and forth on needle over mid 18 sts. Decrease for heel: (1st row RS): 1st row: K10, K2tog back of loop, K1, turn. 2nd row: S1, P4, P2tog, P1, turn. 3rd row: S1, K5, K2tog back of loop, K1, turn. 4th row: S1, P6, P2tog, P1, turn. 5th row: S1, K7, K2tog back of loop, K1, turn. 6th row: S1, P8, P2tog, P1, turn. 7th row: K2tog, K8, K2tog back of loop = 10 sts left on needle. Pick up 7-8 (9-9) sts each side of heel and put all sts on one needle = 36-43 (50-50) sts. Continue in stockinette st and at the same time dec each side of the 12-17 (22-22) sts on top of foot on every row as follows: 1 st 3-4 (4-4) times = 30-35 (42-42) sts. Continue until foot measures 7-8 (9-11) cm (measured from start of heel dec). Put a marker each side and dec for toes at beginning of every other row (4 dec in all) 1 st 6-7 (8-8) times = 6-7 (10-10) sts. Pull double thread through remaining sts and fasten. Insert ribbon through holes. |
|||||||||||||
Diagram explanations |
|||||||||||||
|
|||||||||||||

|
|||||||||||||
|
|||||||||||||
|
Have you made this or any other of our designs? Tag your pictures in social media with #dropsdesign so we can see them! Do you need help with this pattern?You'll find tutorial videos, a Comments/Questions area and more by visiting the pattern on garnstudio.com. © 1982-2024 DROPS Design A/S. We reserve all rights. This document, including all its sub-sections, has copyrights. Read more about what you can do with our patterns at the bottom of each pattern on our site. |
|||||||||||||


With over 40 years in knitting and crochet design, DROPS Design offers one of the most extensive collections of free patterns on the internet - translated to 17 languages. As of today we count 304 catalogs and 11422 patterns - 11417 of which are translated into English (US/in).
We work hard to bring you the best knitting and crochet have to offer, inspiration and advice as well as great quality yarns at incredible prices! Would you like to use our patterns for other than personal use? You can read what you are allowed to do in the Copyright text at the bottom of all our patterns. Happy crafting!
Comments / Questions (24)
Bonjour, Merci pour tous ces beaux modèles que vous nous offrez. Pour celui-ci, je me retrouve avec la même question que Nadine. Quelle est la bonne longueur 35 ou 36 cm pour les devants droite et gauche ? Dans l’attente de votre réponse, Bien cordialement, Suzanne
19.04.2024 - 19:02DROPS Design answered:
Bonjour Suzanne, on va corriger cela, merci pour votre remarque. La bonne longueur est 36 cm pour les devants droite et gauche. Bon tricot!
20.04.2024 - 09:54Werden die Beine auf der Rundstricknadel gestrickt, oder in Reihen?
26.03.2024 - 20:40DROPS Design answered:
Liebe Frau Becker, Beine werden in Reihen gestrickt, dann am Ende wird man eine Blende am Vorderteil (mit Knopflöcher) und am Rückenteil gestrickt - siehe letzen Absath für Anzug. Viel Spaß beim Stricken!
02.04.2024 - 10:39Sehr schöner Body! War einfach zu stricken, Anleitung sehr gut! Bei den Socken bin ich nicht zurecht gekommen, es fehlen leider Bilder dazu.
04.05.2023 - 14:58Bei den Socken: welches sind die mittleren 12 Maschen? Wie nehme ich 3 Maschen auf ein Mal in einer Reihe, auf beiden Seiten, ab?
04.05.2023 - 14:56DROPS Design answered:
Liebe Gisela, die 12 mittleren Maschen sind die 12 Maschen die nicht gestrickt wurden, als man die Ferse gestrickt hatte (1. Größe). Nehmen Sie so ab: stricken Sie bis 2 M vor den 12 Maschen übrig sind, 2 M rechts zusammen, stricken Sie die 12 Maschen und stricken Sie dann 2 M rechts verschränkt zusamen. Bei der nächsten Runde stricken Sie ohne Abnahmen. Diese 2 Runden stricken Sie noch 2 Mal (= 3 Mal insgesamt x 2 Abnahmen = 6 Maschen abgenommen = 30 M übrig). Viel Spaß beim stricken!
04.05.2023 - 15:53Jeg er ved at strikke str. 3 mdr. men har lige målt modtageren og han er 30 cm fra skulder til lige efter ble. Det kan jeg ikke få til at passe med målene i opskriften?
10.07.2022 - 06:19DROPS Design answered:
Hej Majbrit. Enligt måleskitsen så är delen från skuldern till början av ben 36 cm (43-5-2) så det bör passa bra, du kan ev. välja att göra den lite kortare om du önskar det. Mvh DROPS Design
12.07.2022 - 08:52Ich arbeite gerade an der vorderen Blende. Auf dem Foto sieht man deutlich die doppelte Kante, in der Beschreibung steht aber etwas von Perlmuster? Nach 0,5 cm Knopflöcher arbeiten. Danach geht es nicht weiter??? Wieviele Reihen noch ? Wann soll man abketten? Genauso ist es für den Schritt beschrieben. Ich weiß nicht , wie man da Knöpfe schließen soll.
31.01.2021 - 18:40DROPS Design answered:
Liebe Andrea, wieviele Reihe sind es hängt von Ihrer Maschenprobe, wichtig ist hier die Höhe = 0,5 cm für die Knöpfe - die Kante wird ganz am Anfang erklärt: 2 cm glatt, 1 Reihe für die Kante (= 2 re zs, 1 Umschlag), 2 cm glatt. Vergessen Sie nicht, die Knöpfe nach der Kante noch einmal zu stricken (Kante falten um die Länge anzupassen). Viel Spaß beim stricken!
01.02.2021 - 09:38Ich bin beim vorder/Rückenteil. Dort heißt es dir große 6/9 Monate, man sollte ab der Knopfleiste, wo man beginnt hin und her zu stricken, noch 34 cm stricken. Der Overall wäre dann aber SEHR lang. Kann es sein, daß hier 34 cm ab dem Schritt genesen gemeint sind? Echt schönes Muster, aber die Erklärungen in der Anleitung sind dürftig. Wahrscheinlich, weil es zu den älteren gehört. Danke aber für das Muster.
04.07.2020 - 12:39DROPS Design answered:
Liebe Maïmouna, in die 2. Größe strickt man hin und zurück wenn die Arbeit 34 cm mist, diese 34 cm bestehen aus: 2 cm Bündchen (Bein) + 6 cm bein + 26 cm (bis Armausschnitt) - die 6 Maschen für den Blende wurden nach 17 cm abgekettet (= 2 + 6 + 9 cm). Viel Spaß beim stricken!
06.07.2020 - 08:25Hej Jeg kan ikke finde mønsteret/diagrammet. Skal jeg betale for at få diagrammet tilsendt.? Venlig hilsen Pernille Svold
14.01.2018 - 17:42DROPS Design answered:
Hei Pernille. Alle våre oppskrifter på nettet er gratis. På denne oppskriften vises ikke diagrammet på den danske siden, dette skal vi ordne med engang. Takk for at du gjorde oss oppmerksom på dette. mvh Drops design
17.01.2018 - 08:15The chart M1 shows all stitches are knit but I assumed from photo that the main body of garment is stocking stitch. I have tried all knit stitches but doesn't look right. Please clarify.
10.07.2017 - 13:18DROPS Design answered:
Dear Mrs Hutton, M.1 is worked K from right side, ie in stocking st you will then work K from RS and P from WS (remember holes). Happy knitting!
10.07.2017 - 14:16Bonjour j'ai quelques difficultés à placer les jours malgré le diagramme. Pourriez vous me dire combien de maille sépare les jours entre eux pour la taille 6-9 mois .Merci
19.04.2017 - 10:33DROPS Design answered:
Bonjour Mme Boudeux, au 5ème rang de M.1, vous aurez 10 m entre chaque (2 m ens à l'end, 1 jeté) - commencez les jambes par 2 m end, 2 m ens à l'end, 1 jeté, etc... au 7ème rang de M.1, vous commencez par 1 m end, 2 m ens à l'end, 1 jeté, et tricotez 10 m end entre chaque (2 m ens à l'end, 1 jeté), et ainsi de suite. Bon tricot!
19.04.2017 - 10:37