DROPS Safran
DROPS Safran
100% Cotton
from 1.30 £ /50g
Get the yarn to make this pattern from 5.20£.

The yarn cost is calculated from the pattern’s smallest size and the yarn’s cheapest product type. Looking for an even better price? You might find it on the DROPS Deals!

DROPS SS24

Sweet Smile

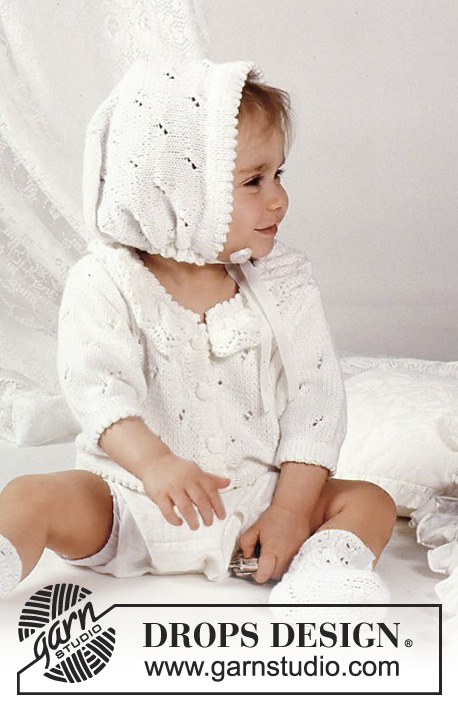
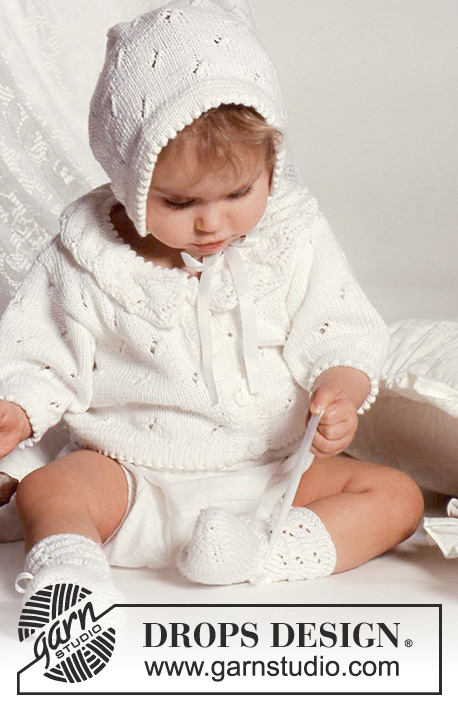
Set of knitted jacket with lace pattern and frill collar, bonnet and socks in for baby and children in DROPS Safran

DROPS Baby 1-8
Size: 3 – 6/9 (12/18 -24) months

Materials: Drops Safran from Garnstudio
100% Egyptian cotton 50 g= 160m
Jacket:
100-150 (200-250) g col 017, white
Set:
200-250 (250-300) g col 017, white.

Drops circular needle: 2.5mm and 3mm.
Drops double pointed needles: 2.5mm and 3mm
Drops straight needles: 2.5mm and 3mm, or the size needed to obtain the correct knitting tension.
Drops buttons: 4 pcs.

-------------------------------------------------------

Alternative Yarn – See how to change yarns here
Yarn Groups A to F – Use the same pattern and change the yarn here
Yarn usage using an alternative yarn – Use our yarn converter here

-------------------------------------------------------

DROPS Safran
DROPS Safran
100% Cotton
from 1.30 £ /50g
Get the yarn to make this pattern from 5.20£.

The yarn cost is calculated from the pattern’s smallest size and the yarn’s cheapest product type. Looking for an even better price? You might find it on the DROPS Deals!

Pattern instructions

NOTE: This pattern is written in British English. All measurements in charts are in cm. For conversion from cm to inches - click here. There are different terms for crocheting in British and American English. If this pattern includes crochet, click for "crochet terms" here. For this pattern in American English, please click here.
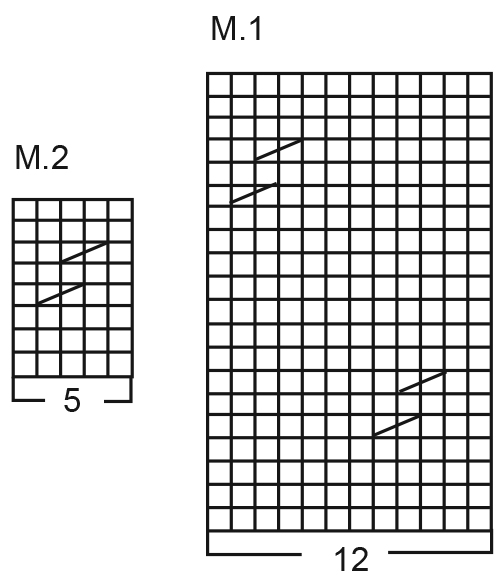
Knitting Tension: 24sts x 32 rows on needles size 3mm in stocking st = 10x10cm.

Hem: Work 2 cm in stocking st. Next row: K2tog, yo (=fold – all measurements are taken from here), work 2 cm stocking st.

Lace pattern: Worked over 13 sts.
1st row and all WS rows: K2, P sts until 2 sts remain, K2.
2nd row: S1, K3, yo, K5, yo, K2tog, yo, K2.
4th row: S1, K4, S1, K2tog, psso, K2, (yo, K2tog) – repeat twice, K1.
6th row: S1, K3, S1, K1, psso, K2, (yo, K2tog) – repeat twice, K1.
8th row: S1, K2, S1, K1, psso, K2, (yo, K2tog) – repeat twice, K1.
10th row: S1, K1, S1, K1, psso, K2, (yo, K2tog) – repeat twice, K1.
12th row: K1, S1, K1, psso, K2, yo, K1, yo, K2tog, yo, K2.
14th row: S1, (K3, yo) – repeat twice, K2tog, yo, K2.
Repeat rows 1-14.

Pattern: See diagram (1 diagram = 1 repeat). Pattern is seen from RS.


Jacket:
Jacket is worked back and forth on circ needle. Cast on 130-140(150-168) sts on circ needles size 2.5mm with white. Work hem. Change to circ needle size 3mm, work M.1 and at the same time dec 10-8 (6-0) sts evenly on first row = 120-132 (144-168) sts. Continue until piece measures 11-12 (13-15) cm. Next row: work 28-31 (34-39) sts across front, cast off 4-4 (4-6) sts for armhole, work 56-62 (68-78) sts across back, cast off 4-4 (4-6) sts for armhole, work 28-31 (34-39) sts across front. Finish fronts and back separately.

Left front: = 28-31 (34-39) sts. Continue in pattern. Dec for armhole on every other row as follows: 1 st 2-2 (3-3) times = 26-29 (31-36) sts. Continue until piece measures 17-19 (21-24) cm. Dec for neck on every other row as follows: 6-7 (9-10) sts once, 1 sts 7 times. Continue until piece measures 24-26 (28-31) cm. Cast off remaining sts for shoulder.

Right front: Work as left front.

Back: = 56-62 (68-78) sts. Continue in pattern. Dec for armhole each side on every other row as follows: 1 st 2-2 (3-3) times = 52-58 (62-72) sts. Continue until piece measures 23-25 (27-30) cm. Cast off centre 22-24 (28-30) sts for back neck. Dec each side for neck on every other row as follows: 1 st twice.
Continue until piece measures 24-26 (28-31) cm. Cast off remain sts for each shoulder.

Sleeves: Cast on 38-40 (40-42) sts on straight needles size 2.5mm with white. Work hem. Change to needles size 3mm, work M.1 and at the same time inc 8-8 (8-8) sts evenly on first row = 46-48 (48-50) sts. At the same time inc 1 sts each side inside 1 edge st as follows: 1 st 8-10 (12-13) times on every 5th row = 62-68 (72-76) sts. Continue until piece measures 16.5-20 (22-24) cm. Cast off 3 sts each side for sleeve top. Dec each side on every other row as follows: 5 sts 2-3 (3-3) times. Continue until piece measures 18-22 (24-26) cm. Cast off.

Assembly: Sew shoulder seams. Left button band: Pick up 40-50 sts on needle size 2.5mm with white along left front and work hem. Cast off. Right button band: Work as left band but after 1 cm make 4 button holes evenly spaced – 1 button hole = cast off 2 sts – cast on 2 sts on next row over cast off sts. Turn hem along fold to WS and sew. Collar: Cast on 13 sts on needle size 3mm and work approx 70 cm in Lace pattern (see explanation). Cast off (adjust to pattern repeat). Pick up approx 120 sts around the edge of the Lace pattern = collar on needles 2.5mm and work 1 cm in stocking stand at the same time dec evenly on row to 80 sts. Next row: *K2tog, yo*, then work 1 cm in stocking st. Cast off.
Fold collar in half and sew to neck of jacket ( - pull the edge a bit when sewing to the back to get a nicer finish). Sew sleeve seams. Sew sleeves to body in edge st to avoid seams being too bulky. Sew in buttons.

Bonnet:

Size: 3 – 6/9 (12/18 -24) months.
Height of bonnet: 15.5-17 (20-20) cm.

Materials: Drops Safran from Garnstudio
100% Egyptian cotton 50 g= 160m
50-50 (50-100) g col no 017, white

Drops needles: 2.5mm and 3mm.
90 cm ribbon.

Knitting Tension: 24sts x 32 rows on needles size 3mm in stocking st = 10x10cm.

Edge: Work 2 cm in stocking st. Next row: *K2tog, yo*. (=fold, all measurements are taken from here). Work 2 cm in stocking st.

Bonnet: Cast on 72-84 (96-96) sts on needle size 2.5mm and work Edge.
Change to needle size 3mm and work M.1. Continue until piece measures 15-17 (18-18.5) cm. Cast off 24-26 (32-32) sts each side. Continue in M.1. across the centre 24-32 (32-32) sts until piece measures 25-28 (30-32) cm.
Cast off.

Assembly: Sew seam centre back. Fold front edge in half to WS and sew. Pick up approx 100 sts along bottom edge (and also the bottom of front edge)on needle size 2.5mm and work 2 rows in stocking st. Next row (RS): *K2tog, yo*, then 1 row stocking st, 1 row in reverse stocking st. Cast off. Insert ribbon through holes.


Socks:

Size: 3 – 6/9 (12/18 -24) months.

Length of foot: 10-11 (12-14) cm.

Materials: Drops Safran from Garnstudio
100% Egyptian cotton 50 g= 160m
50-50 (50-50) g col 017, white

Drops double pointed needles: 3mm.
Ribbon.

Knitting Tension: 24sts x 32 rows on needles size 3mm in stocking st = 10x10cm.

1 Ridge: *1 round reverse stocking st, 1 round stocking st*.

Sock: Cast on 30-35 (40-40) sts on double pointed needles size 3mm with white. Work 2 Ridges. Next round: *K2tog, yo*, 2 rounds in stocking st. Work M.2 until piece measures 7-8 (8-9) cm. Heel: Work 3-4 (4-4) cm in stocking st back and forth on needle over centre back 18 sts. Decrease for heel: (1st row RS): 1st row: K10, K2tog back of loop, K1, turn. 2nd row: S1, P4, P2tog, P1, turn. 3rd row: S1, K5, K2tog back of loop, K1, turn. 4th row: S1, P6, P2tog, P1, turn. 5th row: S1, K7, K2tog back of loop, K1, turn. 6th row: S1, P8, P2tog, P1, turn. 7th row: K2tog, K8, K2tog back of loop = 10 sts left on needle. Pick up 7-8 (9-9) sts each side of heel and put all sts on one needle = 36-43 (50-50) sts. Continue in stocking st and at the same time dec each side of the 12-17 (22-22) sts on top of foot on every row as follows: 1 st 3-4 (4-4) times = 30-35 (42-42) sts. Continue until foot measures 7-8 (9-11) cm (measured from start of heel dec). Put a marker or thread each side and dec for toes at beginning of every other row (4 dec in all) 1 st 6-7 (8-8) times = 6-7 (10-10) sts. Pull double thread through remaining sts and fasten.
Insert ribbon through holes.

Diagram

symbols = K
symbols = K2tog, yo
diagram
diagram

Each of our patterns has specific tutorial videos to help you.

Do you have a question? See a list of frequently asked questions (FAQ)

Knitting tension is what determines the final measurements of your work, and is usually measured per 10 x 10 cm. It is provided like so: number of stitches in width x number of rows in height - eg: 19 stitches x 26 rows = 10 x 10 cm.

The knitting tension is very individual; some people knit/crochet loosely while others work tightly. You adjust the knitting tension with the needle size, which is why the suggested needle size is only meant as a guide! You need to adjust this (up or down) to ensure that YOUR knitting tension matches the knitting tension provided in the pattern. If you work with a different knitting tension than provided you will have a different yarn consumption, and your work will have different measurements than what the pattern suggests.

The knitting tension also determines which yarns can replace each other. As long as you achieve the same knitting tension you can replace one yarn with another.

See DROPS lesson: How to measure your tension/gauge

See DROPS video: How to make a gauge tension swatch

The required amount of yarn is provided in grams, eg: 450 g. To calculate how many balls you’ll need you first need to know how many grams are in 1 ball (25g, 50g or 100g). This information is available if you click on the individual yarn quality on our pages. Divide the amount required with the amount of each ball. For example, if each ball is 50g (the most common amount), the calculation will be as follows: 450 / 50 = 9 balls.

The important thing when changing from one yarn to another is that the knitting/crochet tension remains the same. This is so that the measurements of the finished piece will be the same as on the sketch provided. It is easier to achieve the same knitting tension using yarns from the same yarn group. It is also possible to work with multiple strands of a thinner yarn to achieve the knitting tension of a thicker one. Please try our yarn converter. We recommend you to always work a test swatch.

Please NOTE: when changing yarn the garment might have a different look and feel to the garment in the photo, due to individual properties and qualities of each yarn.

See DROPS lesson: Can I use a different yarn than the one mentioned in the pattern?

All our yarns are categorised into yarn groups (from A to F) according to thickness and knitting tension – group A contains the thinnest yarns and group F the thickest. This makes it easier for you to find alternative yarns to our patterns, should you wish to switch yarn. All yarns within the same group have a similar knitting tension and can easily replace each other. However, different yarn qualities have different structures and properties which will give the finished work a unique look and feel.

Click here for an overview of the yarns in each yarn group

At the top of all our patterns you’ll find a link to our yarn calculator, which is a helpful tool should you wish to use a different yarn than suggested. By filling in the yarn quality you wish to replace, the amount (in your size) and number of strands, the calculator will present good alternative yarns with the same knitting tension. Additionally it will tell you how much you’ll require in the new qualities and whether you’ll need to work with multiple strands. Most skeins are 50g (some are 25g or 100g).

If the pattern is worked with multiple colours, every colour will have to be calculated separately. Similarly, if the pattern is worked with several strands of different yarns (for example 1 strand Alpaca and 1 strand Kid-Silk) you will have to find alternatives for each, individually.

Click here to see our yarn calculator

Since different yarns have different qualities and textures we have chosen to keep the original yarn in our patterns. However, you can easily find options among our available qualities by using our yarn calculator, or simply pick a yarn from the same yarn group.

It is possible that some retailers still have discontinued yarns in stock, or that someone has a few skeins at home that they would like to find patterns for.

The yarn calculator will provide both alternative yarn as well as required amount in the new quality.

If you think it's hard to decide what size to make, it can be a good idea to measure a garment you own already and like the size of. Then you can pick the size by comparing those measures with the ones available in the pattern's size chart.

You'll find the size chart at the bottom of the pattern.

See DROPS lesson: How to read size chart

The needle size provided in the pattern serves only as a guide, the important thing is to follow the knitting tension. And since knitting tension is very individual, you will have to adjust the needle size to ensure that YOUR tension is the same as in the pattern – maybe you’ll have to adjust 1, or even 2 needle sizes, up or down to achieve the correct tension. For this, we recommend that you work test swatches.

Should you work with a different knitting tension than the one provided, the measurements of the finished garment might deviate from the measurement sketch.

See DROPS lesson: How to measure your tension/gauge

See DROPS video: How to make a tension/gauge swatch

Working a garment top-down provides more flexibility and room for personal adjustment. For example it is easier to try the garment on while working, as well as making adjustments to length of yoke and shoulder caps.

The instructions are carefully explaining every step, in the correct order. Diagrams are adjusted to the knitting direction and are worked as usual.

The diagram depicts all rows/rounds, and every stitch seen from the right side. It is read from bottom to top, from right to left. 1 square = 1 stitch.

When working back and forth, every other row is worked from the right side and every other row is worked from the wrong side. When working from the wrong side, the diagram will have to be worked reversed: from left to right, knit stitches are purled, purl stitches are knit etc.

When working in the round every round is worked from the right side and the diagram are worked from right to left on all rounds.

See DROPS lesson: How to read knitting diagrams

The diagram depicts all rows/rounds, and every stitch seen from the right side. It is worked from bottom to top, from right to left.

When working back and forth every other row is worked from the right side: from right to left and every other row is worked from the wrong side: from left to right.

When working in the round, every row in the diagram are worked from the right side, from right to left.

When working a circular diagram you start in the middle and work your way outwards, counter clockwise, row by row.

The rows usually start with a given number of chain stitches (equivalent to the height of the following stitch), this will either be depicted in the diagram or explained in the pattern.

See DROPS lesson: How to read crochet diagrams

Instructions for working several diagrams after each other on the same row/round, will often be written like so: “work A.1, A.2, A.3 a total of 0-0-2-3-4 times". This means you work A.1 once, then A.2 is worked once, and A.3 is repeated (in width) the number of times provided for your size – in this case like so: S = 0 times, M = 0 times, L=2 times, XL= 3 times and XXL = 4 times.

The diagrams are worked as usual: begin with the first row in A.1, then work the first row in A.2 etc.

See DROPS lesson: How to read knitting diagrams

See DROPS lesson: How to read crochet diagrams

The total width of the garment (from wrist-to-wrist) will be larger in the larger sizes, despite the actual sleeves being shorter. The larger sizes have longer sleeve caps and wider shoulders, so there will be a good fit in all sizes.

The measurement sketch/schematic drawing provides information regarding the full length of the garment. If it’s a jumper or a jacket the length is measured from the highest point on the shoulder closest to the neckline, and straight down to the bottom of the garment. It is NOT measured from the tip of shoulder. Similarly, the length of yoke is measured from the highest point on the shoulder and down to where yoke is split into body and sleeves.

On a jacket measures are never taken along bands, unless specifically stated. Always measure inside band stitches when measuring the length.

See DROPS lesson: How to read a schematic drawing

Diagrams are often repeated on the round or in height. 1 repeat is the diagram the way it appears in the pattern. If it says to work 5 repeats of A.1 in the round, then you work A.1 a total of 5 times after/next to each other in the round. If it says to work 2 repeats of A.1 vertically/in height you work the entire diagram once, then begin again at the start and work the entire diagram one more time.

Chain stitches are slightly narrower than other stitches and to avoid working the cast-on edge too tight, we simply chain more stitches to begin with. The stitch count will be adjusted on the following row to fit the pattern and measurement sketch.

The rib edge is more elastic and will contract slightly compared to, for example, stocking stitch. By increasing before the rib edge, you avoid a visible difference in width between the rib edge and the rest of the body.

It’s very easy to cast off too tightly, and by making yarn overs while casting off (and simultaneously casting these off) you avoid a too tight cast off edge.

See DROPS video: How to bind off with yarn overs (yo)

To achieve an even increase (or decrease) you can increase on, for example: every 3rd and 4th row alternately, like so: work 2 rows and increase on the 3rd row, work 3 rows and increase on the 4th. Repeat this until the increase is complete.

See DROPS lesson: Increase or decrease 1 st on every 3rd and 4th row alternately

Should you prefer to work in the round instead of back and forth, you may of course adjust the pattern. You’ll need to add steeks mid-front (usually 5 stitches), and follow the instructions. When you would normally turn and work from the wrong side, simply work across the steek and continue in the round. At the end you’ll cut the piece open, pick up stitches to work bands, and cover the cut edges.

See DROPS video: How to knit steeks and cut open

Should you prefer to work back and forth instead of in the round, you may of course adjust the pattern so you work the pieces separately and then assemble them at the end. Divide the stitches for the body in 2, add 1 edge stitch in each side (for sewing) and work the front and back pieces separately.

See DROPS lesson: Can I adapt a pattern for circular needles into straight needles?

Pattern repeats can vary slightly in the different sizes, in order to get the correct proportions. If you’re not working the exact same size as the garment in the photo, yours might deviate slightly. This has been carefully developed and adjusted so that the complete impression of the garment is the same in all sizes.

Make sure to follow instructions and diagrams for your size!

If you have found a pattern you like which is available in women’s size it’s not very difficult to convert it to men’s size. The biggest difference will be the length of sleeves and body. Start working on the women size that you think would fit across the chest. The additional length will be worked right before you cast off for the armhole/sleeve cap. If the pattern is worked top-down you can add the length right after the armhole or before the first decrease on sleeve.

Regarding additional yarn amount, this will depend on how much length you add, but it is better with a skein too many than too few.

All yarns will have excess fibres (from production) that might come off as lint or shedding. Brushed yarns (ie hairier yarns) have more of these loose, excess fibres, causing more shedding.

Shedding also depends on what is worn under or over the garment, and whether this pulls at the yarn fibres. It’s therefore not possible to guarantee that there will be no shedding

Below are some tips on how to get the best result when working with hairier yarns:

1. When the garment is finished (before you wash it) shake it vigorously so the looser hairs come off. NOTE: do NOT use a lint roller, brush or any method that pulls at the yarn.

2. Place the garment in a plastic bag and put it in your freezer - the temperature will cause the fibres to become less attached to each other, and excess fibres will come off easier.

3. Leave in the freezer for a few hours before taking it out and shaking it again.

4. Wash the garment according to the instructions on the yarn label.

Pilling is a natural process that happens to even the most exclusive of fibers. It's a natural sign of wear and tear that is hard to avoid, and that is most visible in high friction areas of your garment like a sweater's arms and cuffs.

You can make your garment look as new by removing the pilling, using a fabric comb or a pill/lint remover.

Still can't find the answer you need? Then scroll down and leave your question so one of our experts can try to help you. This will be done normally within 5 to 10 working days.
In the meantime, you can read the questions and answers that others have left to this pattern or join the DROPS Workshop on Facebook to get help from fellow knitters/crocheters!

You might also like...

Post a comment to pattern DROPS Baby 1-8

We would love to hear what you have to say about this pattern!

If you want to leave a question, please make sure you select the correct category in the form below, to speed up the answering process. Required fields are marked *.

Comments / Questions (42)

country flag Claudia wrote:

Ich stricke die Jacke für ein neu geborenes Baby, ist es richtig den Kragen 70 cm zu Stricken. Kommt mir sehr lange vor.

27.02.2019 - 09:18

DROPS Design answered:

Liebe Claudia, diese Anleitung fängt mit Grösse 3 Monate an, wenn Sie die Jacke angepasst haben, sollen Sie den kragen auch noch dazu anpassen. Viel Spaß beim stricken!

27.02.2019 - 11:04

country flag Claudia wrote:

Hallo, ich weiß nicht wo ich anfangen soll, es steht Spitze: 13 M. Nächster Abschnitt: 130 M auf einer Rundstricknadel 2,5 anfangen. Wo fängt es an zum stricken ?

26.02.2019 - 10:18

DROPS Design answered:

Liebe Claudia, Sie stricken zuerst den Kragen: 13 M anschlagen und die Spitze (siehe oben, am Anfang der Anleitung) stricken, bis die Arbeit 70 cm misst, abketten. Dann fassen Sie 120 M auf die eine Seite vom Kragen auf, und 1 cm glatt rechts stricken, dann das Lochmuster, 1 cm glatt rechts und abketten. Viel Spaß beim stricken!

26.02.2019 - 11:24

country flag Paivi Alison wrote:

I dont quite understand if I am supposed to start the lace pattern after the folded hem (Sweet Smile jacket) or start following the grids as it says “work M.1 and at the same time dec evenly...” There is no M.1 or M.2 !! The grids shown (but they are not marked as M1 or M2) are either worked over 5 stitches or 12 stitches - both of which are different from lace pattern that is worked over 13 stitches repeating rows 1-14? Please help!!

10.06.2018 - 13:49

DROPS Design answered:

Dear Mrs Paivi, you are right - diagram names are missing, M.1 is the large diagram worked over 12 sts and M.2 the smallest one worked over 5 sts. Correction will be added asap. Happy knitting!

11.06.2018 - 09:43

country flag VIGNI wrote:

Col : Avec les aiguilles 3 monter 13 m et tricoter environ 70 cm en point ajouré. Est-ce bien 70 cm NORME FRANCAISE, merci

03.02.2017 - 22:39

DROPS Design answered:

Bonjour Mme Vigni, on tricote 70 cm (norme internationale des cm), le col se tricote dans le sens de la longueur. Bon tricot!

06.02.2017 - 09:07

Knut wrote:

Det betyder "omslag".

03.07.2016 - 20:22

country flag Gitte Krog Awwal wrote:

Er igang med kraven, men forstår ikke hvad oms betyder? Tak.

03.07.2016 - 18:57

DROPS Design answered:

Hej Gitte. Jeg vil mene det er et omslag (slaa om). God fornöjelse videre.

04.07.2016 - 16:35

country flag Claire Solomons wrote:

This is such a beautiful pattern. I wish to make it for my 5 month old great granddaughter but the instructions confuse me. The M-1 graph and the M-2 graph are different from the lace pattern. I would very much appreciate an explanation from you. I am a very experienced knitter too. I started knitting at the age of ten and have been at it for 80 odd years. Any help you can offer would be great. Thank you so much.

09.05.2016 - 01:47

DROPS Design answered:

Dear Mrs Solomons, there is no chart for the lace pattern, only written pattern. To read diagrams M.1 and M.2, start at the very bottom corner on the right side and read towards the left from RS and from the left towards the right from WS. Read more about diagrams here. Happy knitting!

09.05.2016 - 11:17

Lemarchand wrote:

Je ne comprends pas comment attacher le motif ajouré au col.faut-il le coudre mais comment? Merci

29.01.2016 - 08:44

DROPS Design answered:

Bonjour Mme Lemarchand, quelques modifications ont été ajoutées pour le col: on relève les mailles le long de la bordure ajourée et on tricote l'ourlet picot que l'on plie ensuite en double et que l'on coud le long de l'encolure. Bon assemblage!

01.11.2016 - 15:07

country flag Brigitte Korhammer wrote:

Die Anleitung enthält sehr viele Fehler bzw. Ungenauigkeiten. Beispiel: wenn ich die Knopflöcher so einstricke, kann die Jacke nicht zugeknöpft werden, da die Kante doppelt liegt. Ein gravierender Fehler ist auch beim vorderen Halsausschnitt. Und abheben ist nicht dasselbe wie abnehmen! Schlecht übersetzt!

20.06.2015 - 21:14

country flag DROPS Design NL wrote:

Hoi Hanneke. We hebben het patroon nu ook aangepast zodat het duidelijker is.

19.11.2014 - 10:47