
Popular categories
Looking for a yarn?


|
|||||||||||||||||||
Teddy Bear Parade |
|||||||||||||||||||
 |
 |
||||||||||||||||||
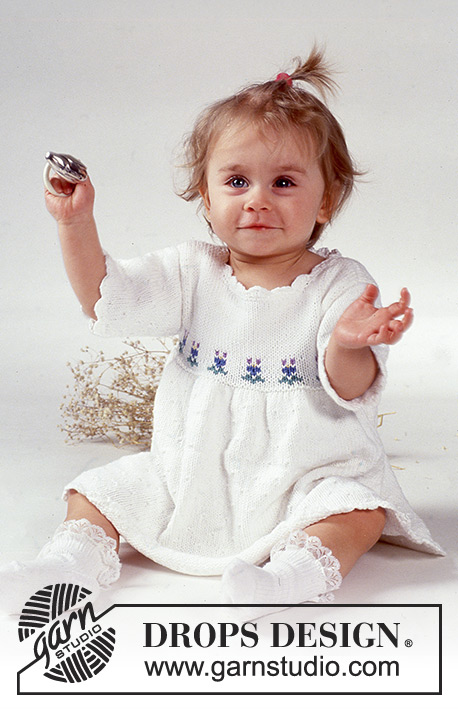
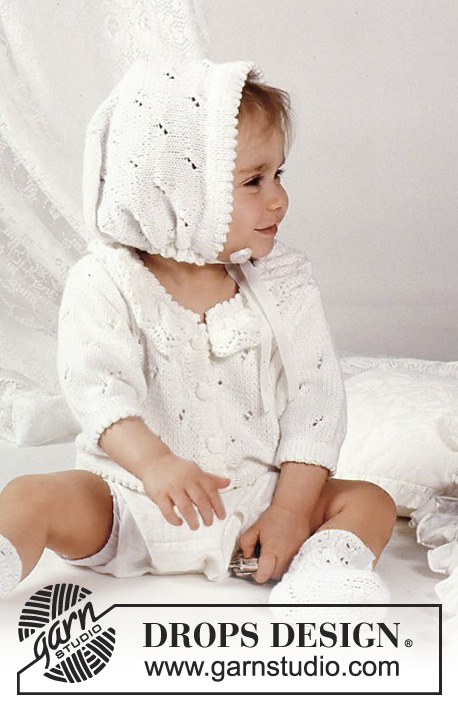
DROPS jacket, sweater and pants with teddy motif and border repeat in Safran.
DROPS Baby 1-7 |
|||||||||||||||||||
|
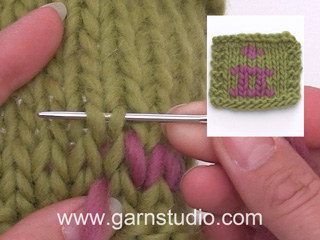
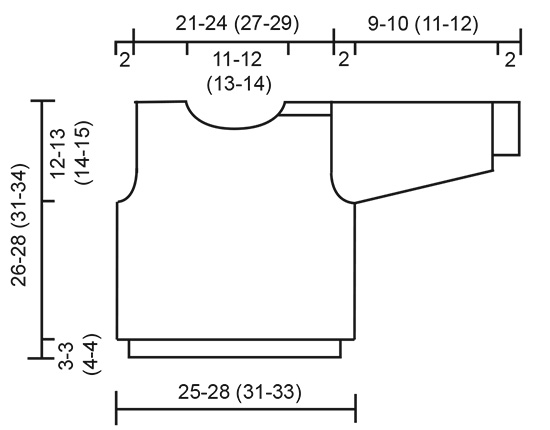
Jacket: Knitting gauge: 24sts x 32 rows on needles size 3 mm / US 2.5 in stockinette st = 4" x 4" (10x10cm). Seed st: 1st row: K1, P1. 2nd row: Work P over K and K over P. Repeat rows 1 and 2. Pattern: See diagram (1 diagram = 1 repeat). Pattern is seen from RS and worked in stockinette st. Body: Jacket is worked back and forth on circ needle. Cast on 136-152(168-184) sts on circ needles size 2.5 mm / US 1.5 with white. Work 2-2 (3-3) cm in seed st. Change to circ needle size 3 mm / US 2.5, and work stockinette st - at the same time put 7 sts each side on needle size 2.5 mm / US 1.5 and work seed st across these for button band – work button holes on right button band , first one when work measures 2 cm / ¾" and then approx 4.5 -5 (6.5-7) cm between each button hole – 1 button hole = bind off 4th st (middle st) , then cast on again on next row. At the same time when piece measures 3-3 (4-4) cm, work M.1 with 1 white edge st each side of button band. On completion of M.1, finish piece in white – remember to check knitting gauge. Continue until piece measures 14-16 (19-20) cm, work next row as follows: Work 36-39 (43-47) sts across front, bind off 4-6 (6-6) sts for arm hole, work 56-62 (70-78) sts across back, bind off 4-6 (6-6) sts for arm hole, work 36-39 (43-47) sts across front. Finish fronts and back separately. Left front: = 36-39 (43-47) sts. Dec for armhole on every other row as follows: 1 st twice = 34-37 (41-45) sts. Continue until piece measures 22-25 (30-32) cm. Dec for neck on every other row as follows: 15-16 (18-19) sts once, 2 sts twice, 1 st twice. Continue until piece measures 26-29 (33-35) cm. Bind off remaining 13-15 (17-20) sts for shoulder. Right front: Work as left front. Back: = 56-62 (70-78) sts. Dec for armhole each side on every other row as follows: 1 st twice = 52-58 (66-74) sts. Continue until piece measures 24-27 (31-33) cm. Bind off centre 24-26 (30-32) sts for neck. Dec 1 st each side for neck. Continue until piece measures 26-29 (33-35) cm. Bind off remaining 13-15 (17-20) sts for each shoulder. Sleeves: Cast on 36-42 (40-42) sts on double pointed needles size 2.5 mm / US 1.5 with white. Work 2-2(3-3) cm in seed st. Change to double pointed needles size 3 mm / US 2.5, work stockinette st, and at the same time inc 0-0 (8-10) sts evenly on first round = 36-42 (48-52) sts. At the same time inc sts under sleeve each side of centre st as follows: 1 st 11-10 (10-10) times for 3months: every 4th round, for 6/9+12/18 months: alternatively every 5th round, for 24 months: every 6th round = 58-62 (68-72) sts. When sleeve measures 3-3 (4-4) cm, work M.1, then finish in white (center 1 repeat on top of sleeve). Continue until piece measures 16.5-20 (22-24) cm. Bind off 6 centre sts under sleeve and finish each side separately working back and forth on needle. Bind off each side on every other row as follows: 5 sts 2-3 (3-3) times. Continue until piece measures 18-22 (24-26) cm. Bind off. Assembly: Sew shoulder seams. Pick up approx 70-80 sts around neck with needles size 2.5 mm / US 1.5 with white. Work 2 cm / ¾" in seed st. Bind off. Sew sleeves to body in edge st to avoid seams being too bulky. Sew in buttons. Pants: Size: 3 – 6/9 (12/18 -24) months Materials: DROPS Safran from Garnstudio 150-200 (250-250) g col 017, white Small amount of col 010, yellow Small amount of col 011, dark yellow Small amount of col 013, coral Small amount of brown DROPS circular needle and double pointed needles: 2.5mm and 3mm/ US 1.5 and 2.5. DROPS buttons: 2 pcs. Knitting gauge: 24sts x 32 rows on needles size 3 mm / US 2.5 in stockinette st = 4" x 4" (10x10cm) Rib: *K1, P1*. Repeat from * - *. Left leg: Cast on 52-62 (72-72) sts on double pointed needles size 2.5 mm / US 1.5 with white. Work 8-10 (10-10) cm rib. Change to double pointed needles size 3 mm / US 2.5. Work M.3. and at the same time inc 24-22 (24-24) sts evenly on 1st round = 76-84 (96-96) sts. Continue until piece measures 21-25 (28-32) cm. Divide work on inside of leg in centre of 1 repeat and work back and forth on needle. Inc 1 st each side for seam= 78-86 (98-98) sts. Continue until piece measures 23-27 (30-34) cm. Bind off 3 sts each side = 72-80 (92-92) sts. Put work aside. Right leg: Work as left leg. Pants: Put left leg and right leg on a circ needle = 144-160 (184-184) sts. Inc on every other round each side of 2 centre sts centre back: 1 st twice – and at the same time dec on every other round each side of centre 2 sts mid front: 1 st twice. Dec as follows: Right side of middle: S1, K1, psso. Left side: K2tog. Continue until piece measures 40-46 (51-56) cm. Work centre 31-35 (41-41) sts centre front and centre back in stockinette st on needle size 3 mm / US 2.5, and work sts each side in rib on needles size 2.5 mm / US 1.5. At the same time dec 8sts evenly across rib on 1st round. Work 3 cm / 1⅛" rib. Bind off 23-27 (33-33) sts each side for armhole and finish back and front separately. Front: = 41-45 (51-51) sts. Continue across all sts on needle size 3 mm / US 2.5. Work rib across 5 sts each side and stockinette st across rest of sts (make sure to make rib pattern fit to continue rib as worked earlier). Dec inside 5 sts each side as follows: 1 st 7-7 (8-8) times alternatively on every *3rd and 4throw* = 27-31 (35-35) sts. Dec in same manner as explained earlier on left and right side. Continue until bib measures 8-8 (10-10) cm (after rib). Change to needle size 2.5 mm / US 1.5 and inc 6 sts evenly on 1st row = 33-37 (41-41) sts. Work 1 cm / ⅜" in rib but after 1 row make 1 button hole 3 sts in from each side – 1 button hole = bind off 2 sts – cast on 2 sts over these on next row. bind off when rib measures 1 cm / ⅜". Piece measures approx 52-58 (65-70) cm. Back: Work as front but when bib measures 4-4 (6-6) cm change to needle size 2.5 mm / US 1.5 and at the same time inc 8 sts evenly on 1st row. Work 1 cm / ⅜" in rib. Bind off centre sts but leave 12 sts each side. Continue on these 12 sts each side on needle size 2.5 mm / US 1.5 until braces are 20 cm long. Bind off. Assembly: Sew seams. Sew in buttons. Embroider M.2 on centre of bib. Embroider mouth in brown with back stitch. Sweater: Materials: DROPS Safran from Garnstudio 100-100 (150-150) g col 010, yellow DROPS circular needle: 2.5mm and 3mm/ US 1.5 and 2.5. DROPS Double pointed needles: 2.5mm and 3mm/ US 1.5 and 2.5 - or the size needed to obtain the correct knitting gauge. DROPS buttons: 3 pcs. Knitting gauge: 24sts x 32 rows on needles size 3 mm / US 2.5 in stockinette st = 10x10cm. Rib: *K1, P1* Body: Cast on 120-134 (148-158) sts on circ needles size 2.5 mm / US 1.5 with yellow. Work 3-3 (4-4) cm rib. Change to circ needle size 3 mm / US 2.5 and work stockinette st. Continue until piece measures 14-15 (17-19) cm. Bind off 6-6 (6-6) sts each side for armhole and finish front and back separately. Front: = 54-61 (68-73) sts. Dec for armhole each side on every other row as follows: 1 st twice = 50-57 (64-69) sts. Continue until piece measures 22-24 (28-31) cm. Bind off centre 14-17 ((18-21) sts for neck and dec on neck edge on every other row as follows: Right shoulder: 2 sts twice, 1 st twice. Continue until piece measures 26-28 (31-34) cm. Bind off. Left shoulder: 1 sts twice on every 3rd row. Continue until piece measures 25-27 (30-33) cm. Change to needle size 2.5 mm / US 1.5 and work 2 cm / ¾" rib, but after 2 rows make 2 button holes evenly spaced – 1 buttonhole= bind off 2 sts, cast on 2 sts on next row. Bind off. Back: = 54-64 (68-73) sts. Work as front until piece measures 25-27 (30-33) cm. Bind off the middle 22-25 (26-29) sts for neck. Right shoulder: Dec 1 st on next row on neck edge. Continue until piece measures 26-28 (31-34) cm. Bind off remaining sts for shoulder. Left shoulder: Dec 1 st on next row on neck edge. Continue in stockinette st until piece measures 28-30 (33-36) cm. Bind off. Sleeves: Cast on 48-50 (50-52) sts on double pointed needles size 2.5 mm / US 1.5 with yellow. Work 2 cm / ¾" rib. Change to needles size 3 mm / US 2.5 and work stockinette st and at the same time inc 0-2 (6-8) sts evenly on first round = 48-52 (56-60) sts. At the same time inc underneath sleeve as follows: 2 sts 5-5 (6-6) times for 3months: every other round, for 6/9+12/18 months+ 24 months: every 3rd round = 58-62 (68-72) sts. Continue until piece measures 7-8 (9-10) cm. Bind off 6 middle sts underneath sleeve and finish each side separately working back and forth on needle. Further dec each side on every other row as follows: 5 sts 3 times. Continue until piece measures 9-10 (11-12) cm. Bind off. Assembly: Sew shoulder seams. Pick up approx 70-80 sts around neck opening on circ needle size 2.5 mm / US 1.5 with yellow. Work 2 cm / ¾" in rib working back and forth on needle, and at the same time make button hole on left shoulder. Bind off. Sew sleeves to body in edge st to avoid seams being too bulky. Sew in buttons. |
|||||||||||||||||||
Diagram explanations |
|||||||||||||||||||
|
|||||||||||||||||||

|
|||||||||||||||||||
|
|||||||||||||||||||

|
|||||||||||||||||||

|
|||||||||||||||||||
|
Have you made this or any other of our designs? Tag your pictures in social media with #dropsdesign so we can see them! Do you need help with this pattern?You'll find tutorial videos, a Comments/Questions area and more by visiting the pattern on garnstudio.com. © 1982-2024 DROPS Design A/S. We reserve all rights. This document, including all its sub-sections, has copyrights. Read more about what you can do with our patterns at the bottom of each pattern on our site. |
|||||||||||||||||||


With over 40 years in knitting and crochet design, DROPS Design offers one of the most extensive collections of free patterns on the internet - translated to 17 languages. As of today we count 304 catalogs and 11422 patterns - 11417 of which are translated into English (US/in).
We work hard to bring you the best knitting and crochet have to offer, inspiration and advice as well as great quality yarns at incredible prices! Would you like to use our patterns for other than personal use? You can read what you are allowed to do in the Copyright text at the bottom of all our patterns. Happy crafting!
Comments / Questions (11)
Ich habe zwei Fragen zu der Hose. Wenn ich alle Maschen, der beiden Beine, auf eine Rundstricknadel genommen habe, was heißt dann in der Nadel 2. Ndl. oder 3. Ndl.? Und wie oft nimmt man hinten zu und vorne ab? Danke für Hilfe, Petra
25.10.2023 - 19:07DROPS Design answered:
Liebe Petra, mit alle 2. Ndl / 3. Ndl wird in jeder 2. Runde / in jeder 3. Runde gemeint. Viel Spaß beim stricken!
26.10.2023 - 06:44Bonjour Concernant les manches de la veste je vois sur le modèle qu il y a en bas des manches le diagramme M1 mais vous ne le mentionnez pas dans vos explications merci pour votre réponse
15.05.2022 - 23:23DROPS Design answered:
Bonjour Florence, M.1 doit être tricoté à 3-3 (4-4) cm de hauteur totale, il est expliqué juste après les augmentations; autrement dit: tricotez au point de riz et continuez en jersey en augmentant au milieu sous la manche, mais à 3 ou 4 cm (cf taille) tricotez M.1 et continuez ensuite en jersey (sans oublier les augmentations). Bon tricot!
16.05.2022 - 08:38Gibt es schon eine Antwort auf meine Frage? Würde nämlich gerne weiterstricken. Danke
23.09.2021 - 21:20DROPS Design answered:
Liebe Sandra, Verzeihung für die späte Antwort, Anleitung wird korrigiert, die Teilung soll bei 21-25 (28-32) cm entstehen. Viel Spaß beim stricken!
04.11.2021 - 08:422. Versuch: Eine Frage zur der Hose, Grösse 12/18 bzw. 24 Monate: Ich bin beim Hosenbein und muss ja nach 34 cm eine Masche auf jede Seite aufnehmen. Dann heisst es weiter: nach 34 cm wieder auf jede Seite 3 Maschen abketten. Bei den kleineren Größen sind jeweils 2 cm zwischen Zu- und Abnahme. Ist das bei den großen Größen nicht? Muss gleich nach der Zunahme wieder abketten? Danke
22.08.2021 - 15:54DROPS Design answered:
Liebe Sandra, Ihre Frage wurde unsere Designteam weitergeleitet, danke im voraus für Ihren Geduld.
23.08.2021 - 07:30Eine Frage zur der Hose, Grösse 12/18 bzw. 24 Monate: Ich bin beim Hosenbein und muss ja nach 34 cm eine Masche auf jede Seite aufnehmen. Dann heisst es weiter: nach 34 cm wieder auf jede Seite 3 Maschen abketten. Bei den kleineren Größen sind jeweils 2 cm zwischen Zu- und Abnahme. Ist das bei den großen Größen nicht? Muss gleich nach der Zunahme wieder abketten? Danke
11.08.2021 - 22:09Merci pour cette correction. Il en reste une dans cette partie " Augmenter 1 m de chaque côté pour les coutures = 78-84 (96-96) m" après augmentation il me semble que cela devrait être 78-86 (98-98) Merci
18.12.2020 - 12:30DROPS Design answered:
Merci encore JoeJ5, cette correction a été faite également. Bonne continuation!
18.12.2020 - 13:09Je pense qu'il y a plusieurs erreurs dans la réalisation du pantalon dans la version française ! "Continuer jusqu'à 21-25 (30-34) cm de hauteur totale. Diviser ensuite l'ouvrage au milieu, à l'intérieur de la jambe au milieu d'un motif et continuer en allers retours. Augmenter 1 m de chaque côté pour les coutures = 78-84 (96-96) m. Continuer jusqu'à 21-25 (30-34) cm de hauteur totale. Rabattre 3 m de chaque côté = 72-80 (92-92) m, mettre en attente." merci de corriger
17.12.2020 - 21:08DROPS Design answered:
Bonjour et Merci JoeJ5, la correction a été faite. Bon tricot!
18.12.2020 - 07:12For the pants after you join both legs onto a circular needle and do the first couple if inc/dec you have Dec as follows: Right side of middle: sl1, k1, psso. Left side of middle k2 tog. Is this done in the front or back? Is it only done once? What is the stitch count?
19.05.2018 - 16:13DROPS Design answered:
Dear Debra, you will increase 2 sts on mid back (YO, K1, marker mid back, K1, YO) and decrease 2 sts on mid front: Slip 1 as if to K, K1, psso, K1, marker mid front, K1, K2 tog). Repeat the increase/decrease every other round until piece measures 40-46 (51-56) cm. Happy knitting!
22.05.2018 - 10:19Goededag. Ik zie geen telpatroon bij dit breipatroon. Klopt dat?
15.05.2018 - 07:34Hej igen. Et spørgsmål mere. Hvad er garnforbrug hvis jeg kun strikker jakke eller kun bluse. Synes ikke tydeligt. Se forbrug ved jakke OG bukser, men hvad dækker det øverste forbrug på hhv 150-50-50-50 så.?? Mvh marianne Bergman
08.10.2015 - 12:56DROPS Design answered:
Hej Marianne, Garnforbruget på den gule bluse finder du nederst under opskriften og garnforbruget på jakken finder du øverst i opskriften. God fornøjelse!
09.10.2015 - 14:23