
Popular categories
Looking for a yarn?


|
||||||||||||||||
Circus Smiles |
||||||||||||||||
 |
 |
|||||||||||||||
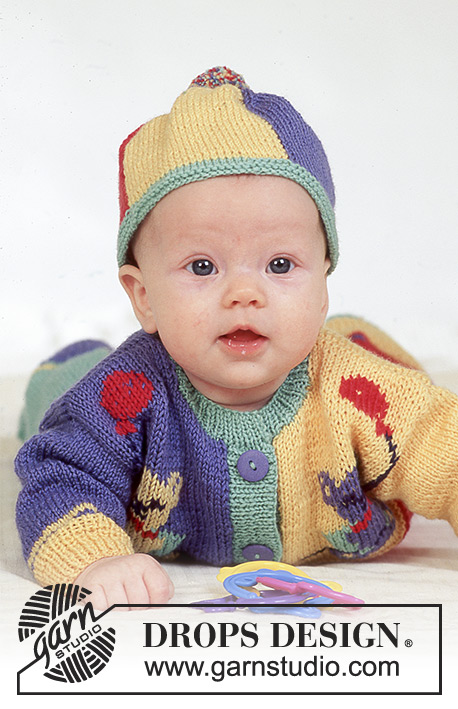
DROPS jumpsuit with teddy motif, hat and socks in “BabyMerino”.
DROPS Baby 4-14 |
||||||||||||||||
|
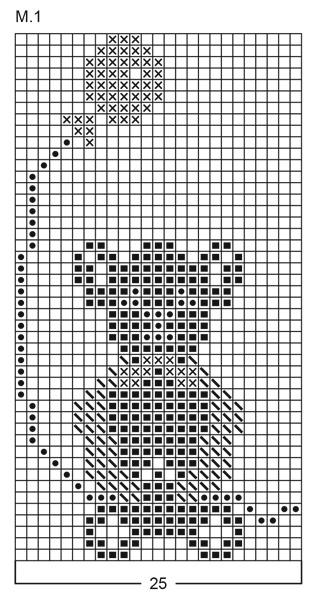
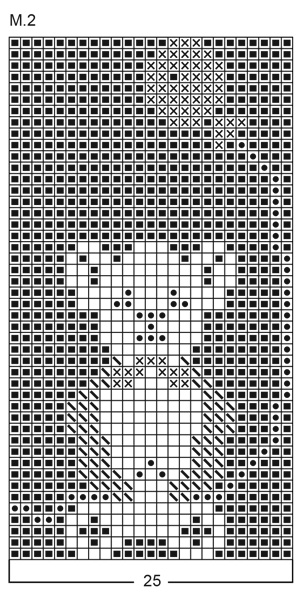
JUMPSUIT: Knitting tension: 26 sts x 35 rows on needles size 2.5 mm in stocking sts = 10 x 10 cm. Garter st, back and forth on needle: K all rows. Garter st, on circular needle: K 1 round, P 1 round. Rib: *K1, P1*, repeat from *-*. Pattern: See diagram. Diagram is seen from RS and knitted in stocking st. Left leg: Cast on 80-88-88 (96-96) sts on circular needle size 2 mm with yellow and knit 4 cm Rib. Change to needle size 2.5 mm and knit 2 rounds in red, 2 rounds in lavender and continue in red, at the same time inc on the inside of leg on every 2-3-3 (4-5) cm: 2 sts 4 times = 88-96-96 (104-104) sts. Remember the knitting tension. When piece measures 17-18-20 (25-28) cm divide piece at inside leg (= split) and complete piece back and forth on needle. Inc 1 st each side for seam = 90-98-98 (106-106) sts. When piece measures 18-20-23 (27-30) cm cast off 5-7-3 (5-5) sts each side = 80-84-92 (96-96) sts. Put piece aside and knit the other leg. Right leg: knit as left leg, but knit Rib in lavender , then 2 rounds light turquoise, 2 rounds yellow and continue in green. Body piece: Put left and right leg in on the same circular needle = 160-168-184 (192-192) sts. Continue in light turquoise over light turquoise leg and red over red leg. Insert a MT mid back and continue back and forth on needle from mid front. Inc 1 st each side mid front for seam = 162-170-186 (194-194) sts. Now inc mid back on both sides of the middle 2 sts (MT) on every other row: 1 st 8 times, at the same time dec each side towards mid front on every other row 1 st 8 times. Dec as follows before MT: K2 tog, after MT: slip 1 st as if to knit, K1, psso = 162-170-186 (194-194) sts. When piece measures 25-26-28 (33-36) cm cast off 5 sts each side towards mid front for split = 152-160-176 (184-184) sts. When piece measures 42-46-51 (56-59) cm continue as follows: P 1 row, K 1 row with lavender over light turquoise and yellow over red, P 1 row with lavender over lavender and yellow over yellow and then continue in stocking st in lavender and yellow instead of light turquoise and red. After 1-1-2 (2-3) cm in the new colours – piece measures 43-47-53 (58-62) cm - knit next row as follows: 3 sts lavender, M.1, 48-52-60 (64-64) sts lavender, 48-52-60 (64-64) sts yellow, M.2, 3 sts yellow. Continue in pattern like this. After the pattern complete piece in main colour. At the same time when piece measures 47-51-56 (61-64) cm divide the piece as follows: 35-37-41 (43-43) sts = front piece, cast off 2 sts for armhole, 78-82-90 (94-94) sts = back piece, cast off 2 sts for armhole, 35-37-41 (43-43) sts = front piece. Now complete each piece separately. Left front piece: = 35-37-41 (43-43) sts. Dec to shape the armhole on every other row: 2 sts 2-1-1 (0-0) times = 31-35-39 (43-43) sts. When piece measures 53-58-64 (69-75) cm, dec to shape the neckline on every other row: 5-6-7 (7-10) sts 1 time, 2 sts 2-2-2 (3-3) times. Cast off remaining sts when piece measures 57-62-68 (74-80) cm. Right front piece: As left front piece, but mirrored. Back piece: = 78-82-90 (94-94) sts. Dec to shape the armhole as described for front piece = 70-78-86 (94-94) sts. When piece measures 55-60-66 (72-78) cm cast off the middle 20-22-24 (28-34) sts for neck and dec to shape the neckline on every other row: 2 sts 1 time, 1 st 1 time. Cast off when piece measures 57-62-68 (74-80) cm. Left sleeve: Knitted in the round on double pointed needles. Cast on 44-46-50 (52-52) sts on double pointed needles size 2 mm with lavender and knit 4 cm Rib. Change to needle size 2.5 mm and continue in stocking as follows: 2 rounds yellow, 2 rounds lavender and then continue in yellow, at the same time inc 2 sts mid under arm a total of 4-6-6 (8-16) times as follows: Size 3 + 6/9 months + 2 years: on every 6th and 7th round alternately Size 12/18 months: on every 8th round Size 3/4 years: on every 4th round = 52-58-62 (68-84) sts. When piece measures 13-17-19 (21-26) cm cast off 6 sts mid under sleeve and complete piece back and forth on needle. Dec to shape the sleeve cap each side on every other row: 5 sts 2 times, cast off. Sleeve measures approx 15-19-21 (23-28) cm. Right sleeve: As left sleeve but knit Rib in yellow, then 2 rounds lavender,2 rounds yellow and continue in lavender. Assembly: Sew shoulder seam. Pick up approx 86-96-108 (108-116) sts along left front piece on needle size 2 mm with light turquoise, P 1 row, knit 2,5 cm Rib, P 1 row and cast off. Repeat along right front edge, but after 1 cm, make 5 buttonholes evenly distributed on row. 1 buttonhole = cast off 3 sts and cast on 3 new sts on return row. Fasten front edges at bottom of split. Pick up approx 90-100 sts round neck on needle size 2 mm with light turquoise, P 1 row, 2 cm in Rib, cast off. Sew tog split on inside of legs and sew tog the opening between legs from mid front to mid back. Set in sleeves and sew on buttons. HAT: Size: 3 – 6/9 – 12/18 months (2 - 3/4) years Head circumference: 39-41-43 (46-46) cm. DROPS pointed needles size 2 mm Knitting tension: 28 sts x 38 rows on needles size 2 mm in stocking sts = 10 x 10 cm. Garter st: Knit all rows Knitted back and forth on pointed needles in 4 colours. Cast on 110-118-122 (130-130) sts (incl 1 edge st each side) on needle size 2 mm with light turquoise and knit 4 rows garter st. Continue in stocking st as follows: 28-30-31 (33-33) sts red (incl 1 edge st), 27-29-30 (32-32) sts light turquoise, 27-29-30 (32-32) sts lavender, 28-30-31 (33-33) sts yellow (incl 1 edge st). When piece measures 9-10-10 (10.5-11.5) cm dec 1 st on the inside of both edge sts and on both sides of each colour change by K tog the first 2 and the last 2 sts of each colour (= 8 dec per row). Repeat the dec on every and every other row alternately until piece measures 14-15-15 (16-17) cm. Cut the thread and pull through remaining sts. Sew tog the red and yellow sections. Make a small tassel with all 4 colours and attach to top of hat. SOCKS: Size: 3 – 6/9 – 9/12 months (2 -3/4 years) Foot length: 10-11-12 (14-15) cm. DROPS pointed needles size 2 mm and 2.5 mm DROPS crochet hook size 2.5 mm Knitting tension: 26 sts x 52 rows on needles size 2.5 mm in garter st = 10 x 10 cm. Rib: *K1, P1*, repeat from *-*. Garter st, back and forth on needle: Knit all rows. Cast on 46-50-50 (54-54) sts on needle size 2 mm with light turquoise and knit 6-7-7 (8-8) cm Rib back and forth on needle. Knit 1 row stocking st and change to needle size 2.5 mm, at the same time dec 10-14-8 (12-8) sts = 36-36-42 (42-46) sts. Knit next row as follows from RS: *K2 tog, 1 yo*, repeat from *-*. Knit 1 row stocking st. Put 12-12-14 (12-14) sts on a thread each side and knit 6-7-9 (10-10) cm garter st on the middle 12-12-14 (18-18) sts. Put sts from threads back on needle and pick up 16-18-23 (26-26) sts on each side of the middle piece = 68-72-88 (94-98) sts. Knit 3-4-4 (5-5) cm garter st on all sts, at the same time after 2-2.5-2.5 (3-3) cm dec on every other row as follows: 1 st at the beg and 1 st at the end of row and K2 tog on both sides of the middle 2 sts for another 3-4-4 (5-5) cm. Cast off and sew seam under foot and along the Rib. Crochet a chain on crochet hook size 2.5 mm, approx 30-35 cm long, and thread through eyelet row. |
||||||||||||||||
Diagram explanations |
||||||||||||||||
|
||||||||||||||||
|
||||||||||||||||
|
||||||||||||||||

|
||||||||||||||||
|
Have you made this or any other of our designs? Tag your pictures in social media with #dropsdesign so we can see them! Do you need help with this pattern?You'll find tutorial videos, a Comments/Questions area and more by visiting the pattern on garnstudio.com. © 1982-2024 DROPS Design A/S. We reserve all rights. This document, including all its sub-sections, has copyrights. Read more about what you can do with our patterns at the bottom of each pattern on our site. |
||||||||||||||||


With over 40 years in knitting and crochet design, DROPS Design offers one of the most extensive collections of free patterns on the internet - translated to 17 languages. As of today we count 304 catalogues and 11422 patterns - 11422 of which are translated into English (UK/cm).
We work hard to bring you the best knitting and crochet have to offer, inspiration and advice as well as great quality yarns at incredible prices! Would you like to use our patterns for other than personal use? You can read what you are allowed to do in the Copyright text at the bottom of all our patterns. Happy crafting!
Comments / Questions (8)
Ich verstehe das mit der Mengenangabe der Wolle nicht ganz am Anfang. Warum tauchen einigen Farben da doppelt auf? Und warum gibt es bei der memgemanagabe für das ganze Set „Mädchen/Junge/Junge/Mädchen und da sind dann auch wieder mehrere Angaben - aber es gibt nur ein Muster und in der Anleitung sind auch die Farben klar definiert? Wieviel Wolle muss ich denn nun für ein ganzes set für ein Mädchen 6/9 Monate besorgen? Liebe Grüße Jule Pape
08.12.2023 - 16:26DROPS Design answered:
Liebe Frau Pape, 6/9 Monate ist hier die 2. Größe, so lesen Sie die 2. Angaben in jeder Farbe für Set oder nur Anzug, dann wählen Sie einfach die gewünschte Farben. Da die Farbkarte aktualisiert wurde, kann Ihnen gerne Ihr DROPS Händler damit (auch per Telefon oder per E-Mail) helfen, die besten passenden Farben zu finden. Viel Spaß beim stricken!
11.12.2023 - 07:11Forstår ikke forklaringen til hvordan det skal økes og felles i bolen. Vennligst hilsen Heidi Bentzen
26.02.2019 - 09:21DROPS Design answered:
Hei Heidi. Du skal øke masker bak, og samtidig felle masker midt foran, dette gjør du på hver 2. pinne. Du øker 1 maske på hver side av de 2 midterste maskene bak (Altså 2 masker økt hver gang), og dette gjør du 8 ganger (altså over 16 omganger. = 16 masker økt). Samtidig feller du 1 maske i hver side mot midt foran, innenfor 1 kantmaske. Du feller 8 ganger totalt (= 16 masker felt). God fornøyelse
26.02.2019 - 15:01Har strikket det ene beinet til Circus smiles. Forstår ikke hvordan jeg lager splitt.
18.02.2019 - 15:13DROPS Design answered:
Hei Heidi. Det betyr rett og slett at du slutter å strikke rundt men går over til å strikke frem og tilbake slik at du får en split i arbeidet. Altså når arbeidet måler 17-18-20 (25-28) cm deles arbeidet på innsiden av benet: strikk til innsiden av benet, snu og strikk den andre veien til du er på innsiden av benet igjen (du strikker nå fra vrangen), snu og strikk tilbake igjen fra retten osv. Husk å øke 1 kantmaske i hver side til å sy sammen arbeidet i etterpå. God fornøyelse
21.02.2019 - 13:28Jeg forstår ikke hvad det er jeg skal når de 2 ben samles, skal der tages ind eller ud midt på rygge og foran?
29.01.2019 - 14:14DROPS Design answered:
Hei Mette. Når bena settes inn på samme pinne setter du et merke midt bak og strikker frem og tilbake over alle maskene, med åpning midt foran. Du øker i tillegg 1 kantmaske i hver side mot åpningen midt foran. Videre skal det felles på innsiden av disse kantmaskene, samtidig som det økes på hver side av merket du satte midt bak. God fonrøyelse
30.01.2019 - 08:18Bonsoir. Pour la combinaison après avoir fait les 8 augmentations et les 8 diminutions on a 162 mailles. Ensuite il faut diminuer d’1 maille de part et d’autre du marqueur ce qui nous donne 160 mailles. Ensuite, à 25 cm il faut réaliser 5 diminutions de chaque côté des devants soit 10 mailles de moins. Le texte dit qu’il reste à ce moment-là 152 mailles mais s’il reste 160 mailles moins dix cela donne 150 mailles et non 152, sauf si je fais une erreur de calcul.
12.09.2018 - 21:51DROPS Design answered:
Bonjour Mme Foiratier, la phrase sur les diminutions explique juste comment diminuer ces mailles sur le dos et les devants, je l'ai décalée avant le nombre total de mailles pour qu'elle ne crée pas un problème de compréhension. Bon tricot!
13.09.2018 - 09:07Mikähän kokoinen pyöröpuikko tulee kysymykseen kun noin ohuella langalla vain 80 silmukkaa?
22.01.2014 - 06:34DROPS Design answered:
Lahkeet voidaan neuloa 40 cm:n pituisella pyöröpuikolla.
23.01.2014 - 14:24Er det mig der ikke kan se ? Skal mønsterets strikkes ind i eller broderes på bagefter, kan ikke se det i opskriften
10.07.2013 - 14:55DROPS Design answered:
Hej Lotte. Mönstret strikkes ind i dragten. Se under ryg- og forstykke, 3e sidste linie: 3 m lavendel, M.1, 48-52-60 (64-64) m lavendel, 48-52-60 (64-64) m gul, M.2, 3 m gul. M.1 og M.2 er mönstrene med bamserne
11.07.2013 - 13:22Jeg kan ikke finde diagrammet til bamsen og aben på opskrift 4 - 14
22.07.2007 - 14:32