DROPS Muskat
DROPS Muskat
100% Cotton
from 1.85 £ /50g
DROPS Vivaldi
DROPS Vivaldi
56% Mohair, 30% Polyamide, 14% Wool
Discontinued
find alternatives
DROPS SS24

In The Garden

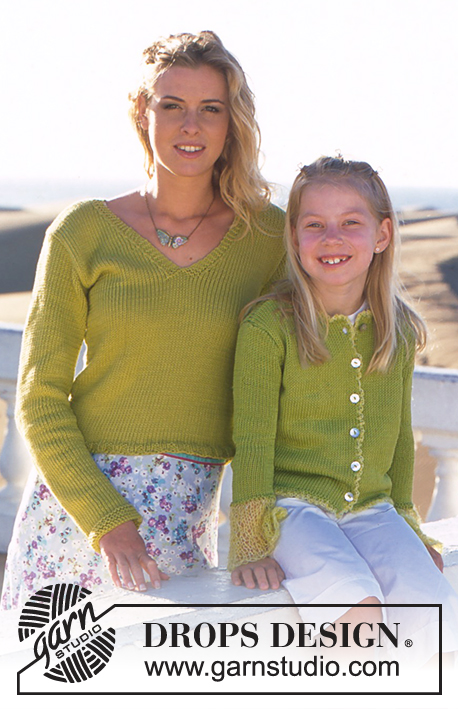
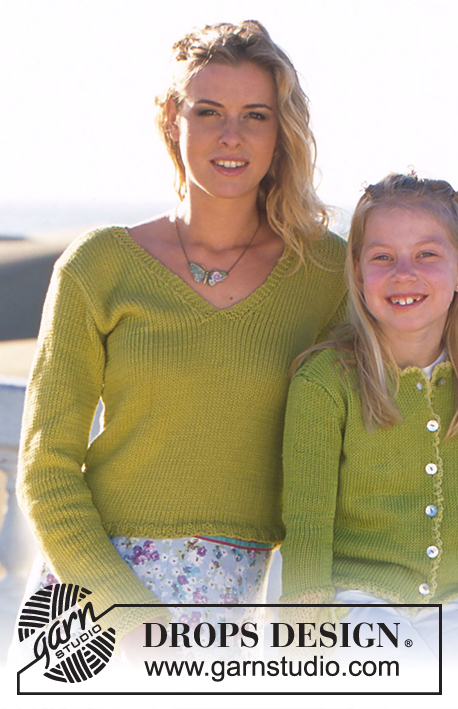
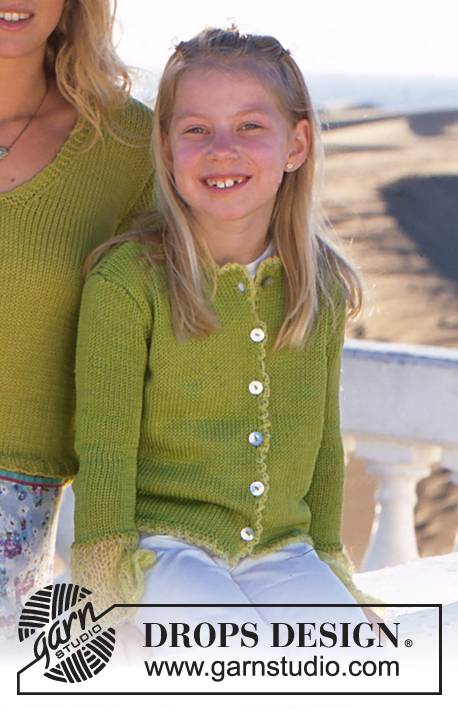
Children’s knitted jacket in Muskat with cuffs and crochet edges in Vivaldi or Kid-Silk

DROPS 88-2
DROPS design: Pattern no R-021-bn
--------------------------------------------------------
Sizes:
5/6 years - 7/8 years - 9/10 years - 11/12 years -13/14 years
110/116 - 122/128 - 134/140 - 146/152 - 158/164 cm

Materials: DROPS Muskat from Garnstudio
250-250-300-300-350 g colour no 53, apple green

and use: DROPS Vivaldi from Garnstudio
50 g for all sizes in colour no 19, lime
or use:
DROPS Kid-Silk from Garnstudio
75 g for all sizes in colour no 18, apple green


DROPS Needle sizes 3.5 and 4 mm.
DROPS Double pointed needles sizes 4 and 8.
DROPS Crochet hook size 4 mm.
DROPS Mother of Pearl Buttons no 521: 6-7 items.
--------------------------------------------------------------

-------------------------------------------------------

Alternative Yarn – See how to change yarns here
Yarn Groups A to F – Use the same pattern and change the yarn here
Yarn usage using an alternative yarn – Use our yarn converter here

-------------------------------------------------------

DROPS Muskat
DROPS Muskat
100% Cotton
from 1.85 £ /50g
DROPS Vivaldi
DROPS Vivaldi
56% Mohair, 30% Polyamide, 14% Wool
Discontinued
find alternatives

Pattern instructions

NOTE: This pattern is written in British English. All measurements in charts are in cm. For conversion from cm to inches - click here. There are different terms for crocheting in British and American English. If this pattern includes crochet, click for "crochet terms" here. For this pattern in American English, please click here.
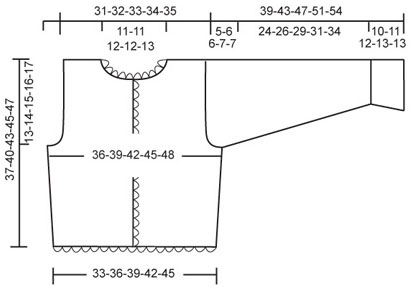
Knitting tension: Remember needle size is only a guide, 21 stitches x 28 rows with needle size 4 mm and stocking stitch = 10 x 10 cm.

Ridge/Garter stitch (back and forth on needle):
1 ridge = Knit 2 rows.
Ridge/Garter stitch (in the round):
1 ridge = 2 rounds. Knit 1 round and purl 1 round.

Decrease tip (for armholes and neck):
Decrease inside the 4 stitches stocking stitch for armholes and 3 stitches stocking stitch in neck.
All decreases are worked from the right side.
Decrease as follows after the 4/3 stitches: Slip 1 stitch as if to knit, K1, pass the slipped stitch over. Decrease as follows before the 4/3 stitches: K2 together.

Buttonhole: Buttonholes are worked on right front piece. Work buttonholes as follows from the right side: 2 stitches garter stitch, K1, 1 yarn over, K2 together.
On the next row purl the yarn over twisted.
Work buttonholes when piece measures:
Size 5/6 years: 3, 9, 16, 22, 27 and 32 cm
Size 7/8 years: 4, 10, 16, 22, 29 and 35 cm
Size 9/10 years: 4, 11, 17, 24, 31 and 37 cm
Size 11/12 years: 4, 10, 16, 22, 28, 34 and 39 cm
Size 13/14 years: 4, 10, 16, 22, 28, 34 and 40 cm
----------------------------------------------------

Back piece: Cast on 72-78-84-90-96 stitches (incl. 1 edge stitch in each side) with needle size 3.5 mm and Muskat and work 1 ridge. Change to needle size 4 mm and continue with stocking stitch. Remember the knitting tension! When piece measures 7 cm, increase 1 stitch in each side every 7 cm a total of 3 times = 78-84-90-96-102 stitches.
When piece measures 24-26-28-29-30 cm, cast off 3-4-5-6-6 stitches in each side for armholes. Then decrease for armholes in each side every 2nd row: 1 stitch 3-4-5-6-8 times = 66-68-70-72-74 stitches. When piece measures 35-38-41-43-45 cm, cast off the middle 20-20-22-22-24 stitches for neck. Then decrease on each side of neck every 2nd row - see Decrease tip: 1 stitch 2 times = 21-22-22-23-23 stitches left on each shoulder. Cast off when piece measures 37-40-43-45-47 cm.

Right front piece: Cast on 41-44-47-50-53 stitches (incl. 1 edge stitch in side and 5 band stitches towards mid front) with needle size 3.5 mm and Muskat. Work 1 ridge,
change to needle size 4 mm and continue with stocking stitch, but the 2 outermost stitches towards mid front are worked in garter stitch up to the neckline. Remember Buttonholes - see description above. When piece measures 7 cm, increase 1 stitch in the side every 7 cm a total of 3 times = 44-47-50-53-56 stitches. When piece measures 24-26-28-29-30 cm, decrease for armhole in side as for back piece = 38-39-40-41-42 stitches on needle. When piece measures 33-36-38-40-41 cm, cast off 13-13-13-13-14 stitches towards mid front for neck. Then decrease towards neck every 2nd row - see Decrease tip: 1 stitch 4-4-5-5-5 times = 21-22-22-23-23 stitches left on shoulder. Cast off when piece measures 37-40-43-45-47 cm.

Left front piece: Cast on and work as for right but in reverse. Do not work buttonholes on left front piece.

Sleeve: The sleeve is worked in the round to avoid a visible seam on the cuffs. Cast on 42-44-47-47-49 stitches with double pointed needles size 8 mm and 1 thread Vivaldi or 2 threads Kid-Silk and purl 1 round. Continue with stocking stitch at the same time as you decrease 6-6-7-7-7 stitches evenly on first round = 36-38-40-40-42 stitches. When piece measures 10-11-12-13-13 cm, change to double pointed needles size 4 mm and Muskat. Work 1 ridge then continue with stocking stitch. At the same time, when piece measures 11-13-15-16-16 cm increase 2 stitches mid under sleeve every 3.5-3-2.5-2-2 cm a total of 7-8-10-13-15 times = 50-54-60-66-72 stitches. When sleeve measures 34-37-41-44-47 cm, cast off 6 stitches mid under. Then finish working sleeve back and forth on needle. Decrease in each side every 2nd row: 2 stitches 2-2-3-3-3 times and 1 stitch 2-3-2-3-3 times, then 2 stitches in each side until piece measures 38-42-46-50-53 cm, finally 3 stitches 1 time in each side. Cast off the remaining stitches, piece measures approx. 39-43-47-51-54 cm.

Assembly: Sew shoulder seams.

Neck: Knit up approx. 66 to 82 stitches around the neck (over bands as well) with needle size 3.5 mm and Muskat and knit 1 row from the wrong side before casting off with knit from right side.
Sew sleeve and side seams in one go inside the 1 edge stitch. Sew on buttons.

Crochet edge: Work with hook size 4 mm and 1 thread Vivaldi or 2 threads Kid-Silk along the whole opening (i.e. from mid back along bottom of body, up the right front piece, around neck, down left front piece and along bottom to mid back). Work as follows: 1 double crochet in first stitch, * 3 chain stitches, skip approx. 1 cm, 1 double crochet in next stitch *, repeat from *-* and finish with 3 chain stitches and 1 slip stitch in first double crochet at beginning of round.

Diagram

diagram measurements

Each of our patterns has specific tutorial videos to help you.

Do you have a question? See a list of frequently asked questions (FAQ)

Knitting tension is what determines the final measurements of your work, and is usually measured per 10 x 10 cm. It is provided like so: number of stitches in width x number of rows in height - eg: 19 stitches x 26 rows = 10 x 10 cm.

The knitting tension is very individual; some people knit/crochet loosely while others work tightly. You adjust the knitting tension with the needle size, which is why the suggested needle size is only meant as a guide! You need to adjust this (up or down) to ensure that YOUR knitting tension matches the knitting tension provided in the pattern. If you work with a different knitting tension than provided you will have a different yarn consumption, and your work will have different measurements than what the pattern suggests.

The knitting tension also determines which yarns can replace each other. As long as you achieve the same knitting tension you can replace one yarn with another.

See DROPS lesson: How to measure your tension/gauge

See DROPS video: How to make a gauge tension swatch

The required amount of yarn is provided in grams, eg: 450 g. To calculate how many balls you’ll need you first need to know how many grams are in 1 ball (25g, 50g or 100g). This information is available if you click on the individual yarn quality on our pages. Divide the amount required with the amount of each ball. For example, if each ball is 50g (the most common amount), the calculation will be as follows: 450 / 50 = 9 balls.

The important thing when changing from one yarn to another is that the knitting/crochet tension remains the same. This is so that the measurements of the finished piece will be the same as on the sketch provided. It is easier to achieve the same knitting tension using yarns from the same yarn group. It is also possible to work with multiple strands of a thinner yarn to achieve the knitting tension of a thicker one. Please try our yarn converter. We recommend you to always work a test swatch.

Please NOTE: when changing yarn the garment might have a different look and feel to the garment in the photo, due to individual properties and qualities of each yarn.

See DROPS lesson: Can I use a different yarn than the one mentioned in the pattern?

All our yarns are categorised into yarn groups (from A to F) according to thickness and knitting tension – group A contains the thinnest yarns and group F the thickest. This makes it easier for you to find alternative yarns to our patterns, should you wish to switch yarn. All yarns within the same group have a similar knitting tension and can easily replace each other. However, different yarn qualities have different structures and properties which will give the finished work a unique look and feel.

Click here for an overview of the yarns in each yarn group

At the top of all our patterns you’ll find a link to our yarn calculator, which is a helpful tool should you wish to use a different yarn than suggested. By filling in the yarn quality you wish to replace, the amount (in your size) and number of strands, the calculator will present good alternative yarns with the same knitting tension. Additionally it will tell you how much you’ll require in the new qualities and whether you’ll need to work with multiple strands. Most skeins are 50g (some are 25g or 100g).

If the pattern is worked with multiple colours, every colour will have to be calculated separately. Similarly, if the pattern is worked with several strands of different yarns (for example 1 strand Alpaca and 1 strand Kid-Silk) you will have to find alternatives for each, individually.

Click here to see our yarn calculator

Since different yarns have different qualities and textures we have chosen to keep the original yarn in our patterns. However, you can easily find options among our available qualities by using our yarn calculator, or simply pick a yarn from the same yarn group.

It is possible that some retailers still have discontinued yarns in stock, or that someone has a few skeins at home that they would like to find patterns for.

The yarn calculator will provide both alternative yarn as well as required amount in the new quality.

If you think it's hard to decide what size to make, it can be a good idea to measure a garment you own already and like the size of. Then you can pick the size by comparing those measures with the ones available in the pattern's size chart.

You'll find the size chart at the bottom of the pattern.

See DROPS lesson: How to read size chart

The needle size provided in the pattern serves only as a guide, the important thing is to follow the knitting tension. And since knitting tension is very individual, you will have to adjust the needle size to ensure that YOUR tension is the same as in the pattern – maybe you’ll have to adjust 1, or even 2 needle sizes, up or down to achieve the correct tension. For this, we recommend that you work test swatches.

Should you work with a different knitting tension than the one provided, the measurements of the finished garment might deviate from the measurement sketch.

See DROPS lesson: How to measure your tension/gauge

See DROPS video: How to make a tension/gauge swatch

Working a garment top-down provides more flexibility and room for personal adjustment. For example it is easier to try the garment on while working, as well as making adjustments to length of yoke and shoulder caps.

The instructions are carefully explaining every step, in the correct order. Diagrams are adjusted to the knitting direction and are worked as usual.

The diagram depicts all rows/rounds, and every stitch seen from the right side. It is read from bottom to top, from right to left. 1 square = 1 stitch.

When working back and forth, every other row is worked from the right side and every other row is worked from the wrong side. When working from the wrong side, the diagram will have to be worked reversed: from left to right, knit stitches are purled, purl stitches are knit etc.

When working in the round every round is worked from the right side and the diagram are worked from right to left on all rounds.

See DROPS lesson: How to read knitting diagrams

The diagram depicts all rows/rounds, and every stitch seen from the right side. It is worked from bottom to top, from right to left.

When working back and forth every other row is worked from the right side: from right to left and every other row is worked from the wrong side: from left to right.

When working in the round, every row in the diagram are worked from the right side, from right to left.

When working a circular diagram you start in the middle and work your way outwards, counter clockwise, row by row.

The rows usually start with a given number of chain stitches (equivalent to the height of the following stitch), this will either be depicted in the diagram or explained in the pattern.

See DROPS lesson: How to read crochet diagrams

Instructions for working several diagrams after each other on the same row/round, will often be written like so: “work A.1, A.2, A.3 a total of 0-0-2-3-4 times". This means you work A.1 once, then A.2 is worked once, and A.3 is repeated (in width) the number of times provided for your size – in this case like so: S = 0 times, M = 0 times, L=2 times, XL= 3 times and XXL = 4 times.

The diagrams are worked as usual: begin with the first row in A.1, then work the first row in A.2 etc.

See DROPS lesson: How to read knitting diagrams

See DROPS lesson: How to read crochet diagrams

The total width of the garment (from wrist-to-wrist) will be larger in the larger sizes, despite the actual sleeves being shorter. The larger sizes have longer sleeve caps and wider shoulders, so there will be a good fit in all sizes.

The measurement sketch/schematic drawing provides information regarding the full length of the garment. If it’s a jumper or a jacket the length is measured from the highest point on the shoulder closest to the neckline, and straight down to the bottom of the garment. It is NOT measured from the tip of shoulder. Similarly, the length of yoke is measured from the highest point on the shoulder and down to where yoke is split into body and sleeves.

On a jacket measures are never taken along bands, unless specifically stated. Always measure inside band stitches when measuring the length.

See DROPS lesson: How to read a schematic drawing

Diagrams are often repeated on the round or in height. 1 repeat is the diagram the way it appears in the pattern. If it says to work 5 repeats of A.1 in the round, then you work A.1 a total of 5 times after/next to each other in the round. If it says to work 2 repeats of A.1 vertically/in height you work the entire diagram once, then begin again at the start and work the entire diagram one more time.

Chain stitches are slightly narrower than other stitches and to avoid working the cast-on edge too tight, we simply chain more stitches to begin with. The stitch count will be adjusted on the following row to fit the pattern and measurement sketch.

The rib edge is more elastic and will contract slightly compared to, for example, stocking stitch. By increasing before the rib edge, you avoid a visible difference in width between the rib edge and the rest of the body.

It’s very easy to cast off too tightly, and by making yarn overs while casting off (and simultaneously casting these off) you avoid a too tight cast off edge.

See DROPS video: How to bind off with yarn overs (yo)

To achieve an even increase (or decrease) you can increase on, for example: every 3rd and 4th row alternately, like so: work 2 rows and increase on the 3rd row, work 3 rows and increase on the 4th. Repeat this until the increase is complete.

See DROPS lesson: Increase or decrease 1 st on every 3rd and 4th row alternately

Should you prefer to work in the round instead of back and forth, you may of course adjust the pattern. You’ll need to add steeks mid-front (usually 5 stitches), and follow the instructions. When you would normally turn and work from the wrong side, simply work across the steek and continue in the round. At the end you’ll cut the piece open, pick up stitches to work bands, and cover the cut edges.

See DROPS video: How to knit steeks and cut open

Should you prefer to work back and forth instead of in the round, you may of course adjust the pattern so you work the pieces separately and then assemble them at the end. Divide the stitches for the body in 2, add 1 edge stitch in each side (for sewing) and work the front and back pieces separately.

See DROPS lesson: Can I adapt a pattern for circular needles into straight needles?

Pattern repeats can vary slightly in the different sizes, in order to get the correct proportions. If you’re not working the exact same size as the garment in the photo, yours might deviate slightly. This has been carefully developed and adjusted so that the complete impression of the garment is the same in all sizes.

Make sure to follow instructions and diagrams for your size!

If you have found a pattern you like which is available in women’s size it’s not very difficult to convert it to men’s size. The biggest difference will be the length of sleeves and body. Start working on the women size that you think would fit across the chest. The additional length will be worked right before you cast off for the armhole/sleeve cap. If the pattern is worked top-down you can add the length right after the armhole or before the first decrease on sleeve.

Regarding additional yarn amount, this will depend on how much length you add, but it is better with a skein too many than too few.

All yarns will have excess fibres (from production) that might come off as lint or shedding. Brushed yarns (ie hairier yarns) have more of these loose, excess fibres, causing more shedding.

Shedding also depends on what is worn under or over the garment, and whether this pulls at the yarn fibres. It’s therefore not possible to guarantee that there will be no shedding

Below are some tips on how to get the best result when working with hairier yarns:

1. When the garment is finished (before you wash it) shake it vigorously so the looser hairs come off. NOTE: do NOT use a lint roller, brush or any method that pulls at the yarn.

2. Place the garment in a plastic bag and put it in your freezer - the temperature will cause the fibres to become less attached to each other, and excess fibres will come off easier.

3. Leave in the freezer for a few hours before taking it out and shaking it again.

4. Wash the garment according to the instructions on the yarn label.

Pilling is a natural process that happens to even the most exclusive of fibers. It's a natural sign of wear and tear that is hard to avoid, and that is most visible in high friction areas of your garment like a sweater's arms and cuffs.

You can make your garment look as new by removing the pilling, using a fabric comb or a pill/lint remover.

Still can't find the answer you need? Then scroll down and leave your question so one of our experts can try to help you. This will be done normally within 5 to 10 working days.
In the meantime, you can read the questions and answers that others have left to this pattern or join the DROPS Workshop on Facebook to get help from fellow knitters/crocheters!

You might also like...

Post a comment to pattern DROPS 88-2

We would love to hear what you have to say about this pattern!

If you want to leave a question, please make sure you select the correct category in the form below, to speed up the answering process. Required fields are marked *.

Comments / Questions (20)

country flag Birgit wrote:

Hallo, am Rückenteil soll nach der ersten Abnahme, die immer in den Hinreihen erfolgen sollen, in jeder 2. Reihe abgenommen werden. Heißt das dann in jeder Hinreihe, oder jeder 2. Hinreihe? Ich wäre für eine Antwort sehr dankbar!!

28.07.2023 - 17:24

DROPS Design answered:

Liebe Birgit, die Abnahmen sind in jeder 2. Reihe gestrickt, dh in jeder Hinreihe. Viel Spaß beim stricken!

31.07.2023 - 09:56

country flag Antonia wrote:

Come lavorare il vivagno a maglia rasata per facilitare la cucitura grazie

16.02.2023 - 07:22

DROPS Design answered:

Buonasera Antonia, può lavorare la maglia di vivagno a legaccio. Buon lavoro!

16.02.2023 - 19:08

country flag Catherine wrote:

Bonjour, Dans les diminutions du dos pour les emmanchures et l'encolure, il faut bien les faire à 3 mailles du bord comme mentionné dans les explications des diminutions ?

15.01.2023 - 18:35

DROPS Design answered:

Bonjour Catherine, on diminue à 4 m du bord pour les emmanchures et à 4 m du bord pour l'encolure. Bon tricot!

16.01.2023 - 10:56

country flag Catherine wrote:

Bonjour, je pense qu'il y a une erreur pour les MANCHES Avec les aiguilles double pointes 8, ne serait-ce pas avec les aiguilles 3,5 ?

14.01.2023 - 09:01

DROPS Design answered:

Bonjour Catherine, non c'est bien juste ainsi, vous montez les mailles avec les aiguilles 8 (en Vivaldi ou Kid-silk) puis tricotez 1 tour envers , et ensuite en jersey en diminuant au premier rang jersey. Vous continuerez avec les aiguilles 4 en Muskat, quand la manche mesure 10-11-12-13-13 cm. Bon tricot!

16.01.2023 - 10:59

country flag Catherine wrote:

Bonjour, Ce modèle 88-2 me parait bien mais il n'y a pas le patron joint. est-il possible de l'avoir ? merci d'avance

22.03.2022 - 17:04

DROPS Design answered:

Bonjour Catherine, les explications de ce modèle se trouvent sur cette page (en français); faites défiler la page jusqu'à Explications:. Bon tricot!

23.03.2022 - 07:30

country flag Jane wrote:

Sorry, how do you bind off at the end of the row on the sleeve. Aren’t you left with a stitch? Thanks for your help

18.09.2020 - 20:06

DROPS Design answered:

Dear Jane, when, you have to bind off 2 sts on each side, bind off 2 sts at the beg of next 2 rows (2 sts at the beg of RS row + 2 sts at the beg of WS row). Happy knitting!

21.09.2020 - 08:18

country flag Jane wrote:

Hi how do you decrease the sleeve before the marker at the end of the row. Won’t you be left with one stitch? Thank you for your help

18.09.2020 - 20:00

country flag Jane wrote:

Thank you so much for your help!

13.04.2020 - 17:09

country flag Bente Gaul wrote:

Undskyld ulejligheden! Jeg har læst forkert! Opskriften er ok!

03.04.2020 - 14:43

DROPS Design answered:

Hej Bente, Godt at høre og rigtig god fornøjelse!

03.04.2020 - 15:34

country flag Bente Gaul wrote:

Jeg kan se, andre har spurgt til ærmegabet. Jeg kan ikke få det til at passe. Jeg strikker str. 11/12 og på ryggen lukkes i hver side først 3 m derefter 1 maske 3 gange, i alt 6 masker. Dvs. , at der i alt forsvinder 12 masker fra pinden - så vi nu er ned på 84 masker, men i opskriften står 72 masker. ??? Hvad er rigtig?

03.04.2020 - 14:37