DROPS Karisma
DROPS Karisma
100% Wool
from 3.00 $ /50g
Get the yarn to make this pattern from 21.00$.

The yarn cost is calculated from the pattern’s smallest size and the yarn’s cheapest product type. Looking for an even better price? You might find it on the DROPS Deals!

DROPS SS24

Tiny Jester

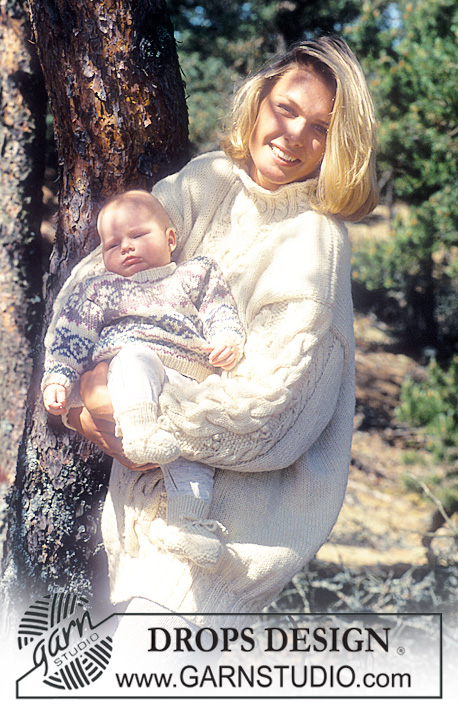
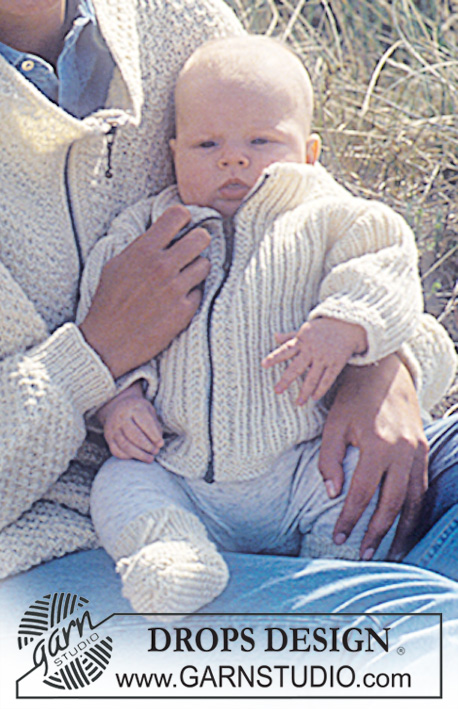
Knitted jacket with Fana pattern, hat and socks in ‘Karisma Superwash’. Sizes 3 months-3 years.

DROPS 36-16
DROPS model no U-008-by
Yarn group B
--------------------------------------------------------
Materials: Drops Karisma Superwash from Garnstudio
Set: 200-250-300 (350-400) g col 1, off white + pattern colours (see jacket)
Jacket:
100-150-200 (250-300) g col 1, off white
50-50-100 (100-100) g col 17, navy blue
50-50-50 (50-50) g col 40, light old pink
50-50-50 (50-50) g col 54, beige brown
Hat: 50-50-50 (50-50) g col 1, off white + oddments of each pattern colour.
Socks: 50-50-50 g col 1, off white.
Jacket:
Size: 3 – 6/9 – 12/18 months (2-3) years.
Drops circular needles, long (80cm): 2,5mm and 3.5mm.
Drops circular needles, short (40cm)(or Drops double pointed needles): 2.5mm and
3.5mm
Or the size needed to obtain the correct knitting tension.
Drops Buttons: 5 pieces.

-------------------------------------------------------

Alternative Yarn – See how to change yarns here
Yarn Groups A to F – Use the same pattern and change the yarn here
Yarn usage using an alternative yarn – Use our yarn converter here

-------------------------------------------------------

DROPS Karisma
DROPS Karisma
100% Wool
from 3.00 $ /50g
Get the yarn to make this pattern from 21.00$.

The yarn cost is calculated from the pattern’s smallest size and the yarn’s cheapest product type. Looking for an even better price? You might find it on the DROPS Deals!

Pattern instructions

NOTE: This pattern is written in American English. All measurements in charts are in cm. For conversion from inches to cm - click here. There are different terms for crocheting in American and British English. If this pattern includes crochet, click for "crochet terms" here. For this pattern in British English, please click here.
Knitting Tension: 21sts x 28 rows on needles size 3.5 mm in stocking st = 10x10cm.
Pattern: See diagram M.1 and M.2. Pattern is seen from RS.
Pattern knitted in stocking st throughout.

Rib: K1, P1.
Jacket is knitted back and forth on circular needle from centre front.
Body: Cast on 106-114-122 (132-132) sts on long circular needles size 2.5mm with
colour no 1. Work 3-3-3 (4-4) cm rib. Change to circular needle size 3.5mm and M.1
following diagram (start at the arrow indicating your size) and at the same time inc 6-6-
14 (12-28) sts evenly on first row = 112-120-136 (144-160) sts. Remember to check
your tension. Continue in M.1 and when piece measures 14-16-19 (20-20) cm, divide

work as follows: 28-30-34 (36-40) sts for front, 56-60-68 (72-80) sts for back, 28-30-34
(36-40) sts for front. Finish each piece separately.
Right Front: = 28-30-34 (36-40) sts. Continue in pattern M.1 until piece measures 19-
21-25 (27-31) cm. Work M.2. and when piece measures 22-24 (28 (30-34) cm, dec on
neck edge as follows: Cast off 5-5-6 (7-9) sts, then on every other row as follows: 3 sts
once, 2 sts once, 1 st 3 times. When M.2 is completed, work 2 rows stocking st with off
white. Cast off. Piece measures approx 27-29-33 (35-39) cm.
Left Front: = 28-30-34 (36-40) sts. Work as right front.
Back: = 56-60-68 (72-80) sts. Knit pattern as front. Continue until piece measures 26-
27-31 (33-37) cm. Cast off centre 22-22-24 (26-30) sts for neck.
Dec 2 sts each side on neck edge on next row. Cast off as front.
Piece measures approx 27-29-33 (35-39) cm.
Sleeves: Cast on 34-34-36 (36-36) sts on short circular needle size 2.5mm with off
white. Work 2-2-3 (3-3) cm rib. Change to needles size 3.5mm and work pattern M1
(start at the star indicating your size - be sure to place one pattern repeat on centre of
top of sleeve), at the same time inc 1-3-7 (7-10) sts evenly on first round = 35-37-43
(43-46) sts. Work M.1 until piece measures 5-11-13 (16-18) cm (adjust to pattern
repeat) and at the same time after the rib, inc sts under the sleeve as follows, 2 sts 10-
9-8 (10-17) times, for 3months: alternatively every 2nd and 3rd round, 6/9 months:
every 5th round. 12/18 months + 2 years: alternatively every 5th and 6th round, 3
years: alternatively every 3rd and 4th round = 55-55-59 (63-80) sts. When M.2 is
completed (make sure you centre the pattern repeat on top of sleeve), work 2 rounds in
stocking with off white. Cast off. Piece measures approx 13-19-21 (24-26) cm.
Assembly: Sew shoulder seams. Pick up 50-60 (75-80) sts along left front with needles
size 2.5mm with off white. Knit 2.5 cm rib. Cast off. Repeat along right front but after 1
cm work 5 buttonholes evenly spaced as follows:
1 buttonhole = cast off 1 st, cast on 1 st on next row. Pick up 74-78 sts on circular
needle size 2.5mm with off white around neck. Work 2 cm rib back and forth on needle.
Cast off. Sew in the sleeves. Sew in buttons.

Hat:
Size: 3 -6/9 – 12/18 months (2-3) years.
Hats circumference: 42-46-50 (50-53) cm
Needles: Drops Circular needle size 2.5mm and 3.5mm.
Tension: 21sts and 28 rows cm in stocking st = 10 on needle size 3.5mm.
Rib: K1, P1.
Cast on 88-96-104 (104-112) sts on needle size 2.5mm with off white. Work 2 cm rib.
Change to needle size 3.5mm and work stocking st until piece measures 16-18-20 (23-
25) cm. Cast off. Remember to check your tension.
Lay hat flat and sew from side to side. Make 3 pompoms from each pattern colour and
sew one in each corner and one on top of hat.

Hat lining: For those children who find wool itchy, a cotton lining can be made from
Muskat Soft in off white. Cast on and work as hat, but cast off when piece measures 8
cm. Sew lining into hat.
Socks:
Size: 3 (6/9 - 9/12) months.
Needles: DROPS Double pointed needles size 2.5mm and 3.5mm
Rib: K1, P1.
Moss stitch: 1st row: K1, P1. 2nd row: P over K and K over P. Repeat 1st and 2nd row.
Tension: : 22sts = 10 cm in stocking st on needle size 3.5mm.

Sock: Cast on 30 (34-38) sts on needles size 2.5mm. Knit in the round 5 (6-6) cm in rib.
Change to needle size 3.5mm. Knit 2 rounds in stocking st then work next round as
follows: *k2tog, yo* . Remember to check your tension.
Knit 1 round stocking st. Continue as follows: Work on the top 8(10-10) sts, and leave
rest on a holder or thread. Work 4 (5-5) cm in stocking st. Pick up approx. 50 (58-62) sts
in a round (incl. the sts on holder and the 8 (10-10) sts.) Knit 1 round stocking st. Knit
1.5 (1.5-2) cm moss st then 1 round P. Next cast off all but the top 8 (10-10) sts. Work
9 (10-11)cm in either moss st or stocking st for sole on these sts. Cast off and sew the
sole to the sock. Thread a ribbon through the row of holes at top.

Diagram

All measurements in charts are in cm.

symbols = off white
symbols = navy blue
symbols = beige brown
symbols = light old pink
symbols = start sleeve in your size here
symbols = start body in your size here
symbols = size 3 years old
diagram
diagram

Each of our patterns has specific tutorial videos to help you.

Do you have a question? See a list of frequently asked questions (FAQ)

Knitting tension is what determines the final measurements of your work, and is usually measured per 10 x 10 cm. It is provided like so: number of stitches in width x number of rows in height - eg: 19 stitches x 26 rows = 10 x 10 cm.

The knitting tension is very individual; some people knit/crochet loosely while others work tightly. You adjust the knitting tension with the needle size, which is why the suggested needle size only serve as a guide! You need to adjust this (up or down) to ensure that YOUR knitting tension matches the knitting tension provided in the pattern. If you work with a different knitting tension than provided you will have a different yarn consumption, and your work will have different measurements than what the pattern suggests.

The knitting tension also determines which yarns can replace each other. As long as you achieve the same knitting tension you can replace one yarn with another.

See DROPS lesson: How to measure your tension/gauge

See DROPS video: How to make a gauge tension swatch

The required amount of yarn is provided in grams, eg: 450 g. To calculate how many balls you’ll need you first need to know how many grams are in 1 ball (25g, 50g or 100g). This information is available if you click on the individual yarn quality on our pages. Divide the amount required with the amount of each ball. For example, if each ball is 50g (the most common amount), the calculation will be as follows: 450 / 50 = 9 balls.

The important thing when changing from one yarn to another is that the knitting/crochet tension remains the same. This is so that the measurements of the finished piece will be the same as on the sketch provided. It is easier to achieve the same knitting tension using yarns from the same yarn group. It is also possible to work with multiple strands of a thinner yarn to achieve the knitting tension of a thicker one. Please try our yarn converter. We recommend you to always work a test swatch.

Please NOTE: when changing yarn the garment might have a different look and feel to the garment in the photo, due to individual properties and qualities of each yarn.

See DROPS lesson: Can I use a different yarn than the one mentioned in the pattern?

All our yarns are categorised into yarn groups (from A to F) according to thickness and knitting tension – group A contains the thinnest yarns and group F the thickest. This makes it easier for you to find alternative yarns to our patterns, should you wish to switch yarn. All yarns within the same group have a similar knitting tension and can easily replace each other. However, different yarn qualities have different structures and properties which will give the finished work a unique look and feel.

Click here for an overview of the yarns in each yarn group

At the top of all our patterns you’ll find a link to our yarn converter, which is a helpful tool should you wish to use a different yarn than suggested. By filling in the yarn quality you wish to replace, the amount (in your size) and number of strands, the converter will present good alternative yarns with the same knitting tension. Additionally it will tell you how much you’ll require in the new qualities and whether you’ll need to work with multiple strands. Most skeins are 50g (some are 25g or 100g).

If the pattern is worked with multiple colours, every colour will have to be converted separately. Similarly, if the pattern is worked with several strands of different yarns (for example 1 strand Alpaca and 1 strand Kid-Silk) you will have to find alternatives for each, individually.

Click here to see our yarn converter

Since different yarns have different qualities and textures we have chosen to keep the original yarn in our patterns. However, you can easily find options among our available qualities by using our yarn converter, or simply pick a yarn from the same yarn group.

It is possible that some retailers still have discontinued yarns in stock, or that someone has a few skeins at home that they would like to find patterns for.

The yarn converter will provide both alternative yarn as well as required amount in the new quality.

If you think it's hard to decide what size to make, it can be a good idea to measure a garment you own already and like the size of. Then you can pick the size by comparing those measures with the ones available in the pattern's size chart.

You'll find the size chart at the bottom of the pattern.

See DROPS lesson: How to read size chart

The needle size provided in the pattern serves only as a guide, the important thing is to follow the knitting tension. And since knitting tension is very individual, you will have to adjust the needle size to ensure that YOUR tension is the same as in the pattern – maybe you’ll have to adjust 1, or even 2 needle sizes, up or down to achieve the correct tension. For this, we recommend that you work test swatches.

Should you work with a different knitting tension than the one provided, the measurements of the finished garment might deviate from the measurement sketch.

See DROPS lesson: How to measure your tension/gauge

See DROPS video: How to make a gauge tension swatch

Working a garment top-down provides more flexibility and room for personal adjustment. For example it is easier to try the garment on while working, as well as making adjustments to length of yoke and shoulder caps.

The instructions are carefully explaining every step, in the correct order. Diagrams are adjusted to the knitting direction and are worked as usual.

The diagram depicts all rows/rounds, and every stitch seen from the right side. It is read from bottom to top, from right to left. 1 square = 1 stitch.

When working back and forth, every other row is worked from the right side and every other row is worked from the wrong side. When working from the wrong side, the diagram will have to be worked reversed: from left to right, knit stitches are purled, purl stitches are knit etc.

When working in the round every round is worked from the right side and the diagram are worked from right to left on all rounds.

See DROPS lesson: How to read knitting diagrams

The diagram depicts all rows/rounds, and every stitch seen from the right side. It is worked from bottom to top, from right to left.

When working back and forth every other row is worked from the right side: from right to left and every other row is worked from the wrong side: from left to right.

When working in the round, every row in the diagram are worked from the right side, from right to left.

When working a circular diagram you start in the middle and work your way outwards, counter clockwise, row by row.

The rows usually start with a given number of chain stitches (equivalent to the height of the following stitch), this will either be depicted in the diagram or explained in the pattern.

See DROPS lesson: How to read crochet diagrams

Instructions for working several diagrams after each other on the same row/round, will often be written like so: “work A.1, A.2, A.3 a total of 0-0-2-3-4 times". This means you work A.1 once, then A.2 is worked once, and A.3 is repeated (in width) the number of times provided for your size – in this case like so: S = 0 times, M = 0 times, L=2 times, XL= 3 times and XXL = 4 times.

The diagrams are worked as usual: begin with the first row in A.1, then work the first row in A.2 etc.

See DROPS lesson: How to read knitting diagrams

See DROPS lesson: How to read crochet diagrams

The total width of the garment (from wrist-to-wrist) will be larger in the larger sizes, despite the actual sleeves being shorter. The larger sizes have longer sleeve caps and wider shoulders, so there will be a good fit in all sizes.

The measurement sketch/schematic drawing provides information regarding the full length of the garment. If it’s a jumper or a jacket the length is measured from the highest point on the shoulder (usually closest to the neckline), and straight down to the bottom of the garment. It is NOT measured from the tip of shoulder. Similarly, the length of yoke is measured from the highest point on the shoulder and down to where yoke is split into body and sleeves.

See DROPS lesson: How to read a schematic drawing

Diagrams are often repeated on the round or in height. 1 repeat is the diagram the way it appears in the pattern. If it says to work 5 repeats of A.1 in the round, then you work A.1 a total of 5 times after/next to each other in the round. If it says to work 2 repeats of A.1 vertically/in height you work the entire diagram once, then begin again at the start and work the entire diagram one more time.

Chain stitches are slightly narrower than other stitches and to avoid working the cast-on edge too tight, we simply chain more stitches to begin with. The stitch count will be adjusted on the following row to fit the pattern and measurement sketch.

The rib edge is more elastic and will contract slightly compared to, for example, stocking stitch. By increasing before the rib edge, you avoid a visible difference in width between the rib edge and the rest of the body.

It’s very easy to cast off too tightly, and by making yarn overs while casting off (and simultaneously casting these off) you avoid a too tight cast off edge.

See DROPS video: How to bind off with yarn overs (yo)

To achieve an even increase (or decrease) you can increase on, for example: every 3rd and 4th row alternately, like so: work 2 rows and increase on the 3rd row, work 3 rows and increase on the 4th. Repeat this until the increase is complete.

See DROPS lesson: Increase or decrease 1 st on every 3rd and 4th row alternately

Should you prefer to work in the round instead of back and forth, you may of course adjust the pattern. You’ll need to add steeks mid-front (usually 5 stitches), and follow the instructions. When you would normally turn and work from the wrong side, simply work across the steek and continue in the round. At the end you’ll cut the piece open, pick up stitches to work bands, and cover the cut edges.

See DROPS video: How to knit steeks and cut open

Should you prefer to work back and forth instead of in the round, you may of course adjust the pattern so you work the pieces separately and then assemble them at the end. Divide the stitches for the body in 2, add 1 edge stitch in each side (for sewing) and work the front and back pieces separately.

See DROPS lesson: Can I adapt a pattern for circular needles into straight needles?

Pattern repeats can vary slightly in the different sizes, in order to get the correct proportions. If you’re not working the exact same size as the garment in the photo, yours might deviate slightly. This has been carefully developed and adjusted so that the complete impression of the garment is the same in all sizes.

Make sure to follow instructions and diagrams for your size!

If you have found a pattern you like which is available in women’s size it’s not very difficult to convert it to men’s size. The biggest difference will be the length of sleeves and body. Start working on the women size that you think would fit across the chest. The additional length will be worked right before you cast off for the armhole/sleeve cap. If the pattern is worked top-down you can add the length right after the armhole or before the first decrease on sleeve.

Regarding additional yarn amount, this will depend on how much length you add, but it is better with a skein too many than too few.

All yarns will have excess fibres (from production) that might come off as lint or shedding. Brushed yarns (ie hairier yarns) have more of these loose, excess fibres, causing more shedding.

Shedding also depends on what is worn under or over the garment, and whether this pulls at the yarn fibres. It’s therefore not possible to guarantee that there will be no shedding

Below are some tips on how to get the best result when working with hairier yarns:

1. When the garment is finished (before you wash it) shake it vigorously so the looser hairs come off. NOTE: do NOT use a lint roller, brush or any method that pulls at the yarn.

2. Place the garment in a plastic bag and put it in your freezer - the temperature will cause the fibres to become less attached to each other, and excess fibres will come off easier.

3. Leave in the freezer for a few hours before taking it out and shaking it again.

4. Wash the garment according to the instructions on the yarn label.

Pilling is a natural process that happens to even the most exclusive of fibers. It's a natural sign of wear and tear that is hard to avoid, and that is most visible in high friction areas of your garment like a sweater's arms and cuffs.

You can make your garment look as new by removing the pilling, using a fabric comb or a pill/lint remover.

Still can't find the answer you need? Then scroll down and leave your question so one of our experts can try to help you. This will be done normally within 5 to 10 working days.
In the meantime, you can read the questions and answers that others have left to this pattern or join the DROPS Workshop on Facebook to get help from fellow knitters/crocheters!

You might also like...

Post a comment to pattern DROPS 36-16

We would love to hear what you have to say about this pattern!

If you want to leave a question, please make sure you select the correct category in the form below, to speed up the answering process. Required fields are marked *.

Comments / Questions (20)

country flag Wilma Keighley wrote:

I’m at 20 cm for the body at which point the pattern says to split fronts and back, however from the diagram I don’t see why I would split until 39 cm. Can you tell me where I’m misunderstanding please

19.02.2022 - 18:31

DROPS Design answered:

Dear Wilma, if you are working the largest size, 39 cm is the total length of the body (including after working the fronts and back). The measurement above 39 (19 cm) is the length of the armhole. So you need to work 19 cm with each part (fronts/ back) separately. Happy knitting!

19.02.2022 - 18:55

country flag Nanna-Karin Svendsen wrote:

Strikker jakken her. Men skjønner ikkje fellingen til halsen. Har dere ein video av den så eg kan lære meg den?

07.06.2021 - 23:35

DROPS Design answered:

Hej Nanna-Karin. Vi har nog dessvärre inte en video, men du feller 5 m i varje sida mot halsen (minsta storleken), därefter feller du på hver 2 p. Först 3 m i varje sida, sedan 2 m i varje sida, sedan 1 maska i varje sida, sedan 1 maska i varje sida och till sist 1 maska i varje sida. Mvh DROPS Design

10.06.2021 - 09:33

country flag Phyllis wrote:

Bij het voorpand staat eerst dat ik 5 steken aan de halskant moet afkanten. Daarna komt de zin: Kant daarna aan beide halszijden af in iedere 2e naald......etc. Wordt hiermee bedoelt dat er aan het begin en einde van elke 2e naald dus wordt afgekant? Dus aan de hals én aan de schouderkant? Dat lijkt mij vreemd. Ik vermoed dat hier wordt bedoelt: alleen aan de halskant?

26.03.2020 - 11:43

DROPS Design answered:

Dag Phyllis,

Het is de bedoeling om alleen aan de halszijde af te kanten, niet aan de schouderzijde. Ik heb de tekst nu aangepast.

27.03.2020 - 13:09

country flag Trish H wrote:

I am at the last cm if the back. I have K 17, bound off 22, K 17. Please explain how I then do the rows to bind off 2 on each side of the neck edge to finish the back?

29.07.2019 - 23:40

DROPS Design answered:

Dear Trish, you will now finish each shoulder separately, binding off 2 stitches at the beg of next row starting from neck towards shoulder. When first shoulder is finished, cut the yarn, join and work 2nd shoulder same way. Happy knitting!

06.08.2019 - 10:51

country flag Linda Christin Hjelvik Jørrgensen wrote:

Tusen takk:-)

08.05.2019 - 10:18

country flag Linda Christin Hjelvik Jørrgensen wrote:

Hei! Har skrevet ut oppskrift Drops 36-16. Tiny Jester. Det står at vi finner oppskrift til sokker under modell 6! Dette finner jeg ikke!! Kan dere hjelpe meg? Med vennlig hilsen Linda Christin:-)

08.05.2019 - 09:34

DROPS Design answered:

Hej Linda, jo her finder du sokkern DROPS 36-6 - sokker

08.05.2019 - 09:44

country flag Marlies Hoffmann wrote:

Hallo, beim Ärmel der Jacke heißt es zum Schluss "Die Arb misst ca. 13-19-21 (24-26) cm" Bitte überprüfen Sie die kleinste Größe mit 13 cm! Das erscheint mir zu kurz. Mit frdl. Gruß Marlies Hoffmann

08.02.2018 - 20:36

DROPS Design answered:

Liebe Frau Hoffmann, die Ärmel sind etwas kürzer als in den heutigen Modellen, da die Shulter auch etwas breiter sind. Vergleichen Sie diese Maßnahmen mit einer ähnlichen Modellen so können Sie diese Massen anpassen, wenn Sie möchten. Viel Spaß beim stricken!

09.02.2018 - 09:32

country flag Monique wrote:

Aha😅thank you Knut!!

15.08.2015 - 09:32

Knut wrote:

Beige mix ab 6/9 mnd!

14.08.2015 - 20:44

country flag Monique wrote:

Dank je wel, dat is duidelijk nu. Blijft echter gezien de wazige telpatroon een raadsel, waarom op de foto nergens beige mix no, 54 te zien is, het valt me op omdat ik nu met hulp van de foto aan de slag ben gegaan. Op de foto zie ik maar 3 kleuren! Heb nog nooit zo'n onduidelijke tekening gezien bij Garn maar het is gelukkig geen moeilijk vestje.

14.08.2015 - 19:58