
Popular categories
Looking for a yarn?


|
|
DROPS 40-3 |
|
|
|
|
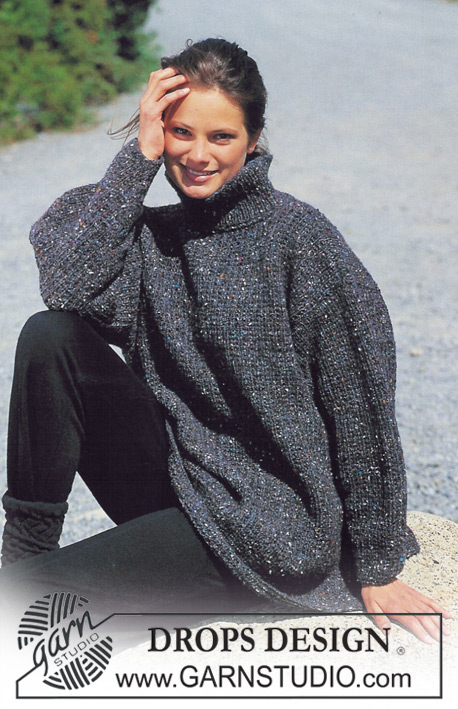
Knitted jacket with zip and English rib, knitted hat, scarf, fingerless mittens and socks in DROPS Alpaca.
DROPS 40-3 |
|
|
Garter st, back and forth on needle: K all rows. Garter st, in the round: K 1 round, P 1 round. English Rib, back and forth on needle (for jacket and scarf): first row: 1 edge st, *K1, 1 yo, slip 1 st as if to knit*, 1 edge st. Second row: *K tog yo and slipped st, 1 yo, slip 1 st as if to knit*, 1 edge st. Repeat row 2. Back and front piece: Knitted back and forth on circular needle with double thread Alpaca, 1 thread of each color. Cast on 160-164-168 sts on circular needle size 3.5 mm = US 4 with grey/charcoal grey and work 6 rounds garter st, Change to needle size 5 mm = US 8 and continue in stockinette st with 2 sts each side towards mid front in garter st, at the same time inc 36-44-52 sts evenly on first round = 196-208-220 sts. Remember the knitting gauge! When piece measures 31-32-32 cm = 12¼"-12½"-12½" work next round as follows: 48-51-54 sts = front piece, bind off 4 sts for armhole, 92-98-104 sts = back piece, bind off 4 sts for armhole, 48-51-54 sts = front piece. Now complete each piece separately. Front piece: = 48-51-54 sts. Dec to shape the armhole on every other row: 2 sts 1-1-2 times, 1 st 0-2-2 times = 46-47-48 sts. When piece measures 50-50-51 cm = 19¾"-19¾"-20" dec to shape the neckline on every other row: 5 sts 1-1-1 time, 2 sts 4-4-4 times, 1 st 1-2-2 times. Bind off remaining when piece measures 58-59-60 cm = 22¾"-23¼"-23⅝". Back piece: = 92-98-104 sts. Dec to shape the armhole as described for front piece = 88-90-92 sts. When piece measures 56-57-58 cm = 22"-22½"-22¾" bind off the middle 20-22-22 sts for neck and dec 2 sts on neckline on next row. Bind off remaining when piece measures 58-59-60 cm = 22¾"-23¼"-23⅝". Sleeves: Cast on 36-40-40 sts on double pointed needles size 3.5 mm = US 4 with grey/charcoal grey and work 4 rounds garter st. Change to needle size 5 mm = US 8 and continue in stockinette st, at the same time inc 14-10-12 sts evenly on round = 50-50-52 sts. At the same time after the garter st inc 2 sts mid under arm 23-23-23 times on every 4th round = 96-96-98 sts. When piece measures 45-45-46 cm = 17¾"-17¾"-18" bind off 6 sts mid under arm and complete sleeve back and forth on needle. Dec to shape the sleeve cap each side on every other row: 5 sts 4 times. Bind off when piece measures 50-50-51 cm = 19¾"-19¾"-20". Assembly: Join shoulders. Pick up approx 90-100 round the neck on double pointed needles size 5 mm = US 8 with grey/charcoal grey and work 8 cm = 3⅛" English Rib, bind off loosely. Pick up approx 85 sts from WS on needle size 5 mm = US 8 with grey/charcoal grey along left front piece inside the 2 garter sts, work 2 rows stockinette st, bind off = pocket for zip. Repeat along right front piece. Sew on zip as follows: S/M from bottom edge towards top, size L: 1 cm = ⅜" from bottom edge towards the top. Set in sleeves. HAT: Rib: *K2, P2*, repeat from *-*. Cast on 116-128 sts on double pointed needles size 3 mm = US 2,5 with double thread Alpaca, 1 thread of each color, and work 26-28 Rib. Bind off by K tog all sts 2 by 2, cut the thread and pull through remaining sts. SCARF: Garter st, back and forth on needle: K all rows. English Rib, back and forth on needle: first row: 1 edge st, K1, 1 yo, slip 1 st as if to knit*, 1 edge st. Second row: *K tog yo and slipped st, 1 yo, slip 1 st as if to knit*, 1 edge st. Repeat these 2 rows. Cast on 36 sts (incl 1 edge st each side) on needle size 6 mm = US 10 with double thread Alpaca, 1 thread of each color. Work 6 rows garter st and continue in English Rib until piece measures 150 cm = 59". Work 6 rows garter st and bind off. FINGERLESS MITTENS: Size: Medium Rib: *K2, P2*, repeat from *-*. Garter st, in the round: K 1 round, P 1 round. Cast on 60 sts on double pointed needle size 3,5 mm = US 4 with double thread Alpaca, 1 thread of each color, and work Rib, beg round with P2 and insert a MT between these 2 sts. When piece measures 25 cm = 9¾" change to needle size 3 mm = US 2,5 and work 4 rounds garter st, at the same time dec 20 sts evenly on first round = 40 sts. Continue in Rib, beg round with P2, and now measure piece from here! When piece measures 2 cm = ¾" continue for thumb as follows: inc 1 st on both sides of MT and inc 1 st on both sides of these 2 sts on every other round 5 times = 12 sts for thumb (incorporate the inc sts in Rib as you go along). Now put the 12 sts + 1 st either side = 14 sts on a thread and cast on 2 new sts behind these 14 sts = 40 sts on round. When piece measures 12 cm = 4¾" bind off. Thumb: Pick up 14 sts from thread and cast on 2 new sts behind these = 16 sts. Work 5 rounds, bind off. Work the other mitten in the same way, but mirrored. Inc for thumb at the end of round instead of the beg. SOCKS: Rib: *K2, P2*, repeat from *-*. Cast on 100 sts with double thread Alpaca, 1 thread of each color, on needle size 3 mm = US 2,5 and work 3 cm = 1⅛" Rib. Continue in Rib, at the same time dec 1 st on both sides of 2 K sts (= mid back). Dec as follows: Before 2 K st (start 2 sts before): slip 1 st as if to knit, K1 or P1 (follow rib pattern), psso. After st: K or P 2 tog (follow rib pattern). Repeat this dec 14 times on every 4th round = 72 sts. When piece measures 30 cm = 11¾" change to needle size 2.5 mm = US 1,5 and 1 thread charcoal, at the same time dec 24 sts evenly on round = 48 sts. Distribute sts on 4 needles = 12 sts on each needle. Now work the foot. Change to stockinette st and work 5 cm = 2" on sts on needle 1 and 4 for heel. Insert a MT in middle st and continue as follows: Row 1: (RS) *work to 3 sts after MT, P2 tog into back of st), turn the piece Row 2: work to 3 sts after MT, P2 tog into back of st, turn the piece Repeat rows 1 and 2 until no sts left at sides. Now pick up 10 sts on each side of heel and distribute heel sts on 2 needles. Work stockinette st on all sts, at the same time dec 1 st on either side of heel as follows: P2 tog into back of st at the end of first row (row beg mid under heel) and K2 tog at the beg of fourth row until there are 12 sts on each needle = total of 48 sts. Continue until foot measures approx 19 cm = 7½" and now dec 4 sts on every other round by K tog 2 sts at the end of every row. Continue until 24 sts on needles. Now dec 4 sts on every round until 8 sts left. Cut the thread and pull through remaining sts. |
|

|
|
|
Have you made this or any other of our designs? Tag your pictures in social media with #dropsdesign so we can see them! Do you need help with this pattern?You'll find tutorial videos, a Comments/Questions area and more by visiting the pattern on garnstudio.com. © 1982-2024 DROPS Design A/S. We reserve all rights. This document, including all its sub-sections, has copyrights. Read more about what you can do with our patterns at the bottom of each pattern on our site. |


With over 40 years in knitting and crochet design, DROPS Design offers one of the most extensive collections of free patterns on the internet - translated to 17 languages. As of today we count 304 catalogs and 11422 patterns - 11417 of which are translated into English (US/in).
We work hard to bring you the best knitting and crochet have to offer, inspiration and advice as well as great quality yarns at incredible prices! Would you like to use our patterns for other than personal use? You can read what you are allowed to do in the Copyright text at the bottom of all our patterns. Happy crafting!
Comments / Questions (7)
Hej! Kan ni utveckla/förklara mönstret till mössan här? Finns det någon skiss?
27.08.2022 - 12:01DROPS Design answered:
Hei Hanna. Er ingen diagram til denne luen, men den strikkes bare med 2 rett og 2 vrang masker, til arbeidet måler 26 (28) cm. Deretter felles det av ved å strikke 2 og 2 masker sammen i 2 omganger etter hverandre. mvh DROPS Design
29.08.2022 - 11:56Bonjour, pouvez-vous me préciser à quel tour de tête correspondent les tailles femme et homme du bonnet ? Merci d'avance !
02.01.2020 - 13:51DROPS Design answered:
Bonjour Margot, nous n'avons pas ces indications sur ce modèle relativement ancien; c'est un modèle en taille unique femme/homme, comme il se tricote en côtes, il va se contracter et devrait ainsi correspondre à bon nombre de tour de tête car il va s'étirer. Bon tricot!
02.01.2020 - 16:05In patroon 40-3 staat bij hoofdstuk mouwen dat als je 50 steken hebt nog 23 x 1 steek moet mindere tot 96 steken. 50+23= 73. Het moet zeker aan beide kanten 1 steek zijn. Met vriendelijke groeten, Afke
29.10.2012 - 16:20DROPS Design answered:
De vertaling is inderdaad hier niet helemaal duidelijk. Het is nu geworden: Meerder bovendien vanaf de ribbelst rand 23 (23-23) keer 1 st aan beide kanten van de eerste st op de nld (= midden van de ondermouw) in Maat: S+M:
30.10.2012 - 15:02Anthea, MT is short for marking thread, i.e a marker.
14.06.2011 - 18:01Cast on 60 sts on double pointed needle size 4 mm with double thread Alpaca, 1 thread of each colour, and work Rib, beg round with P2 and insert a MT between these 2 sts. I haven't found a mistake but could you let me know what 'MT' means? Thankyou
14.06.2011 - 08:15Beste Afke. Bij het afwerken sluit u eerst de schoudernaden van het vest, dan kunt u de steken 90 tot 100 st opnemen rond de hele hals: langs de voorpanden en achterpand. Vervolgens breit u het ritsbeleg op de binnenkant van de voorpanden zoals beschreven. Gr. Tine
24.11.2010 - 10:26Ik ben het vest aan het breien van patroon 40-03 Het is bijna af en ben terecht gekomen bij het afwerken Daar staat: Neem ca 90/100 steken op rond de hals. Zoveel steken zijn er niet want volgens mij zijn dit alleen de steken van het rugpand, Omdat er later staat neem de steken op langs het voorpand en de halsmindering voor 2 cm te breien voor het rits beleg. Op het patroon is het ook moeilijk tot niet te zien. Kunt u hulp bieden?
24.11.2010 - 10:26